background image

English 

- 75

P

layback

Go To Photo List

To setup, follow steps 1 to 3 in page 72.

4

Press the 

OK

button to select the picture you want

to see, then press the 

ANYKEY

button.

5

Press the 

…†

buttons to select 

Go To Photo

List

, then press the 

OK

or 

button. 

Slideshow

Rotate

Zoom

Go To Photolist 

MOVE

SELECT

RETURN

EXIT

Photo List

CD

DSC01194.JPG

Index: 1/10

..

DSC01189.JPG

DSC01190.JPG

DSC01191.JPG

DSC01192.JPG

DSC01193.JPG

DSC01194.JPG

DSC01199.JPG

1/2 Page

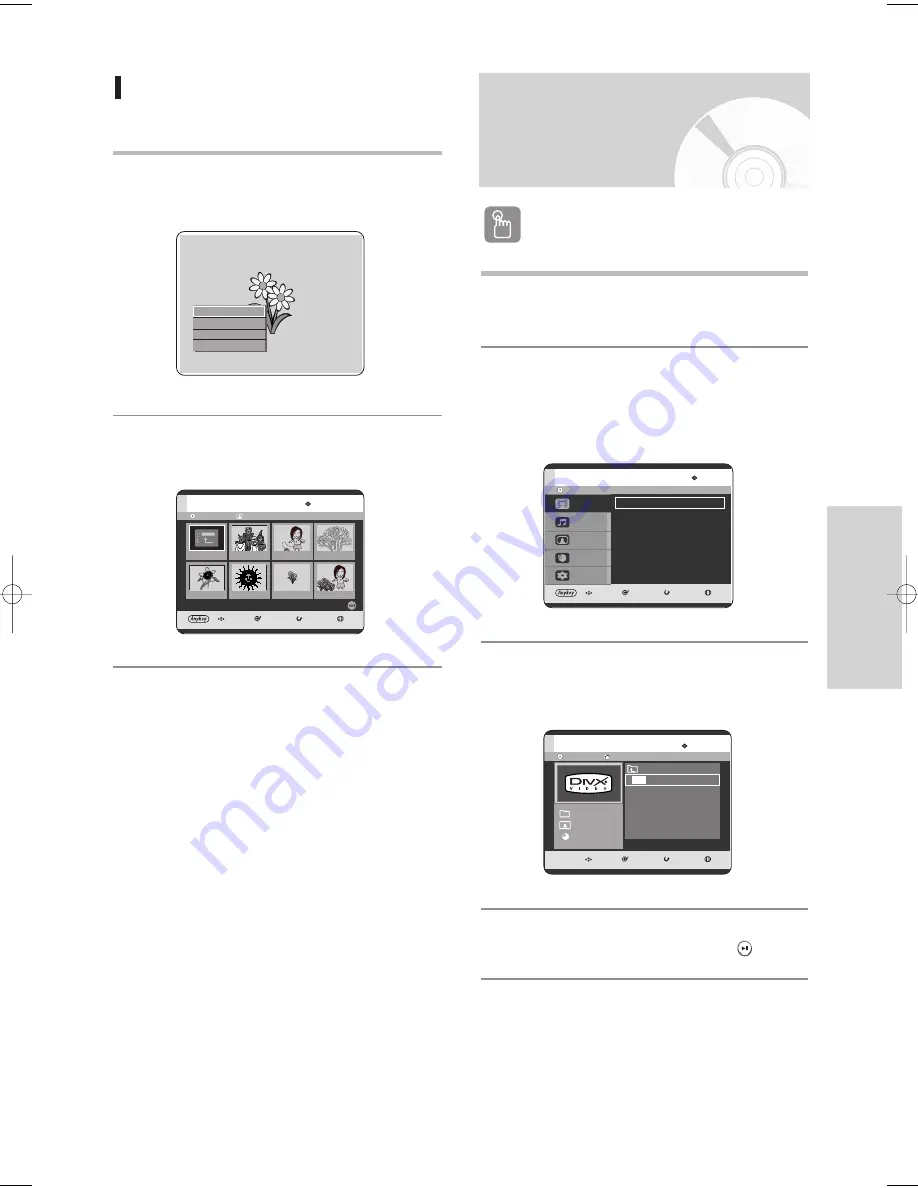
Playing an MPEG4

Using the MENU button

1

Insert a DivX disc or Mixed disc (JPEG + MP3 + DivX)
into the disc tray. 

2

Press the 

…†

buttons to select 

Title

, then press

the 

OK

or 

button.

(In case of playing a DivX Disc, see number 4 on
this page.)

3

Press the 

…†

buttons to select 

DivX List

then press the 

OK

or 

button.

The DivX List screen is displayed.

4

Press the 

…†

buttons to select the avi file

(DivX), then press the 

OK

or 

PLAY (

)

button.

CD

MOVE

SELECT

RETURN

EXIT

Title

Music

Photo

Programme

Setup

Title

Title List

DivX List

MOVE

SELECT

RETURN

EXIT

[DivX] ABC.avi

..

1/1 Page

MPEG4

01/01

703.4MB

DIVX

CD

ABC.avi

DivX List

5-00903E-EURO_61-76  2005.9.24  3:39 PM  Page 75

Содержание DVD-HR710

Страница 1: ...Instruction Manual DVD HR710 DVD HR721 www samsung com AK68 00903E 01 English ...

Страница 2: ...alue of the fuse is indicated on the pin face of the plug If it requires replacing a fuse approved to BS1362 of the same rating must be used Never use the plug with the fuse cover omitted if the cover is detachable If a replacement fuse cover is required it must be of the same colour as the pin face of the plug Replacement covers are available from your dealer If the fitted plug is not suitable fo...

Страница 3: ...ve fallen into the apparatus the apparatus has been exposed to rain or moisture does not operate normally or has been dropped Precaution Handling Cautions Before connecting other components to this HDD DVD RECORDER be sure to turn them all off Do not move the HDD DVD RECORDER while a disc is being played or the disc may be scratched or broken the HDD DVD RECORDER internal parts may be damaged Do n...

Страница 4: ... own home When switching from the first layer to the second layer of a dual layered DVD Video disc there may be momentary distortion in the image and sound This is not a malfunction of the unit Once a DVD RW R recorded in Video Mode is finalised it becomes DVD Video Do not place the HDD DVD RECORDER on top of a heat source Do not disconnect the AC power cord while the power is on Do not attempt to...

Страница 5: ... to play some DVD R discs depending on the disc and the condition of the recording Audio CD CD RW R DVD R Disc Playback and Recording Recording and playback can be performed on DVD RW discs in both the Video and VR Modes Once a DVD RW recorded in both the Video and VR Modes is finalised you cannot perform addtional recording Once a DVD RW recorded in Video Mode is finalised it becomes DVD Video In...

Страница 6: ...D RAM RW R discs that are incompatible with the DVD VIDEO format cannot be played with this product For more information on DVD recording compatibility consult your DVD RAM RW R manufacturer Use of poor quality DVD RAM RW R discs may cause following unexpected problems including without limitation recording failure loss of recorded or edited materials or damage to the HDD DVD RECORDER Disc Format ...

Страница 7: ...ayed CD CD R RW MP3 JPEG DVD Video DVD RAM RW R For a DVD RW R disc which has been recorded in Video Mode on another component it can play only when finalised Some commercial discs and DVD discs purchased outside your region may not be playable with this product When these discs are played either No disc or Please check the regional code of the disc will be displayed If your DVD RW disc is an ille...

Страница 8: ...Case 3 Connecting to an AV amplifier with a digital output jack 23 Connecting to AV 3 IN DV input jack 24 Case 1 Connecting a VCR Set Top Box STB DVD player or Camcorder to the AV3 IN jacks 24 Case 2 Connecting a Camcorder to the DV IN jack 24 System Setup System Setup On Screen Menu Navigation 25 Plug Auto Setup 26 Setting the Clock 27 Presetting Channels with the Auto Setup function 28 Presettin...

Страница 9: ... Deleting a Title 96 Splitting a Section of a Title Split 97 Deleting a Section of a Title Partial Delete 99 Advanced Editing Playlist 101 Creating a Playlist 101 Playing Entries in the Playlist 102 Renaming a Playlist Entry 103 Editing a Scene for the Playlist 104 Deleting a Playlist Entry from the Playlist 108 Copying from HDD to DVD 109 About the Copy Screen 109 Changing the Record Mode 112 Cop...

Страница 10: ...ith a double sided 9 4 GB DVD RAM disc up to 8 hours of video with a 4 7 GB DVD RAM RW R disc depending on the recording mode Selectable Recording Mode You can set your HDD DVD RECORDER to one of four different recording speeds each varying in recording quality and length EP 6Hr or 8Hr mode yields the most recording time LP SP modes provide less recording time with higher quality recording XP mode...

Страница 11: ...ay these type of discs on various DVD components only when they have been finalised Before Reading the User s Manual About the use of this user s manual 1 Be sure to be familiar with Safety Instructions before using this product See pages 2 7 2 If a problem occurs check the Troubleshooting See pages 126 129 2005 Samsung Electronics Co All rights reserved No part or whole of this user s manual may ...

Страница 12: ...tc on a recorded title Creating a playlist DVD RAM RW in VR mode HDD With this HDD DVD RECORDER you can create a new playlist on a disc and edit it without the original pre existing recording You can only use either the VR or Video mode on a DVD RW but not both at the same time You can change the DVD RW to format to another format by reinitializing It should be noted that the disc s data will be l...

Страница 13: ...the batteries Dry Cell Check if the batteries are drained Check if remote sensor is blocked by obstacles Check if there is any fluorescent lighting nearby Dispose of batteries according to local environmental regulations Do not put them in the household trash Video Audio Cable RF Cable for TV Batteries for Remote Control AAA Size Remote Control Instruction Manual Quick Guide Setting the Remote Con...

Страница 14: ...u encounter problems operate the television directly NOTE If several codes are indicated for your television brand try each one in turn until you find one that works If you replace the remote control s batteries you must set the brand code again NOTE BRAND BUTTON SAMSUNG 01 02 03 04 05 06 07 08 09 AIWA 82 ANAM 10 11 12 13 14 15 16 17 18 BANG OLUFSEN 57 BLAUPUNKT 71 BRANDT 73 BRIONVEGA 57 CGE 52 CO...

Страница 15: ... preset Channels Same as PROG button on the remote control 9 AV 3 INPUT Connect external equipment 10 DV INPUT Connect external digital equipment with a DV jack such as a camcorder 11 OPEN CLOSE BUTTON Opens and closes the disc tray 12 PLAY PAUSE BUTTON Plays a disc or pauses playback or recording 13 P SCAN BUTTON Selects the progressive scan mode 14 REC BUTTON Starts recording Description Front P...

Страница 16: ...g a Video cable 5 S VIDEO OUT Connects the input of external equipment using an S Video cable 6 COMPONENT VIDEO OUT Connects to equipment having Component video input 7 AV1 TV OUTPUT SCART Connector 8 AV2 EXT INPUT SCART Connector 9 In from aerial connector 10 Out to TV connector Fan The fan always revolves when the power is on Ensure a minimum of 10cm clear space on all sides of the fan when inst...

Страница 17: ... Button Press to play pause a disc 28 PLAY LIST TITLE MENU Button Use this to return to the Title menu or to view the recorded files list 29 ANYKEY Button Allows access to common functions of the recorder 30 CANCEL Button 31 SUBTITLE Button Press this to switch the DVD s subtitle language 32 TIMER Button Press to directly enter the Timer Recording Mode menu 33 MARKER Button Use this to bookmark a ...

Страница 18: ...ORDER Connecting the HDD DVD RECORDER Additional connections Antenna HDD DVD RECORDER External decoder box TV Other type of connecting the Video output cable Other type of connecting the Audio output cable Connecting to AV 3 IN DV input jack Quick Overview 18 Connecting the HDD DVD RECORDER 19 Additional connections 19 Antenna HDD DVD RECORDER External decoder box TV 20 Other type of connecting th...

Страница 19: ...r HDD DVD RECORDER to the television using the SCART cable if the appropriate input is available on the television 1 Connect the RF cable as shown 2 Connect one end of the SCART cable to the AV1 socket on the rear of the HDD DVD RECORDER 3 Plug the other end into the appropriate connector on the television 4 Plug in the HDD DVD RECORDER and TV 5 Turn on the HDD DVD RECORDER and TV 6 Press the INPU...

Страница 20: ...ers should note that not all high definition television sets are fully compatible with this product and may cause artifacts to be displayed in the picture in case of 576 progressive scan picture problems It is recommended that the user switch the connection to the standard definition output If there are questions regarding our TV set compatibility with this model 576p HDD DVD RECORDER please conta...

Страница 21: ...between the AUDIO OUT jacks on the HDD DVD RECORDER and AUDIO IN jacks on TV or AV amplifier See pages 22 23 yellow yellow Video Audio Cable Case 2 Connecting to an S Video output jack 1 Connect an S Video cable not included between the S VIDEO OUT jack on HDD DVD RECORDER and S VIDEO INPUT jack on your TV or AV amplifier You will enjoy high quality images 2 Connect audio cables white and red betw...

Страница 22: ...ite red Othertypeofconnecting theAudiooutputcable Case 3 Component Video output jacks 1 Connect Component video cables not supplied between the COMPONENT OUT Y PB PR jacks on HDD DVD RECORDER and COMPONENT IN Y PB PR jacks on your TV You will enjoy high quality and accurate colour reproduction images 2 Connect audio cables white and red between the AUDIO OUT jacks on the HDD DVD RECORDER and AUDIO...

Страница 23: ...input jack use this connection To enjoy Dolby Digital MPEG2 or DTS sound you will need to set up the audio settings See page 39 Case 2 Connecting to a stereo amplifier with AV output jacks If your stereo amplifier only has AUDIO INPUT jacks L and R use the AUDIO OUT jacks white red white red Front L speaker Front R speaker or Rear L Front L Subwoofer Centre Front R Rear R ...

Страница 24: ...f the HDD DVD RECORDER You can record from connected equipment VCR STB DVD player or Camcorder DVD STB VCR Camcorder yellow white red yellow white red Connecting to AV 3 IN DV input jack If the input is not selected automatically use INPUT button to select proper input NOTE AV 3 in selection will be automatically done If the input is not selected automatically use INPUT button to select proper inp...

Страница 25: ...o the Previous menu screen displayed or to exit the on screen menu On Screen Menu Navigation 25 Plug Auto Setup 26 Setting the Clock 27 Presetting Channels with the Auto Setup function 28 Presetting Channels with the Manual Setup function 30 Setting up the Language Options 31 Auto Power Off Setting 32 CM Skip Time Setting 33 EP Mode Time Setting 34 Setting up the Front Display Options 35 Automatic...

Страница 26: ...RDER to the TV Using the RF Cable and scart cable 2 Plug the HDD DVD RECORDER into the mains AUTO in the front panel display flickers 3 Press a number button to select the language 4 Press the OK button to start the auto setup Auto setup will be started Check antenna and TV cable connection Yes No Country Selection A NL S PL B I CH CZ DK N TR Others FIN P GR D E HU Auto channel scan completed succ...

Страница 27: ...u don t press the OK button the date and time will be saved automatically after 5 seconds if it is Incorrect input correct Time Date Year using œ buttons or number buttons Press OK button then the date and time will be saved When you need to change clock setting you can set up it manually Now HDD DVD RECORDER is ready for use Function for Plug Auto Setup is fixed already So if you want to change t...

Страница 28: ...on 1 With the unit in Stop mode press the MENU button 2 Press the buttons to select Setup then press the OK or button 3 Press the buttons to select Install then press the OK or button This feature allows you to manually set the HDD DVD RECORDER tuner band to Antenna or Cable whichever you connected to the Antenna In jack during initial setup HDD MOVE SELECT RETURN EXIT Title Music Photo Programme ...

Страница 29: ...d the HDD DVD RECORDER switches automatically to programme 1 The number of stations automatically stored by the HDD DVD RECORDER depends on the number of stations that it has found 7 Channel scan will be started Press the OK button to stop the Auto Setup HDD SELECT RETURN EXIT Title Music Photo Programme Setup Install OK Your data will be lost Press OK to continue Return to exit HDD MOVE SELECT RE...

Страница 30: ...case of Edit You can add or edit PR programme information After change PR informations CH Name Decoder MFT select Save then press the OK button CH Tune the channel using œ buttons Name Display station name automatically detected in broadcasting signal If not detected you can edit name by using œ buttons Decoder If you set on you can record scrambled channels using external decoder box Before setti...

Страница 31: ...e buttons to select Setup then press the OK or button 3 Press the buttons to select Language then press the OK or button Language setup menu will be displayed HDD MOVE SELECT RETURN EXIT Title Music Photo Programme Setup Setup System Clock Set Language Audio Video Parental Control Install HDD MOVE SELECT RETURN EXIT Title Music Photo Programme Setup Language Audio Original Subtitle Automatic Disc ...

Страница 32: ... set with the Auto Power off function is reached during playback or recording the device will operate until the playback or recording is finished This feature automatically turns off your HDD DVD RECORDER if you do not press any button for the selected time Auto Power Off Setting HDD MOVE SELECT RETURN EXIT Title Music Photo Programme Setup Setup System Clock Set Language Audio Video Parental Cont...

Страница 33: ...me then press the OK or button 5 Press the buttons to select the desired time interval then press the OK or button 6 If you press the CM SKIP button during playback the section corresponding to the set time is skipped and then the next section is played HDD MOVE SELECT RETURN EXIT Title Music Photo Programme Setup System Auto Power Off Off CM Skip Time 15 Sec EP Mode Time 6 Hour Front Display Auto...

Страница 34: ...Video Parental Control Install HDD MOVE SELECT RETURN EXIT Title Music Photo Programme Setup System Auto Power Off Off CM Skip Time 15 Sec EP Mode Time 6 Hour Front Display Auto Dim Chapter Creator Off NICAM On DivX R Registration HDD MOVE SELECT RETURN EXIT Title Music Photo Programme Setup System Auto Power Off Off CM Skip Time 15 Sec EP Mode Time 6 Hour Front Display Auto Dim Chapter Creator Of...

Страница 35: ...t Panel Display bright Dim Makes the Front Panel Display dim Auto Dim Makes the Front Panel Display dim automatically when the set is powered off HDD MOVE SELECT RETURN EXIT Title Music Photo Programme Setup Setup System Clock Set Language Audio Video Parental Control Install HDD MOVE SELECT RETURN EXIT Title Music Photo Programme Setup System Auto Power Off Off CM Skip Time 15 Sec EP Mode Time 6 ...

Страница 36: ...page 81 about how to set recording speed The message Do you want to create the chapter menu after this recording is displayed 7 Press the œ buttons to select Yes and press the OK button A new chapter is created according to the selected recording mode A chapter will be about 5 minutes long in XP and SP and about 15 minutes long in LP and EP mode DVD RW V MOVE SELECT RETURN EXIT Title Music Photo P...

Страница 37: ... Press the buttons to select Setup then press the OK or button 3 Press the buttons to select System then press the OK or button System menu will be displayed NICAM programmes are divided into 3 types NICAM Stereo NICAM Mono and Bilingual transmission in another language NICAM programmes are always accompanied by a standard mono sound broadcast and you can select the desired sound by setting NICAM ...

Страница 38: ...MOVE SELECT RETURN EXIT Title Music Photo Programme Setup Audio Digital Output PCM DTS Off Dynamic Compression On V Mode Compatibility Off Press the RETURN or œ button to return to the previous menu Press the MENU button to exit the menu NOTE 4 Press the buttons to select NICAM then press the OK or button 5 Press the buttons to select Off or On then press the OK or button Off Only set at this posi...

Страница 39: ...CM sound track is always outputted as PCM It has no relation with Digital Output setting Be sure to select the correct Digital Output or you will hear no sound or a loud noise NOTE When DTS soundtrack is played sound does not output from AV Audio Output NOTE V Mode Compatibility This feature is about the setup for selecting audios when recording the NICAM STEREO Multi audio broadcasting on HDD It ...

Страница 40: ...side of movie picture will be cut off 3 16 9 Wide You can view the full 16 9 picture on your widescreen TV HDD MOVE SELECT RETURN EXIT Title Music Photo Programme Setup Video TV Aspect 16 9 Wide 3D Noise Reduction Off Video Output Component 4 3 Letter Box 4 3 Pan Scan 16 9 Wide Setting up the Video display Options 1 With the unit in Stop mode press the MENU button 2 Press the buttons to select Set...

Страница 41: ... Video Output Component HDD MOVE SELECT RETURN EXIT Title Music Photo Programme Setup Video TV Aspect 4 3 Letter Box 3D Noise Reduction Off Video Output Component Component RGB 3D Noise Reduction motion adaptive noise reduction 1 Off Normal 2 On Provides a clear picture through noise reduction for recording HDD MOVE SELECT RETURN EXIT Title Music Photo Programme Setup Video TV Aspect 4 3 Letter Bo...

Страница 42: ...P SCAN button on the front of the HDD DVD RECORDER The message Press Yes to confirm Progressive scan mode Otherwise press No will appear Press the œ buttons to select Yes and then press the OK button 2 The message Please set your TV to Progressive input To deactivate press STOP key will appear Press the OK button If your TV supports Progressive Scan press the P SCAN button on the front of the HDD ...

Страница 43: ...ode Interlace Scan will appear Video Output Mode Interlace Scan Do not press the P SCAN button if you are using a TV that does not support Progressive mode as nothing will be displayed on the screen If you press the P SCAN button by mistake when your TV does not support Progressive mode the mode will then need to be released To release the Progressive mode press the P SCAN button on the front pane...

Страница 44: ...ord again 5 Press the OK or button to select Password 6 Press the buttons to select On or Off then press the OK or button If you forgot your password 1 Remove the disc 2 Press and hold the SEARCH SKIP button on the front panel for 5 seconds or more HDD MOVE SELECT RETURN EXIT Title Music Photo Programme Setup Setup System Clock Set Language Audio Video Parental Control Install HDD 0 9 NUMBER SELEC...

Страница 45: ...firm the password Setting the Rating Level 1 Press the buttons to select Rating Level then press the OK or button 2 Press the buttons to select the rating level you want then press the OK or button 3 When you operate your HDD DVD RECORDER for the first time the Create the Password message will be displayed For example if you select up to Level 6 discs that contain Level 7 8 will not play A larger ...

Страница 46: ...era Angle 62 Repeat Play 62 Zooming In 64 Select Media 65 Playing an Audio CD MP3 65 Viewing a Picture 72 Playing an MPEG4 75 Disc Types Disc Logo Recorded content Disc Shape Max Playing Time Single sided 12cm 240 DVD VIDEO AUDIO VIDEO Double sided 12cm 480 Single sided 8cm 80 Double sided 8cm 160 AUDIO CD AUDIO Single sided 12cm 74 Single sided 8cm 20 1 XP ExcellentQuality Single sided 2 SP Stand...

Страница 47: ...he disc for recording DVD RAM RW R discs may not be able to play on some DVD players depending on the player disc and the condition of the recording Discs with NTSC programmes recorded on them cannot be recorded using this product NOTE When you stop playing back a disc the HDD DVD RECORDER remembers where you stopped so when you press PLAY button again it will pick up where you left off Unless the...

Страница 48: ...his button if the disc contains more than one title Some discs may not support the title menu functionality Some type of discs contain a dedicated menu system that allows you to select special functions for title chapter audio track subtitle film preview information on characters etc HDD DVD VIDEO DVD RAM RW R MPEG4 AUDIO CD CD DA Fast X 2 Fast X 4 Fast X 8 Fast X 16 Fast X 32 Fast X 128 X 2 X 4 X...

Страница 49: ...t moves to the next chapter or track or marker HDD DVD RAM RW VR mode Slow Motion Play Step Motion Play Slow Motion Play In pause or step mode press the SEARCH buttons on the remote control If you press the SEARCH button Slow 1 8 Slow 1 4 Slow 1 2 If you press the SEARCH button Slow 1 8 Slow 1 4 Slow 1 2 To return to normal speed playback press the PLAY button Press and hold the SEARCH buttons dur...

Страница 50: ...he buttons to select Search then press the OK or button Search Navigation Marker Subtitle Audio Repeat Zoom Select Media Disc Manager HDD 1 10 00 01 45 Title Time MOVE CHANGE DVD Video 1 10 1 40 00 01 45 Title Chapter Time MOVE CHANGE Step Motion Play Press the STEP buttons on the remote control in the pause mode Each time the button is pressed a new frame will appear When the STEP button is press...

Страница 51: ...ons to select Time 4 Enter the time in the sequence of hours minutes and seconds using the number buttons then press the OK button Search Navigation Marker Subtitle Audio Repeat Zoom Select Media Disc Manager HDD 1 10 00 01 45 Title Time MOVE CHANGE DVD Video 1 10 1 40 00 01 45 Title Chapter Time MOVE CHANGE This may not work for some discs When an audio CD CD DA or an MP3 disc is inserted dependi...

Страница 52: ...oto Pressing the INFO button three times Current playback information screen appears Displays information of Playback Name Title Created Time Length Playing Time Audio and if the disc protection is activated 3 To stop title play press the STOP button To return the title list screen press the TITLE LIST button HDD MOVE SELECT RETURN EXIT Title Music Photo Programme Setup Title Title List HDD No Tit...

Страница 53: ...le List then press the ANYKEY button 3 Press the buttons to select Navigation then press the OK or button 4 Press the buttons to select Scene Navigation then press the OK or button 5 Press the œ œ buttons to select desired scene then press the OK or PLAY button HDD No Title Length MOVE SELECT RETURN EXIT Title List 001 18 JAN 2005 12 15A 00 10 21 002 19 JAN 2005 12 15A 00 40 03 003 20 JAN 2005 12 ...

Страница 54: ...8 JAN 2005 12 15 AV3 18 JAN 2005 12 15 SP V Mode Compatibility Using the ANYKEY button 1 Press the ANYKEY button during playback 2 Press the buttons to select Navigation then press the OK or button 3 Press the buttons to select Scene Navigation then press the OK or button 4 Press the œ œ buttons to select desired scene then press the OK or PLAY button Search Navigation Marker Subtitle Audio Repeat...

Страница 55: ...005 12 15A 00 50 16 1 1 page 19 JAN 2005 12 15AV3 19 JAN 2005 12 15 SP V Mode Compatibility Scene Navigation Time Navigation Rename Protection Copy Delete Edit Playlist Navigation Select Media Disc Manager HDD œ œ CHANGE SELECT RETURN EXIT Time Navigation 12 15 12 25 12 15 Using the ANYKEY button 1 Press the ANYKEY button during playback 2 Press the buttons to select Navigation then press the OK o...

Страница 56: ...d the scene is memorized 3 Press the œ buttons to move to the next position 4 Press the OK button again when the desired scene appears The number 02 is displayed and the scene is memorized HDD DVD RAM or DVD RW VR Mode discs have the Marker function instead of the Bookmark function The Marker function allows you to mark up to 99 scenes Since the scenes may be displayed as many different pages numb...

Страница 57: ...o the next marker MOVE PLAY CANCEL RETURN Marker 01 02 N 2 MOVE PLAY CANCEL RETURN Marker 01 02 N 2 Search Navigation Marker Subtitle Audio Repeat Zoom Select Media Disc Manager Clearing a marker Using the MARKER button 1 Press the MARKER button during playback Using the ANYKEY button Press the ANYKEY button during playback Press the buttons to select Marker then press the OK or button 2 Press the...

Страница 58: ...by one and the 8th marker becomes the 7th V mode MOVE SELECT RETURN Bookmark 2 Press the OK button when the desired scene appears The number 1 is displayed and the scene is memorized 3 Press the œ buttons to move to the next position 4 Press the OK button again when the desired scene appears The number 2 is displayed and the scene is memorized Repeat above to bookmark other positions You can bookm...

Страница 59: ...e Search Bookmark Audio Subtitle Angle Repeat Zoom Select Media MOVE PLAY CANCEL RETURN Bookmark 1 2 Clearing a bookmark Using the MARKER button 1 Press the MARKER button during playback Using the ANYKEY button Press the ANYKEY button during playback Press the buttons to select Bookmark then press the OK or button 2 Press the œ buttons to select a bookmarked scene 3 Press the CANCEL button to dele...

Страница 60: ...btitle Selecting the Subtitle Language Using the ANYKEY button 1 Press the ANYKEY button during playback 2 Press the buttons to select Subtitle then press the OK or button 3 Press the buttons to select the desired subtitle language then press the OK or button The subtitle display may be different depending on the disc type Some discs allow you to select the language for the disc menu only NOTE Sea...

Страница 61: ... mode HDD DVD RAM RW DVD VIDEO Dolby Digital 2 0 L R Audio ENG Dolby Digital 5 1CH Audio Using the ANYKEY button 1 Press the ANYKEY button during playback 2 Press the buttons to select Audio then press the OK or button 3 Press the buttons to select the desired soundtracks or audio channel then press the OK or button Search Navigation Marker Subtitle Audio Repeat Zoom Select Media Disc Manager Sear...

Страница 62: ...e 2 Angle 3 Angle 4 Angle 5 Angle 6 Search Bookmark Audio Subtitle Angle Repeat Zoom Select Media Search Bookmark Audio Subtitle Angle Repeat Zoom Select Media This function is disc dependent and may not work on all DVDs This function does not work when a DVD has not been recorded with a multi camera angle system NOTE Playing Repeatedly Repeat Playback Using the REPEAT button 1 Press the REPEAT bu...

Страница 63: ...m Select Media Disc Manager Repeat Off Repeat A B Repeat Title Search Navigation Marker Subtitle Audio Repeat Zoom Select Media Disc Manager HDD DVD RAM RW VR mode unfinalised DVD R and unfinalised DVD RW V mode discs will do not repeat a chapter NOTE Repeat A B Using the REPEAT A B button 1 Press the REPEAT A B button during playback 2 Press the OK button at the point where you want the repeat pl...

Страница 64: ...ons to select Zoom then press the OK or button will be displayed 3 Press œ buttons to move to the area you want to enlarge 4 Press the OK button The screen will be enlarged to twice the normal size The screen size will be enlarged to four times the normal size Zooming In Search Navigation Marker Subtitle Audio Repeat Zoom Select Media Disc Manager If you set point B before five seconds of playback...

Страница 65: ...s the buttons to select the track song you want to hear and then press the OK button MOVE SELECT RETURN EXIT Music List TRACK 1 TRACK 2 TRACK 3 TRACK 4 TRACK 5 TRACK 6 TRACK 7 1 3 Page CD DA 01 15 04 57 CDDA CDDA CDDA CDDA CDDA CDDA CD TRACK 1 02 10 Audio CD CD DA Screen Elements 1 Current track song Displays the number of the track currently being played 2 Displays the current play index total tr...

Страница 66: ... and the tracks songs are played automatically 2 Press the buttons to select the track you want to hear and then press the OK button MP3 Screen Elements 1 Current track song Displays the name of the track being played 2 Displays the current folder play index and current track size 3 Displays available buttons 4 This shows the operating state of a disc and a playback time corresponding to a portion...

Страница 67: ...ed Copy Play Mode Go To Playlist New Playlist or Select Media DVD TV Repeat CD CD DA MP3 Using the REPEAT button 1 Press the REPEAT button during playback 2 Press the REPEAT button repeatedly to select the repeat mode you want Repeat Track CD CD DA MP3 Repeat Folder MP3 Repeat All CD CD DA MP3 Random CD CD DA MP3 The random option plays a disc s track in random order Normal CD CD DA MP3 Tracks on ...

Страница 68: ...7 1 3 Page CD DA 01 15 04 57 CDDA CDDA CDDA CDDA CDDA CDDA CD TRACK 1 02 10 Normal Repeat Track Repeat All Random Play Mode Go To Playlist New Playlist New Playlist You can register a maximum 28 tracks in the playlist 1 Press the ANYKEY button during the Music List playback 2 Press the buttons to select New Playlist then press the OK or button 3 Press the buttons to select tracks in the order in w...

Страница 69: ... OK button The selected tracks are played automatically MOVE SELECT RETURN EXIT Music List TRACK 1 TRACK 2 TRACK 3 TRACK 4 TRACK 5 TRACK 6 TRACK 7 1 3 Page CD DA 01 15 04 57 CDDA CDDA CDDA CDDA CDDA CDDA CD TRACK 1 02 10 Play Mode Go To Playlist New Playlist MOVE SELECT RETURN EXIT Playlist Playlist 1 Playlist 2 1 1 Page PLAYLIST 00 00 CD 00 00 PLAYLIST MOVE Delete EXIT Make Playlist TRACK 1 TRACK...

Страница 70: ...he ANYKEY button during the Music List playback 2 Press the buttons to select Go To Playlist then press the OK or button 3 Press the buttons to select the Playlist you want to delete 4 Press the ANYKEY button 5 Press the buttons to select the Delete Playlist then press the OK or button 6 Press the œ œ buttons to select Yes then press the OK button The selected Playlist is deleted MOVE SELECT RETUR...

Страница 71: ...A CDDA CDDA CDDA CDDA CD 01 TRACK 1 02 TRACK 3 03 TRACK 7 04 TRACK 4 1 1 Page Go To Music List 1 Press the ANYKEY button during the Playlist playback 2 Press the buttons to select Go To Music List then press the OK or button MOVE SELECT RETURN EXIT Playlist 1 1 Page PLAYLIST 01 04 04 30 CD TRACK 1 02 10 Playlist 1 TRACK 1 TRACK 2 TRACK 3 TRACK 4 CDDA CDDA CDDA Go To Music List New Playlist MOVE SE...

Страница 72: ... 1 3 Page ROOT 01 15 4 0 MB MP3 MP3 MP3 MP3 MP3 CD Flower mp3 02 10 HDD DVD Copy Play Mode Go To Playlist New Playlist Select Media If a disc contains only MP3 files or only JPEG files the MP3 or JPEG screen appears after the disc is loaded If a disc contains a mix of MP3 and JPEG files you need to select Music for MP3 files or Photo for JPEG files NOTE Viewing a Picture 1 Insert a JPEG disc or Mi...

Страница 73: ... 10 DSC01189 JPG DSC01190 JPG DSC01191 JPG DSC01192 DSC01193 JPG DSC01194 JPG DSC01199 JPG 1 2 Page Copy Slide Show Select Media MOVE SELECT RETURN EXIT Photo List CD DSC01194 JPG Index 1 10 DSC01189 JPG DSC01190 JPG DSC01191 JPG DSC01192 DSC01193 DSC01194 DSC01199 JPG 1 2 Page Slow Normal Fast Copy Slide Show Select Media To stop the Slide Show 1 Press the ANYKEY button 2 Press the buttons to sel...

Страница 74: ...etup follow steps 1 to 3 in page 72 4 Press the OK button to select the picture you want to see then press the ANYKEY button 5 Press the buttons to select Zoom then press the OK or button 6 Each time the OK button is pressed the picture is enlarged up to 4x four times the normal size X2 X4 X2 Normal To stop the Zoom 1 Press the ANYKEY button 2 Press the buttons to select Zoom Off then press the OK...

Страница 75: ...JPG DSC01199 JPG 1 2 Page Playing an MPEG4 Using the MENU button 1 Insert a DivX disc or Mixed disc JPEG MP3 DivX into the disc tray 2 Press the buttons to select Title then press the OK or button In case of playing a DivX Disc see number 4 on this page 3 Press the buttons to select DivX List then press the OK or button The DivX List screen is displayed 4 Press the buttons to select the avi file D...

Страница 76: ...ould have exactly the same name to corresponding MPEG4 file name Some MPEG4 files created on a personal computer may not be play back That is why Codec Type Version and Higher resolution over specification is not supported NOTE DivX Subtitle Encoding 1 Press the ANYKEY button during playback 2 Press the buttons to select Subtitle Encoding then press the OK or button 3 Press the buttons to select a...

Страница 77: ...ble Recordable Not recordable Not recordable Not recordable Recordable Not recordable Not recordable Not recordable Recordable finalised not finalised Recordable Recordable DVD RW DVD R HDD DVD RAM DVD RW DVD R Before Recording 77 Recording the current TV programme you are watching 79 Recording from external equipment you are watching 81 Copying from a Camcorder 82 Making a One Touch Recording OTR...

Страница 78: ... modes by pressing the REC MODE button repeatedly while the unit is in Stop mode for the desired recording time and picture quality In general picture quality improves as the recording time decreases In FR mode the most suitable record mode is adjusted automatically according to remaining time on the disc and length of the timer recording This function is selected only one mode in XP SP LP and EP ...

Страница 79: ...button If you select DVD Press the OPEN CLOSE button and place a recordable disc on the disc tray Press the OPEN CLOSE button to close the disc tray Wait until LOAD disappears from the front panel display If an unused DVD RAM disc is used you will be prompted to format first Make your selection using the œ buttons then press OK button See page 78 If an unused DVD RW disc is used whether to initial...

Страница 80: ...sh a recording in progress When using DVD RAM RW R discs the message Updating the information of disc Please wait for a moment is displayed You can not change the recording mode and the PROG while recording Recording will stop automatically if there is no free space left for recording Up to 99 titles can be recorded onto a disc DVD RAM RW R Up to 999 titles can be registered on the HDD HDD recordi...

Страница 81: ...hanges in the following sequence PR Number AV1 AV2 AV3 DV If you connect a digital camcorder press the INPUT button to select DV See page 82 3 Press the REC MODE button repeatedly or press the REC MODE button then press the buttons to select the recording speed quality SP LP EP XP 4 Press the REC button Information concerning the external input mode is displayed on the screen then recording begins...

Страница 82: ...ck record menu that enables camcorder control appears on the top of the screen 5 Select the Play icon on the upper part of the screen to playback the camcorder and find the starting position to copy You can press the PLAY button of the remote control to play the camcorder 6 To start recording use the œ buttons to select Record icon in the top side of the screen then press the OK button You can pre...

Страница 83: ... œ buttons to select Yes then press the OK button Or press the STOP button again About INFO button During recording press the INFO button once the system information screen appears Displays Active Status Background Status and Main Screen information Pressing the INFO button twice Disc information screen appears Displays Total numbers of Titles and Playlists Recordable Time Title Available Space Mu...

Страница 84: ...n It plays back the title that you are currently recording from the beginning Stopping Playback Recording 1 Press the STOP button Playback screen disappears and the recording in progress screen appears 2 Pressing the STOP button once more will stop the recording Play No sound is heard during search mode DVD disc playback is available during HDD recording However JPEG MP3 and DivX files in the disc...

Страница 85: ...rch mode NOTE Using the TITLE LIST button 1 With the unit in recording mode press the TITLE LIST button The Title List screen is displayed 2 Press the SKIP buttons to select the title you want to play OK or PLAY button Selected title list will be played back HDD No Title Length MOVE SELECT RETURN EXIT Title List 008 18 JAN 2005 02 15A 00 10 21 009 19 JAN 2005 14 15A 00 40 03 010 20 JAN 2005 16 05A...

Страница 86: ...ress the ANYKEY button Press the buttons to select Add then press the OK or button 4 Set timer recording option Fill the input items using the œ buttons and number buttons œ Moves to the previous next item 0 9 Sets a value To Select the media to record HDD or DVD Source The video input source AV1 AV2 or AV3 or the broadcasting channel you want to make a timer recording from Date Timer Recording al...

Страница 87: ...ng on DVD RAM RW R you must insert the disc 7 Turn the power off to finish the Timer Recording setting Timer Recording will not work when the power is on VPS PDC VPS Video Programme System or PDC Programme Delivery Control function If you set this function on you can control the starting and ending time of recording by special signal included in the broadcasting signal If a TV programme is shorten...

Страница 88: ...tup Programme Timer Record Flexible Recording for Timer recording only In FR mode the most suitable record mode is adjusted automatically according to remaining time on the disc and length of the timer recording This function is selected only one mode in XP SP LP and EP modes and you can use this mode for timer recording The FR mode recording setup is the same as Timer Recording When setting the m...

Страница 89: ...dit the items you want to modify See the Making a Timer Recording section for more information on Timer Recording Input items See pages 86 to 87 5 Press the OK button to select Save then press the OK button to confirm the edited setting 6 Press the MENU button after finishing the operation The Timer Record List screen will disappear HDD Current Time 12 00 MOVE SELECT RETURN EXIT Timer Record List ...

Страница 90: ...st No To Source Date Start End Mode VPS PDC Available Time HDD 29 10 SP Add a list 01 HDD PR 02 01 JAN 12 00 14 00 SP On 02 HDD PR 07 15 JAN 14 10 14 30 SP On 03 HDD AV2 01 JAN 15 10 15 30 SP On Do you want to delete No 01 No Yes HDD Current Time 12 00 MOVE SELECT RETURN EXIT Timer Record List No To Source Date Start End Mode VPS PDC Available Time HDD 29 10 SP Add a list 01 HDD PR 07 15 JAN 14 10...

Страница 91: ... On HDD OK 02 PR 07 15 JAN 14 10 14 30 SP On HDD OK 03 AV2 01 JAN 15 10 15 30 SP On HDD OK Timer rec was finished successfully OK HDD MOVE SELECT RETURN EXIT History List No Source Date Start End Mode VPS PDC To Status 01 PR 02 01 JAN 12 00 14 00 SP On HDD OK 02 PR 07 15 JAN 14 10 14 30 SP On HDD OK 03 AV2 01 JAN 15 10 15 30 SP On HDD OK Info Delete List Clear Go To Timer Rec List 3 Press the ANYK...

Страница 92: ...OK Info Delete List Clear Go To Timer Rec List HDD MOVE SELECT RETURN EXIT History List No Source Date Start End Mode VPS PDC To Status 01 PR 02 01 JAN 12 00 14 00 SP On HDD OK 02 PR 07 15 JAN 14 10 14 30 SP On HDD OK 03 AV2 01 JAN 15 10 15 30 SP On HDD OK Do you want to delete a history list No Yes Go To Timer Rec List Switches directly from the History List to the Timer Rec List 5 1 Press the AN...

Страница 93: ...sly recorded programmes If a title is deleted that title cannot be played again Play List This refers to a unit of playback which is made by selecting a desired scene in the entire Title List When one playlist is played only the scene selected by the user will play and then stop Since only the information necessary for playing a desired scene is included in a playlist even if that playlist is dele...

Страница 94: ...e of a recorded programme Using the TITLE LIST button 1 With the unit in Stop mode Playback mode press the TITLE LIST button The Title List screen is displayed Using the MENU button With the unit in Stop mode Playback mode press the MENU button Press the buttons to select Title then press the OK or button twice 2 Press the buttons to select an entry you want to rename from the Title List then pres...

Страница 95: ...ngth MOVE SELECT RETURN EXIT Title List 001 18 JAN 2005 12 15A 00 10 21 002 19 JAN 2005 12 15A 00 40 03 003 20 JAN 2005 12 15A 00 20 15 004 25 JAN 2005 12 15A 00 50 16 1 1 Page 18 JAN 2005 12 15 AV3 18 JAN 2005 12 15 SP V Mode Compatibility HDD MOVE SELECT RETURN EXIT Title List Title Protection 18 JAN 2005 12 15 AV3 18 JAN 2005 12 15 SP V Mode Compatibility On Off HDD No Title Length MOVE SELECT ...

Страница 96: ...ons to select Yes then press the OK button HDD No Title Length MOVE SELECT RETURN EXIT Title List 001 18 JAN 2005 12 15A 00 10 21 002 19 JAN 2005 12 15A 00 40 03 003 20 JAN 2005 12 15A 00 20 15 004 25 JAN 2005 12 15A 00 50 16 1 1 Page 18 JAN 2005 12 15 AV3 18 JAN 2005 12 15 SP V Mode Compatibility HDD Title List Deleting Please wait 18 JAN 2005 12 15 AV3 18 JAN 2005 12 15 SP V Mode Compatibility H...

Страница 97: ...2005 12 15A 00 40 03 003 20 JAN 2005 12 15A 00 20 15 004 25 JAN 2005 12 15A 00 50 16 1 1 Page 18 JAN 2005 12 15 AV3 18 JAN 2005 12 15 SP V Mode Compatibility You cannot delete a protected entry If you want to delete a protected entry select Off in the Title Protection menu See page 95 When the Disc Protection has been set to Protected you cannot delete titles See page 120 Once an entry is deleted ...

Страница 98: ...03 20 JAN 2005 12 15A 00 20 15 004 25 JAN 2005 12 15A 00 50 16 1 1 Page 19 JAN 2005 12 15AV3 19 JAN 2005 12 15 SP V Mode Compatibility Split Partial Delete Rename Protection Copy Delete Edit Playlist Navigation Select Media Disc Manager HDD 18 JAN 2005 12 15AV3 MOVE SELECT RETURN EXIT Split 00 00 00 Title List No 001 Split 1 00 00 00 Split 2 00 00 00 Select Split Return HDD 18 JAN 2005 12 15AV3 MO...

Страница 99: ...s displayed 4 Press the buttons to select Partial Delete then press the OK or button 5 Press the OK button at the starting point The image and starting point time is displayed in the section deletion starting point window HDD No Title Length MOVE SELECT RETURN EXIT Title List 001 18 JAN 2005 12 15A 00 10 21 002 19 JAN 2005 12 15A 00 40 03 003 20 JAN 2005 12 15A 00 20 15 004 25 JAN 2005 12 15A 00 5...

Страница 100: ...s than 5 seconds you will be prompted with the message The range is too short If the end time precedes the starting time you will be prompted with the message End point cannot be marked earlier than start point The section cannot be deleted when it includes a still picture Press the MENU button after the operation has finished The Title List screen will disappear NOTE HDD 18 JAN 2005 12 15AV3 MOVE...

Страница 101: ...The image and end point time is displayed in the End window The yellow coloured selection bar moves to the Make item VR mode HDD No Title Length MOVE SELECT RETURN EXIT Title List 001 18 JAN 2005 12 15A 00 10 21 002 19 JAN 2005 12 15A 00 40 03 003 20 JAN 2005 12 15A 00 20 15 004 25 JAN 2005 12 15A 00 50 16 1 1 Page 18 JAN 2005 12 15 AV3 18 JAN 2005 12 15 SP V Mode Compatibility HDD No Title Length...

Страница 102: ...displayed Using the MENU button With the unit in Stop mode Playback mode press the MENU button Press the buttons to select Title then press the OK or button twice The Title List screen is displayed Press the ANYKEY button Press the buttons to select Playlist then press the OK or button Press the buttons to select Go To Playlist then press the OK or button 2 Press the buttons to select the playlist...

Страница 103: ...tion in Renaming the Title See page 94 The maximum number of characters that can be entered is 31 All 31 characters can be displayed by pressing the INFO button 5 Press the œ buttons to select Save then press the OK button The changed title is displayed in the title field of the selected playlist entry VR mode HDD No Title Length MOVE SELECT RETURN EXIT Playlist 001 Dolphin 00 10 21 002 19 JAN 200...

Страница 104: ...scene you want to play then press the ANYKEY button The playlist entry to be played is selected 5 Press the buttons to select Play then press the OK or button The selected scene is played To stop scene play press the STOP button VR mode Playing a Selected Scene HDD Playlist No 1 MOVE SELECT RETURN EXIT Edit Playlist HDD No Title Length MOVE SELECT RETURN EXIT Playlist 001 16 JAN 2005 12 15A 00 10 ...

Страница 105: ... scene you want to modify is changed with the selected section Modifying a Scene Replacing a Scene HDD 16 JAN 2005 12 15 MOVE SELECT RETURN EXIT Modify Scene 00 00 20 Scene No 001 Start 00 00 20 End 00 00 00 Start End Change Cancel HDD 16 JAN 2005 12 15 MOVE SELECT RETURN EXIT Modify Scene 00 00 30 Scene No 001 Start 00 00 20 End 00 00 30 Start End Change Cancel HDD 16 JAN 2005 12 15 MOVE SELECT R...

Страница 106: ...0 06 04 04 0 00 03 05 0 00 26 06 00 01 07 1 1 Page Play Modify Move Add Delete You cannot move the selected scene to the position of the next scene because the selected scene should be inserted before that position which requires no action Depending on the kind of disc the displayed screen may have a slight difference NOTE HDD Playlist No 1 MOVE SELECT RETURN EXIT Edit Playlist Cancel 01 00 00 26 ...

Страница 107: ...LECT RETURN EXIT Add Scene 00 00 15 Scene No 001 Start 00 00 15 End 00 00 00 Start End Add Cancel HDD 01 JAN 2005 12 15 MOVE SELECT RETURN EXIT Add Scene 00 00 00 Scene No 001 Start 00 00 00 End 00 00 00 Start End Add Cancel Title List 1 7 Title List 1 7 7 Press the OK button at the end point of the scene The image and end point time are displayed in the End window To cancel press the œ buttons to...

Страница 108: ...Stop mode Playback mode press the MENU button Press the buttons to select Title then press the OK or button twice The Title List screen is displayed Press the ANYKEY button Press the buttons to select Playlist then press the OK or button Press the buttons to select Go To Playlist then press the OK or button 2 Press the buttons to select the title you want to edit from the Playlist then press the A...

Страница 109: ... copied up to 7 titles can be copied at one time Recording mode for copying HS high speed you can copy more quickly than normal playback speed Copies in the same record mode as source title XP SP LP EP you can not use high speed copy Record time of title to be copied Copy start button Record mode setup button Remaining time and space on the current disc in DVD Record mode Total record time and spa...

Страница 110: ...ton to select Start then press the OK button About Using COPY button Press the buttons to select title you want to copy from the title list and then press the COPY button on the remote control You can go to copy screen During Playback you can also copy the title by pressing the COPY button HDD No Title Length MOVE SELECT RETURN EXIT Title List 001 18 JAN 2005 12 15A 00 10 21 002 19 JAN 2005 12 15A...

Страница 111: ...ed the title to be copied is displayed at its playback speed while copying To cancel the copying in progress press the CANCEL button 11 1 After a successful copy The title is successfully copied message is displayed HDD 1 DVD If you want to stop copy press CANCEL key HDD 1 DVD If you want to stop copy press CANCEL key The title is successfully copied High speed copy This means that you can transfe...

Страница 112: ...a recordable disc on the disc tray 2 Press the OPEN CLOSE button to close the disc tray Wait until LOAD disappears from the front panel display Check that the disc has enough available space for the recording 3 Select the HDD by pressing the HDD button on the front panel of the HDD DVD RECORDER or on the remote control 4 With the unit in Stop mode Playback mode press the TITLE LIST button The Titl...

Страница 113: ...04 25 JAN 2005 12 15A 00 50 16 1 1 Page 19 JAN 2005 12 15AV3 19 JAN 2005 12 15 SP V Mode Compatibility Rename Protection Copy Delete Edit Playlist Navigation Select Media Disc Manager HDD No Title Length MOVE SELECT RETURN EXIT Add Copy List 001 18 JAN 2005 12 15A 00 10 21 002 19 JAN 2005 12 15A 00 40 03 003 20 JAN 2005 12 15A 00 20 15 004 25 JAN 2005 12 15A 00 50 16 1 1 Page 18 JAN 2005 12 15 AV3...

Страница 114: ...LP HS 00 30 21 No Title Rec Mode Length Add a list Start Rec Mode DVD Available LP 04 00 16 4 48 GB 00 56 03 1 88 GB Total HDD Copy To HDD DVD MOVE SELECT RETURN EXIT Copy 1 18 JAN 2005 12 15A LP HS 00 10 21 2 19 JAN 2005 13 15A SP LS 00 15 21 3 20 JAN 2005 15 15A SP HS 00 30 21 No Title Rec Mode Length Add a list Start Rec Mode DVD Available LP 04 00 16 4 48 GB 00 56 03 1 88 GB Total HDD Copy To ...

Страница 115: ...ng process can be performed as described in pages 110 to 111 HDD Copy To HDD DVD MOVE SELECT RETURN EXIT Copy 1 18 JAN 2005 12 15A LP HS 00 10 21 2 19 JAN 2005 13 15A SP LS 00 15 21 3 20 JAN 2005 15 15A SP HS 00 30 21 No Title Rec Mode Length Add a list Start Rec Mode DVD Available LP 04 00 16 4 48 GB 00 56 03 1 88 GB Total HDD Copy To HDD DVD MOVE SELECT RETURN EXIT Copy 1 18 JAN 2005 12 15A LP H...

Страница 116: ...to copy from the title list and then press the COPY button on the remote control You can go to copy screen During Playback you can also copy the title by pressing the COPY button 7 Press the OK or buttons to select Start then press the OK button DVD RAM VR No Title Length MOVE SELECT RETURN EXIT Title List 001 18 JAN 2005 12 15A 00 10 21 002 19 JAN 2005 12 15A 00 40 03 003 20 JAN 2005 12 15A 00 20...

Страница 117: ...VD RW V mode R disc to HDD high speed copy is not available Record mode cannot be changed when you copy a title from DVD to HDD NOTE Copying MP3 or JPEG Files from a Disc to HDD File Copy 1 Insert a JPEG disc or MP3 disc into the disc tray 2 Press the OPEN CLOSE button to close the disc tray Wait until LOAD disappears from the front panel display Check that the disc has enough available space for ...

Страница 118: ...DD Free space 2939 MB Total file number 1 1 Copying File Name Flower mp3 43 Folder Copy 1 Insert a Disc JPEG or MP3 into the tray 2 Press the buttons to select Music or Photo then press the OK or button MP3 or JPEG folder is displayed 3 Press the buttons to select the MP3 or JPEG folder you want to copy then press the ANYKEY button 4 Press the buttons to select Copy then press the OK or button Fol...

Страница 119: ...he HDD File size on a disc and the copied file in the HDD may be slightly different due to the file system NOTE Editing the Disc Name Follow these instructions to give a name to a disc 1 With the unit in Stop mode press the ANYKEY button 2 Press the buttons to select Disc Manager then press the OK or button Disc Manager DVD RAM VR MOVE SELECT RETURN EXIT Disc Manager Search Scene Navigation Time N...

Страница 120: ...perations 1 With the unit in Stop mode press the ANYKEY button 2 Press the buttons to select Disc Manager then press the OK or button 3 Press the œ buttons to select Protection then press the OK button 4 Press the œ buttons to select On then press the OK button Search Scene Navigation Time Navigation Marker Rec Mode Select Madia Disc Manager DVD RAM VR MOVE SELECT RETURN EXIT Disc Manager Disc Nam...

Страница 121: ...format for DVD RW 4 Press the œ buttons to select Yes then press the OK button The disc is formatted DVD VR and DVD V are defined according to their recording format DVD VR DVD V DVD RAM DVD RW DVD RW DVD R DISC DVD RW VR MOVE SELECT RETURN EXIT Disc Manager Disc Name Used Space Available Space 00 10 32 01 29 SP Not Protected VR Mode Disc Protection Info Current Rec Mode Protection Rename Delete A...

Страница 122: ...able Space 002 22 08 033 27 SP 0145MB 4725MB Delete All Format Music Photo Partition Used Space Available Space HDD MOVE SELECT RETURN EXIT Disc Manager Title Partition Used Space Available Space 00 10 32 35 47 10 SP 0006MB 10034MB Delete All Format Music Photo Partition Used Space Available Space Music Photo Title Select contents to delete all HDD MOVE SELECT RETURN EXIT Disc Manager Title Partit...

Страница 123: ...2 09 SP Disc Protection Info Not Protected Rename Protection Delete All Format DVD RAM VR MOVE SELECT RETURN EXIT Disc Manager Disc Name Used Space Available Space 00 11 56 00 11 56 SP Disc Protection Info Not Protected Rename Protection Delete All Format No Yes Do you want to delete all title lists When Protected Entry exists The Delete All Title List function will not operate If there is a title...

Страница 124: ...rmat No Yes Do you want to finalise disc If you select Yes you will be prompted again with the message Disc will be finalised Do you want to continue 4 Press the œ buttons to select Yes then press the OK button The disc is finalised Once a disc is finalised you cannot delete entries from the record list After being finalised the DVD R DVD RW video mode operates in the same manner as a DVD Video De...

Страница 125: ...DVD V Current Rec Mode unfinalise Format No Yes Do you want to unfinalise disc DVD RW VR F MOVE SELECT RETURN EXIT Disc Manager Disc Name Used Space Available Space 00 00 00 00 00 SP DVD V Current Rec Mode unfinalise Format No Yes Disc will be unfinalised Do you want to continue 4 Press the œ buttons to select Yes then press the OK button The disc is unfinalised Finalise Unfinalise Mark DVD Video ...

Страница 126: ... a Samsung authorised service centre Power Recording The HDD DVD RECORDER requires some time to initialize and the input will be displayed for approx 10 seconds after it is turned on Checkpoint 1 Check whether the power cord is securely plugged into the power outlet Did you set the HDD DVD RECORDER channel settings correctly Check the free space on your HDD DVD RAM RW R discs Checkpoint 1 Checkpoi...

Страница 127: ...tings configured in the settings menu may not work properly Checkpoint 1 Play mode settings are different from the settings configured in the Settings menu The aspect ratio is fixed for DVD discs See pages 40 41 Checkpoint 1 Cannot change the aspect ratio The angle operation is available only when the disc contains images captured from different angles Checkpoint 1 The angle operation does not wor...

Страница 128: ...40 41 Check whether there is damage to or any foreign material on your disc Some low quality discs may not play properly If scenes change from dark to bright suddenly the screen may shake vertically temporarily but this is not a fault Checkpoint 1 Checkpoint 2 Checkpoint 3 Checkpoint 4 The disc revolves but no image or bad quality images is displayed Re check the recording time and the end time se...

Страница 129: ...eck the TV DVD selection button setting Check whether TV control button is selected or not Checkpoint 1 Checkpoint 2 Checkpoint 3 Checkpoint 4 The remote control doesn t work A recorded disc is played with only the subtitle and the audio signal which were selected during recording Checkpoint 1 Is it possible to change a subtitle and an audio signal on a recorded disc Other Press and hold the SEARC...

Страница 130: ... 35 C Keep level when operating Less than 75 operating humidity Composite Video 1 0 V p p at 75Ω load sync negative Max Audio Input Level 2Vrms IEEE 1394 4p compatible jack PAL SECAM B G D K I Video Composite Audio analogue Video Composite RGB Audio analogue Analogue output jacks x 2 Optical Coaxial digital audio output Composite Video Video output jack x 1 S Video output x 1 Y 1 0Vp p C 0 286Vp p...

Страница 131: ...iagrafevı pou iscuvoun se cwvra avllh apov authv gia thn opoiva proorizovtan hv kataskeuavsthke H egguvhsh authv den kaluvptei apozhmiwvseiı giaÚ Kefalevı bivnteo kai kasetofwvnwn Kefalevı binteokavmeraı Gennhvtrieı aktinwvn Iaser sta CD DVD Thleceiristhvria Lucniveı fouvrnwn mikrokumavtwn Prosarmogevı metatropevı hv ruqmivseiı anex avrthta an eivnai epituchvı hv anepituchvı ouvte opoiadhvpote zhm...

Страница 132: ...f wastes and recycle it responsibly to promote the sustainable reuse of material resources Household users should contact either the retailer where they purchased this product or their local gov ernment office for details of where and how they can take this item for environmentally safe recycling Business users should contact their supplier and check the terms and conditions of the purchase con tr...

Отзывы: