background image

I-16

I-17

I

R

I

C

E

V

I

T

O

R

E


T

E

R

R

E

S

T

R

E


D

I

G

I

T

A

L

E

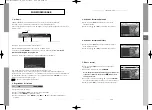
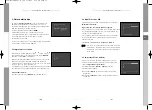
1.3 Manuale scansione 

Per sintonizzare i nuovi canali e i segnali più deboli, è disponibile
l’opzione “

Manuale scansione

” che consente di immettere

manualmente i dati sui canali.
Dopo aver selezionato “

Manuale scansione

” dal menu

Installazione verrà visualizzata la schermata seguente:

● 

Selezionare il numero del canale.

È possibile selezionare il canale specifico da cercare.

Le opzioni seguenti sono impostante per default, tuttavia è 
possibile modificarle.
La barra di stato del segnale mostra se il canale è valido.

● 

Immettere la frequenza del canale da trovare.

● 

Selezionare la larghezza di banda.

È possibile selezionare un valore pari a 

6

,

7

8

MHz.

● 

Selezionare la modalità di intervallo di sicurezza.

È possibile selezionare il valore 

Auto

,

1/32

,

1/16

,

1/8

, o 

1/4

.

● 

Selezionare la modalità FFT (Fast Fourier Transform).

Il valore 

AUTO

,

2K

8K

è impostato automaticamente.

● 

Una volta selezionate le opzioni, premere il tasto 

OK

per 

avviare la procedura di scansione.

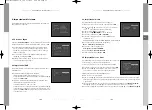
1.4 Azzera alle impostazioni di fabbrica

Consente di tornare ai valori impostati in fabbrica nel caso
in cui si verificassero dei problemi dopo la modifica di alcuni
valori relativi ai dati dei canali o per l’uso di valori errati.
Nella finestra di richiesta, se si preme il tasto 

OK

, il ricevitore

viene automaticamente reimpostato in base ai valori
predefiniti.

N

No

otta

a  

:

Questa operazione elimina tutte le impostazioni 

esistenti!

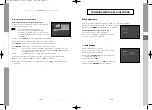
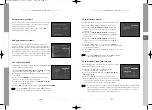
1.1 Seleziona paese

Per sintonizzare i nuovi canali, è disponibile l’opzione “

Seleziona

paese

” che consente di selezionare la nazione dove hanno sede i

servizi dell’emittente.
Una volta selezionato “

Seleziona paese

” nel menu Installazione,

verrà visualizzata la schermata seguente:

● 

Selezionare la propria nazione.
È possibile selezionare il valore 

ITALY

SPAIN

SWEDEN

UK

USER

BELGIUM

GERMAN

FINLAND

, o 

FRANCE

premendo i tasti 

.

● 

Una volta selezionata l’opzione, premere il tasto 

OK

per 

scegliere la nazione corrispondente all’area di trasmissione.

Se non si desidera salvare le modifiche, premere il tasto 

EXIT

senza premere 

OK

.

N

No

otta

a  

:

Se si modifica il codice nazionale, tutti i programmi 
salvati verranno eliminati.

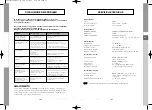
1.2 Auto scansione

Il sottomenu “

Auto scansione

” consente di scaricare

automaticamente i canali dal punto di caricamento
preprogrammato.

Per scaricare automaticamente i canali:

● 

È possibile selezionare la frequenza specificata tra 

Frequenza inizio

Frequenza fine

.

● 

Premere il tasto 

OK

.

Verrà visualizzato il menu Auto scansione.

Tutti i canali nell’elenco verranno automaticamente scaricati.

FUNZIONAMENTO DEL RICEVITORE

FUNZIONAMENTO DEL RICEVITORE

MF68-00345A(REV1.2)_ITA  4/18/05  1:28 PM  Page 16

Содержание DTB-S500F

Страница 1: ...RE TERRESTRE DIGITALE REV 1 2 DTB S500F DTB S501E GB DIGITAL TERRESTRIAL RECEIVER MF68 00345A Instructions for use GB Istruzioni per l uso I Istruzioni per l uso Instructions for use MF68 00345A REV1 2 _COVER 4 18 05 1 26 PM Page 1 ...

Страница 2: ...Istruzioni per l uso I DTB S500F DTB S501E MF68 00345A REV1 2 _3 4 4 18 05 1 26 PM Page II ...

Страница 3: ...RICEVITORE TERRESTRE DIGITALE DTB S500F DTB S501E Istruzioni perl uso I MF68 00345A REV1 2 _ITA 4 18 05 1 28 PM Page II ...

Страница 4: ...ire l STB scollegarlo dalla presa a muro Utilizzare un panno leggermente inumidito con acqua non utilizzare solventi per pulire la parte esterna VENTILAZIONE Non bloccare i fori di ventilazione dell STB Accertarsi che l aria circoli liberamente attorno al dispositivo Non posizionare mai l STB in modo tale che sia esposto alla luce solare diretta o accanto ad apparecchi per riscaldamento ad esempio...

Страница 5: ...Impostazione funzionamento auto 25 Risoluzione dei problemi 26 Smaltimento 26 Specifiche tecniche 27 I 4 R I C E V I T O R E T E R R E S T R E D I G I T A L E FUNZIONALITÀ GENERALI 1 SEZIONE UTENTE 400 CANALI PROGRAMMABILI SCARICAMENTO SOFTWARE ATTRAVERSO PC GUIDA ELETTRONICA AVANZATA AI PROGRAMMI SUPPORTO MULTILINGUA PER OSD TELETEXT VBI SUPPORTATO CON PIÙ LINGUE TELECOMANDO A INFRAROSSI A FUNZIO...

Страница 6: ... alle finestre poiché sarebbe difficile o impossibile ricevere i canali digitali 3 COLLEGAMENTO DEL RICEVITORE AL TELEVISORE Per collegare il ricevitore al televisore è possibile utilizzare un cavo SCART o RCA Se il televisore viene collegato tramite il cavo SCART collegare il connettore SCART contrassegnato con TV alla relativa presa SCART sul televisore 4 COLLEGAMENTO DEL VCR Per consentire il c...

Страница 7: ...dati Pannello posteriore Pannello anteriore DESCRIZIONE 1 Questo tasto serve per accendere e spegnere il ricevitore Standby 2 7 Display segmento Questo display a LED visualizza il numero di canale corrente Mentre il ricevitore è in modalità Standby il display visualizza l ora corrente 3 Sensore a infrarossi Consente di ricevere i comandi a infrarossi del telecomando 4 EXIT Questo tasto serve per u...

Страница 8: ...tasti vengono utilizzati per selezionare funzioni speciali per l STB 10 Tasto freccia Sposta la barra di evidenziazione dell applicazione MHP OK Questo tasto serve per inserire i dati del ricevitore nel sistema di menu e confermarli 11 APP È il tasto che consente di accedere al gestore dell applicazione SAMSUNG 12 LIST Premendolo mentre si guarda il televisore viene visualizzato un elenco di canal...

Страница 9: ...e segue banner apparirà ogni volta che si cambia canale Premere il tasto i in modalità di visualizzazione Questa immagine appare anche ogni volta che si cambia canale Premendo il tasto TV RADIO del telecomando vengono attivati i programmi TV e Radio Informazioni dettagliate sul programma Premere il tasto i due volte mentre si sta visualizzando un programma Con la prima pressione del tasto apparirà...

Страница 10: ...a l elenco dei programmi in blocchi da 30 minuti L intervallo di tempo può essere regolato premendo i seguenti tasti sulla schermata EPG Tasto 1 1 ora e 30 minuti tasto 2 30 minuti tasto 3 15 minuti Selezionare il canale premendo i tasti e premere il tasto OK per visualizzare il canale selezionato FUNZIONI DI BASE FUNZIONAMENTO DEL RICEVITORE Menu principale Dopo avere installato il sistema dell a...

Страница 11: ...l uso di valori errati Nella finestra di richiesta se si preme il tasto OK il ricevitore viene automaticamente reimpostato in base ai valori predefiniti N No ot ta a Questa operazione elimina tutte le impostazioni esistenti 1 1 Seleziona paese Per sintonizzare i nuovi canali è disponibile l opzione Seleziona paese che consente di selezionare la nazione dove hanno sede i servizi dell emittente Una ...

Страница 12: ...TORE I 18 I 19 I R I C E V I T O R E T E R R E S T R E D I G I T A L E 2 4 Sposta e modifica canale Selezionare l elenco Interattivo TV RADIO premendo i tasti Selezionare l elenco Interattivo TV RADIO premendo i tasti oppure i tasti CH CH Selezionare il canale premendo il tasto ROSSO Premere i tasti per modificare la posizione del canale desiderato e premere CH CH per passare alle pagine precedent...

Страница 13: ...pagamento 3 Chiave elettronica La funzione Chiave elettronica consente di impostare le limitazioni della visualizzazione e impedisce l accesso non autorizzato all STB tramite l uso del PIN Personal Identification Number un numero personale di 4 cifre codice PIN preimpostato in fabbrica 0000 Selezionando questo menu si dispone di tre opzioni è possibile impostare il blocco di qualsiasi canale modif...

Страница 14: ...a desiderata per l accensione e lo spegnimento utilizzando i tasti Numerici 0 9 e i tasti Premere i tasti per scegliere un ora da prenotare per l accensione Selezionare il programma per impostare l evento premendo i tasti e i tasti Numerici 0 9 4 Impostazioni di sistema È possibile modificare le impostazioni predefinite del sistema in base alle proprie esigenze 4 1 Selezione lingua L opzione Selez...

Страница 15: ...r impostare il modem seguire le istruzioni fornite di seguito Selezionare Tone o Pulse in Modalit di composizione Selezionare il Tempo d attesa portante nell intervallo compreso tra 1 e 255 secondi utilizzando i tasti o i tasti numerici Selezionare il Tempo attuale portante nell intervallo compreso tra 0 1 25 5 secondi utilizzando i tasti o i tasti numerici Selezionare il Tempo perdita portante ne...

Страница 16: ...reggere manuale di istruzioni della TV Non c è audio Il cavo audio non è collegato Verificare la connessione e correggere correttamente livello volume 0 aumentare il volume sul televisore audio disattivato premere il tasto MUTE Il telecomando non Funzionamento non corretto Puntare il telecomando verso funziona il ricevitore Batterie scariche o inserite sostituire le batterie o inserirle non corret...

Страница 17: ...onosciuti idonei dalla Samsung ad effettuare l attivita di riparazione in garanzia In caso di difficolta la preghiamo di rivolgersi alla SAMSUNG ELECTRONICS ITALIA S P A VIA C DONAT CATTIN 5 20063 CERNUSCO SUL NAVIGLIO MI TEL 02 921891 FAX 02 92141801 Servizio Clienti Tel 199 153 153 http www samsung it CONDIZIONI DI GARANZIA 1 La garanzia viene accettata solo nel caso in cui il certificato risult...

Страница 18: ...Instructions for use GB DTB S500F DTB S501E MF68 00345A REV1 2 _3 4 4 18 05 1 26 PM Page IV ...

Страница 19: ...DIGITAL TERRESTRIAL RECEIVER DTB S500F DTB S501E Instructions foruse GB MF68 00345A REV1 2 _GB 4 18 05 1 27 PM Page II ...

Страница 20: ...UIDS Keep liquids away from the STB CLEANING Before cleaning disconnect the STB from the wall socket Use a cloth lightly dampened with water no solvents to clean the exterior VENTILATION Do not block the STB ventilation holes Ensure that free airflow is maintained around the STB Never store the STB where it is exposed to direct sunlight or near heating equipment e g a radiator Never stack other el...

Страница 21: ...n Setting 25 Troubleshooting 26 Disposal 26 Technical Specifications 27 GB 4 D i g i t a l T e r r e s t r i a l R e c e i v e r GB GENERAL FEATURES 1 USER SECTION 400 PROGRAMMABLE CHANNELS SOFTWARE DOWNLOAD VIA PC ADVANCED ELECTRONIC PROGRAM GUIDE MULTI LANGUAGE SUPPORTED FOR OSD TELETEXT VBI SUPPORTED WITH MULTI LANGUAGE FULL FUNCTION INFRARED REMOTE CONTROL UNIT AUTO AND MANUAL SCAN FACILITY CH...

Страница 22: ...oor or window mounted aerials as it will be difficult or impossible to receive digital channels 3 CONNECTING THE RECEIVER TO TV To connect the receiver with your television you can use SCART Cable or RCA cable In the case of connecting your TV through SCART cable connect the SCART connector marked TV to the respective SCART port on the TV 4 CONNECTING YOUR VCR To connect a VCR the receiver has bee...

Страница 23: ...tion Rear Panel Front Panel DESCRIPTION 1 This key is used to turn the receiver on and off Standby 2 7 Segment Display This LED display will show the current channel number While the receiver is in Standby mode the display will show the current time 3 Infrared Sensor This is to receive the IR commands from the Remote Control Unit 4 EXIT This is for exiting a menu or returning to the previous menu ...

Страница 24: ...Color key RED GREEN YELLOW BLUE Used to select special operation for the STB 10 Arrow Key Move the highlight bar for the MHP Application OK Enter and confirm any data to the receiver in the menu system 11 APP This key is the hard key for accessing the SAMSUNG application manager 12 LIST Press while viewing TV and a list of channels is displayed 13 MENU This key is used to open up the menu or retur...

Страница 25: ...e the following picture banner each time you switch channels Press the i key in view mode You will also see this picture each time you change channels When you press TV RADIO key on the Remote Control Unit TV and Radio program are toggled Detailed program information Press the i key twice while you are viewing a program First you will see the banner described above After pressing the i key a secon...

Страница 26: ...tes per block Time interval can be adjusted by press keys as followings on EPG screen 1 Key 1 hour and 30 minutes 2 key 30 minutes 3 key 15 minutes Select the channel by pressing the keys and press the OK key to watch this channel BASIC FUNCTIONS OPERATING THE RECEIVER Main Menu After installing your antenna system and STB with appropriate connectors Plug in the AC main power and switch on the rec...

Страница 27: ...be in error At the request window if you press the OK key the receiver will be reset to factory default settings automatically N No ot te e This cause your previous settings to be deleted 1 1 Select Country To tune in new channels the STB has been provided with the option Select Country Select the country where broadcasting services are provided After selecting the Select Country from the Installa...

Страница 28: ...PERATING THE RECEIVER OPERATING THE RECEIVER GB 18 GB 19 D i g i t a l T e r r e s t r i a l R e c e i v e r GB 2 4 Move Edit Channel Select the TV RADIO Interactive list with keys Select the TV RADIO Interactive list with or CH CH keys Select channel by pressing the RED key Press the keys to change the position of the channel you want and CH CH for moving up or down pages on list Press the OK key...

Страница 29: ... This Parental Lock feature sets viewing restrictions and prevents unauthorized access to your STB through the PIN Personal Identification Number which is a 4 digit number The factory preset PIN Code 0000 On selecting this menu you will have three options to set lock for any desired channel and to change your PIN Code and to Set Modem Lock Enter PIN Code If you have not entered your own PIN Code t...

Страница 30: ...very Thursday Every Friday and Every Saturday Insert the preferable Switch on off time by the Numerical 0 9 keys and keys Press the keys to choose a switch time you want to reserve Select program to set the event program by pressing the and Numerical 0 9 keys 4 System Setup This option enables you to change the factory preset system settings as per your requirements 4 1 Language Selection The Lang...

Страница 31: ...ey makes MHP App Control unchanged 4 8 Modem Setup If you want to setup Modem please follow the instruction below Select Tone or Pulse in Dial Method Select the Carrier Wait Time ranged in 1 255 seconds with the keys or numeric keys Select the Carrier Present Time ranged in 0 1 25 5 seconds with the keys or numeric keys Select the Carrier Loss Time ranged in 0 1 25 5 seconds with the keys or numer...

Страница 32: ...ruction manual No sound Audio cord connected Check connection and correct incorrectly Loudness level 0 Increase loudness on television set Muting active Press the MUTE key Remote Control does not Incorrect operation Point remote control operate directly towards the Receiver Batteries dead or inserted Replace batteries or insert correctly incorrectly Poor picture quality Signal strength too low Che...

Страница 33: ... the European Union and other European countries with separate collection systems This marking shown on the product or its literature indicates that it should not be disposed with other household wastes at the end of its working life To prevent possible harm to the environment or human health from uncontrolled waste disposal please separate this from other types of wastes and recycle it responsibl...

Отзывы: