3-10
3. Disassembly and Reassembly
Part
Photo
Description
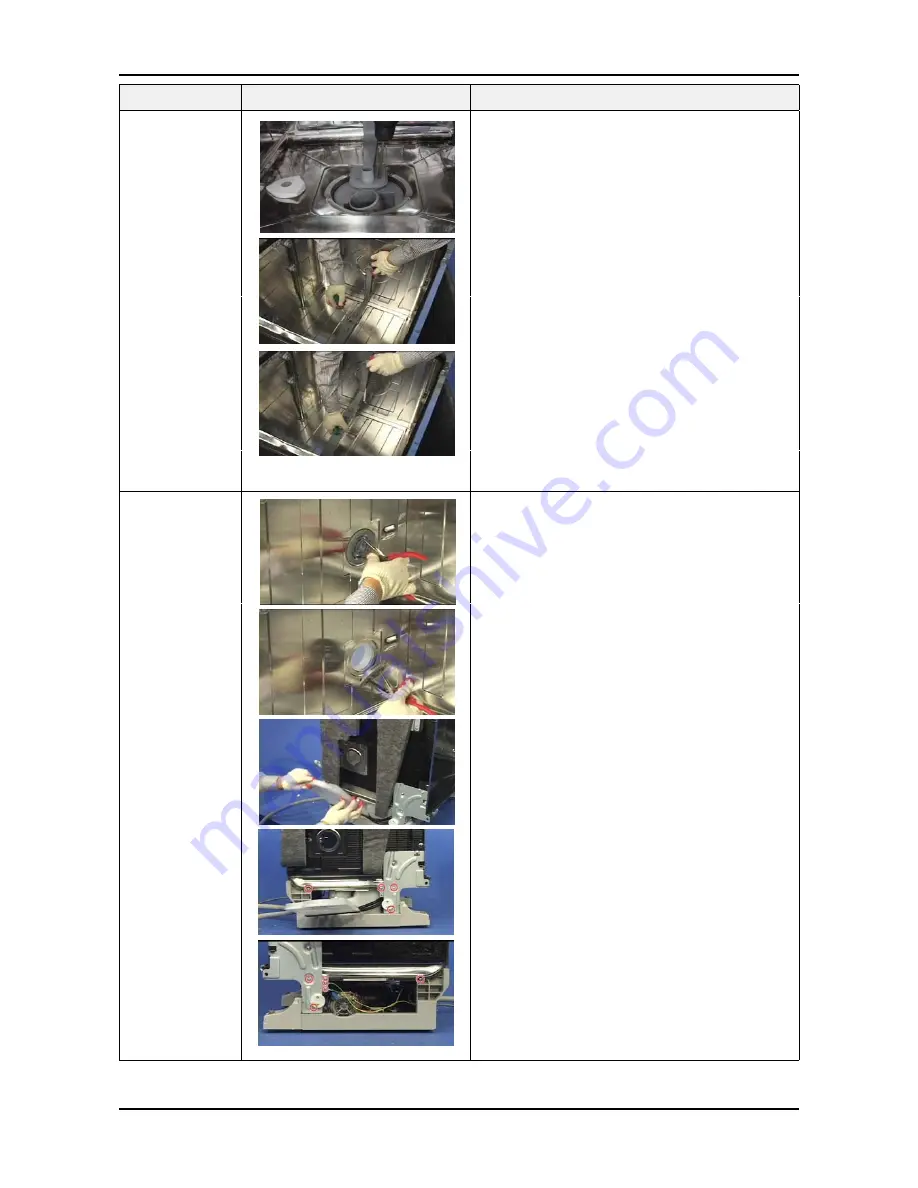
MANIFOLD
ELBOW ASS’Y
Ƒ
Separate lower rotor ass’y
Ƒ
Separate filter ass’y
Ƒ
Separate upper/lower rack ass’y
1) Remove the two (2) screw holding DISTRIBUTOR
COVER.
3) You can remove the MANIFOLD ELBOW ASS’Y
like figure.
TUB ASS’Y (1)
14. Manifold elbow Ass’y
2) Widen MANIFOLD ELBOW HOLDER using screw
driver.
15. Tub ass'y (1)
Ƒ
Separate top table ass'y
Ƒ
Separate housing L, R
Ƒ
Separate out door
Ƒ
Separate control panel ass'y
Ƒ
Separate Inner door sub ass’y
Ƒ
Separate filter ass'y, Manifold elbow ass’y
2) Remove the ten screws for holding TUB ASS’Y and
ground wires.
1) Use your hand to hold the AIR BREAK and rotate
the AIR BREAK CAP. Use a jig to remove by rotating
the AIR BREAK CAP. If you have no jig, you can use
a pair of long nose pliers.
It can be separated into a AIR VENT GASKET,
AIR BREAK CAP, AIR BREAK ASS’Y.
* No different screw allowed. (ground washer screw)
Содержание DMS300 series
Страница 8: ......
Страница 48: ...5 4 5 Exploded Views and Parts List 5 3 TUB ASS Y DMS500 400 300 301TR ...
Страница 50: ...5 6 5 Exploded Views and Parts List 5 4 BASE ASS Y DMS500 400 300 301TR ...
Страница 52: ...5 8 5 Exploded Views and Parts List 5 5 SUMP ASS Y DMS500 400 300 301TR ...
Страница 54: ...5 10 5 Exploded Views and Parts List 5 6 ASSY RACK DMS500 400 300 301TR DMS500 400 301TR DMS300TR DMS TR 22 23 ...


