background image

ƈ

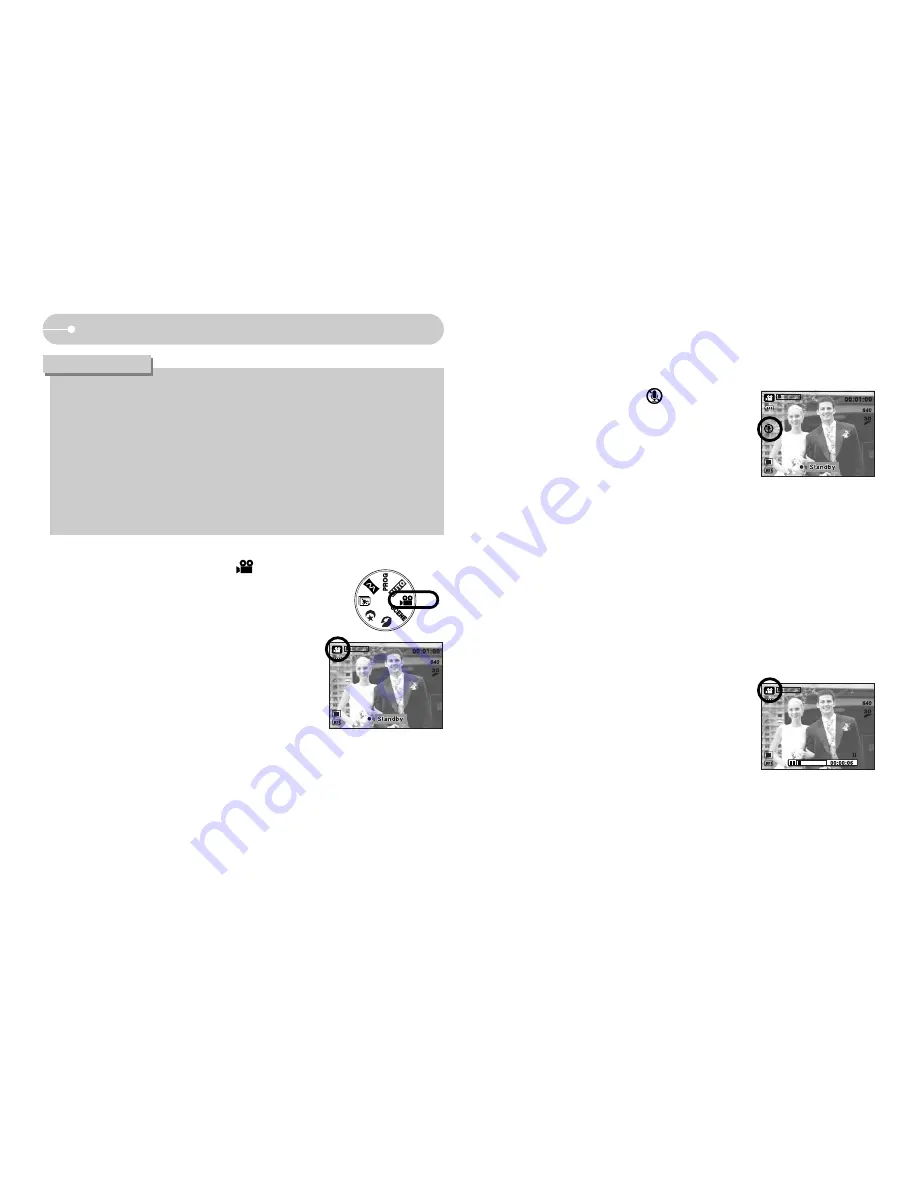
Pausing while recording a movie clip (Successive Recording)

This camera allows you to temporarily stop during unwanted scenes, while
recording a movie clip. Using this function, you can record your favourite scenes
into a movie clip without having to create multiple movie clips.

ƃ

Using Successive Recording 

1. Press the shutter button and movie clips are

recorded for as long as the available recording
time allows. Movie clips will still be recorded if the
shutter button is released.

2. Press the Pause button to pause recording. Press

the Pause button again to resume the recording.

3. If you wish to stop recording, press the shutter

button again.

ƈ

How to use the MOVIE CLIP mode (         )
A movie clip can be recorded for as long as the
available recording time of the memory capacity allows.

1. Select the MOVIE CLIP mode by rotating the

mode dial. (Available recording time will display on
the LCD monitor)

2. The MOVIE CLIP mode icon and available 

recording time will display on the LCD monitor.

3. Point the camera towards the subject and

compose the image by using the LCD monitor.
Press the shutter button and movie clips are
recorded for as long as the available recording
time allows. Movie clips will still be recorded if the
shutter button is released.

If you wish to stop recording, press the shutter button again.
* Image size and type are listed below.
- Image size : 640X480, 320X240 (Selectable)  
- File type

:  *.avi (MPEG-4)

ƈ

Recording the movie clip without voice
You can record the movie clip without voice.

1. Press the Up button and the (        ) icon will

display on the LCD monitor.

2. Press the shutter button and movie clip is recorded

for as long as the available recording time without
voice allows.

3. To stop the recording, press the shutter button

again.

ŝ

18

Ş

Starting the recording mode

ƃ

If the close-up, sunset, dawn or fireworks mode is selected, camera shake might
occur. If this is the case, use a tripod or other firm support to eliminate this.

ƃ

In the [Children] and [Close up] scene mode, the Continuous Automatic
Focusing (CAF) function will be activated and the CAF icon is displayed at
the bottom of the LCD monitor. 

ƃ

Continuous automatic focusing : The camera keeps focusing while the
object is moving even if the shutter button is not slightly pressed. Note that
using the Continuous automatic focusing uses more battery than the
Automatic focusing does.

INFORMATION

[MOVIE CLIP mode]

[ MOVIE CLIP mode ]

[Successive recording of a

movie clip]

;

;\\WWXX"";

;PP]]\\\\MMZZ:

:-

-+

+"

Содержание Digimax L80

Страница 1: ...sung Camera This manual will guide you through using the camera including capturing images downloading images and using the application software Please read this manual carefully before using your new camera User Manual ENGLISH ...

Страница 2: ...red trademarks of their respective companies ƈ Use this camera in the following order ƃ If you use a card reader to copy the images on the memory card to your PC the images could be damaged When transferring the images taken with the camera to your PC be sure to use the supplied USB cable to connect the camera to your PC Please note that the manufacturer holds no responsibility for loss or damage ...

Страница 3: ...he risk of explosion ƈ Should any form of liquid or a foreign object enter the camera do not use it Switch off the camera and then disconnect the power source You must contact your dealer or Samsung Camera Service centre Do not continue to use the camera as this may cause a fire or electric shock ƈ Do not insert or drop metallic or inflammable foreign objects into the camera through access points ...

Страница 4: ...ystem chart 4 ƃIdentification of features 5 ƈFront Top 5 ƈBack Bottom 6 ƈBottom 5 function button 7 ƈSelf timer lamp 7 ƈCamera Status Lamp 7 ƈMode icon 8 ƃConnecting to a Power Source 8 ƈUsing the AC Charger 9 ƃInserting the memory card 10 ƃInstructionsonhowtousethememorycard 11 ƃWhen Using the Camera for the First Time 13 ƃLCD monitor indicator 14 ƃStarting the recording mode 15 ƈHow to use the A...

Страница 5: ...r later ҮMac OS 9 0 10 4 Forplayingbackamovieclip MacOS 10 1orlater MPlayer VLCMediaPlayer ҮMinimum 64MB RAM Ү110MB of available hard disk space ҮUSB port ҮCD ROM drive Software CD see p 73 Camera strap User manual Product warranty Camera case SD memory card MMC see p 10 DPOF compatible printer see p 54 PictBridge compatible printer see p 57 Computer see p 76 Included items Rechargeable battery SL...

Страница 6: ...ŝ5Ş Identification of features Front Top Camera strap eyelet Shutter button Power button Flash Speaker Lens Lens cover Self timer lamp Auto focus lamp Microphone Remote control sensor Mode dial ...

Страница 7: ... Bottom LCD monitor USB AV connection terminal 5 function button E Effect button button DELETE button Play mode button Printer button Zoom T button Digital zoom Camera status lamp Zoom W button Thumbnail Camera strap eyelet Tripod socket ...

Страница 8: ...essing the shutter button of remote control will allow an interval of 2 seconds before the image is taken Blinking Blinking Blinking Blinking ƈ Camera Status Lamp Status Description The lamp turns on and off when the camera is ready to take a picture The lamp blinks while saving the image data and turns off when the camera is ready to take a picture The lamp blinks The lamp lights up LCD monitor t...

Страница 9: ...y charged battery 640X480 image size 30fps frame rate ƈ Number of images and battery life Using the SLB 0837 ſ These figures are measured under Samsung s standard conditions and shooting conditions and may vary depending on the user s methods ƈ You should use the rechargeable battery SLB 0837 supplied with the camera Be sure to charge the battery before using the camera ƈ Insert the battery as sho...

Страница 10: ...dition that are displayed on the LCD monitor Battery status Battery indicator Fully charged Low capacity recharge or use spare battery Low capacity recharge or use spare battery Low capacity recharge or use spare battery Before turning on the camera power with an AC Charger insert a rechargeable battery that had been charged for at least 10 minutes If you have access to a main supply using an AC C...

Страница 11: ...battery CAUTION ƈ Charging LED of the AC Adapter ƃ A USB cable for transmitting data can t be used for charging the rechargeable battery ƃ A USB cable for recharging the battery is optional When the USB cable for recharging the battery is inserted into the connection terminal of the camera you can charge the battery and transmit data at the same time ƈ Charging time When the camera is turned off U...

Страница 12: ... the memory card in its case when not in use ƃ During and after periods of extended use you may notice that the memory card is warm This is perfectly normal ƃ Do not use a memory card that is used in another digital camera To use the memory card in this camera format the memory card using this camera ƃ Do not use a memory card formatted by another digital camera or memory card reader ƃ If the memo...

Страница 13: ... a picture ƈ When using a 20MB internal memory the specified shooting capacity will be as follows These figures are approximate as image capacities can be affected by variables such as subject matter and memory card type The recording times can be changed by the zoom operation The zoom button doesn t operate while recording movies ƃ Don t remove the memory card when the camera status lamp is blink...

Страница 14: ...setup In all other instances the cursor will be shifted to the left of its current position UP DOWN button changes the value of each item ƃ Setting up the language 1 Select the Language menu by pressing the UP DOWN button and press the RIGHT button 2 Select the desired sub menu by pressing the UP DOWN button and press the OK button When the settings are complete press the MENU button twice to exit...

Страница 15: ...tering p 38 9 Card inserted indicator 10 Continuous auto focus p 18 11 Auto focus frame 12 Camera shake warning p 19 13 Date Time 2006 04 01 01 00 PM p 62 14 Exposure compensation p 35 15 White Balance p 34 16 ISO p 33 17 RGB RGB p 33 18 Sharpness p 39 19 Image quality Frame rate p 37 38 20 Image size p 37 Numberofavailableshotsremaining 6 p 12 Remainingtime Movieclip Voicerecording 00 01 00 01 00...

Страница 16: ...serted an image will be stored on the memory card 3 Close the battery chamber cover 4 Press the power button to turn on the camera If the date time that is displayed on the LCD monitor is incorrect reset the date time before taking a picture 5 Select the AUTO mode by rotating the mode dial 6 Point the camera towards the subject and compose the image by using the LCD monitor 7 Press the shutter but...

Страница 17: ...e or normal angle mode by using this button 1 Select the Wide angle mode by rotating the mode dial 2 The screen size will be changed as shown 3 Point the camera towards the subject and compose the image by using the LCD monitor 4 Press the shutter button to capture an image ſ When you select the wide angle mode sub menus of the SIZE menu are changed For details of the sub menu changes refer to the...

Страница 18: ...f fast moving objects for example children Landscape To take pictures of distant scenery Close up Close up shooting for small objects such as plants and insects Text Use this mode to shoot a document Sunset For taking pictures of sunsets Dawn Daybreak scenes Backlight Portrait without shadows caused by backlight Firework Firework scenes Beach Snow For ocean lake beach and snow scape scenes ƈ How t...

Страница 19: ... recorded for as long as the available recording time allows Movie clips will still be recorded if the shutter button is released If you wish to stop recording press the shutter button again Image size and type are listed below Image size 640X480 320X240 Selectable File type avi MPEG 4 ƈ Recording the movie clip without voice You can record the movie clip without voice 1 Press the Up button and th...

Страница 20: ... shutter button ƈ The available recording time may vary depending on shooting conditions and camera settings ƈ When the Flash Off or Slow synchro mode is selected in a low lighting condition the camera shake warning indicator may appear on the LCD monitor In this case use a tripod support the camera on a solid surface or change to flash shot mode ƈ Shooting against the light Taking a picture again...

Страница 21: ...ndition of the flash Pressing the shutter button down fully takes and stores the image If you select voice memo recording the recording will start after the camera has finished storing the image data Shutter button ƃ If the menu is not displayed this button works as the OPTICAL ZOOM or DIGITAL ZOOM button ƃ This camera has a 3X optical zoom and a 10X digital zoom function Using both will offer a t...

Страница 22: ...he digital zoom may take a little longer for the camera to process Allow time for this to take place ƃ The digital zoom cannot be used in movie clip shots ƃ You may notice a decrease in image quality when using the digital zoom ƃ To view a clearer digital zoom image press the shutter button halfway at the maximum 3X optical zoom position and press the zoom T button again ƃ The digital zoom can t b...

Страница 23: ...ton will stop the voice memo ƃ A distance of 40cm between you and the camera microphone is the best distance to record sound INFORMATION Macro Down button ƈ While the menu is showing press the DOWN button to move from the main menu to a sub menu or to move down the sub menu When the menu is not showing you can use the MACRO DOWN button to take macro pictures The distance ranges are shown below Pre...

Страница 24: ...us frame 2 Press the SHUTTER button halfway When the green auto focus frame lights up it means the camera is focused on the subject Be careful not to press the SHUTTER button all the way down to avoid taking an unwanted picture 3 With the SHUTTER button still pressed down only halfway move the camera to recompose your picture as desired and then press the SHUTTER button completely to take the pict...

Страница 25: ...ng an image in poorly lit conditions with the flash there may be a white speck in the captured image The speck is caused by the reflecting of the flash light from the atmospheric dust It is not camera malfuction INFORMATION ƃ Flash range Unit m ƈ When the menu is displayed on the LCD monitor pressing the LEFT button makes the cursor shift to the left tab ƈ When the menu is not displayed on the LCD...

Страница 26: ... conjunction with a slow shutter speed in order to obtain the correct exposure When you take an image in a condition with poor light the camera shake warning indicator will display on the LCD monitor We recommend using a tripod for this function The flash does not fire Select this mode when capturing images in a place or situation where flash photography is prohibited When you capture an image in ...

Страница 27: ... will be taken after the specified time has elapsed ƃ Description of Self timer Remote mode Icon Mode Description Remote 10s 2s Double You can take a picture by remote control instead of using the shutter button of the camera Pressing the shutter button of remote control will allow an interval of 2 seconds before the image is taken Pressing the shutter button will allow an interval of 2 seconds be...

Страница 28: ...cond interval for the remaining 2 seconds ƃIf you operate the Self timer button and Play mode button during the self timer operation the self timer function is canceled ƃUse a tripod to prevent camera shake INFORMATION ƈ MENU button When you press the MENU button a menu related to each camera mode will be displayed on the LCD monitor Pressing it again will return the LCD to the initial display A m...

Страница 29: ...s preset focus frames composite shooting photo frame are cancelled automatically ƈ Even if the camera is turned off the special effect setting will be preserved To cancel the special effect select the sub menu in the Colour menu and select the sub menu in the rest special effect menu E Effect button O O O O O X X O X X X X O X X X X O X X O X X X X O O O O O O O O O O O O O O O O X X X X Scene mod...

Страница 30: ...HighLight Capture Shutter Edit Special Effect Preset focus frames Capture Shutter Edit Capture Shutter Edit Capture Shutter Move ƃ Moving and changing the focus frame You can change the focus frame after selecting a Range menu 1 Point the camera towards the subject and compose the image by using the LCD monitor 2 Press the button 3 The colour of focus frame turns white Press the Up Down Left Right...

Страница 31: ...ombine 2 4 different shots in a still image 1 Press the E button in the available camera modes 2 Select the menu by pressing the Left Right button 3 Select a desired sub menu by pressing the Up Down button and press the OK button cancels the composite shooting 2 different shots are combined in a still image 3 different shots are combined in a still image 4 different shots are combined in a still i...

Страница 32: ...e OK Del Moving backward to the 2nd shot Save OK Del After taking the 2nd shot again Save OK Del Deleting the 2nd shot The final picture Pressing the Shutter button ƈYou can add 9 types of frame like borders to a still image you want to capture ƈDate Time information will not be printed on the stored image taken with Photo Frame menu 4 The photo frame will appear Press the shutter button to captur...

Страница 33: ... 3 Select a desired sub menu by pressing the UP DOWN button and press the OK button Movie clip frame stabiliser function becomes disabled Reduces camera shake during movie recording The recording frame range will become narrower than when you select the menu Pre view frames may not display smoothly on the LCD monitor Stabilizer Main menu Sub menu Available camera mode RGB R Red G Green B Blue ISO ...

Страница 34: ...T buttons to select the desired ISO sensitivity value AUTO The camera s sensitivity is automatically changed by variables such as lighting value or subject brightness ƈ ISO You can select the ISO sensitivity when taking pictures The speed or specific light sensitivity of a camera is rated by ISO numbers button ƈ RGB Allows the user to adjust the R Red G Green and B Blue values of the images to be ...

Страница 35: ...The white balance menu bar will appear as shown 2 Use the LEFT and RIGHT buttons to set the white balance to the desired value The value you set wil be displayed on the LCD monitor AUTO The camera automatically selects the appropriate white balance settings depending on the prevailing lighting conditions DAYLIGHT For taking images outside CLOUDY For taking images under a cloudy and overcast sky Fl...

Страница 36: ...P and DOWN buttons to select the exposure compensation icon The exposure compensation menu bar will appear as shown 2 Use the LEFT and RIGHT buttons to set the desired exposure compensation factor button ƈ Long Time shutter This camera automatically adjusts the shutter speed and aperture values to the shooting environment However in NIGHT SCENE mode you can set the shutter speed and aperture value...

Страница 37: ...rmal METERING Multi Spot SIZE 3264X2448 3072X2304 2816X2112 2592X1944 2272X1704 2048X1536 SIZE 3264X2448 3072X2304 2816X2112 2592X1944 2272X1704 2048X1536 ƈ You can use the menu on the LCD monitor to set up recording functions In any mode with the exception of VOICE RECORDING mode pressing the MENU button displays the menu on the LCD monitor ſ The menu will not be displayed on the LCD monitor in t...

Страница 38: ...ign rule for Camera File system ƃ JPEG Joint Photographic Experts Group JPEG is the image compression standard developed by the Joint Photographic Experts Group This type of compression is most commonly used for compressing photos and graphics because it can compress the files efficiently INFORMATION ƈ You can select the image size appropriate for your application Icon 3264X 3072X 2816X 2592X 2272...

Страница 39: ... be metered for light This is suitable when the subject in the centre is exposed correctly regardless of the back lighting ſ If the subject is not in the centre of the focus area do not use the spot metering as this may result in an exposure error In this circumstance it is better to use exposure compensation ƈ You can select frame rate and take continuous images in the Motion capture mode 1SEC ta...

Страница 40: ...le Take one picture only Continuous Images will be taken continuously until the shutter button is released The shooting capacity depends on the memory AEB Take three pictures in a series in different exposures short exposure 1 3EV standard exposure 0 0EV and over exposure 1 3EV Use the mode if it is hard to decide exposure of the object ſ High resolution and picture quality increases file saving t...

Страница 41: ...s displayed on the LCD monitor ƃ Playing back a still image 1 Select the PLAY mode by pressing the play mode button 3 Select an image that you want to play back by pressing the LEFT RIGHT button ſ Press and hold the Left or Right button to fast forward the images played ƈ In any mode with the exception of VOICE RECORDING mode you can check the recording status in the LCD monitor ƈ Idle mode If you...

Страница 42: ...e play mode button for more than 3 seconds changes the buzzer and start up sound setting to OFF even though you may have set these to ON ƃLightly press the shutter button in Play mode to switch to the currently set shooting mode INFORMATION Play Capture E ƈMovie clip capture function capture still images from the movie clip ƃ How to capture the movie clip Steps 1 3 are the same as those for playin...

Страница 43: ...a new file name No The movie trimming will cancel ƃIf the time line bar passes by the start point by pressing the REW Left button the first frame of the movie clip will display ƃIf you don t specify the ending point of the movie clip the trimming confirmation window will display at the point of the last frame INFORMATION Pause Trimming Yes No Confirm OK ƃ Playing back a recorded voice Steps from 1...

Страница 44: ... view an image separately press the enlargement button Thumbnail Enlargement button Normal display mode Highlighted image Pressing the enlargement button Pressing the thumbnail button LCD monitor Indicator Using the camera buttons to set the camera ƈ The LCD monitor displays shooting information about the displayed image No Description Icon Page 1 Play mode icon 2 Battery p 9 3 Voice Memo p 22 4 P...

Страница 45: ...ed a loss of quality may occur ƃThe maximum enlargement rate in proportion to the image size Image size 8M 7M 6M 5M 4M 3M 2M 1M VGA X12 8 X12 0 X11 0 X10 1 X8 9 X8 0 X6 3 X4 0 X2 5 Maximum enlargementrate ƃTrimming You can extract part of the image that you want and save it separately 1 Select an image that you want to enlarge and press the enlargement button Press the Menu button and a message wi...

Страница 46: ...he voice memo button and the voice memo indicator will display The camera is now ready to record a voice memo 3 Press the shutter button to start recording and voice will be recorded to the still image for 10 seconds While the voice is recording the recording status window will be displayed as shown alongside 4 The recording can be stopped by pressing the shutter button again 5 The icon will be di...

Страница 47: ...sing the LEFT RIGHT button and press the DELETE button 2 A message will display as shown alongside on the LCD monitor 3 Select the sub menu values by pressing the LEFT RIGHT button and then press the OK button If Yes is selected deletes the selected images If No is selected cancels Delete Image ƃDeleting Images in Thumbnail Display Mode 1 Use the UP DOWN LEFT and RIGHT buttons to select the image ...

Страница 48: ...y OK button When the menu is displayed on the LCD monitor the OK button is used for confirming data that is changed by using the 5 function button Printer button Left Right Menu OK button ƈ If you select Computer sub menu in the USB setup menu Connecting Computer message will display when you connect the camera to your printer and the connection will not be established In this case press the Print...

Страница 49: ...nt button Up Down Left Right button Play Pause button MENU OK button When you press the MENU button the play mode menu will be displayed on the LCD monitor Pressing it again will return the LCD to the initial display When the menu is displayed on the LCD monitor the OK button is used for confirming data that is changed by using the 5 function button Up Down Left Right button In play mode you can s...

Страница 50: ... Menu tab Main menu Sub menu Secondary menu Page Right 90 Left 90 180 Horizontal Vertical Standard Select All Pics Cancel Index No Yes p 54 Size Select All Pics Cancel No Yes Full Basic OSD Off p 56 p 56 p 53 COPY TO CARD Unlock Lock Menu tab Main menu Sub menu Secondary menu Page Show Play Repeat Play Interval 1 3 5 10 sec OFF Select All Pics Select All Pics 3072 X 2304 2816 X 2112 2592 X 1944 22...

Страница 51: ...ithout prior notice Menu tab Main menu Sub menu Secondary menu Page One Pic All Pics Yes No Auto PostCard Card 4X6 L 2L Letter A4 A3 Auto Full 1 2 4 8 9 16 Index IMAGES AUTO SET CUSTOM SET Size p 57 p 58 p 58 Layout Menu tab Main menu Sub menu Secondary menu Page Auto Plain Photo FastPhoto Auto Draft Normal Fine Auto Date Off On Auto File Name Off On Standard Index Yes No Yes No Type p 58 Quality ...

Страница 52: ...epeat Play The slide show is repeated until cancelled 3 Press the OK button and the slide show will be started ƃ Setting play interval Set the slide show play interval 1 Select the Interval sub menu by pressing the UP DOWN button and press the RIGHT button 2 Use the Up Down buttons to select the desired interval 3 Press the OK button to save the configuration ƃ The loading time depends on the imag...

Страница 53: ...K W Unlock T ƈ Of all the files stored in the memory card the unprotected files in the DCIM subfolder will be deleted Remember that this will permanently delete unprotected images Important shots should be stored on a computer before deletion takes place The startup image is stored in the camera s internal memory i e not on the memory card and it will not be deleted even if you delete all files on...

Страница 54: ...art up image The resized image will have a new file name 1 Press the play mode button and press the menu button 2 Press the LEFT RIGHT button and select the RESIZE menu tab 3 Select a desired sub menu by pressing the UP DOWN button and press the OK button ƃ A large sized image can be resized to a smaller sized image but not vice versa ƃ Only JPEG images can be resized TIFF Movie clip AVI Voice rec...

Страница 55: ... angle image Some photo labs may not support the wide angle size print ƈ This function allows you to embed printing quantity information on a stored image 1 Press the play mode button and press the menu button 2 Press the LEFT RIGHT button and select the DPOF menu tab 3 Select the Standard menu by pressing the UP DOWN button and press the RIGHT button 4 Select a desired sub menu by pressing the UP...

Страница 56: ...ress the play mode button and press the menu button 2 Press the LEFT RIGHT button and select the DPOF menu tab 3 Select the Size menu by pressing the UP DOWN button and press the RIGHT button 4 Select a desired sub menu by pressing the UP DOWN button and press the OK button Select Selection window for the print size of an image to be changed is displayed Up Down Left Right Select an image Zoom W T...

Страница 57: ...the system will return to the playback mode Please be sure to delete any unnecessary files to free up space before inserting the memory card into the camera ƃ When you move the images that are stored in the internal memory by doing COPY TO CARD to the card the next number of file names will be created in the card to avoid duplication of the file name When the Reset of the File setup menu is set Th...

Страница 58: ...rom Step 2 and onward Or press the Printer button and the camera is connected to the printer displaying the Connecting Printer message But the camera may not connect to the printer depending on the manufacturer and model of the printer IMAGES One Pic All Pics Exit MENU Move Print Menu OK PictBridge Picture Selection ƈ You can use the USB cable to connect this camera to a printer that supports Pict...

Страница 59: ...ttons to select the CUSTOM SET menu tab 2 Use the UP and DOWN buttons to select the desired sub menu value and then press the RIGHT button 3 Use the UP and DOWN buttons to select the desired sub menu value and then press the OK button ſ Some menu options are not supported in all manufacturer and printer models If not supported the menus are still displayed in the LCD but are not selectable ſ If th...

Страница 60: ...d DOWN buttons to select the desired sub menu value and then press the OK button If Yes is selected All print and image settings will be reset If No is selected Settings will not be reset ſ Default print setting varies depending on the printer manufacturer For your printer s default setting refer to the user s guide that came with your printer ƈ DPOF Print This allows you to directly print the fil...

Страница 61: ...High Computer Printer Off On Dark Normal Bright NTSC PAL Quick View off 0 5 1 3sec p 65 No Yes AF Lamp LCD Video Out Reset USB p 63 p 63 p 63 p 64 p 64 p 65 Sound Menu tab Main menu Sub menu Secondary menu Page Series Reset Off 1 3 5 10min p 61 No Yes 06 04 01 13 00 yy mm dd Off dd mm yy mm dd yy Off Date Date Time ENGLISH FRANÇAIS DEUTSCH ESPAÑOL ITALIANO P CCK PORTUGUÊS DUTCH DANSK SVENSKA SUOMI...

Страница 62: ...FRANÇAIS DEUTSCH ESPAÑOL Back Set OK Setup menu ƃ Assigning File Names 1 In any mode with the exception of Voice Recording mode press the MENU button 2 Press the LEFT RIGHT button and select the SETUP menu tab 3 Select the File menu by pressing the UP DOWN button and press the RIGHT button 4 Select a desired sub menu by pressing the UP DOWN button and press the OK button Series New files are named...

Страница 63: ...n from another camera Always format the memory card using this camera If you insert a memory card that has been formatted using other cameras memory card readers or PCs you will get a Card Error message Setting up the Date Time Date type ƈ You can change the date and time that will be displayed on the captured images and set up the date type ƃ Setting Date Time Selecting Date Format RIGHT button S...

Страница 64: ... to connect the camera to your printer Auto Focus lamp ƈ You can turn on and off the Auto Focus lamp ƃ Sub menus Off The AF lamp will not light up in a low light condition On The AF lamp will light up in a low light condition Setup menu Imprinting the recording date ƈ There is an option to include DATE TIME on still images ƃ Sub menus Off The DATE TIME will not be imprinted on the image file Date ...

Страница 65: ...e the same as those indicated on the LCD monitor Setup menu LCD brightness ƈ You can adjust the LCD brightness ƃ LCD sub menu Dark Normal Bright Selecting Video out type ƈ The Movie output signal from the camera can be NTSC or PAL Your choice of output will be governed by the type of device monitor or TV etc to which the camera is connected PAL mode can support only BDGHI ƈ Connecting to an extern...

Страница 66: ...TUP USB AF Lamp LCD Video Out Quick View Back Set OK off 0 5 sec 1 sec 3 sec Start up image ƈ You can set up a start up image start up sound and shutter sound Every camera working mode with the exception of Voice recording mode has the MyCAM menu The items indicated by are default settings Menu tab Main menu Sub menu Page Off LOGO User Image 1 User Image 2 Off Sound 1 Sound 2 Sound 3 Off Sound 1 S...

Страница 67: ... is high magnetism or excessive vibration Areas with high explosives or highly flammable materials ƈ Do not leave this camera in places subject to dust chemicals like naphthalene and mothball high temperature and high humidity Keep this camera with silica gel in a hermetically sealed box when not planning to use the camera for a long period of time ƈ Sand can be particularly troublesome to cameras...

Страница 68: ...t or going on a trip you should check the camera condition Take a picture to test the camera and prepare a spare battery Samsung cannot be held responsible for camera malfunctions Important notes ƈ Extremes in temperature may cause problems If the camera is transferred from a cold to a warm and humid environment condensation can form on the delicate electronic circuitry If this occurs turn the cam...

Страница 69: ... error ƍ Delete the erroneous files ϛMemory card error ƍ Contact a camera service centre Warning indicator Before contacting a service centre Low Battery ϛThere is low battery capacity ƍ Insert a fully charged battery Low Light ϛWhen taking pictures in dark places ƍ Take pictures in Flash Photography mode The camera doesn t switch on ϛThere is low battery capacity ƍ Insert charged battery p 8 ϛBat...

Страница 70: ...memory card The images don t play back ϛIncorrect file name Violation of DCF format ƍ Do not change the image file name Battery power quickly drains ϛThe Camera is being used in low temperatures ƍ Keep the camera in warm conditions i e inside a coat or jacket and only remove it in order to take pictures Camera does not take images when pressing the Shutter button ϛThere is insufficient memory capa...

Страница 71: ...E XP Mac OS 9 0 10 4 Alternatively the PC does not support USB ƍ Install Windows 98 98SE 2000 ME XP Mac OS 9 0 10 4 to PC that supports USB ϛThe camera driver is not installed ƍ Install a USB Storage Driver ƈ Image Sensor Type 1 1 8 CCD Effective Pixel Approx 8 1Mega pixel Total Pixel Approx 8 4Mega pixel ƈ Lens Focal Length SHD f 7 4 22 2mm 35mm film equivalent 35 105mm F No F2 8 5 1 Digital Zoom...

Страница 72: ...a Red Green Blue Negative ƈ White Balance Auto Daylight Cloudy Fluorescent_H Fluorescent_L Tungsten Custom ƈ Voice Recording Voice Recording Max 1 hour Voice Memo in Still Image Max 10 sec ƈ Date Imprinting Date Date Time Off user selectable ƈ Shooting Still Image ŋModes Auto Program Wide Motion Capture Night Portrait Scene Movie ŋScene Children Landscape Close up Text Sunset Dawn Backlight Firewo...

Страница 73: ...s a camera driver and image editing software tool for Windows ҮUnder no circumstances should all or part of either the software or the user manual be reproduced ҮCopyrights for software are licensed only for use with a camera ҮIn the unlikely event of a manufacturing fault we will repair or exchange your camera We cannot however be held responsible in any way for damage caused by inappropriate use...

Страница 74: ...he Internet Explorer INFORMATION ƈ Camera driver This enables images to transfer between the camera and PC This camera uses the USB Storage Driver as the camera driver You can use the camera as a USB card reader After installing the driver and connecting this camera to the PC you can find Removable Disk in Windows Explorer or My Computer A USB Storage Driver is provided only for Windows A USB Driv...

Страница 75: ...er install the XviD codec ſ The XviD codec is distributed according to and under the terms and conditions of the GNU General Public License and everyone can copy modifiy and distribute this codec freely but WITHOUT ANY WARRANTY IMPLIED OR EXPRESSED OF MERCHANTABILITY OR FITNESS FOR A PARTICULAR PURPOSE provided however that you have to follow the GNU General Public License whenever you are distrib...

Страница 76: ...ŝ75Ş Setting up the application software 4 Install the Digimax Master Digimax Reader and Adobe Reader in order ...

Страница 77: ...enu will disappear 6 Connect the PC to the camera with the USB cable SETUP Date Time Imprint Sound USB AF Lamp Back Set OK Computer Printer 6 Turn the camera power on The Found New Hardware Wizard will open and the computer will recognise the camera ſ If your OS is Windows XP an image viewer program will open If the download window of Digmax Master opens after starting Digimax Master the camera dr...

Страница 78: ...lected file Copy copies files 5 Click a folder where you want to paste the file ƈ Connecting the camera to a PC ƈ Disconnecting the camera and PC Refer to page 78 Removing the removable disk ſIf you selected Printer in Step 4 when you connect the camera to your printer the Connecting Printer message will display and the connection will not be established In this case disconnect the USB cable and t...

Страница 79: ...evice window will open Select the USB Mass Storage Device and click the OK button 2 Double click the Unplug or Eject Hardware icon on the task bar Double click ƃ We recommend that you should copy the images to the PC to view them Opening images directly from the removable disk may be subject to unexpected disconnection ƃ When you upload a file that is not taken by this camera to the Removable Disk...

Страница 80: ...C VideoLAN Client media player CAUTION Using the USB Driver for MAC 5 A Safe to Remove Hardware window will open Click the OK button 6 A Unplug or Eject Hardware window will open Click the Close button and the removable disk will be removed safely 7 Unplug the USB cable 1 A USB Driver for MAC is not included with the software CD as MAC OS supports the camera driver 2 Check the MAC OS version durin...

Страница 81: ... the captured images select the Select All button Select desired folder in the window and click the Select All button You can save captured images and selected folder If you click the Cancel button downloading will be cancelled Removing the USB Driver for Windows 98SE ƈ To remove the USB driver refer to the process shown below 4 Disconnect the USB cable 5 Remove the KENOX X80 Digimax L80 on the Ad...

Страница 82: ...ay window Shows the folder location of the selected image ڿ Image display window Images of the selected folder are displayed ſ Refer to the Help menu in Digimax Master for further information 4 Select a destination and make a folder to save downloaded images and folders Folder names can be made in order of date and images will be downloaded Folder name will be made as you want and images will be d...

Страница 83: ...Some movie clips that were compressed with a codec that is not compatible with the Digimax Master can t play back in the Digimax Master ſ Refer to the Help menu in Digimax Master for further information ƃ Image edit You can edit the still image Image edit functions are listed below ڹ Edit menu You can select the following menus Tools You can resize or crop the selected image See the Help menu Adju...

Страница 84: ...back a movie on this camera 1 Select a movie for playing back on the camera by pressing the Add button Inserteffectsandeditthemovie Tosavetheeditedmovie pressthe Make button 2 Select Movie for camera video type 3 Select Camera option Output location File name and press the Make button Frame size Selecting the width and height of the frame Frame rate Selecting the frame rate per second File locatio...

Страница 85: ...ormation ƃThis program only recognises Korean English and Russian If this program scans a letter that is not shown on the Keyboard it will not be recognised INFORMATION 4 Select the image you want to save as a text file Only an image that was taken with a SAMSUNG camera can be opened 5 Click the Area Analysis icon to scan the image 6 Part of the image you selected will be displayed as shown 7 Clic...

Страница 86: ...era to the USB port located on the back of the computer ƈ When the movie clip doesn t play back on the PC ſ When the movie clip recorded by the camera doesn t play back on the PC the causes are mostly due to the codec installed on the PC FAQ ƈ Please check the following if the USB connection malfunctions Case 1 USB cable is not connected or it is not the supplied USB cable ƍ Connect the supplied U...

Страница 87: ...only the Digimax Master the problems mentioned above occasionally happen Close the Digimax Master program by clicking the Digimax Master icon on the Taskbar Install all the application programs included in the software CD ƃ When codec for playing back the movie file isn t installed ƍ Install the codec as listed below Installing codec for Windows 1 Insert the CD provided with the camera 2 Run the w...

Страница 88: ...uipment ƈ ƈ Declaration of Conformity Trade Name SAMSUNG TECHWIN Model No Digimax L80 Responsible Party Samsung Opto Electronics America INC Address 40 Seaview Dr Secaucus NJ 07094 Telephone No 201 902 0347 This device complies with Part 15 of the FCC Rules Operation is subject to the following two conditions 1 This device may not cause harmful interference and 2 this device must accept any interf...

Страница 89: ...ŝ88Ş MEMO MEMO ...

Страница 90: ...1 4320 4510 www samsungphoto fr SAMSUNGOPTO ELECTRONICSGMBH AMKRONBERGERHANG6 D 65824SCHWALBACH TS GERMANY TEL 49 0 6196665303 FAX 49 0 6196665366 www samsungcamera de TIANJINSAMSUNGOPTO ELECTRONICSCO LTD 7PINGCHANGROADNANKAIDIST TIANJIN P RCHINA POSTCODE 300190 TEL 86 22 2761 4599 FAX 86 22 2769 7558 www samsungcamera com cn SAMSUNGOPTO ELECTRONICSUKLIMITED SAMSUNGHOUSE1000HILLSWOODDRIVE HILLSWOO...

Отзывы: