background image

Installing your Microwave Oven

8

GB

This microwave oven can be placed almost anywhere (kitchen
work surface or shelf, movable trolley, table).

For your personal safety, this appliance must be:

Properly earthed (3-pin plug)

Plugged into a standard 230 Volt, 50 Hz,
AC earthed socket

1

Install the oven on a flat, level, stable surface. Make sure there is adequate
ventilation for your oven by leaving at least 10cm(four inches) of space
behind and on the sides of the oven and 20cm(eight inches) above.

2

Never block the air vents as the oven may overheat and automatically
switch itself off. It will remain inoperable until it has cooled sufficiently.

3

Remove all packing materials inside the oven. 

4

Plug the cable into a 3-pin, earthed socket. If the power cable of this
appliance is damaged, it must be replaced by a special cable as supplied
from service centre.

Be sure to remove the protective film from outer case.
The protective film is on the outer case to prevent
scratches.
When installing or before using, be sure to remove it.

Outdoor Use
This microwave oven is not designed for outdoor use.
You should use it indoors only.

During Air Cooling
Do not turn power off while the cooling fan is automatically air-
cooling for 1min.

Recommendations

DO NOT install the microwave oven in
hot or damp surroundings.
Example: Next to a traditional oven or

radiator.

The power supply specifications of the
oven must be respected and any
extension cable used must be of the
same standard as the power cable
supplied with the oven.

Wipe the interior and the door seal
with a damp cloth before using your
microwave oven for the first time.

CM1029-EU-1  2/11/00 4:58 AM  Page 8

Содержание CM1029

Страница 1: ...MICROWAVE OVEN CM1029 1000Watts Owner s Instructions P 30sec Code No CM1029 EU 1 2 11 00 4 58 AM Page 1...

Страница 2: ...Pads Programming 14 How to Operate Memory Cooking 15 Stopping the Cooking 15 Double Quantity Pad Programming 16 How to Operate Double Quantity Pad 17 Controlling Beep Tone 17 Error Codes 17 Hidden Key...

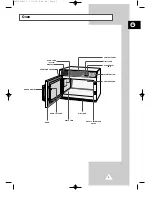
Страница 3: ...TERLOCK HOLES PLATE TRAY P 30sec DOOR HANDLE DOOR LATCHES OVEN LAMP 230V 25W OVEN LAMP COVER CONTROL PANEL START BUTTON CEILING COVER STOP CANCEL PAD 30sec PAD DOOR DISPLAY AIR FILTER CM1029 EU 1 2 11...

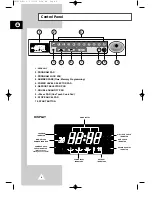
Страница 4: ...Cook Pad 9 STOP CANCEL PAD 10 START BUTTON 4 GB Control Panel TIME DISPLAY DEFROST INDICATORS DOUBLE QUANTITY INDICATOR DATA CHECK INDICATOR AIR FILTER CHECK INDICATOR POWER SOURCE CHECK INDICATOR Wh...

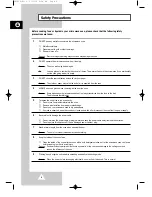
Страница 5: ...mpt be made to operate the oven with the door open or to tamper with the safety interlocks door latches or to insert anything into the safety interlock holes b Do not place any object between the oven...

Страница 6: ...not store flammable materials in the oven Remove wire twist ties from paper or plastic bags Do not use your microwave oven to dry newspapers If smoke is observed keep the oven door closed and switch o...

Страница 7: ...the container to the top and choose a container that is wider at the top than at the bottom to prevent the liquid from boiling over Bottles with narrow necks may also explode if overheated ALWAYS chec...

Страница 8: ...socket If the power cable of this appliance is damaged it must be replaced by a special cable as supplied from service centre Be sure to remove the protective film from outer case The protective film...

Страница 9: ...oven should be cleaned regularly to prevent grease and food particles from building up Inside and outside surfaces Door and door seals Plate tray ALWAYS ensure that the door seals are clean and the d...

Страница 10: ...ed to warm food Overheating may cause the containers polystyrene to melt Paper bags or newspaper May catch fire Recycled paper or metal trims May cause arcing Glassware Oven to tableware Can be used u...

Страница 11: ...ill stop and ON appears again Food may be removed from oven whilst the fan is still running 8 Open the door and take the food out 9 Close the door The oven lamp will go off Whilst in a heating cycle o...

Страница 12: ...o the specific power level indicated Power Level Max Time HIGH 25 min MEDIUM 40 min LOW 40 min HIGH DEFROST 50 min LOW DEFROST 50 min Power levels may be changed during the cooking reheating cycle by...

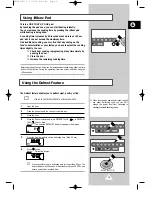
Страница 13: ...may only be added by using the 30sec button Using the Defrost Feature The Defrost feature enables you to defrost meat poultry or fish Use only containers that are microwave safe 1 Open the door 2 Pla...

Страница 14: ...l not operate or respond when you press a cooking time exceeding the maximum value It is not possible to set a cooking time for longer than the maximum time allowed on the chosen program The power lev...

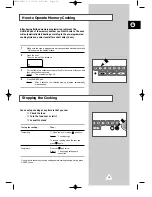
Страница 15: ...e it in the centre of the oven and then close the door securely Result The oven lamp will go off 4 Press NUMBER pad Result After 2 seconds the selected memory program automatically starts heating Stop...

Страница 16: ...aximum time allowed for each power level the oven does not operate exceeding the maximum time Double Quantity Factor Editing Double Quantity Pad Programming Feature Key Entry Display Remark Hold down...

Страница 17: ...Snd 0 No sound Default tone is Snd 2 Controlling Beep Tone 30sec Error Codes Error Items Code Error Beep Cause Remedy Cause Power frequency is other than 50 Hz Remedy Unplug the power cord plug and c...

Страница 18: ...n be set after data display Data display after 2 sec Number of times of use by memory program code Magnetron oscillating time total Hold together for 2 sec Unit 10 hrs Hold together for 2 sec Unit 1 h...

Страница 19: ...with very mild soap and water Do not use window cleaner as the front door can be scratched by harsh soap or cleaners Cleaning the Ceiling Cover 1 Hold side stoppers of ceiling cover with both hands a...

Страница 20: ...and then press NUMBER 3 pad Hold together for 2 seconds in order to save the new value This completes the programming of the air filter clean time 4 Press CANCEL pad to return to cooking mode After th...

Страница 21: ...ing the lamp cover You don t need to remove outer panel to replace lamp 2 Remove the lamp by rotating it clockwise 3 Replace with a new lamp by rotating it counter clockwise Lamp Cover Outer Panel Lam...

Страница 22: ...1 2 3 Add 60 75 ml cold water 4 5 tbsp Brussel sprouts 500 g Add 120 150 ml 8 10 tbsp water High 5 51 2 3 Carrots 500 g Cut into even sized slices High 41 2 5 3 Add 60 75 ml cold water 4 5 tbsp Cauli...

Страница 23: ...in Time min Plated Meal 350g Plate a meal of 2 3 chilled components Medium 31 2 41 2 3 chilled on a ceramic dish Reheat covered Chicken Curry 300 g Plate a meal of 2 chilled components Medium 21 2 31...

Страница 24: ...t in a deep ceramic plate chilled Stir several times during cooking Baked Beans 250 g Put the beans in a deep ceramic plate Medium 21 2 3 1 2 canned Reheat covered Stir during reheating Fresh Portion...

Страница 25: ...Cake 100 g 1pc Put the piece of cake on a ceramic Defrost 1 1 11 2 10 20 slight de plate Let stand until cream is frosting totally defrosted Fruit Cake 100 g 1pc Put the piece of cake on a Defrost 2...

Страница 26: ...t to change without notice Model CM1029 Power source 230 V 50 Hz Power consumption Microwave 1 700 W Output power 1 000W IEC 705 Operating frequency 2 450 MHz Dimensions W x H x D Outside 464 x 368 x...

Страница 27: ...27 GB Memo CM1029 EU 2 2 11 00 5 00 AM Page 27...

Страница 28: ...ELECTRONICS THIS APPLIANCE IS MANUFACTURED BY Printed in Korea CM1029 EU 2 2 11 00 5 00 AM Page 28...

Отзывы: