background image

GB

5

Cooking / Reheating

Make sure the oven is plugged into a properly earthed electrical outlet
and “ON” appears in the display window.
Open the door(The oven lamp will be turned on.).
Put the food into a suitable container, place it in the centre of the oven
and then close the door securely (The oven lamp will go off.).

Whilst heating, one press on

pad stops the oven. You can restart it

by pressing the

pad or a second press on

pad will cancel the

selected program. When it is NOT in a heating cycle, one tap on
pad cancels the selected program. You can set the power level first
and then the cooking time next, or vice versa. You can press +30sec
button one or more times in order to add the cooking time by 30
seconds.

When heating cycle is completed and you open the door, the oven
lamp automatically turns on and goes off 1 min later.

When you open the door whilst in a heating cycle, the oven stops
operating and the oven lamp automatically turns on for 1 min and
goes off 1 min later. If you leave the oven door open for more than 1
min, the oven beeps once every minute and after 5 min the power
source check indicator ‘ON’ appears in the display window.

When in a heating cycle, you can not change the power level or
heating time. But you can add 30 sec increments using the +30sec
pad. The dial may be rotated but this does not affect the current
operation and the display remains the same. It becomes effective next
time you set the oven manually after you finish the current heating. If
you want to change the current setting, firstly stop the heating by
using CANCEL pad and set desired power level and cooking time
again.
But when you are NOT in a heating cycle, you can change the power
level and heating time. Changed values are promptly shown in the
display.

The oven is designed not to work when power level is set to “0” mode
between the heating mode and the defrosting mode.

When you first plug in the power cord, the oven beeps once and all
the indicators show for 5 sec in the display window.

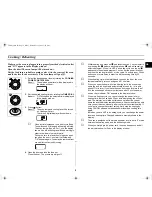
1.

Select the desired power level by rotating the COOKING
POWER CONTROL DIAL
.
Result :

The selected power level will be displayed in
the display window.

2.

Set the desired heating time by rotating the TIMER DIAL.
Result :

“ON” blinks and the selected time is displayed
in the display window.

3.

Press

button:

Result :

The oven lamp and cooling fan will be turned
on. Heating will start.
The time on digital display will count down.

When all time is elapsed, the end of cycle Beep
Tone will sound 4 times and all heating will stop.
The oven lamp will go off. For 1 min, the display
shows ‘0‘ and the cooling fan will keep working in
order to cool down the interior parts.
During the time, the fan will not stop even when
you open the door. 1 min later it will stop and
“ON” appears again. Food may be removed from
oven whilst the fan is still running.

4.

Open the door and take the food out.
Close the door. The oven lamp will go off.

CM1019_GB.fm Page 5 Friday, November 15, 2002 1:52 PM

Содержание CM1019

Страница 1: ...Reheating 5 Power Levels and Time Variations 6 Stopping the Cooking 6 Using 30sec Pad 6 Adjusting the Cooking Time 7 Using the Defrost Feature 7 Error Codes 8 Care of Your Microwave Oven 8 Replacemen...

Страница 2: ...and front face or allow food or cleaner residues to accumulate on sealing surfaces Ensure that the door and door sealing surfaces are kept clean by wiping after use first with a damp cloth and then w...

Страница 3: ...the temperature can equalize Stir during heating if necessary and ALWAYS stir after heating Take care when handling the container after heating You may burn yourself if the container is too hot A risk...

Страница 4: ...ever block the air vents as the oven may overheat and automatically switch itself off It will remain inoperable until it has cooled sufficiently 3 Remove all packing materials inside the oven 4 Plug t...

Страница 5: ...the same It becomes effective next time you set the oven manually after you finish the current heating If you want to change the current setting firstly stop the heating by using CANCEL pad and set de...

Страница 6: ...hat you can Check the food Turn the food over or stir it Leave it to stand If you want to cancel any cooking settings before starting cooking simply press CANCEL once Using 30sec Pad This is a ONE TOU...

Страница 7: ...microwave safe Open the door Place the frozen food in the centre of the plate tray Close the door Before operating the oven times can be increased decreased using either the TIMER dial or 30sec butto...

Страница 8: ...s of ceiling cover with both hands and pull them in and down Then take the ceiling cover out of the oven cavity 2 Rinse ceiling cover in soapy water or Food Sanitizer Solution 3 Be sure to replace the...

Страница 9: ...s filter in warm soapy water 4 Be sure to replace the Air Filter before using the oven If the Air Filter becomes clogged with debris this will cause an overheating problem on the oven Replacement of L...

Страница 10: ...r bags or newspaper Recycled paper or metal trims Can be used to warm food Overheating may cause the polystyrene to melt May catch fire May cause arcing Glassware Oven to table ware Fine glassware Gla...

Страница 11: ...d water 4 5 tbsp High 4 5 3 Cauliflower 500 g Cut into even sized florets Add 60 75 ml cold water 4 5 tbsp High 5 5 3 Green Beans 500 g Cut into slices Add 60 75 ml cold water 4 5 tbsp High 5 5 3 Pota...

Страница 12: ...widthways Reheat covered High 4 5 3 Bechamel Potatoes chilled 400 g Put bechamel potatoes on a flat ceramic plate Reheat covered Medium 5 6 3 Baked Potatoes ready cooked and chilled 500 g 2 x 250 g P...

Страница 13: ...m Cake slight de frosting 100 g 1pc Put the piece of cake on a ceramic plate Let stand until cream is totally defrosted Defrost 1 1 1 10 20 Fruit Cake defrosting warming 100 g 1pc Put the piece of cak...

Страница 14: ...solvents Take particular care when cleaning the door seals to ensure that no particles Accumulate Prevent the door from closing correctly Clean the microwave oven cavity right after each use with a m...

Страница 15: ...e without notice Note Model CM1019 Power source 230 V 50 Hz Power consumption Microwave 1700 W Output power 1000 W IEC 705 Operating frequency 2 450 MHz Dimensions W x H x D Outside Oven cavity 464 x...

Страница 16: ...CM1019_GB fm Page 16 Friday November 15 2002 1 52 PM...

Отзывы: