background image

GB

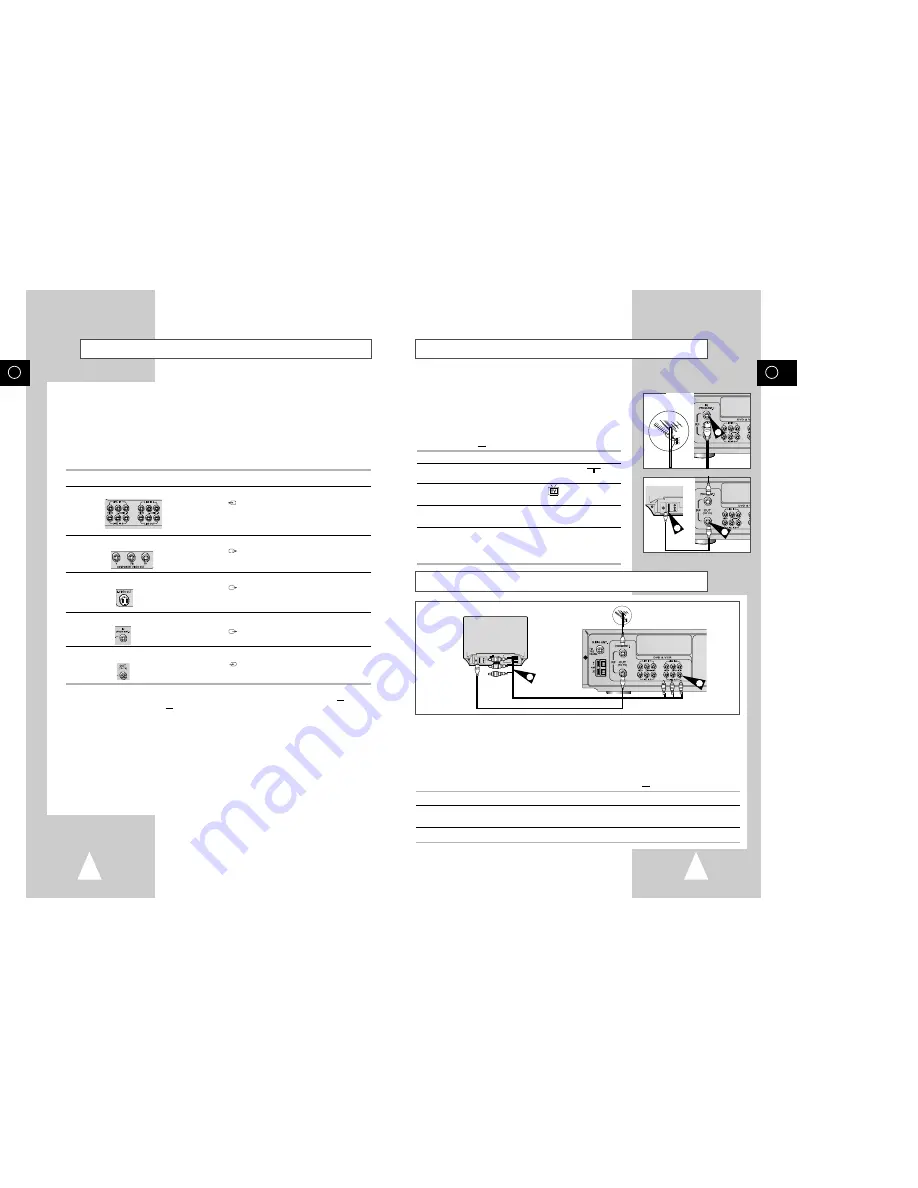
Connecting DVD-VCR to the TV using the Coaxial Cable

Connecting DVD-VCR to the TV using the RCA Cable

11

GB

Deciding How to Connect DVD-VCR

10

To receive television programmes a signal must be received from
one of the following sources:

An outdoor aerial

An indoor aerial

A cable television network

A satellite receiver

Make sure that both the television and the DVD-VCR are
switched off before connecting the cables.

1

Remove the aerial or network input cable from the television.

2

Connect this cable to the 75

coaxial socket marked 

on the 

rear of your DVD-VCR.

3

Plug the coaxial cable supplied into the 

socket on your 

DVD-VCR.

4

Plug the other end of the coaxial cable into the connector
previously used for the aerial on the television.

5

To obtain better quality pictures and sound on your television, you
can also connect your DVD-VCR to the television via the RCA
cable (see section below) if your television is equipped with this
type of connection.

You can connect your DVD-VCR to the television using the RCA cable if the appropriate input is available
on the television. You thus:

Obtain better quality sound and pictures

Simplify the setting up procedure of your DVD-VCR

Regardless of the type of connection chosen, you must always connect the coaxial cable supplied.
Otherwise, no picture will be visible on the screen when the DVD-VCR is switched off.

Make sure that both the television and the DVD-VCR are switched off before connecting the cables.

1

Connect the coaxial cable as indicated in the above section.

2

Connect one end of the RCA Audio/Video cable to the Video output and Audio L, R output socket on the rear
of the DVD-VCR.

3

Plug the other end into the appropriate connector on the television.

You must take into account various factors when connecting audio or video systems:

Types of connectors available on your systems

Systems connected permanently to the DVD-VCR (satellite receiver for example) or
temporarily (camcorder for example)

Your DVD-VCR is equipped with the following connectors.

Connector

Location

Type

Direction

Recommended Use

LINE

Rear

Audio/Video RCA

In/Out

Television

Other VCR

COMPONENT Rear

RCA

Out

COMPONENT out (DVD only)

output

S-VIDEO Rear

S-JACK

Out

S-Video out (DVD only)

output

OUT TO TV

Rear

75 

Out

Television 

coaxial

IN FROM ANT. Rear

75 

In

Aerial

coaxial

Cable television network

Satellite receiver

Whenever you connect an audio or video system to your DVD-VCR, ensure that all
elements are switched off.

Refer to the documentation supplied with your equipment for detailed connection
instructions and associated safety precautions.

3

2

TV

4

Aerial

RF coaxial cable

2

3

TV

Содержание CHT-1010

Страница 1: ...DVD VCR CHT 1010 Instruction Manual www samsungvcr com PAL NTSC ...

Страница 2: ...on DVD VCD 58 Recalling a Marked Scene 58 Clearing a Mark 58 Using the Zoom DVD VCD 59 MP3 Play 60 MP3 Play CD R MP3 disc requirements 61 FOREWORD Safety Instructions 5 Disc Type and Characteristics 6 DVD VCR OVERVIEWS Front View of the DVD VCR 7 Rear View of the DVD VCR 7 Infrared Remote Control 8 Display Indicators 9 Accessories 9 CONNECTING YOUR DVD VCR Deciding How to Connect DVD VCR 10 Connec...

Страница 3: ... it in a cool dry place Appendix A Advanced Connections Connecting the FM and AM antennas 62 Connecting the Speakers 63 LINE3 AUDIO Setting 64 Speaker Volume Control 64 Speaker setup 65 Dolby Pro Logic II decoder 67 SOUND mode effect function 68 Listening to radio broadcasts 69 Presetting stations 69 SOLVING PROBLEMS Technical Specifications 70 Problems and Solutions VCR 72 Troubleshooting Guide D...

Страница 4: ...rough the on screen menu Video with CD sound VHS quality MPEG 1 compression technology An LP is recorded as an analog signal with more distortion CD is recorded as a Digital Signal with better audio quality less distortion and less deterioration of audio quality over time VIDEO CD AUDIO CD 12 Cm 8 Cm 74 min 20 min 12 Cm 8 Cm 74 min 20 min Disc Types Logos Recording Types Disc Size Max Playing Time...

Страница 5: ... 41 JOG SHUTTLE 1 2 3 4 5 6 7 8 9 19 10 11 12 13 14 15 16 20 17 1 The DVD Deck is selected 2 A DVD CD VCD or SVCD is loaded 3 A disc with LPCM Linear Pulse Code Modulation audio is loaded 4 A DVD with a Dolby Digital is loaded 5 A DVD with a DTS soundtrack is loaded 6 The time counter position time remaining or current deck status is displayed 7 The current TV show or video is broadcast in Stereo ...

Страница 6: ...onnection chosen you must always connect the coaxial cable supplied Otherwise no picture will be visible on the screen when the DVD VCR is switched off Make sure that both the television and the DVD VCR are switched off before connecting the cables 1 Connect the coaxial cable as indicated in the above section 2 Connect one end of the RCA Audio Video cable to the Video output and Audio L R output s...

Страница 7: ...uto scanning The number of stations automatically stored by the DVD VCR depends on the number of stations that it has found 6 Check the data and time see page 17 7 On completion press RETURN to exit the menu Auto preset can be performed by pressing STOP on the VCR continuously for 5 seconds or more with no tape inserted Connecting Other Equipment to Your DVD VCR You can connect other audio and or ...

Страница 8: ...u are not using a RCA cable To view pictures from your DVD VCR when a RCA cable is used the television must be set to the audio video mode AV 1 Switch on the television 2 Switch on the DVD VCR by pressing STANDBY ON on the front of the DVD VCR or STANDBY ON on the remote control 3 Select a programme position on the television to be reserved for use with your DVD VCR 4 Insert the video cassette in ...

Страница 9: ...CLOCK SET menu is displayed 4 Press or to select the hour minutes day month and year Result The option selected flashes 5 Press the or buttons to increase or decrease the value Result The day of the week is displayed automatically You can hold the or buttons down to scroll more quickly through the values 6 On completion press RETURN twice to exit the menu Copying from DVD to VCR The DVD VCR allows...

Страница 10: ...age Using the and buttons move the selection arrow to Language set then press ENTER button 3 Set menu Language Move the selection bar to your desired Language then press ENTER button 1 LANGUAGE SET RETURN ENTER MAIN MENU LANGUAGE SET RETURN ENTER English Français Deutsch Español Italiano Nederlands ...

Страница 11: ...ready preset on your DVD VCR will be deleted 5 Press ENTER to start the auto scanning Result The PLEASE WAIT indication flashes on the television screen The first frequency band is scanned and the first station found is displayed and stored The DVD VCR then searches for the second station and so on When the automatic scanning procedure has finished the DVD VCR switches automatically to programme 1...

Страница 12: ...tton to select a MANUAL SET UP option Result The TV STATION TABLE menu is displayed 6 Press the or buttons to select a programme number as required 7 Press the button to preset the station Result The MANUAL TUNING menu is displayed 8 Press the or buttons to start scanning Result The frequency band is scanned and the first station found is displayed 9 Press the or buttons until the NAME is selected...

Страница 13: ...orresponding or buttons until the required preset TV programme is selected Result The selected station is displayed at the same time on the television screen 7 To change the programme number assigned to a station press the ENTER button on the remote control For example To move a TV station in programme 1 to programme 3 8 Press the or buttons to select required position and the press ENTER again to...

Страница 14: ...The MAIN MENU is displayed 2 Press the corresponding or buttons to select the USER SET option 3 Press the ENTER button to select this option Result The USER SET menu is displayed 4 Press the corresponding or buttons until the COLOUR SYSTEM option is selected 5 Press the button to select AUTO PAL MESECAM B W AUTO When playing back a cassette the system standard is automatically selected by the DVD ...

Страница 15: ...AY option is selected 5 To Press or until Repeat play ON is displayed Do not wish to repeat play OFF is displayed 6 On completion press RETURN twice to exit the menu Auto Repeat Play Auto Power Off The Auto Power Off feature automatically turns off your DVD VCR if no signal is received and you do not press any button for the selected time 1 Press SETUP on the remote control Result The MAIN MENU is...

Страница 16: ...r DVD VCR ejects the cassette when you start recording check to make sure that the cassette s safety tab is intact or that the opening created by a broken safety tab is covered with adhesive tape If you reach the end of the tape while recording the cassette rewinds automatically Displaying Hiding On Screen Information Selecting the Recording Speed Your DVD VCR displays most information both on the...

Страница 17: ...AUTO mode the DVD VCR automatically switches to LP mode to record the whole programme 1 JAN TUE 12 09 PR DAY START STOP 1 SA 9 12 00 12 50SP SET RETURN DELETE CLEAR Recording a Programme with Automatic Stop This function enables you to record up to nine hours LP of programmes Your DVD VCR stops automatically after the requested length of time 1 Switch on the television 2 To monitor the programme b...

Страница 18: ...anually to obtain the best possible picture When noise bars or streaks appear during playback adjust alignment manually by pressing the PROG TRK or buttons until the picture is clear and stable Result The tracking bar appears The image is adjusted The tracking bar disappears when you release the button Checking a Preset Recording Cancelling a Preset Programme You can check your preset recordings W...

Страница 19: ...ssette in Slow Motion You can select the mode in which the sound is reproduced on the loudspeakers and AV outputs The following options are available Option Description L Used to listen to the sound on the left Hi Fi channel R Used to listen to the sound on the right Hi Fi channel MIX Used to listen to the mixed sound of the Hi Fi and normal channels MONO Used to listen to the sound on the normal ...

Страница 20: ...next Index mark 4 If you want to watch the tape from a particular Index simply press II Index Skip Search This feature will enable you to fast forward rewind to a specific point on a tape E g if you have recorded 3 different programmes on a tape and you have rewound the tape to the beginning by using this feature you can go directly to the start of programme 2 simply by pressing the INDEX button 1...

Страница 21: ... new recording press the ll button 4 Turn the JOG Dial again as often as necessary to advance frame by frame until the exact recording position is located 5 While the DVD VCR is in still mode hold the REC button down for a while to activate the Assemble Edit function Result Record symbol flashes in the display 6 Select the source from which you wish to record by pressing The PROG TRK or buttons fo...

Страница 22: ...he new sound and original sound mixed together press the Audio button on the remote control until the MIX option is displayed see page 34 VCR Using the TV Buttons on the Remote Control VCR Your DVD VCR remote control will work with Samsung televisions and compatible brands To determine whether your television is compatible follow the instructions below 1 Switch your television on 2 Point the remot...

Страница 23: ...connection DVD SQPB Super VHS Quasi Playback This function is for playback of Super VHS format tapes only not for recording 1 Inset the SVHS format tape that you want to see 2 Press PLAY ll to start playing the cassette 3 Press SVHS button to start SQPB If the SQPB is on during normal playback the video output is distorted VCR 3 Television Connection to an Television Super Jack Component Jack Tele...

Страница 24: ...in Stop mode press the SETUP button on the remote Result The MAIN MENU is displayed 2 Press the corresponding or buttons to select the DVD option 3 Press the ENTER button to select this option Result The DVD SETUP menu is displayed Disc Menu Setup of the Menu Language Use the Menu preference menu to select the language you want a DVD s disc menu to be displayed in Audio Setup of the Audio Language...

Страница 25: ...URN ENTER Setting Up the Audio Language Features Using the Audio Language 1 With the unit in Stop mode press the SETUP button on the remote Result The MAIN MENU is displayed 2 Press the corresponding or buttons to select the DVD option 3 Press the ENTER button to select this option Result The DVD SETUP menu is displayed 4 Press the or buttons to move to Audio 5 Press the ENTER button 6 Press the o...

Страница 26: ...he component video out JACK S Video Sends S VIDEO signal to the S JACK Video Sends Composite signal to the Line out JACK How to make the SETUP MENU disappear or return to menu screen during set up Press the RETURN button DVD Setting Up the Audio Options 1 With the unit in Stop mode press the SETUP button on the remote Result The MAIN MENU is displayed 2 Press the corresponding or buttons to select...

Страница 27: ...g CD play back buttons on the remote control don t operate but the shuttle allow you to select playback speed 2X 4X and 8X 4 Slow Motion During playback press the ll Play Still button to Still the image Then use the Search Forward to play in slow motion at variable speeds Each press increases the slow motion speed playback to 1 8 1 4 or 1 2 normal speed Audio is muted during slow motion playback F...

Страница 28: ...ring play press the DISPLAY button on the remote Current track NUMBER and elapsed time will be displayed Use the or buttons to select a track Use the or buttons or NUMBER buttons to enter a different track number then press the ENTER button To enter the time from which you want to start use the or buttons to select then use the NUMBER buttons to enter the time Press the ENTER button To make the sc...

Страница 29: ...lay to start A The B is automatically highlighted Press ENTER at the point where you want the repeat play to stop B 3 Press ENTER 4 To return to normal play press REPEAT again then press the or buttons to select Off and press ENTER DVD repeats play by chapter or title VCD repeat play by disc or track Depending on the disc the Repeat function may not work If the title or track is completed before m...

Страница 30: ...e ENTER button 3 Use the or buttons to select the first chapter or track to add to the program Press the ENTER button The selection numbers appear in the Program Order box 4 Press the PLAY STILL button The disc will be played in programmed order Press the CLEAR button to change selections 1 Press the MODE button 2 Use the or buttons to select RANDOM Press the ENTER button The disc will be played i...

Страница 31: ...t the subtitle will be displayed Initially the subtitling will not appear on screen The subtitle languages are represented by abbreviations This function depends on what languages are encoded on the disc and may not work with all DVDs A DVD disc can contain up to 32 subtitle languages How to have the same subtitle language come up whenever you play a DVD Refer to Setting Up the Language Features o...

Страница 32: ...splayed 2 Use the or buttons to move to the desired bookmark icon 3 When you reach the scene you want to mark press the ENTER button The icon will change to a number 1 2 or 3 4 Press the MARK button to turn off the display 1 During play press the MARK button on the remote 2 Use the or buttons to select a marked scene 3 Press the PLAY STILL button to skip to the marked scene 1 During play press the...

Страница 33: ...rade mark of Microsoft Inc and SDMITM registered trade mark of The SDMI Foundation You cannot copy such files Your DVD player only accepts one level of file directory Consequently you must choose either to save all your MP3 recording files at the root of the disc and or create folders in the directory for each artist or music type e g classical rock jazz etc Important The above recommendations can...

Страница 34: ...ety please take note of the following points Make sure that the unit is well ventilated Poor ventilation may cause damage by overheating Make sure that the cooling fan or ventilation holes are not obstructed If the ventilation holes are blocked by newspaper clothes etc heat builds up inside the main unit resulting in a risk of fire When the power is supplied to the main unit the cooling fan will b...

Страница 35: ...f the speakers in the room For the center speaker If the distance of Dc is equal to or longer than the distance of Df set the delay time to 0 ms Otherwise change the value according to the table A Df Dc For the surround speakers If the distance of Df is equal to the distance of Ds set the delay time to 0 ms Otherwise change the value according to the table shown on the right B Df Ds 1 Center speak...

Страница 36: ...ded in Dolby Surround but also regular stereo sources into five channels front left right center and surround left right In addition various parameters can be set according to the type of source and contents so you can adjust the sound field with greater precision Select the source you want to use CD Video FM AM Input LINE1 LINE2 LINE3 TV CH 1 Press the SOUND MODE button Press the SOUND MODE butto...

Страница 37: ...e speakers Audio is not output using other connections 1 2 You can automatically or manually tune in to FM and AM stations to listen to radio broadcasts 1 Press the FM AM button Each time you press the button the band alternates between FM and AM 2 Tune in to a station Automatic tuning Hold down l l to begin the automatic tuning Manual tuning Press l to tune in to a lower frequency or press l to t...

Страница 38: ...rd recording Resolution Above 240 lines standard recording Audio S N Above 68dB Hi Fi 39dB Mono Audio frequency characteristics 20Hz 20KHz Hi Fi Disc DVD CD 12cm CD 8cm VIDEO CD 12cm DVD Audio S N 95dB Audio dynamic range 100dB SENSITIVITY FM AM 15 dB 64 dB RECEIVER S N RATIO 60 dB 35 dB THD 0 5 2 FRONT SPEAKER 50W X 2 6Ω CENTER SPEAKER 50 W 6Ω SURROUND SPEAKER 50 W X 2 6Ω AMP SUBWOOFER SPEAKER 10...

Страница 39: ...ut the instructions Setting the DVD VCR output the normal TV transmissions in your area Channel see page 23 move the channel number To prevent this you will need to change the several channels down from the original setting DVD VCR output channel in the following example from 38 to 40 way 4 Replace the aerial plug into the socket marked aerial symbol on the rear of the DVD VCR 5 Re tune your TV to...

Страница 40: ...THIS APPLIANCE IS DISTRIBUTED BY www samsung com AK68 00096R 2003 02 21 ...

Отзывы: