background image

MICROWAVE OVEN

Owner’s Instructions and Cooking Guide

CE297DN

Quick Look-up Guide ............................................................................. 2
Oven....................................................................................................... 2
Control Panel ......................................................................................... 3
Accessories............................................................................................ 3
Using this Instruction Booklet................................................................. 4
Safety Precautions ................................................................................. 4
Installing Your Microwave Oven ............................................................ 5
Setting the Time ..................................................................................... 6
What to Do if You are in Doubt or Have a Problem ............................... 6
Cooking / Reheating............................................................................... 7
Power Levels.......................................................................................... 7
Stopping the Cooking............................................................................. 8
Adjusting the Cooking Time ................................................................... 8
Using the Auto Reheat Feature ............................................................. 8
Auto  Reheat Settings ............................................................................ 9
Using the Snack Cook Feature .............................................................. 9
Snack Cook Setting.............................................................................. 10
Using the Auto Power Defrost Feature ................................................ 10
Auto Power Defrost Settings................................................................ 11
Using the Auto Crusty Cook Function.................................................. 11
Using the Manual Crusty Cook Function ............................................. 12
Choosing the Heating Element Position .............................................. 13
Choosing the Accessories ................................................................... 13
Grilling .................................................................................................. 14
Combining Microwave and the Grill ..................................................... 14
Manual Stop Turntable Function.......................................................... 15
Switching the Beeper Off ..................................................................... 15
Safety-Locking Your Microwave Oven................................................. 15
Cookware Guide .................................................................................. 16
Cooking Guide ..................................................................................... 17
Cleaning Your Microwave Oven .......................................................... 23
Storing and Repairing Your Microwave Oven...................................... 24
Technical Specifications....................................................................... 24

jlY`^ku†niU”GGwˆŽŒGXGG{œ™š‹ˆ SGvŠ›–‰Œ™GZWSGYWWZGGXWa[WGht

Содержание CE297DN

Страница 1: ... mode Cuisine Snack 9 Réglages du mode Cuisine Snack 9 Décongelez un plat automatiquement 10 Temps pour la décongélation automatique 10 Utiliser le mode Cuisson croustillante automatique 11 Le mode Cuisson croustillante manuelle 12 Choisissez la position de l élément chauffant 13 Choisissez les accessoires 13 Cuisez un plat au gril 13 Combinez la cuisson aux micro ondes et le gril 14 Désactivez la...

Страница 2: ...e ou plusieurs fois pour sélectionner le type d aliments à décongeler Pour plus d informations reportez vous au tableau ci dessous 2 Sélectionnez le poids des aliments en tournant le bouton de sélection 3 Appuyez sur le bouton Laissez le plat dans le four Appuyez sur le bouton 30s chaque fois que vous souhaitez ajouter 30 secondes 1 Appuyez sur le bouton 2 Réglez le temps de cuisson en tournant le...

Страница 3: ...BOUTON DE DÉMARRAGE ET DE SÉLECTION heure temps poids et quantité 1 5 2 3 4 6 7 8 9 10 11 12 1 Coupleur déjà placé sur l axe du moteur situé au centre du plancher du four Objet le coupleur fait tourner le plateau 2 Anneau de guidage à placer au centre du plancher du four Objet l anneau de guidage supporte le plateau 3 Plateau à placer sur l anneau de guidage en adaptant le centre sur le coupleur O...

Страница 4: ...aison ils provoquent des arcs électriques ou étincelles qui pourraient endommager les parois du four 2 NE réchauffez JAMAIS des bocaux bouteilles ou récipients fermés hermétiquement ou sous vide Exemple petits pots pour bébé des aliments hermétiques Exemple œufs noix en coquille tomates Raison l augmentation de la pression pourrait les faire exploser Il convient que les oeufs dans leur coquilles e...

Страница 5: ...n gatde Ne laissez les enfants utiliser le four sans surveillance que si des instructions appropriées ont été données afin que l enfant puisse utiliser le four de façon sure et comprenne les dangers d un usage incorrect ATTENTION Si la porte ou ses joints sont endommagés vous ne devez pas utiliser le four tant qu il n a pas été réparé par une personne compétente ATTENTION Il est dangereux pour tou...

Страница 6: ...ype d aliments Avez vous choisi le niveau de puissance approprié Des étincelles et craquements se produisent à l intérieur du four arcs électriques Avez vous utilisé un plat avec des décorations métalliques Avez vous laissé une fourchette ou un autre ustensile métallique à l intérieur du four Avez vous mis du papier d aluminium trop près des parois du four Le four provoque des interférences avec d...

Страница 7: ...la cuisson en appuyant sur le bouton d annulation 1 Appuyez sur le bouton Résultat la puissance de cuisson maximale 900 W s affiche par défaut Réglez le niveau de puissance approprié en appuyant de nouveau sur le bouton jusqu à ce que la puissance souhaitée s affiche Pour plus de renseignements reportez vous au tableau de la page suivante 2 Réglez le temps de cuisson en tournant le bouton de sélec...

Страница 8: ...émarre Lorsqu elle est terminée 1 un signal sonore retentit quatre fois 2 un signal de rappel de fin de cuisson est émis toutes les minutes 3 l heure s affiche de nouveau Code Sym bole Aliment Quantité Temps de repos en minutes Recommandations 1 Assiette garnie Réfrigérée 300 à 350g 400 à 450g 500 à 550g 3 min Mettez les aliments dans une assiette en céramique et recouvrez cette dernière d un film...

Страница 9: ...ront être disposés de chaque côté du plateau tournant Après le réchauffage garnir de laitue tranche de tomate garnitures et épices 2 Mini Ravioli refroidi 200 250 g 300 350 g 3 min Mettre les raviolis déjà cuisinés et froids dans un récipient en plastique prévu pour le four à micro ondes et disposer le plat au milieu du plateau tournant Mélanger soigneusement avant et après la cuisson Ce programme...

Страница 10: ...00 g 3 Appuyez de nouveau sur le bouton pour lancer le processus de décongélation Résultat la décongélation commence un signal sonore peut se faire entendre à mi parcours pour vous faire penser à retourner l aliment Appuyez de nouveau sur le bouton pour terminer la décongélation Aliment Portion Temps de repos Recommandation 1 Viande 200 2000g 20 60 min Protéger les bords avec du papier d aluminium...

Страница 11: ...roustillant car il devient très chaud 3 Ouvrez la porte du four Placez les aliments sur le plateau croustillant Fermez la porte Placez le plateau croustillant sur la grille ou sur le plateau tournant dans le four à micro ondes 4 Sélectionnez le type de produit en appuyant une ou plusieurs fois sur le bouton Crusty Cook Cuisson croustillante 5 Sélectionnez la portion en faisant tourner la commande ...

Страница 12: ...ésistant à la chaleur sur le plat croustilleur un saladier en plastique par exemple Ne mettez jamais le plat croustilleur dans le four sans que le plateau soit installé 4 Placez le plat croustilleur sur la grille métallique ou sur le plateau dans le four 5 Sélectionnez le temps et la puissance de cuisson appropriés Pour plus de renseignements reportez vous au tableau de la page côté Aliment Quanti...

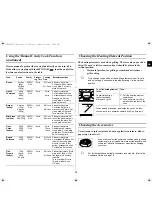
Страница 13: ...chauffant est en position horizontale Si vous souhaitez sélectionner le mode combiné micro ondes gril utilisez uniquement des plats garantis à la fois micro ondes et four classique Des récipients ou ustensiles métalliques pourraient endommager votre four Pour mettre l élément chauffant alors en position horizontale mode gril ou mode combiné micro ondes gril tirez l élément chauffant vers vous pous...

Страница 14: ...e four ou provoquer un incendie N appuyez pas sur le bouton d activation ou de désactivation de la rotation du plateau en cours de cuisson 1 Assurez vous que l élément chauffant est en position horizontale Pour plus de renseignements reportez vous à la page 13 2 Ouvrez la porte du four Placez les aliments sur la grille puis posez cette dernière sur le plateau Fermez la porte 3 Appuyez sur le bouto...

Страница 15: ...l afficheur le signal sonore est désactivé et ne retentit plus chaque fois que vous appuyez sur un bouton 2 Pour rétablir le signal sonore appuyez simultanément sur les deux mêmes boutons Résultat l indication suivante apparaît sur l afficheur le four fonctionne avec le signal sonore actif 1 Appuyez simultanément sur les boutons et Résultat le four est verrouillé aucune fonction ne peut être sélec...

Страница 16: ...is risquent de se déformer en cas de surchauffe Risquent de brûler Risquent de provoquer des arcs électriques étincelles Verre Résistant à la chaleur Verres de table Bocaux Utilisable à condition de ne pas présenter de décorations métalliques Utilisables pour réchauffer des aliments ou des liquides Du verre fin peut cependant être fêlé ou brisé par un changement soudain de température Retirez le c...

Страница 17: ...eau ci dessous et laissez le couvercle pendant la cuisson Prolongez la cuisson selon vos goûts Remuez deux fois en cours de cuisson puis une fois lorsque la cuisson est terminée Ajoutez du sel des fines herbes et du beurre lorsque la cuisson est terminée Laissez recouvert pendant le temps de repos Conseils de cuisson pour le riz et les pâtes Riz utilisez un grand saladier en verre avec couvercle A...

Страница 18: ...r les débordements Évitez de gâcher les aliments en les faisant cuire trop longtemps Il est préférable de sous estimer le temps de cuisson et d ajouter ensuite du temps si nécessaire Chauffer et laisser reposer Lorsque vous réchauffez des aliments pour la première fois nous vous conseillons de noter les temps de cuisson pour référence ultérieure Veillez toujours à ce que les aliments réchauffés so...

Страница 19: ... et vérifiez la température avant de servir Lait 100ml 200ml 300W 30 à 40 sec 1min à 1min 10 sec 2 à 3 Remuez ou agitez puis versez dans un biberon stérilisé Placez le biberon au centre du plateau Cuisez sans couvercle Remuez et laissez reposer pendant au moins trois minutes Remuez de nouveau et vérifiez la température avant de servir Aliment Quantité Puis sance Cuisson en minutes Repos en minutes...

Страница 20: ...tions Soupe réfrigé rée 2 x 250g 2 x 250g 900W 3 à 4 5 à 6 2 à 3 Versez la soupe dans deux assiettes creuses en céramique et recouvrez Posez une assiette sur le plateau et l autre sur la grille Remuez après le réchauffage Remuez de nouveau avant de servir Poulet au curry avec du riz réfrigé ré 2 x 350g 600W 7 à 8 3 Mettez les deux plats composés de deux aliments dans deux assiettes plates en céram...

Страница 21: ... dessus Ce mode peut également servir pour des aliments plus gros généralement appréciés lorqu ils sont dorés et croustillants sur le dessus des morceaux de poulet par exemple Dans ce cas retournez les morceaux de poulet à mi cuisson Pour plus de renseignements reportez vous aux tableaux des deux pages suivantes ATTENTION Lorsque vous utilisez le mode combiné micro ondes gril assurez vous que l él...

Страница 22: ...nutes après la cuisson Morceaux de poulet 450 g 2 morce aux 650 g 2 à 3mor ceaux 850 g 4 morce aux 300W gril 7 à 8 9 à 10 11 à 12 7 à 8 8 à 9 9 à 10 Badigeonnez les morceaux de poulet d huile puis ajoutez des épices Disposez les morceaux en cercle les ailes et les pattes au centre Laissez reposer 2 à 3 minutes Poulet rôti 900g 1100g 450W gril 10 à 12 12 à 14 9 à 11 11 à 13 Badigeonnez le poulet d ...

Страница 23: ...ES AMANDES EFFILÉES Étalez 30 g d amandes éffilées dans une assiette en céramique de taille moyenne Faites dorer pendant 3 à 4 minutes à 600 W en remuant plusieurs fois pendant l opération Laissez reposer 2 à 3 minutes dans le four Utilisez un gant isolant pour sortir l assiette du four Nettoyez votre four à micro ondes Pour empêcher l accumulation de graisses et de particules d aliments vous deve...

Страница 24: ... et l humidité risquent de détériorer certains éléments du four Ce four à micro ondes n est pas conçu pour utilisation commerciale Spécifications techniques Les descriptions et caractéristiques figurant dans ce mode d emploi sont données à titre d information et sans engagement Soucieux de la qualité de ses produits SAMSUNG se réserve le droit d effectuer des modifications sans préavis Modèle CE29...

Страница 25: ...tings 9 Using the Snack Cook Feature 9 Snack Cook Setting 10 Using the Auto Power Defrost Feature 10 Auto Power Defrost Settings 11 Using the Auto Crusty Cook Function 11 Using the Manual Crusty Cook Function 12 Choosing the Heating Element Position 13 Choosing the Accessories 13 Grilling 14 Combining Microwave and the Grill 14 Manual Stop Turntable Function 15 Switching the Beeper Off 15 Safety L...

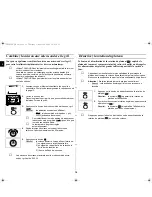
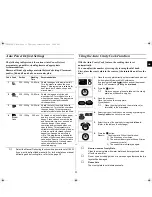
Страница 26: ...n cooking is over 1 Place the frozen food in the oven Select the type of food that you are cooking by pressing the Power Defrost button one or more times 2 Select the weight by turning the dial knob as required 3 Press the button Leave the food in the oven Press 30s one or more times for each extra 30 seconds that you wish to add 1 Press the button 2 Select the cooking time by turning the dial kno...

Страница 27: ...me weight and serving size 1 3 4 5 6 8 7 2 10 9 12 11 1 Coupler already placed over the motor shaft in the base of the oven Purpose The coupler rotates the turntable 2 Roller ring to be placed in the centre of the oven Purpose The roller ring supports the turntable 3 Turntable to be placed on the roller ring with the centre fitting to the coupler Purpose The turntable serves as the main cooking su...

Страница 28: ...mings Skewers forks etc Reason Electric arcing or sparking may occur and may damage the oven 2 DO NOT heat Airtight or vacuum sealed bottles jars containers Ex Baby food jars Airtight food Ex Eggs nuts in shells tomatoes Reason The increase in pressure may cause them to explode Tip Remove lids and pierce skins bags etc 3 DO NOT operate the microwave oven when it is empty Reason The oven walls may ...

Страница 29: ... the oven WARNING If the door or door seals are damaged the oven must not be operated until it has been repaired by a competent person WARNING It is hazardous for anyone other than a comperent person to carry out any service or repair operation which involves the removal of a cover which gives protection against exposure to microwave energy WARNING Liquids and other foods must not be heated in sea...

Страница 30: ... either overcooked or undercooked Was the appropriate cooking length set for the type of food Was an appropriate power level chosen Sparking and cracking occur inside the oven arcing Have you used a dish with metal trimmings Have you left a fork or other metal utensil inside the oven Is aluminium foil too close to the inside walls The oven causes interference with radios or televisions Slight inte...

Страница 31: ... Result The 900W maximum cooking power indications are displayed Select the appropriate power level by pressing the button again until the corresponding wattage is displayed Refer to the power level table 2 Set the cooking time by turning the dial knob 3 Press the button Result The oven light comes on and the turntable starts rotating 1 Cooking starts and when it has finished the oven beeps four t...

Страница 32: ...se the door Use only recipients that are microwave safe 1 To stop temporarily Open the door Result Cooking stops To resume cooking close the door and press again 2 To stop completely Press the button Result The cooking stops If you wish to cancel the cooking settings press the Cancel button again Press the 30s button once for each 30 seconds to be added During the cooking to increase or decrease t...

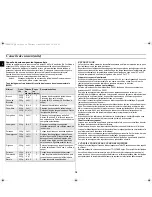
Страница 33: ...a similar size Put them into a glass bowl with lid Add 45 ml 3 tablespoons water when cooking 200 450 g add 60 ml 4 tablespoons for 500 650 g and add 75 ml 5 tablespoons for 700 750 g Stir after cooking When cooking bigger quantities stir once during cooking 3 Chicken pieces 200 300 g 1 pc 400 500 g 2 pcs 600 700 g 2 3 pcs 800 900 g 3 4 pcs 3 mins Brush the chicken pieces with oil and spice them w...

Страница 34: ...e proof plastic dish in the centre of turntable Pierce film of ready product or cover plastic dish with microwave wrap Stir carefully before and after standing time This programme is suitable for ravioli as well as for noodles in sauce 3 Frozen Chicken Wings 250 300 g 350 400 g 450 500 g 3 mins Put the frozen ready chicken wings or small drumsticks pre cooked and spiced on the metal rack with the ...

Страница 35: ...hield the tail of the whole fish with aluminium foil Turn the fish over when the oven beeps This programme is suitable for whole fishes and fish fillets 4 Bread Cake 125 1000 g 5 20 min Put bread on a piece of kitchen paper and turn over as soon as the oven beeps Place cake on a ceramic plate and if possible turn over as soon as the oven beeps Oven keeps operating and is stopped when you open the ...

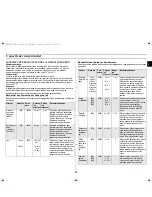
Страница 36: ...he pie on crusty plate Put crusty plate on rack 3 Frozen Baguettes 150 g 1pc 250 g 2pcs 350 g 3pcs 4 min 2 3 Preheat the crusty plate using 600W grill Put one frozen baguette off center on crusty plate put 2 frozen baguettes side by side on the crusty plate This programme is suitable for baguettes with topping e g vegetables ham and cheese 4 Frozen Chicken Nuggets 250 g 500 g 4 min Preheat the cru...

Страница 37: ... 4 pieces 250g 600W Grill 3min 6 6 min 8 8 min Preheat crusty plate Put frozen burger in a circle on crusty plate Put crusty plate on the rack Turn over after 4 5 min Mini Pizza chilled 100 150g 200 250g 600W Grill 5min 3 3 min 4 4 min Preheat crusty plate Put the chilled pizza pieces in a circle on the plate Set crusty plate on the rack Oven Chips frozen 200g 300g 400g 450W Grill 4min 9min 12min ...

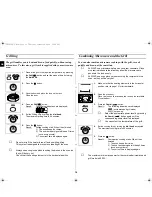
Страница 38: ... and place the food on the rack Close the door 4 Press the Grill button Result The follwing indications are displayed 5 Set the Grilling time by turning the dial knob The maximum grilling time is 60 minutes 6 Press the button Result Grilling cooking start When it has finished 1 The oven beeps four times 2 The end reminder signal will beep 3 times once every minute 3 The current time is displayed a...

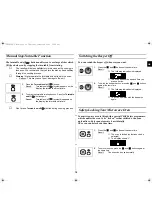
Страница 39: ...familiar with it cannot operate it accidentally The oven can be locked at any time 1 Press the Turntable on off button Result Turntable on off symbol appears on the display the turntable will not rotate 2 To switch the turntable rotating back on Press the Turntable on off button again Result Turntable on off symbol disappears on the display the turntable will rotate 1 Press the and buttons at the ...

Страница 40: ...g Polystyrene cups containers Paper bags or newspaper Recycled paper or metal trims Can be used to warm food Overheating may cause the polystyrene to melt May catch fire May cause arcing Glassware Oven to table ware Fine glassware Glass jars Can be used unless decorated with a metal trim Can be used to warm foods or liquids Delicate glass may break or crack if heated suddenly Must remove the lid S...

Страница 41: ... Guide for frozen vegetables Use a suitable glass pyrex bowl with lid Cook covered for the minimum time see table Continue cooking to get the result you prefer Stir twice during cooking and once after cooking Add salt herbs or butter after cooking Cover during standing time Cooking Guide for rice and pasta Rice Use a large glass pyrex bowl with lid rice doubles in volume during cook ing Cook cover...

Страница 42: ...he food It is preferable to underestimate cooking time and add extra heating time if necessary Heating and standing times When reheating food for the first time it is helpful to make a note of the time taken for future reference Always make sure that the reheated food is piping hot throughout Allow food to stand for a short time after reheating to let the temperature even out The recommended stand...

Страница 43: ... ceramic plates dishes Cover with microwave cling film Put one plate directly on the turn table other on the rack Plate Meal chilled 2 x 350g 600W 7 9 3 Plate two meals of 2 3 chilled components on two flat ceramic plates Cover with microwave cling film Put one plate directly on the turntable other on the rack Food Portion Power Time min Standing Time min Instructions Drinks coffee tea and water 1...

Страница 44: ...to ceramic deep plate Cook covered Stir after cooking time Stand for 2 3 minutes Before serving stir well and check the tem perature carefully Baby porridge grain milk fruit 190g 600W 20sec 2 3 Empty into ceramic deep plate Cook covered Stir after cooking time Stand for 2 3 minutes Before serving stir well and check the tem perature carefully Baby milk 100ml 200ml 300W 30 40 sec 1 min to 1 min 10s...

Страница 45: ...ime to brown the top of the food Also this mode can be used for thick food portions that benefit from a browned and crispy top e g chicken pieces turning them over half way through cooking Please refer to the grill table for further details IMPORTANT REMARK Whenever the combination mode microwave grill is used make sure that the grill heating element is under the ceiling in the horizontal position...

Страница 46: ...l 9 11 Put the fresh gratin into a small glass pyrex dish Put the dish on the rack After cooking stand for 2 3 minutes Chicken Pieces 450 g 2pcs 650 g 2 3pcs 850 g 4pcs 300W Grill 7 8 9 10 11 12 7 8 8 9 9 10 Brush chicken pieces with oil and spices Put them in a circle with the bones to the middle Put one chicken piece not into the centre of the rack Stand for 2 3 minutes Roast Chicken 900g 1100g ...

Страница 47: ...imes well during cooking BROWNING ALMOND SLICES Spread 30 g sliced almonds evenly on a medium sized ceramic plate Stir several times during browning for 3 to 4 minutes using 600 W Let it stand for 2 3 minutes in the oven Use oven gloves while taking out Cleaning Your Microwave Oven The following parts of your microwave oven should be cleaned regularly to prevent grease and food particles from buil...

Страница 48: ...o store your oven away temporarily choose a dry dust free place Reason Dust and damp may adversely affect the working parts in the oven This microwave oven is not intended for commercial use Technical Specifications SAMSUNG strives to improve its products at all times Both the design specifications and these user instructions are thus subject to change without notice Model CE297DN Power source 230...

Отзывы: