background image

Menu Navigation       30

Section 4: Menu Navigation

This section explains the menu navigation for your phone. It also includes an outline of all the available menus 

associated with your phone.

Menu Navigation

You can tailor the phone’s range of functions to your needs using menus and sub-menus. Menus and sub-menus 
can be accessed by scrolling using the Navigation keys or by using the shortcuts.

Locking and Unlocking the Phone

When the device is locked and you press the 

Hold

 button, the T919 displays the Unlock screen.

Opening an Application

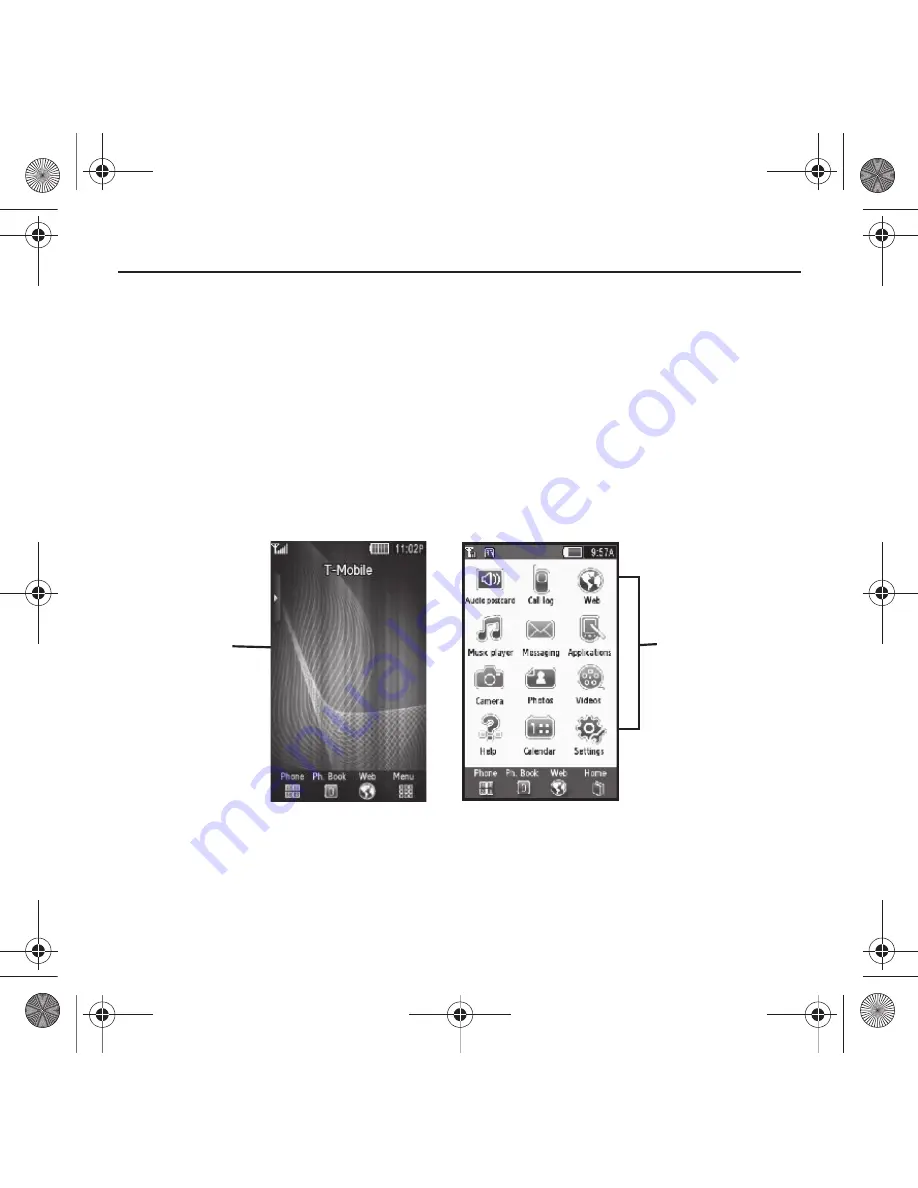
The Idle screen is the first screen displayed. The Main Functions menu displays after you select the Menu icon.

To open an application a menu:

1.

Tap the associated icon.

2.

Touch 

Home

 to return to the main menu.

Main Functions

Idle Screen

T919 Roxy.book  Page 30  Thursday, September 25, 2008  5:01 PM

Содержание Behold Series

Страница 1: ...ies P O R T A B L E Q u a d B A N D M O B I L E P H O N E User Manual Please read this manual before operating your phone and keep it for future reference T919 Roxy book Page 1 Thursday September 25 2008 5 01 PM ...

Страница 2: ...t attempt to modify prepare derivative works of reverse engineer decompile disassemble or otherwise attempt to create source code from the software No title to or ownership in the Intellectual Property is transferred to you All applicable rights of the Intellectual Property shall remain with SAMSUNG and its suppliers Samsung Telecommunications America STA LLC Headquarters Customer Care Center 1301...

Страница 3: ...URPOSE OR USE THE DESIGN CONDITION OR QUALITY OF THE PRODUCT THE PERFORMANCE OF THE PRODUCT THE WORKMANSHIP OF THE PRODUCT OR THE COMPONENTS CONTAINED THEREIN OR COMPLIANCE OF THE PRODUCT WITH THE REQUIREMENTS OF ANY LAW RULE SPECIFICATION OR CONTRACT PERTAINING THERETO NOTHING CONTAINED IN THE INSTRUCTION MANUAL SHALL BE CONSTRUED TO CREATE AN EXPRESS OR IMPLIED WARRANTY OF ANY KIND WHATSOEVER WI...

Страница 4: ...lay Layout 17 Help 20 Section 3 Call Functions 21 Making a Call 21 Adjusting the Call Volume 22 Answering a Call 22 Options During a Call 23 Accessing the Contacts List During a Call 25 Call Log 25 Section 4 Menu Navigation 30 Menu Navigation 30 Accessing Widgets 37 Widget Bar Navigation 37 Widget Settings 40 Section 5 Entering Text 41 Changing the Text Input Mode 41 Using T9 Mode 43 Using ABC Mod...

Страница 5: ...tries 51 Speed Dialing 51 My Profile 52 Phonebook Management 53 Section 7 Messages 58 Types of Messages 58 Audio Postcard 59 Text Messages 60 Picture Messages 64 E mail 67 Voice Notes 67 Inbox 68 Instant Messaging IM 72 Outbox 73 My Folders 76 Templates 76 Voice Mail 80 Delete by folder 81 Memory Status 81 Broadcast Messages SIM Card Dependent 82 Section 8 Applications 83 Files 83 Games and Apps 8...

Страница 6: ...etooth Device 119 Section 11 Camera 120 Using the Camera 120 Take and Send 120 Photos 123 Recording a Video 128 Videos 131 My Album 132 Section 12 Changing Your Settings 133 Widget 133 myFaves Settings 134 Sound Profiles 134 Display Settings 142 Time Date 144 Phone Settings 144 Security 146 Airplane mode 149 Bluetooth 149 Call Settings 152 Application Settings 153 Network selection 153 Memory Sett...

Страница 7: ...ronic Devices 168 FCC Hearing Aid Compatibility HAC Regulations for Wireless Devices 168 Potentially Explosive Environments 170 Emergency Calls 170 FCC Notice and Cautions 171 Other Important Safety Information 172 Product Performance 172 Availability of Various Features Ring Tones 173 Battery Standby and Talk Time 173 Battery Precautions 173 Care and Maintenance 175 Section 14 Warranty Informatio...

Страница 8: ...he plug in SIM card and its contacts information can be easily damaged by scratching or bending so be careful when handling inserting or removing the card Keep all SIM cards out of reach of small children If necessary switch off the phone by holding down the key until the power off image displays 1 Remove the battery cover by lifting the top black portion up and away from the silver lower portion ...

Страница 9: ...til the card locks into place Make sure that the card s gold contacts face into the phone and that the upper left angled corner of the card is positioned as shown Note If the card is not inserted correctly the phone does not detect the SIM card Re orient the card back into the slot T919 Roxy book Page 6 Thursday September 25 2008 5 01 PM ...

Страница 10: ...s This type of memory card is designed for use with this mobile phone and other devices Note The Samsung T919 supports up to an 8 Gigabyte memory card 1 Place the microSD card into the slot as shown Ensure the microSD s gold contact pins face upward and the card is placed so that the indentations on the card face the same direction as those illustrated T919 Roxy book Page 7 Thursday September 25 2...

Страница 11: ... battery 1 Slide the battery back into the phone so that the tabs on the end align with the slots at the bottom of the phone 2 Press the battery down until it clicks into place T919 Roxy book Page 8 Thursday September 25 2008 5 01 PM ...

Страница 12: ...r by sliding it back onto the phone 4 Close the top black portion of the battery cover until you hear a light click as shown Note Make sure the battery is properly installed before switching on the phone T919 Roxy book Page 9 Thursday September 25 2008 5 01 PM ...

Страница 13: ...recharges fully in approximately 4 hours 1 With the battery installed temporarily remove the plastic cover on the right side of the phone and plug in the wall charger s connector into the jack Important Verify that the handset battery is installed prior to connecting the wall charger If the battery is not installed and the wall charger is connected the handset power cycles continuously preventing ...

Страница 14: ...ttery level becomes too low the phone automatically turns off Switching the Phone On or Off 1 Press and hold the key until the phone switches on 2 If the phone asks you to enter the phone password use the keypad to enter this password and touch the Confirm soft key 3 If the phone asks for a PIN use the keypad to enter the PIN For more information refer to Check PIN code on page 147 4 The phone sea...

Страница 15: ...word a greeting and your name Note These steps may be different depending on your network Accessing Your Voice Mail You can access your Voice Mail by either pressing and holding the key on the keypad or by using the phone s menu To access Voice Mail using the menu 1 In Idle mode press the Phone icon and press Voice mail 2 When connected follow the voice prompts from the voice mail center T919 Roxy...

Страница 16: ...lightweight easy to use and offers many significant features The following list outlines a few of the features included in your phone User friendly menu driven access to features and options Instant Messaging capability The Application feature provides Files Games Organizer Alarm Calendar Tasks Calculator World Time Unit conversion Timer and Stopwatch T919 Roxy book Page 13 Thursday September 25 2...

Страница 17: ...d contrast and keypad access In bright light conditions outdoors the phone increases keypad brightness and contrast for better viewing While talking on the phone if the sensors are blocked the phone locks the keypad to prevent accidental key presses 2 External speaker allows you to hear the other caller and the different ring tones or sounds offered by your phone 1 1 1 1 3 1 4 1 6 2 1 5 T919 Roxy ...

Страница 18: ... two seconds to turn the phone on or off While in the Menu mode it returns the phone to Idle mode and cancels your input Side Views of Your Phone The following illustrations show the external elements of your phone 1 Volume keys allow you to adjust the ringer volume in standby mode with the phone open or adjust the voice volume during a call When receiving an incoming call Pressing the volume key ...

Страница 19: ...rrying strap to the phone 4 Camera button allows you to take pictures when you are in camera mode Launches the camera with a short press 5 Hold button Locks and Unlocks the phone Back View of Your Phone The following illustration shows the external elements of your phone 1 Camera lens is used to take pictures 2 Mirror self portrait allows you to center the camera lens for self portraits 1 1 1 2 T9...

Страница 20: ...dget Bar Navigation on page 37 Function categories Function categories are also shortcuts to the Phone for dialing a number Ph Book accessing the Contacts list Web for Internet connection and Menu displays the icons for application access While viewing the Main Menu the Menu category changes to Home The Home icon returns you to Idle mode where the time and date and Widget bar display Icons This li...

Страница 21: ...ved Displays when a new picture message is received Displays when a call is in progress DisplayswhenCallforwardingissettoForwardalways Formoreinformation referto Call Settings on page 152 Displays when you set the phone volume to Silent Profile Displays when Sound profiles are set to Silent Displays when Sound profiles are set to Vibration Displays when Sound profiles are set to Driving Displays w...

Страница 22: ...nutes or 10 minutes 5 Touch Save to confirm your selection LCD Brightness After you set the backlight duration set the brightness levels 1 In Idle mode touch Menu Settings 2 Touch Display settings 3 Touch LCD brightness 4 Touch On or Off from the Automatic field 5 Slide the Level bar from 1 5 to select the brightness level 6 Touch Save to confirm your selection Display Your phone has a display on ...

Страница 23: ... Enter a Search this option allows you to search based on a keyword My Account this option provides you with account specific information such as your current status current activity Bill Summary Plan Services Voicemail Settings Find a Retail Store and FAQ s Info About thisoptionoffers generalinformationaboutT MobileHelpincludingconcept andsitedesign copyrightinformation and contact email address ...

Страница 24: ...0 times when the person does not answer the call or is already on the phone provided your call is not sent to voice mail For more information refer to Call Settings on page 152 Making an International Call 1 In Idle mode press and hold the key The character displays 2 Enter the country code area code and phone number 3 Press the key to make the call Correcting the Number 1 Touch the key to clear t...

Страница 25: ...ume key to increase the volume level and the Down volume key to decrease the level In Idle mode you can also adjust the ring volume using these keys Answering a Call When somebody calls you the phone rings and displays the incoming call image The caller s phone number or name if stored in Contacts List displays 1 Press the key to answer the incoming call If the Any key option in the Answering mode...

Страница 26: ...o Headset While on a call switch to the headset instead of speaker by touching the Headset icon Muting a Call During a call you can activate the Mute feature This feature is used for example during a multiparty call when you want to listen to the call but do not want to interrupt with background noise or talking 1 Touch the Mute icon so the other caller cannot hear you speaking 2 Touch the Unmute ...

Страница 27: ...n progress To place a call on hold 1 Touch Hold to place the current call on hold 2 Touch Resume to activate the call that is on hold To make a new call while a call is in progress 1 Enter the new phone number that you wish to dial or look it up in Call history 2 Touch Hold to place the first caller on hold 3 Touch New call to dial the second call 4 Dial the new phone number and press To switch be...

Страница 28: ...90 most recent calls you received dialed and missed The name or number if already stored in your Contacts List displays Note At any time while you are in Call history you may use the drop down list to scroll between All calls Missed calls Outgoing calls and Incoming calls Missed calls This menu lets you view the 30 most recent calls you received but did not answer The name and number if already st...

Страница 29: ...ready stored in your Contacts List displays Delete Touching this icon allows you to delete the records in each call record separately or you can delete all of your call records at one time 1 Touch the check box beside the number in the Delete list to delete or select the All check box and touch the Delete soft key The selected number or all the numbers are deleted and the list redisplays Note If S...

Страница 30: ... conversation can be held with a single caller While you are in a multi party call 1 Touch Split The short list of call participants displays the callers in the order they were dialed 2 Touch the number for the participant in which you want to speak privately You can now talk privately to that person while the other participants can continue to converse with each other If there is only one other p...

Страница 31: ...d a call on hold you may switch between the two calls To switch between the two calls 1 Touch either the Active call tab or the On hold tab and touch the Swap icon The current active call is placed on hold and the call on hold is then reactivated so that you can continue conversing with that person 2 To finish end each call normally by pressing the key Searching for a Number in the Contacts List Y...

Страница 32: ...an incoming call by a call waiting tone To answer a new call while you have a call in progress 1 Press the key to answer the incoming call The first call is automatically put on hold 2 To switch between the two calls touch either the In call tab or the On hold call tab then touch the swap icon 3 To end a call on hold touch the On hold tab then touch the End call icon 4 To end the current remaining...

Страница 33: ...e accessed by scrolling using the Navigation keys or by using the shortcuts Locking and Unlocking the Phone When the device is locked and you press the Hold button the T919 displays the Unlock screen Opening an Application The Idle screen is the first screen displayed The Main Functions menu displays after you select the Menu icon To open an application a menu 1 Tap the associated icon 2 Touch Hom...

Страница 34: ...ate it Firmly touch and slide your finger up or down the screen to scroll through lists of menu items Scrolling on the T919 requires a more firm touch on the screen than the gentle touch required to open menu items Flick the screen in an upward motion to quickly scroll through the list The following image illustrates how to access the Settings menu options Note Tapping or touching individual entri...

Страница 35: ...ch My Account Telenav Voice recognition Calendar Bluetooth Today Alarm Message composer Games and Apps Voice mail Digital clock Analog clock Dual clock and Birthday The following table contains a description of each Widget it s function and how to navigate through that particular application If the application is already described in another section of this user manual then a cross reference to th...

Страница 36: ...sts Albums From this screen you can play your music files 䊳 Tap the Music Library icon to display the Music Library menu For more information refer to Music Player on page 110 InstantMessaging IM isawayofsendingshort simplemessagesthataredeliveredimmediately to users online at that moment Beforeusingthisfeature youneedtosubscribetoamessengerservice Forfurtherdetails contact your service provider T...

Страница 37: ...sstoMoreGamesandotherapplicationssoyoucandownloadmoregamesfromthe T Mobile website 䊳 Touch drag and drop then tap the Games and Apps icon to launch the More games menu For more information refer to Games and Apps on page 89 The display shows the current time on an analog clock 䊳 Touch drag and drop the Analog clock onto the desktop to view the time in an analog format This menu allows you to chang...

Страница 38: ...toand receiveshorttextmessagesfrom other mobilephones For more information refer to Text Messages on page 60 YoucanalsousetheMultiMediaService MMS tocreatemultimediamessagestosendandreceive from other mobile phones For more information refer to Picture Messages on page 64 1 In Idle mode Touch Menu Messaging Create message 2 Tap the screen to display the keyboard and create your message This search...

Страница 39: ...ropriate day The display shows the current time on a digital clock 䊳 Touch drag and drop the Analog clock onto the desktop to view the time in a digital format This feature allows you to find out what time it is another part of world 䊳 Touch drag and drop the World clock onto the desktop to view the time in dual locations From this application you can activate Bluetooth and configure it so other B...

Страница 40: ... and Dropping Certain menus allow you to move drag and drop an application onto the Main display screen or other object For example you can drag the Music Player from the Shortcut menu onto the Main display screen using the drag and drop feature see illustration To drag and drop an application or item into another object or onto the Main display 1 Touch and hold the icon you wish to move and drag ...

Страница 41: ...n another menu or in the case of this example on the Main display screen Tapping After you drag and drop an application to the desktop tap on the application to display more information Drag from the Drop onto the Idle screen Widget bar T919 Roxy book Page 38 Thursday September 25 2008 5 01 PM ...

Страница 42: ...gets but can only display six widget icons at one time To view more widgets 䊳 Swipe up and down along the Widget bar Tip Flick the screen in an upward motion to quickly scroll through the list T919 Roxy book Page 39 Thursday September 25 2008 5 01 PM ...

Страница 43: ... box to place a check mark next to the Widget you want to display Note By default the widgets are all checked so they display 3 Touch the check box again to remove the check mark and hide the widget Note For more information refer to Widget on page 133 Touch a checkbox to active this Widget T919 Roxy book Page 40 Thursday September 25 2008 5 01 PM ...

Страница 44: ... words with only one keystroke per letter Each key on the keypad has more than one letter for example touching can enter J K or L However the T9 mode automatically compares the series of keystrokes you make with an internal linguistic dictionary to determine the most likely word thus requiring far fewer keystrokes than the traditional ABC mode ABC mode this mode allows you to enter letters by touc...

Страница 45: ...d select one of the following options Abc ABC abc Numeric Symbols or 2 Press Shift to toggle T9 mode from T9Abc to T9ABC or T9abc 3 Touch the text mode you desire The text mode changes to the mode you touched Text Mode Indicator T919 Roxy book Page 42 Thursday September 25 2008 5 01 PM ...

Страница 46: ... on the screen from which to choose If these choices do not include the word you want to use add a new word into the T9 dictionary Example Both the words Of and Me have the 6 and 3 keys The phone displays the most commonly used choice first 4 Insert a space by touching Space and start entering the next word To add a new word into the T9 dictionary 1 If the word does not display in the alternate ch...

Страница 47: ...keys corresponding to the digits you want to enter Using Symbols Symbol mode enables you to insert symbols and punctuation marks into text To display a list of symbols touch Symbols 1 To select a symbol touch the desired symbol key 2 To display more symbols touch the left or right keys 3 To clear the symbol s touch the key 4 Select the other letters in the same way To enter a period or comma touch...

Страница 48: ...rd Depending on which format you are using portrait or QWERTY the keys are associated with different letters and or characters Refer to the following layouts to determine which keys are associated with letters characters or symbols The handwriting method is also displayed For more information on handwriting a text message see Creating a Text Message using the Pen Tool on page 62 0 160 Create New M...

Страница 49: ...nd synchronizes with the T Mobile network After the initial use of this feature additional new contact information stores directly to the phone s memory and synchronizes with T Mobile s network during predetermined timed intervals For more information refer to Mobile Backup on page 54 Note When storing an entry into your SIM card note that only the Name and Number are saved To save additional info...

Страница 50: ...ollowing screen to add additional contact information for this contact 8 Touch Save when you are finished Note For further details about how to enter characters see Using ABC Mode on page 44 Allows you to add a ringtone web address or caller image to the contact information Allows you to add an email address or associate an IM address with this contact Allows you to schedule a Birthday or Annivers...

Страница 51: ...uch Done 5 Touch Save when you are finished Note For further details about how to enter characters see Using ABC Mode on page 44 Finding a Phonebook Entry You can store phone numbers and their corresponding names onto either your SIM card or phone s built in memory They are physically separate but are used as a single entity called Phonebook Depending on the storage size of the particular SIM card...

Страница 52: ...o the Phone or SIM card Depends on where the entry was originally created Making a Call from the Phonebook Once you have stored phone numbers in the Phonebook you can dial them easily and quickly by using the location numbers that were assigned to them Note If you cannot remember a location number you must search the Phonebook to find an entry by name For more information refer to Finding a Phoneb...

Страница 53: ...p members Addmember allows you to add a member to the Caller Group Edit allows you to edit the Group information Remove member allows you to remove a member from the Caller Group 4 Touch the Group name field enter a new name and touch Done 5 Touch the Group picture field and select the Photos folder or touch an image from the Images screen 6 Touch the Group ringtone field and touch a ringtone from...

Страница 54: ...re deleted they cannot be recovered 1 In Idle mode touch Ph book 2 Touch Delete 3 Touch All or touch the check box beside each entry you want to delete and touch Delete The selected entries or all of the Phonebook entries are deleted Speed Dialing Once you have stored phone numbers from your Contacts List you can set up to 8 speed dial entries and then dial them easily whenever you want simply by ...

Страница 55: ...e mail number in the Ph book My Profile My Profile allows you to create a virtual business card Once completed you can send the card to recipients as a V card attachment Note As with any profile your profile can be associated with a group To create a profile 1 In Idle mode touch Ph book My profile displays 2 Touch My Profile 3 Touch the First name field and enter a first name for this profile 4 To...

Страница 56: ...opy contacts 3 Touch Phone to SIM or SIM to Phone 4 Touch the All check box or touch the check box next to each contact you want to copy and touch Copy 5 The selected contact s is copied from Phone memory to SIM memory or from the SIM memory to the Phone memory depending on the Save new contacts setting Move The Move option allows you to move all contacts from your SIM card to your Phone or from y...

Страница 57: ...you want to send the namecard The namecard automatically sends to the selected device Mobile Backup T Mobile backs up your Address book the first time you turn on your phone and each time you make a change to the address book Important To manage your contacts and options regarding Mobile Backup go to my t mobile com See your Terms Conditions for further details 1 In Idle mode touch Ph Book More 2 ...

Страница 58: ... numbers The FDN List allows you to set up a list of numbers your phone may dial Use Security settings to enable FDN mode For more information on changing this setting see Fixed Dialing Mode on page 147 To enable FDN mode a PIN2 number is required You can obtain your PIN2 from T Mobile customer service Note FDN mode must first be enabled in the Security settings For more information on changing th...

Страница 59: ...contact View contacts from This option allows you to view all the contacts stored on the Phone SIM or the Phone and SIM 1 In Idle mode touch Menu Settings Application settings Phonebook The Management menu displays 2 Touch View contacts from The following options are available All allows you to view all contacts stored to the Phone s memory and the SIM memory when you view the phonebook Phone allo...

Страница 60: ...hone number 5 Touch Save to confirm your entries Memory Status You can check how many names and numbers are stored in the Phonebook within the SIM card Phone memory and the FDN list You can also see the current storage capacity of all three memories 1 In Idle mode touch Ph book 2 From the drop down list select Contacts 3 Touch More 4 Touch Memory status The Phone SIM and FDN status displays T919 R...

Страница 61: ...of Messages Your phone provides the following message types Audio postcard Text Messages Picture Messages Voice Note E mail Instant Messaging Broadcast Messages SIM Dependent Message Icons on the Icon Line Icons displayed at the top of the screen indicate new messages were received For more information refer to Icons on page 17 T919 Roxy book Page 58 Thursday September 25 2008 5 01 PM ...

Страница 62: ...ciated message tab and then Touch the View or Connect soft key Audio Postcard In this menu you can select a frame take a picture and then record a voice message up to one minute long and send it as an Audio Postcard In Idle mode Touch Audio postcard The screen displays a default postcard in landscape mode 1 Touch the Left or Right key to display more postcard frames 1 New messages 2 Missed calls 3...

Страница 63: ...the email address and touch Add My Album allows you to send the Audio Postcard to My Album Text Messages Short Message Service SMS allows you to send and receive short text messages to and from other mobile phones The Message icon displays when you receive a new text message When the memory is full the message icon flashes on your phone and you cannot receive any new messages You must delete a mes...

Страница 64: ...sh entering your message touch Done 4 Touch Send 5 Select one of the following from the Send To menu and touch Add when you are finished Recent recipients allows you to select a number or an address from the last 20 destinations you entered Phonebook allows you to enter the phone number you want from your Contacts List Newnumber allows you to enter a phone number not already listed in the Phoneboo...

Страница 65: ... Touch the Pen tool then use your fingertip or a stylus to handwrite your message Note As you write the keypad translates your handwriting into text 4 Use the key to correct any characters then touch the keypad icon and enter the correct letters or words using the keyboard 5 When you finish entering your message touch Done 6 Touch Send Pen Tool T919 Roxy book Page 62 Thursday September 25 2008 5 0...

Страница 66: ...or sending subsequent messages 1 In Idle mode Touch Menu Messaging Messages settings Text message Sending options 1 Touch Sending options 2 Touch one of the following options to set Send settings for text messages Reply Path allows the recipient of your message to send you a reply message using your message center if your network supports this service Delivery Report when this option is enabled th...

Страница 67: ... In Idle mode Touch Menu Messaging Create message 2 Tap the screen to display the keyboard and create your message Tip Tilting the phone to a horizontal position displays the QWERTY keyboard while holding the phone in the vertical position displays the numeric keypad Additionally the QWERTY keyboard and the numeric keypad can be changed only when the angle of a phone from the ground is more than 4...

Страница 68: ...Text Template to attach to this message Insert from Ph Book allows you to select a contact profile from the Phonebook Bookmark allows you to select a URL to attach to this message 8 Touch Send 9 Select one of the following send options from the Send To menu Recent recipients allows you to select a number or an address from the last 20 destinations you entered Phonebook allows you to enter the phon...

Страница 69: ...equest for a reply along with your message to the recipient Keep a copy your phone maintains a copy of all the sent picture messages Add my name card automatically attaches My Name Card when you send a picture message Receiving options Send read report you can set the option to receive a Read report Send delivery report you can set the option to receive a Delivery report Reject anonymous you can s...

Страница 70: ...ou can record a voice note of up to one minute long and then immediately send it via Picture Messaging When you access this menu a timer displays on the screen 1 In Idle mode Touch Menu Messaging Create message 2 Touch Sound to record a voice note and select Record Sound 3 Touch the Stop icon to stop recording and save the sound 4 Touch More and select one of the following options Delete deletes t...

Страница 71: ...age was read otherwise the envelope displays as closed The following types of messages may display in your inbox When you enter the Inbox the list of messages displays with the sender s phone numbers or names if available in your Contacts List After you have read the message the envelope in the icon displays as opened 1 In Idle mode Touch Menu Messaging Inbox Viewing a Text Message from the Inbox ...

Страница 72: ...ose the following options Reply to allows you to replay to the senders picture message with a text or picture message Delete deletes the selected message from the Inbox Forward allows you to forward the message to another number More Move to My folder movesthe selected message to a personal folder At the create folder promtp touch OK enter a name for the new folder and touch Done Or if a folder al...

Страница 73: ...ntact information Save as Template allows you to save the voice note as a template Save attachment allows you to save the voice note to the Voice list folder Details displays information about the message such as time and date the message was received the sender s email address or phone number recipient s email address or phone number size priority delivery report and read report Lock Unlock allow...

Страница 74: ...mode touch Menu Messaging Messages settings Push messages Receiving options you can specify whether to turn push message reception On or Off Service Loading specify whether to load this service Always Prompt or Never Sorting Inbox Messages Your Inbox messages can be sorted by Date Sender Type Subject Size and Lock Unlock To sort the Inbox 1 In Idle mode touch Menu Messaging Inbox 2 Touch Sort by a...

Страница 75: ...required for sign in varies depending on the Instant Messaging provider you use 4 If you use Windows Live agree to the terms and conditions of use for this service and touch I agree 5 Follow the on screen instructions to read reply to compose send and manage your Instant Messaging account Using the Instant Messenger Options Use the following procedure to access the Instant Messenger options 1 In I...

Страница 76: ...choose one of the following options Create new allows you to create a new message Sort by allows you to display messages in the Outbox by Date Receipient Type Subject or Size Move movesthe selected message to apersonal folder At thecreatefolder prompt touch OK Enter a namefor the new folder and touch Done Or if a folder already exists touch Move Delete allows you to delete a selected message from ...

Страница 77: ... page to this message Add subject allows you to add a subject to this message Automatically changes the type of message to a picture message Add attachment allows you to add a File Name card Schedule Memo Tasks or Bookmarks to this outgoing message as an attachment Edit style allows you to modify the Background color Font color Font style or Page duration for this message Note this option automati...

Страница 78: ... Album Save in Drafts allows you to resave this file to the drafts More Add page Inserts an additional page into the message and automatically converts to a Picture message Add subject allows you to add a subject to the message Add attachment allows you to insert a File Name Card Schedule Memo Tasks or Bookmarks into the message Edit style allows you to modify the Background color Font color Font ...

Страница 79: ... stored text Templates in your message Creating a Text template 1 In Idle mode touch Menu Messaging Templates 2 Touch Text templates 3 Touch Create 4 Tap the screen and enter the text for the text template and touch Done For more information refer to Using ABC Mode on page 44 5 Touch Save Deleting a Text template 1 In Idle mode touch Menu Messaging Templates 1 Touch Text templates 2 Touch Delete 3...

Страница 80: ... from Sounds allows you to select a sound music or a voice note to attach to this message 7 Touch Video to add a video clip to this message and select from the following Record Video allows you to record a video clip up to 600Kb to attach to this message Add from Videos allows you to select a video to add from the Videos folder 8 Touch Other and select from the following Text Template allows you t...

Страница 81: ...t a picture from the Photos album to attach to this message 6 Touch Sound to add a sound to this message and select from the following Record Sound allows you to record a voice message to attach to this message Add from Sounds allows you to select a sound music or a voice note to attach to this message 7 Touch Video to add a video clip to this message and select from the following Record Video all...

Страница 82: ...e allows you to modify the Background color Font color Font style or Page duration for this picture message template 1 In Idle mode touch Menu Messaging Templates 2 Touch Picture message templates 3 Touch a template from the list 4 Touch Edit The template displays 5 Touch More Edit style 6 Touch the Select page drop down menu to select This page or All pages 7 Touch the Background color drop down ...

Страница 83: ...twork informs you whether or not your message was delivered Request read report when this option is enabled your phone sends a request for a reply along with your message to the recipient 7 Touch the Keep a copy checkbox if you want to keep a copy of this message 8 Touch Save to save your sending options Voice Mail This menu provides you with a way of accessing your voice mailbox if provided by yo...

Страница 84: ...folders 4 At the Locked messages confirmation touch Yes to delete your selections Memory Status You can check the amount of the memory used and the memory remaining for picture messages Text messages Push messages Broadcast messages or Configuration messages To view the memory status 䊳 In Idle mode touch Menu Messaging Memory status The display shows the total space including the used and free spa...

Страница 85: ...rious topics such as the weather or traffic Note Please contact T Mobile customer service for further details Text Message saved on the Phone and SIM card Inbox Outbox Drafts My folders Configuration messages Inbox My folders Push messages Inbox My folders T919 Roxy book Page 82 Thursday September 25 2008 5 01 PM ...

Страница 86: ... Applications 2 Touch Files 3 Touch Images The following options are available Browse Wallpapers Using the Browse Wallpapers option allows you to access the T Mobile website download new images using the t zones browser Note When downloading Wallpapers charges may apply My Album My Album is a private online picture album that you can use to store and send pictures videos voice messages and text Us...

Страница 87: ...en to change the view The following options are available My Album allows you to view images stored in My Album Take photo allows you to take a photo Create folder allows you to create a folder for your photos Manage allows you to move or copy image files to another location Delete allows you to delete one or more image files More Rename allows you to rename an image file Sort by allows you to org...

Страница 88: ...e to protect it fromdeletion Details displays the Name Format Resolution Size Forwarding Date created and Location Icons This menu allows you to personalize your favorite numbers with downloadable icon types Important These icons are only available is you subscribe to myFaves Call your customer service representative for additional details 1 In Idle mode touch Menu Applications Files Icons The fol...

Страница 89: ...etooth enabled device Bluetooth visibility allows you to enable this video so itis visible to other Bluetooth devices Lock allows you to lock this video file to protect it from deletion Sounds In this menu you can view the list of sounds downloaded from the web server or received in multimedia messages You can set a downloaded sound as the current ring tone 1 In Idle mode touch Menu Applications F...

Страница 90: ...devices Lock allows you to lock the music file to protect it from deletion 2 Select a music file and then touch one of the following options Set as allows you to set the music as your ring tone a Individual ringtone or an alarm tone Send via allows you to send the music file via Picture message or to a Bluetooth enabled device Details displays the music Name Format Size Forwarding Date created and...

Страница 91: ...ed voice note More Send via allows you to send the selected file asa Message or to a Bluetooth enabled device Set as allows you to set the sound as your ring tone a Individual ringtone or an Alarm tone Details displays the sound Name Format Size Forwarding Date created and Location Prior to listening to the voice note the following options are available Create folder allows you to create a folder ...

Страница 92: ...l bar to view the list Games and Apps Browse Games You can download more games from the T Mobile website by using the More Games option 1 In Idle mode touch Menu Applications Games and Apps Browse Games T zones launches 2 When downloading games charges may apply MIDlet game options will differ depending on the MIDlet you select Browse Games Options 3 Touch a game to start it or 4 Touch one of the ...

Страница 93: ...gs using the ring melody selected in the Ring tone menu Increasing melody the melody volume increases Vibration the phone vibrates but does not ring Vibration then melody the phone vibrates 3 times and then starts ringing Vibration melody the phone vibrates then plays a melody Vibration increasing melody the phone vibrates and the melody volume increases simultaneously 8 Touch the Alarm tone field...

Страница 94: ... Name or displays the Create Text Message screen Lookup Name allows you use a voice command to locate and display contact information stored in the Contacts list For more information refer to Finding a Phonebook Entry on page 48 Go to Menu accesses all the features of your phone if they are activated such as Web Calendar Ringtones Tasks Phonebook Voice mail and Games and Apps Check Item lets you c...

Страница 95: ...rained to recognize natural speech and performs best when you speak naturally In very noise environments it may be helpful to use the supplied earset or optional Bluetooth headsets Contacts List Voice Activation On startup Nuance reads your Contacts list and voice activates all the names When you have add or change contacts Nuance automatically reloads and voice activates the list when you add or ...

Страница 96: ...te the location work for example that you want to dial After a brief pause a list of available commands displays on the screen along with the Say a command message Note You cannot dial Voice Mail using the Location Dialing feature Send Text Message To access Voice recognition 1 In Idle mode touch Menu Applications Voice recognition After a brief pause a list of available commands displays on the s...

Страница 97: ...tact Opening Applications You can open an application or access a menu on your phone using Voice recognition To access Voice recognition 1 In Idle mode touch Menu Applications Voice recognitino After a brief pause a list of available commands displays on the screen along with the Say a command message 2 Say Go To at a distance of 3 8 inches from the microphone A list of options displays and a prom...

Страница 98: ... can choose to view the confirmation list even if there is only one choice Additionally you can choose never to view a confirmation list even if there are multiple choices When the name or number you speak is not recognized the Automatic setting displays the confirmation list 1 In Idle mode touch Menu Applications Voice recognition After a brief pause a list of available commands displays on the s...

Страница 99: ...tion 3 Touch Adapt Voice 4 The screen displays an adaptation message The entire adaptation process takes just a couple of minutes to complete Tip Perform the adapation process in a quiet room 5 Touch Start to being adapation or touch Back to cancel Modes Your voice recognition software includes an interface that allows you to customize your voice command mode setting to match your experience and c...

Страница 100: ... LVR number build number and device number Tasks This feature allows you to enter a list of tasks 1 In Idle mode touch Menu Applications Tasks 2 Touch the screen to create a task or 3 Touch Create task 4 Touch the Title field and enter a Title for this task 5 Touch the Priority field and select a level from the drop down menu High Medium or Low 6 Touch the Start date field and scroll up or down to...

Страница 101: ...Set details and select the alarm detail information that applies to this alarm 4 Touch Save to confirm your selections 5 Touch Save Memo This feature allows you to create a memo 1 In Idle mode touch Menu Applications Memo 2 Touch the screen or touch Create memo 3 Compose the note and touch Done For more information refer to Using ABC Mode on page 44 Memo options 1 While viewing the list of Memos t...

Страница 102: ... arithmetic functions addition subtraction multiplication and division 1 In Idle mode touch Menu Applications Calculator 2 Enter the first number using the numeric keys 3 Enter the operation for your calculation by touching the Plus Minus Multiplication or Division key 4 Enter the next number 5 To view the result touch the key Repeat steps 1 to 4 as many times as required World Clock This feature ...

Страница 103: ...egories Currency Length Weight Volume Area Temperature To convert a currency length weight volume area or temperature do the following 1 Touch the category that you want to convert 2 Enter the quantity you want converted in the empty field 3 Touch the drop down box to the right of the empty field and select the conversion type for example if you are converting currency use the drop down to select ...

Страница 104: ...ou can have up to 50 lap times 1 In Idle mode touch Menu Applications Stopwatch Help Help is designed to work with t zones to show you some of the unique features of your phone You can search help files on the fly while traveling at home or anywhere using help wap t mobile com 1 In Idle mode touch Menu Help Calendar With the Calendar feature you can Consult the calendar by day week or month Create...

Страница 105: ... allows you to delete scheduled events for Today This month All data before today or all data Calendar settings allows you to select the Starting day for this calendar as well as whether you view the calendar by Month Week or day Missed alarm events displays a list of missed alarm events Memory status displays the number of events scheduled out of a possible number depending on the memory size of ...

Страница 106: ...splays Today s date or another touched date Event list displays a list of the scheduled events for this week More View by month displays the calendar in month view View by week displays the calendar in week view Delete allows you to delete all events for a selected date delete all events for a specified period or delete all events for this weeks dates Calendar settings allows you to select the Sta...

Страница 107: ...s display Memory Status This menu item shows the number of calendar events that are stored on the handset as well as the total number of available events Example 2 300 means that currently there are two alarm events scheduled out of a possible 300 䊳 In Idle mode touch Menu Calendar More Memory status T919 Roxy book Page 104 Thursday September 25 2008 5 01 PM ...

Страница 108: ...n on the bottom of the screen or 3 Touch the Widget bar and tap the Web icon The following options are available Home Touch Home to select this menu You connect to the network and the t zones homepage loads Note The content of the t zones startup homepage depends on your Wireless Web service provider To go to the startup homepage from any other screen in the t zones touch the Home icon For more in...

Страница 109: ...ch as when entering a URL You can enter alphanumeric characters by using your phone s keypad For more information refer to Entering Text on page 41 Selecting and Using Menu Options Various menus are available when you are using t zones to navigate the Wireless Web To access the browser options menu 䊳 Touch the Options soft key Note The menus may vary depending on your version of t zones The follow...

Страница 110: ...webpages storedinyourweb browser To store a URL address 1 Touch Bookmarks and touch the screen or 2 Touch Add New 3 Enter a URL in the Enter URL Address field Allows you to select the page size to view Allows you to Go to a URL in which to navigate Displays a collection of up to 100 URL direct links URL addresses to predefined web pages stored in your web browser Resizes the window Save image Allo...

Страница 111: ... text message or sends the URL to a Bluetooth enabled device Browser Settings Various settings are available when you are using the t zones browser to navigate the wireless web 1 In Idle mode touch Menu Web Browser settings Clear cache You can clear the information stored in the cache the phone s temporary memory which stores the most recently accessed web pages 䊳 At the Clear cache prompt touch t...

Страница 112: ...t recently visited web sites 1 Touch Delte History 2 At the Delete history prompt touch Yes to delete or touch No to cancel Preferences The Preferences option allows you to set t zones preferences such as Run JavaScript Display images or Play sound About Browser About Browser displays information about the browser such as the type and version T919 Roxy book Page 109 Thursday September 25 2008 5 01...

Страница 113: ... screen you can either access the music tracks playlists artists or Albums simply by touching one of the categories You can also configure your settings for the music player from this screen For more information refer to Music Player Settings on page 110 Music Player Settings The Music Player Settings menu allows you to set preferences for the music player such as whether you want the music to pla...

Страница 114: ... Menu Music player or 2 From the Widget bar tap the Music player icon once When the Music player launches use the following list as a guide in order to access the Music player functions Normal Jazz Rock Wide Pop Dynamic Dance Surround Classic Playlists Composers Artists Recently played Albums Recently added When you touch the Sound icon the Increase volume and Decrease volume icons display T919 Ro...

Страница 115: ...t list and as the last song in the list ends the player begins replaying all of the songs in the order they display within the current list Advance advances to the next song Toggles the Shuffle mode On or Off Shuffle the current list of songs are randomly shuffled for playback Plays the previous song title touch once to toggle the play state of the current song to Play touch twice to toggle the pl...

Страница 116: ...e checkbox to the right of each track you want to add to this playlist or touch Select All to add all the music tracks to this playlist then touch Add Tip Touch the drop down menu in the upper right corner of the screen to view the Music library All tracks Playlists Artists or Albums screens Adding Music to a Playlist Before music can be played directly via the Music Player it is necessary to crea...

Страница 117: ...t to add the selections The music is automatically added to the current playlist Removing Music from a Playlist To remove music files from a playlist 1 In Idle mode touch Menu Music player 2 Touch More Go to Music library 3 Touch Playlists 4 Touch a playlist name to display the playlist 5 Touch Remove 6 Touch the checkbox to the right of each track you want to remove from this playlist or touch Se...

Страница 118: ... image from the Images folder or from the Photos folder 7 Touch Save 8 Touch Done Playlist Settings This option allows you to determine if the music can play in the background whether there are sound effects and how the Music menu displays 1 In Idle mode touch Menu Music player 2 Touch More Go to Music library 3 Touch Playlists 4 Touch More Settings 5 Touch On or Off for Background Playing 6 Touch...

Страница 119: ...mode touch Menu Music player The Music library screen displays 2 Touch Current playlist All tracks Play lists Artists or Albums 3 Touch a music file The music player starts playing the music 4 While listening to a music file touch one of the shortcut keys For more information refer to Music Player Shortcut Keys on page 111 or touch one of the following Set as saves the select music file as a ringt...

Страница 120: ...nto a Music folder on the microSD card For more information refer to USB Settings on page 149 Deleting Music Files 1 In Idle mode touch Menu Music player 2 Touch More Go to Music library 3 Touch All tracks 4 Touch Delete 5 Touch the checkbox next to each music file you want to delete then touch Delete The music file s deletes Assigning Music Files You can choose to assign music files as a ringtone...

Страница 121: ...screen displays 3 Touch the check box next to each individual music file you want to move or touch All to move all the music files to the Phone or Memory card 4 Touch Move 5 Touch Phone or Memory 6 Touch Move here The files are moved to the Phone or Memory card Copying a Music file 1 In Idle mode touch Menu Applications Files Sounds Music 2 Touch Manage 3 Touch Copy The Copy screen displays 4 Touc...

Страница 122: ...re Go to Music library 3 Touch All tracks 4 Touch a track to send via Bluetooth 5 Touch Send via bluetooth Note Bluetooth must be enabled to send a music file to another Bluetooth device 6 Touch Search to search for a Bluetooth device 7 Touch the Bluetooth device in which to send this music file The music file sends to the selected Bluetooth device T919 Roxy book Page 119 Thursday September 25 200...

Страница 123: ...rivacy Take and Send Your 5 0 megapixel camera produces photos in JPEG format Note When you take a photo in direct sunlight or in bright conditions shadows may display on the photo 1 In Idle mode touch Menu Camera or 2 Press the Camera key to activate the camera 3 Adjust the image by aiming the camera at the subject 4 Prior to taking a picture touch the Setup icon to set the Scene Resolution White...

Страница 124: ... saving destination for photos View finder displays in camera mode so you can capture another photo 9 Press the key to return to the Idle screen Configuring Camera Options 1 In Capture mode prior to taking a new photo touch one of the on screen icons to use various options for the camera module The following options are available Camera Video allows you to take a picture or record a video Mode tak...

Страница 125: ... the image quality to Superfine Fine Normal or Economy Exposuremeter allows you to set how the camera measures or meters the light source Matrix Centre weighted or Spot Anti Shake allows you to touch On to activate Anti Shake or Off to deactivate it WDR allows you to set the Wide Dynamic Range Touch On to activate WDR or Off to deactivate it Flash allows you to set the flash mode to Automatic Manu...

Страница 126: ...Camera mode and when the Camera displays you are in Video mode allows you to change the shooting mode allows you to set a time delay before the camera takes the photo allows you to configure settings for this photo or for the Camera allows you to set the flash mode allows you to set the brightness levels allows you to configure the default destination allows you to view the image from the Photos f...

Страница 127: ...ther Bluetooth devices Lock allows you to lock this photo file to protect it from deletion 4 Touch a photo on the screen to view the photo 5 While viewing the photo choose from the following options Send via allows you to send the selected photo as a Picture message Audio postcard or to a Bluetooth enabled device Set as allows you to set the photo as your Wallpaper or as a Picture ID Slideshow all...

Страница 128: ...Menu Applications File Image Photos 2 Touch Delete 3 Touch the checkbox to the right of the photos you want to delete or touch Select all then touch Delete 4 Touch the key to return to Idle mode Renaming a Photo 1 In Idle mode touch Menu Photos When you access this menu your phone displays the photos in Line view or Thumbnail view depending on which mode you select Tip You can also navigate by tou...

Страница 129: ...cking a photo prevents deletion of the file 1 In Idle mode touch Menu Applications Files Images Photos When you access this menu your phone displays the photos in Line view or Thumbnail view depending on which mode you select 2 Touch More Lock 3 Touch the photo that you want to lock The lock icon displays as locked 4 Touch the photo again to unlock it 5 Touch Done Saving a Photo as Wallpaper After...

Страница 130: ...just the Auto Level Brightness Contrast and Color for this photo Transform allows you to transform the selected photo Select Resize Rotate or Flip Crop allows you to use the crop tool to crop this photo Drag the drop tool in the direction that you want to begin cropping the box expands with sizing points displayed Touch the sizing points and drag the box in the direction you want to crop When you ...

Страница 131: ...Options on page 128 5 Touch the icon to change to Camcorder mode 6 Press the camera key to begin recording the video 7 Touch the icon when you want to stop recording 8 Tap the screen once and touch one of the following Send to My Album online allows you to save this recorded video in My Album online Play allows you to play the recorded video or 9 Configure the video options For more information re...

Страница 132: ...ws you to turn audio recording On or Off Storage allows you to store video to the Phone memory or to the memory card Review allows you to turn the review feature On or Off Guidelines allows you to turn the guidelines On or Off 2 You can use the icons to quickly change the video options For more information on camcorder shortcut keys see Camcorder Shortcuts on page 130 Once the video is recorded th...

Страница 133: ... in Camera mode and when the Camera displays you are in Video mode allows you to change the recording mode allows you to set a time delay before the camera takes the photo allows you to configure settings for this photo or for the Camera allows you to set the flash mode allows you to set the brightness levels allows you to configure the default destination allows you to view the file from the Vide...

Страница 134: ...o organize your video files by Date Type Name or Size Send via Bluetooth allows you to send this video to a Bluetooth enabled device Bluetooth visibility allows you to enable this video so itis visible to other Bluetooth devices Lock allows you to lock this video file to protect it from deletion 5 Touch a video file When you access this menu your phone displays the videos in Line view or Thumbnail...

Страница 135: ...bum Note When accessing My Album charges may apply The feature is not activated until you send your first image to the remote My Album location 1 In Idle mode touch the Menu Applications Files Images My Album The web browser launches and the T Mobile Web page displays 2 Touch the My Albums Menu link 3 Photos sent to this folder are stored in the Inbox Album Touch the Back soft key to view the phot...

Страница 136: ...s display or hide in the Widget bar 1 From Idle mode touch Settings Widget 2 Touch the check box to place a check mark next to the widget you want to display in the shortcut bar Note By default the Web Photos message inbox IM Tips Search My Account Telenav Voice recognition Calendar Bluetooth and Today icons are selected The remainder of the widgets must be selected so they can display 3 Touch the...

Страница 137: ... menu and select Call 4 Touch the Call alert type field select one of the following and touch Save Melody the phone rings using the ring melody selected in the Ring tone menu Increasing melody the melody volume increases Vibration then melody the phone vibrates 2 times and then starts ringing Vibration melody the phone vibrates and plays a melody simultaneously Vib increasing melody the phone vibr...

Страница 138: ...eld touch to select a ringtone and touch Save 6 Touch the Message alert repetition drop down and select one of the following options Once repeats the message alert once Periodic repeats the message alert periodically 7 Touch the Alert tone volume field then touch and drag the slider to the volume level you desire range is 1 7 and touch Save 8 Touch the Message alert vibration field and select Vibr...

Страница 139: ...gs using the ring melody selected in the Ring tone menu Vibration the phone vibrates but does not ring Vibration melody the phone vibrates and plays a melody simultaneously Mute the phone is silent and does not play a melody or vibrate 8 Touch the Phone sound volume field then touch and drag the slider to the volume level you desire range is 0 7 9 Touch Save to return to the Sound Profiles menu Si...

Страница 140: ... Vibration intensity slider and scroll to the desired intensity level 0 7 5 Touch the Call alert vibration field and select Vibration 1 5 then touch Save 6 Touch Save to return to the Sound Profiles menu Message 1 From Idle mode touch Menu Settings Sound Profiles 2 Touch Vibration 3 Touch the drop down menu and select Message 4 Touch the Message alert repetition drop down and select one of the fol...

Страница 141: ...ll alert type field select one of the following and touch Save Melody the phone rings using the ring melody selected in the Ring tone menu Increasing melody the melody volume increases Vibration then melody the phone vibrates 2 times and then starts ringing Vibration melody the phone vibrates and plays a melody simultaneously Vib increasing melody the phone vibrates and the melody increases simult...

Страница 142: ...s 1 7 8 Touch the Message alert vibration field and select Vibration select Vibration 1 3 then touch Save 9 Touch Save to return to the Sound Profiles menu Phone 1 From Idle mode touch Menu Settings Sound Profiles 2 Touch Driving 3 Touch the drop down menu and select Phone 4 Touch the Keypad tone drop down and select one of the following tones Beep TouchWiz 5 Touch the Power on type field select o...

Страница 143: ... the phone to vibrate and ring loudly Call 1 From Idle mode touch Menu Settings Sound Profiles 2 Touch Outdoor 3 Touch the drop down menu and select Call 4 Touch the Call alert type field select one of the following and touch Save Melody the phone rings using the ring melody selected in the Ring tone menu Increasing melody the melody volume increases Vibration then melody the phone vibrates 3 time...

Страница 144: ... repeats the message alert once Periodic repeats the message alert periodically 7 Touch the Alert tone volume field then touch and drag the slider to the intensity level you desire range is 1 7 8 Touch the Message alert vibration field and select Vibration select Vibration 1 3 then touch Save 9 Touch Save to return to the Sound Profiles menu Phone 1 From Idle mode touch Menu Settings Sound Profile...

Страница 145: ...ion melody the phone vibrates and plays a melody simultaneously Mute the phone is silent and does not play a melody or vibrate 7 Touch the Phone sound volume field then touch and drag the slider to the volume level you desire range is 0 7 8 Touch Save to return to the Sound Profiles menu Display Settings In this menu you can change various settings for the display or backlight 1 From Idle mode tou...

Страница 146: ...e backlight duration set the brightness levels 1 From Idle mode touch Menu Settings Display settings 2 Touch LCD brightness 3 From the Automatic field touch On to activate or Off to deactivate 4 Touch and drag the Level slider to the brightness level you desire range is 1 5 5 Touch Save Backlight time A backlight illuminates the internal display and the keypad When you touch any key the backlight ...

Страница 147: ...need to manually set the time and date according to the current time zone using the Set time menu Prompt first you are prompted for a time change if available 3 Touch the Time zone field only available if Time zone updating is set to Manual only or Prompt first 4 Touch 12H 12 hour or 24H 24 hour from the Time format field 5 Touch the Time field and select Hour minute 6 Touch the Date format drop d...

Страница 148: ...ions Automatic English Français Español 4 Touch the Input language drop down list and select from one of the following English Français Español 5 Touch Save Vibration feedback You can set the level of intensity at which you want the vibration mode 1 From Idle mode touch Menu Settings Phone settings 2 Touch Vibration feedback 3 Touch and drag the Vibration intensity slider to the intensity level yo...

Страница 149: ... settings 2 Touch On or Off from the Auto keypad lock field Security The Security feature enables you to restrict the use of your phone by others and to restrict the types of calls Various codes and passwords are used to protect the features of your phone 1 From Idle mode touch Menu Settings Phone settings 2 Touch Security Lock Phone When the Lock Phone feature is enabled the phone is locked and y...

Страница 150: ...e Phone Password on page 147 Fixed Dialing Mode FDN Fixed Dial Number mode if supported by your SIM card allows you to restrict your outgoing calls to a limited set of phone numbers 1 Touch On or Off from the Fixed dialing mode field On you can only call phone numbers storedinPhonebook You must enter your PIN2 You can obtain your PIN2 fromT Mobile s customer service department Off you can call any...

Страница 151: ...w one Once you have entered a new PIN you are asked to confirm it by entering it again 1 Touch the Change PIN code field 2 Enter your PIN code 3 Confirm your PIN code Change PIN2 code The Change PIN2 code feature allows you to change your current PIN2 to a new one You must first enter the current PIN2 obtained from T Mobile before you can specify a new one Once you have entered a new PIN2 you are ...

Страница 152: ...one settings 2 Touch USB Settings 3 Select one of the following USB modes Samsung PC studio sets PC Studio to launch as the default application when a USB connection is detected Ask on connection requires the phone to display a message which requires you to assign a default USB application Mass storage allows you to utilize the onboard storage capacity of the phone to store and upload files This o...

Страница 153: ...Using ABC Mode on page 44 4 Touch Done My Phone s Visibility 1 From Idle mode touch Menu Settings 2 Touch Bluetooth Settings 3 Touch On or Off from the My phone s visibility field 4 Touch Save Secure Mode When the Bluetooth Visibility is turned on your phone is wirelessly transmitting its phone name and status This transmission can pose a security risk and incite unauthorized connection to your ph...

Страница 154: ... 2 Touch Bluetooth Settings Bluetooth services The following information displays Headset the Bluetooth headset enables both incoming and outgoing calls using the Bluetooth headsets Handsfree the Bluetooth car kit enables both incoming and outgoing calls Bluetooth Stereo Headset used to make calls and listen to music through the Bluetooth stereo headset Serial Port used to connect to other Bluetoo...

Страница 155: ...ut off or you were unable to connect Auto reply sets up an automatic text reply for incoming calls Call forwarding incoming calls are re routed to a secondary number that you specify Call barring allows you to restrict specific types of incoming and outgoing calls on your phone Call waiting this network service informs you when someone is trying to reach you during another call You can specify ind...

Страница 156: ...ent between the two To change the Network Selection mode 1 From Idle mode touch Menu Settings Network selection Search now To change the Network Selection mode 1 Touch Search now The phone scans for network connections and displays them 2 Touch the network to which you subscribe and touch Select Default setup To change your Default setup 1 Touch Default setup 2 Touch one of the following options A...

Страница 157: ...Menu Settings Memory settings Memory card details The details display 2 Touch one of the following options Format allows you to erase all the data on the inserted memory card and formats it for your phone Rename allows you to rename this memory card if a name was assigned Memory status You can check the amount of the memory being used and the memory remaining for Shared memory Messages Files Calen...

Страница 158: ...hone settings are returned to default values 3 Touch Reset Master reset From this menu you can reset your phone and sound settings to the factory default settings 1 From Idle mode touch Menu Settings Reset settings 2 Touch Master reset enter your password then select Yes to confirm The phone resets to the factory default settings automatically and when finished displays the Main menu Software Upda...

Страница 159: ...he biological effects of RF energy The exposure limit set by the FCC for wireless mobile phones employs a unit of measurement known as the Specific Absorption Rate SAR The SAR is a measure of the rate of absorption of RF energy by the human body expressed in units of watts per kilogram W kg The FCC requires wireless phones to comply with a safety limit of 1 6 watts per kilogram 1 6 W kg The FCC ex...

Страница 160: ... a particular model phone this site uses the phone FCC ID number which is usually printed somewhere on the case of the phone Sometimes it may be necessary to remove the battery pack to find the number Once you have the FCC ID number for a particular phone follow the instructions on the website and it should provide values for typical or maximum SAR for a particular phone Additional product specifi...

Страница 161: ...he exposure to RF is drastically lower because a person s RF exposure decreases rapidly with increasing distance from the source The so called cordless phones which have a base unit connected to the telephone wiring in a house typically operate at far lower power levels and thus produce RF exposures well within the FCC s compliance limits Do wireless phones pose a health hazard The available scien...

Страница 162: ...elongs to an interagency working group of the federal agencies that have responsibility for different aspects of RF safety to ensure coordinated efforts at the federal level The following agencies belong to this working group National Institute for Occupational Safety and Health Environmental Protection Agency Federal Communications Commission Occupational Safety and Health Administration National...

Страница 163: ...ustic neuroma tumors of the brain or salivary gland leukemia or other cancers None of the studies demonstrated the existence of any harmful health effects from wireless phones RF exposures However none of the studies can answer questions about long term exposures since the average period of phone use in these studies was around three years What research is needed to decide whether RF exposure from...

Страница 164: ...lude both laboratory studies and studies of wireless phone users The CRADA will also include a broad assessment of additional research needs in the context of the latest research developments around the world What steps can I take to reduce my exposure to radio frequency energy from my wireless phone If there is a risk from these products and at this point we do not know that there is it is probab...

Страница 165: ...hese systems reduce the absorption of RF energy in the head because the phone which is the source of the RF emissions will not be placed against the head On the other hand if the phone is mounted against the waist or other part of the body during use then that part of the body will absorb more RF energy Wireless phones marketed in the U S are required to meet safety requirements regardless of whet...

Страница 166: ...specifies test methods and performance requirements for hearing aids and wireless phones so that no interference occurs when a person uses a compatible phone and a compatible hearing aid at the same time This standard was approved by the IEEE in 2000 FDA continues to monitor the use of wireless phones for possible interactions with other medical devices Should harmful interference be found to occu...

Страница 167: ... phone within easy reach Be able to access your wireless phone without removing your eyes from the road If you get an incoming call at an inconvenient time let your voice mail answer it for you 4 Let the person you are speaking with know you are driving if necessary suspend the call in heavy traffic or hazardous weather conditions Rain sleet snow ice and even heavy traffic can be hazardous 5 Do no...

Страница 168: ...ponsible Listening Caution Avoid potential hearing loss Damage to hearing occurs when a person is exposed to loud sounds over time The risk of hearing loss increases as sound is played louder and for longer durations Prolonged exposure to loud sounds including music is the most common cause of preventable hearing loss Some scientific research suggests that using portable audio devices such as port...

Страница 169: ...at lower volumes than when using earbuds Limit the amount of time you listen As the volume increases less time is required before you hearing could be affected Avoid using headphones after exposure to extremely loud noises such as rock concerts that might cause temporary hearing loss Temporary hearing loss might cause unsafe volumes to sound normal Do not listen at any volume that causes you disco...

Страница 170: ...l it is recommended that the equipment should only be used in the normal operating position held to your ear with the antenna pointing over your shoulder if you are using an external antenna National Institute on Deafness and Other Communication Disorders National Institutes of Health 31 Center Drive MSC 2320 Bethesda MD 20892 2320 Voice 301 496 7243 Email nidcdinfo nih gov Internet http www cdc g...

Страница 171: ...e If you have any questions about using your wireless phone with such a device consult your health care provider For more information see http www fcc gov oet rfsafety rf faqs html FCC Hearing Aid Compatibility HAC Regulations for Wireless Devices On July 10 2003 the U S Federal Communications Commission FCC Report and Order in WT Docket 01 309 modified the exception of wireless phones under the H...

Страница 172: ...e is relatively immune to interference noise The hearing aid and wireless phone rating values are then added together A sum of 5 is considered acceptable for normal use A sum of 6 is considered for best use In the above example if a hearing aid meets the M2 level rating and the wireless phone meets the M3 level rating the sum of the two values equal M5 This is synonymous for T ratings This should ...

Страница 173: ...ised to switch the phone off while at a refueling point service station Users are reminded of the need to observe restrictions on the use of radio equipment in fuel depots fuel storage and distribution areas chemical plants or where blasting operations are in progress Areas with a potentially explosive atmosphere are often but not always clearly marked They include below deck on boats chemical tra...

Страница 174: ...e your phone bill FCC Notice and Cautions FCC Notice The phone may cause TV or radio interference if used in close proximity to receiving equipment The FCC can require you to stop using the phone if such interference cannot be eliminated Vehicles using liquefied petroleum gas such as propane or butane must comply with the National Fire Protection Standard NFPA 58 For a copy of this standard contac...

Страница 175: ...enial of telephone services to the offender or legal action or both Product Performance Getting the Most Out of Your Signal Reception The quality of each call you make or receive depends on the signal strength in your area Your phone informs you of the current signal strength by displaying a number of bars next to the signal strength icon The more bars displayed the stronger the signal If you re i...

Страница 176: ...s and features are network dependent and may require additional subscription and or usage charges Not all features are available for purchase or use in all areas Downloadable Ring Tones may be available at an additional cost Other conditions and restrictions may apply See your service provider for additional information Battery Standby and Talk Time Standby and talk times will vary depending on ph...

Страница 177: ... the battery in hot or cold places such as in a car in summer or winter conditions as you will reduce the capacity and lifetime of the battery Always try to keep the battery at room temperature A phone with a hot or cold battery may temporarily not work even when the battery is fully charged Li ion batteries are particularly affected by temperatures below 0 C 32 F Do not place the phone in areas t...

Страница 178: ...ng temperature moisture can form inside the phone which may damage the phone s electronic circuit boards Do not drop knock or shake the phone Rough handling can break internal circuit boards Do not use harsh chemicals cleaning solvents or strong detergents to clean the phone Wipe it with a soft cloth slightly dampened in a mild soap and water solution Do not paint the phone Paint can clog the devi...

Страница 179: ...ces or other externally exposed parts that are scratched or damaged due to normal use d malfunctions resulting from the use of Product in conjunction with accessories products or ancillary peripheral equipment not furnished or approved by SAMSUNG e defects or damage from improper testing operation maintenance installation or adjustment f installation maintenance and service of Product or g Product...

Страница 180: ...anty Purchaser must pay all parts shipping and labor charges for the repair or return of such Product WHAT ARE THE LIMITS ON SAMSUNG S WARRANTY LIABILITY EXCEPT AS SET FORTH IN THE EXPRESS WARRANTY CONTAINED HEREIN PURCHASER TAKES THE PRODUCT AS IS AND SAMSUNG MAKES NO WARRANTY OR REPRESENTATION AND THERE ARE NO CONDITIONS EXPRESS OR IMPLIED STATUTORY OR OTHERWISE OF ANY KIND WHATSOEVER WITH RESPE...

Страница 181: ...TERMS OR AS LIMITED AS THE LAW PERMITS THE PARTIES UNDERSTAND THAT THE PURCHASER MAY USE THIRD PARTY SOFTWARE OR EQUIPMENT IN CONJUNCTION WITH THE PRODUCT SAMSUNG MAKES NO WARRANTIES OR REPRESENTATIONS AND THERE ARE NO CONDITIONS EXPRESS OR IMPLIED STATUTORY OR OTHERWISE AS TO THE QUALITY CAPABILITIES OPERATIONS PERFORMANCE OR SUITABILITY OF ANY THIRDPARTY SOFTWARE OR EQUIPMENT WHETHER SUCH THIRD ...

Страница 182: ...tails Important Please provide warranty information proof of purchase to Samsung s Customer Care Center in order to provide this service at no charge If the warranty has expired on the device charges may apply Customer Care Center 1000 Klein Rd Plano TX 75074 Toll Free Tel 1 888 987 HELP 4357 Samsung Telecommunications America LLC 1301 East Lookout Drive Richardson Texas 75082 Phone 1 800 SAMSUNG ...

Страница 183: ...Call 21 Making a Call from Phonebook 49 Redialing Last Number 22 Call Records All calls 25 Delete 26 Incoming calls 26 Missed calls 25 Outgoing calls 26 Call Waiting 29 Caller Group Adding 49 Camcorder Options 128 Camera 120 taking photos 120 Camera Shortcuts shortcut keys 130 Change Phone Password 147 Charging battery 10 Check PIN code 147 Clear phone memory 154 Configuring Picture Options 121 Co...

Страница 184: ...ion 30 Messages 58 Messaging Types of Messages 58 Missed Call Viewing 25 Moving a Music file 118 M Ratings 169 Multi Party Call 26 Dropping One Participant 27 Private Conversation 27 Setting up 27 Music copying a music file 118 moving a music file 118 Music files moving and copying 118 Music Player 110 add to current list 114 adding music 113 assigning 117 assigning alarm tone 118 assigning Indivi...

Страница 185: ...es 125 Locking 126 Renaming pictures 125 Picture message settings 66 Push Message Settings 71 Push message viewing in Inbox 70 R Recording Video 128 S SAR values 156 Security 146 Settings 133 Call Settings 152 Display 142 Phone 144 Security 146 Sound 134 Time Date 144 Voice recognition 95 Shortcuts 32 SIM card installation 6 installing 5 Speed Dial Setting Up Entries 52 Standard Limited Warranty 1...

Страница 186: ...r Phonebook 46 Finding a Phonebook Entry 48 Using Mobile Address Book 46 Using Management Checking the Memory Status 57 V Voice Command Menu 91 Voice Commands checking phone status 94 name dial 92 name lookup 94 open applications 94 send text message 93 Voice Mail 12 80 Voice Recognition 91 Say a Command options 91 W Warranty Information 176 Web 105 bookmarks 107 Browser settings 108 Enter URL 107...

Отзывы: