


1. Precautions
1.2. Servicing Precautions
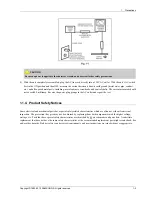
DANGER
An electrolytic capacitor installed with the wrong polarity might explode.
CAUTION
Before servicing units covered by this service manual, read and follow the Safety Precautions section of this manual.
NOTE
If unforeseen circumstances create conflict between the following servicing precautions and any of the safety precautions,
always follow the safety precautions.
1.2.1. General Servicing Precautions
1) Always unplug the unit’s AC power cord from the AC power source and disconnect the DC Power Jack before
attempting to: (a) remove or reinstall any component or assembly, (b) disconnect PCB plugs or connectors, (c) connect a
test component in parallel with an electrolytic capacitor.
2) Some components are raised above the printed circuit board for safety. An insulation tube or tape is sometimes used.
The internal wiring is sometimes clamped to prevent contact with thermally hot components. Reinstall all such elements
to their original position.
3) After servicing, always check that the screws, components and wiring have been correctly reinstalled. Make sure that
the area around the serviced part has not been damaged.
4) Check the insulation between the blades of the AC plug and accessible conductive parts (examples: metal panels,
input terminals and earphone jacks).
5) Insulation Checking Procedure: Disconnect the power cord from the AC source and turn the power switch ON. Connect
an insulation resistance meter (500 V) to theblades of the AC plug. The insulation resistance between each blade of the
AC plug and accessible conductive parts (see above) should be greater than 1 megohm.
6) Always connect a test instrument’s ground lead to the instrument chassis ground before connecting the positive lead;
always remove the instrument’s ground lead last.
1-3
Copyright© 1995-2013 SAMSUNG. All rights reserved.
Содержание BD-H8500A
Страница 19: ...2 Product Specifications Copyright 1995 2013 SAMSUNG All rights reserved 2 11 ...
Страница 20: ...2 Product Specifications 2 12 Copyright 1995 2013 SAMSUNG All rights reserved ...
Страница 21: ...2 Product Specifications Copyright 1995 2013 SAMSUNG All rights reserved 2 13 ...
Страница 22: ...2 Product Specifications 2 14 Copyright 1995 2013 SAMSUNG All rights reserved ...
Страница 23: ...2 Product Specifications Copyright 1995 2013 SAMSUNG All rights reserved 2 15 ...
Страница 24: ...2 Product Specifications 2 16 Copyright 1995 2013 SAMSUNG All rights reserved ...
Страница 25: ...2 Product Specifications Copyright 1995 2013 SAMSUNG All rights reserved 2 17 ...
Страница 26: ...2 Product Specifications 2 18 Copyright 1995 2013 SAMSUNG All rights reserved ...
Страница 27: ...2 Product Specifications 2 3 Option Product Specification Copyright 1995 2013 SAMSUNG All rights reserved 2 19 ...
Страница 29: ...3 Disassembly and Reassembly 3 1 2 Wi Fi Module Removal Copyright 1995 2013 SAMSUNG All rights reserved 3 2 ...
Страница 30: ...3 Disassembly and Reassembly 3 1 3 Assy Deck Removal 3 3 Copyright 1995 2013 SAMSUNG All rights reserved ...
Страница 31: ...3 Disassembly and Reassembly 3 1 4 Assy S HDD Removal Copyright 1995 2013 SAMSUNG All rights reserved 3 4 ...
Страница 32: ...3 Disassembly and Reassembly 3 1 5 S M P S PCB Removal 3 5 Copyright 1995 2013 SAMSUNG All rights reserved ...
Страница 33: ...3 Disassembly and Reassembly 3 1 6 Front PCB Removal Copyright 1995 2013 SAMSUNG All rights reserved 3 6 ...
Страница 34: ...3 Disassembly and Reassembly 3 1 7 Main PCB Removal 3 7 Copyright 1995 2013 SAMSUNG All rights reserved ...
Страница 35: ...3 Disassembly and Reassembly 3 2 PCB Location Copyright 1995 2013 SAMSUNG All rights reserved 3 8 ...
Страница 36: ...4 Troubleshooting 4 Troubleshooting 4 1 Troubleshooting 4 1 Copyright 1995 2013 SAMSUNG All rights reserved ...
Страница 37: ...4 Troubleshooting Copyright 1995 2013 SAMSUNG All rights reserved 4 2 ...
Страница 38: ...4 Troubleshooting 4 3 Copyright 1995 2013 SAMSUNG All rights reserved ...
Страница 39: ...4 Troubleshooting Copyright 1995 2013 SAMSUNG All rights reserved 4 4 ...
Страница 40: ...4 Troubleshooting 4 5 Copyright 1995 2013 SAMSUNG All rights reserved ...
Страница 41: ...4 Troubleshooting Copyright 1995 2013 SAMSUNG All rights reserved 4 6 ...
Страница 42: ...4 Troubleshooting 4 7 Copyright 1995 2013 SAMSUNG All rights reserved ...
Страница 43: ...4 Troubleshooting Copyright 1995 2013 SAMSUNG All rights reserved 4 8 ...
Страница 44: ...4 Troubleshooting 4 9 Copyright 1995 2013 SAMSUNG All rights reserved ...
Страница 45: ...4 Troubleshooting Copyright 1995 2013 SAMSUNG All rights reserved 4 10 ...
Страница 46: ...4 Troubleshooting 4 11 Copyright 1995 2013 SAMSUNG All rights reserved ...
Страница 51: ...4 Troubleshooting Copyright 1995 2013 SAMSUNG All rights reserved 4 16 ...
Страница 52: ...5 PCB Diagrams 5 PCB Diagrams 5 1 Copyright 1995 2013 SAMSUNG All rights reserved ...
Страница 53: ...5 PCB Diagrams 5 1 Wiring Diagram Copyright 1995 2013 SAMSUNG All rights reserved 5 2 ...
Страница 54: ...5 PCB Diagrams 5 2 Main PCB 5 3 Copyright 1995 2013 SAMSUNG All rights reserved ...
Страница 55: ...5 PCB Diagrams Copyright 1995 2013 SAMSUNG All rights reserved 5 4 ...
Страница 56: ...5 PCB Diagrams 5 3 Front PCB 5 5 Copyright 1995 2013 SAMSUNG All rights reserved ...
Страница 57: ...5 PCB Diagrams 5 4 Touch PCB Copyright 1995 2013 SAMSUNG All rights reserved 5 6 ...
Страница 60: ...6 Schematic Diagrams Block Diagram BD H8900 6 3 Copyright 1995 2013 SAMSUNG All rights reserved ...
Страница 61: ...6 Schematic Diagrams Copyright 1995 2013 SAMSUNG All rights reserved 6 4 ...
Страница 65: ...6 Schematic Diagrams 6 3 S M P S S M P S PCB Copyright 1995 2013 SAMSUNG All rights reserved 6 8 ...
Страница 66: ...6 Schematic Diagrams 6 4 Power Block Main PCB 6 9 Copyright 1995 2013 SAMSUNG All rights reserved ...
Страница 67: ...6 Schematic Diagrams 6 5 Front End SC7501 1 Main PCB Copyright 1995 2013 SAMSUNG All rights reserved 6 10 ...
Страница 68: ...6 Schematic Diagrams 6 6 Front End SC7501 2 Main PCB 6 11 Copyright 1995 2013 SAMSUNG All rights reserved ...
Страница 69: ...6 Schematic Diagrams 6 7 F_ Micom Main PCB Copyright 1995 2013 SAMSUNG All rights reserved 6 12 ...
Страница 70: ...6 Schematic Diagrams 6 8 HDMI 4K UPSCALER Main PCB 6 13 Copyright 1995 2013 SAMSUNG All rights reserved ...
Страница 71: ...6 Schematic Diagrams 6 9 HDMI_GPIO Main PCB Copyright 1995 2013 SAMSUNG All rights reserved 6 14 ...
Страница 72: ...6 Schematic Diagrams 6 10 Ethernet_USB Main PCB 6 15 Copyright 1995 2013 SAMSUNG All rights reserved ...
Страница 73: ...6 Schematic Diagrams 6 11 FOX B MMC Flash Main PCB Copyright 1995 2013 SAMSUNG All rights reserved 6 16 ...
Страница 74: ...6 Schematic Diagrams 6 12 FOX B DDR3 Main PCB 6 17 Copyright 1995 2013 SAMSUNG All rights reserved ...
Страница 75: ...6 Schematic Diagrams 6 13 FOX B Interface Main PCB Copyright 1995 2013 SAMSUNG All rights reserved 6 18 ...
Страница 76: ...6 Schematic Diagrams 6 14 SATA_USB Main PCB 6 19 Copyright 1995 2013 SAMSUNG All rights reserved ...
Страница 77: ...6 Schematic Diagrams 6 15 TSD_Power Main PCB Copyright 1995 2013 SAMSUNG All rights reserved 6 20 ...
Страница 78: ...6 Schematic Diagrams 6 16 Tuner_LNB Main PCB 6 21 Copyright 1995 2013 SAMSUNG All rights reserved ...
Страница 79: ...6 Schematic Diagrams 6 17 CI Main PCB Copyright 1995 2013 SAMSUNG All rights reserved 6 22 ...
Страница 80: ...6 Schematic Diagrams 6 18 Front Front PCB 6 23 Copyright 1995 2013 SAMSUNG All rights reserved ...
Страница 81: ...6 Schematic Diagrams 6 19 Touch Touch PCB Copyright 1995 2013 SAMSUNG All rights reserved 6 24 ...


