9
Remote Control
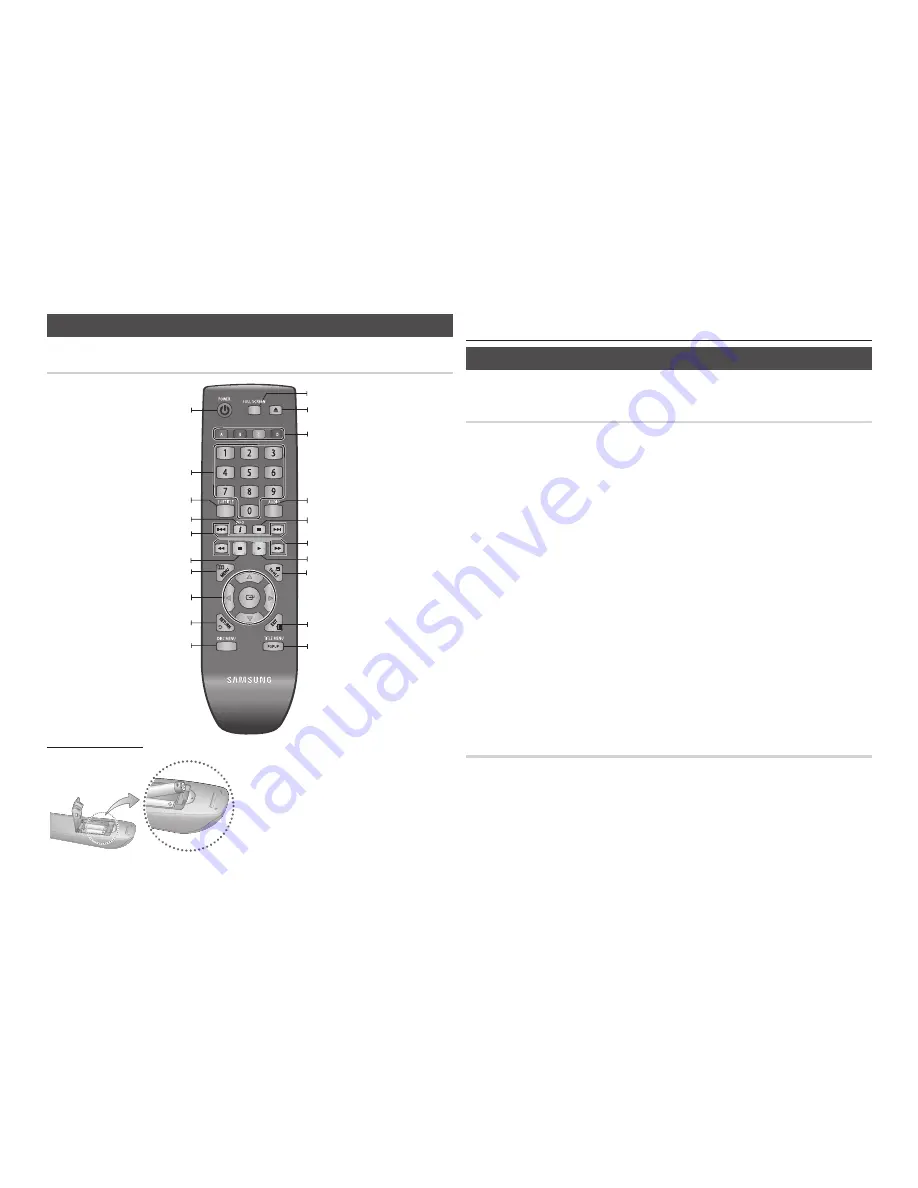
Tour of the Remote Control
Installing batteries
✎
NOTE
▪
If the remote does not operate properly:
•
Check the po/– of the batteries.
•
Check if the batteries are drained.
•
Check if the remote sensor is blocked by obstacles.
•
Check if there is any fluorescent lighting nearby.
!
CAUTION
▪
Dispose of batteries according to local environmental
regulations. Do not put them in the household trash.
Turn the player on and off.
Use to enter the disc menu.
Press numeric buttons to operate options.
Press to switch the Blu-ray Disc/DVD’s
subtitle language.
Press to skip backwards or forwards.
Press to stop a disc.
Press to search a disc backwards or
forwards.
Press to move to the home menu.
Press to see the full screen on a TV.
Press to use the Tools menu.
Use to access various audio functions on
a disc (Blu-ray Disc/DVD).
Press to pause a disc.
Press to play a disc.
Return to the previous menu.
Use to select menu items and change
menu values.
Press to exit the menu.
Use to enter the popup menu/title menu.
These buttons are used both for menus
on the player and also several Blu-ray
Disc functions.
Use to display the playback information
when playing a Blu-ray Disc/DVD.
To open and close the disc tray.
A. Connecting to a TV
Case 1 : Connecting to a TV with an HDMI Cable - Best Quality
(Recommended)
Using an HDMI cable, connect the
11
HDMI OUT
terminal on the rear of the player to the
HDMI IN
terminal of your TV. See page 11.
Turn on the player and TV.
21
Press the input selector on your TV remote control until the HDMI signal from the player
31
appears on your TV screen.
✎
NOTE
An HDMI cable outputs digital video/audio, so you don’t need to connect an audio cable.
▪
If the player is connected to your TV in
▪
the HDMI 720p, 1080i, or 1080p output mode, you must use a High
speed (category 2) HDMI cable.
HDMI outputs only a pure digital signal to the TV.
▪
If your TV does not support HDCP (High-bandwidth Digital Content Protection), random noise appears on the
screen.
Depending on your TV, certain HDMI output resolutions may not work. Please refer to the user manual of
▪
your TV.
When you connect the player to the TV using the HDMI cable for the first time or to a new TV, the HDMI
▪
output resolution will be automatically set to the highest supported by the TV.
A long HDMI cable may cause screen noise.
▪
If this occurs, set Deep Color to Off in the menu.
If you use an HDMI-to-DVI cable to connect to your display device, you must also connect the AV Out or
▪
Digital Audio Out to your display device or to an audio sytem to hear audio.
If both HDMI and Video out are connected at the same time, only the HDMI signal is outputed.
▪
Case 2 : Connecting to a TV with an Audio/Video cable - Good
Quality
Using an Audio/Video cable,
11
connect the
VIDEO OUT (yellow) / AUDIO OUT (red and
white)
terminals on the rear of the player to the
VIDEO IN (yellow) / AUDIO IN (red and
white)
terminals of your TV. See page 11.
Turn on the player and TV.
21
Press the input selector on your TV remote control until the “VIDEO” signal from the player
31
appears on the TV screen.
Connections


