background image

23

English

Installation Pr

oc

edur

e

Steps

Remote control display

10 

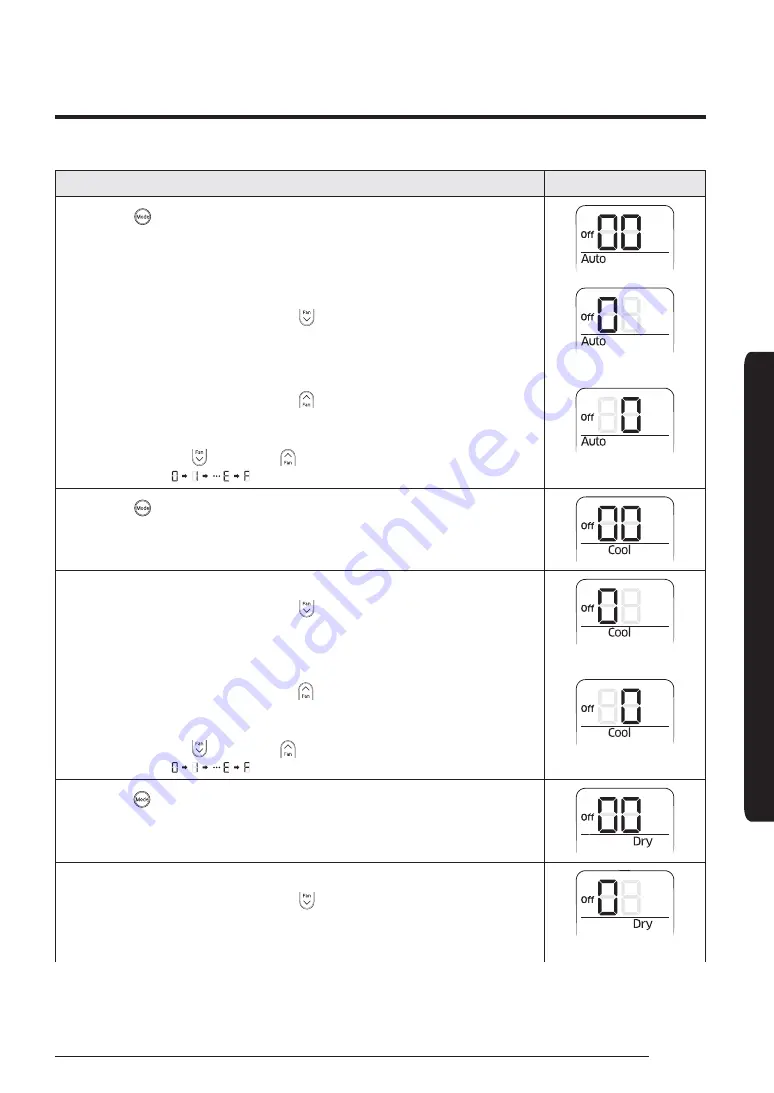
Press the 

 (Mode) button. Auto and Off appear on the remote control display.

11 

Set the SEG14 and SEG15 values:

Set the SEG14 value by pressing the 

 (Low Fan) button repeatedly until the 

value you want to set appears on the remote control display.

SEG14

Set the SEG15 value by pressing the 

 (High Fan) button repeatedly until the 

value you want to set appears on the remote control display.

When you press the 

 (Low Fan) or 

 (High Fan) button, values appear in the 

following order: 

SEG15

12 

Press the 

 (Mode) button. Cool and Off appear on the remote control display.

13 

Set the SEG16 and SEG17 values:

Set the SEG16 value by pressing the 

 (Low Fan) button repeatedly until the 

value you want to set appears on the remote control display.

SEG16

Set the SEG17 value by pressing the 

 (High Fan) button repeatedly until the 

value you want to set appears on the remote control display.

When you press the 

 (Low Fan) or 

 (High Fan) button, values appear in the 

following order: 

SEG17

14 

Press the


(Mode) button. Dry and Off appear on the remote control display.

15 

Set the SEG18 and SEG20 values: 

Set the SEG18 value by pressing the 

 (Low Fan) button repeatedly until the 

value you want to set appears on the remote control display.

SEG18

Содержание AM TN4 KH Series

Страница 1: ...Airconditioner Installation manual AM TN4 KH Thank you for purchasing this Samsung air conditioner Before operating this unit please read this manual carefully and retain it for future reference...

Страница 2: ...nit 9 Step 6 Cutting and flaring the pipes 9 Step 7 Connecting the assembly pipes to the refrigerant pipes 10 Step 8 Performing the gas leak test 11 Step 9 Insulating the refrigerant pipes 11 Step10 I...

Страница 3: ...designed the indoor unit is not suitable to be installed in areas used for laundry Do not use the units if damaged If problems occur switch the unit off and disconnect it from the powersupply In orde...

Страница 4: ...c lines Always verify that the cut off and protection switches are suitably dimensioned Verify that the airconditioneris connected to the power supply in accordance with the instructions provided in t...

Страница 5: ...unit must be installed such that it is beyond public access and is not touchable by users Rigid wall without vibration Where it is not exposed to direct sunshine Where the airfilter can be removed an...

Страница 6: ...nit mm The sub duct hole is not applicable to the Wind Free models A A A 9 Model AM170TN4DKH A mm 372 B mm 222 C mm 338 Net dimension W D H mm 840 x 840 x 372 Liquid pipe connection mm 9 52 Gas pipe c...

Страница 7: ...of breakage You must hold the hanger plate on the corner and carry the indoor unit Step 3 Optional Insulating the bodyof the indoorunit If you install a cassette type indoor unit on the ceiling when t...

Страница 8: ...sure that the ceiling is strong enough to support the weight of the indoor unit Before hanging the unit test the strength of each attached suspension bolt If the length of the suspension bolt is more...

Страница 9: ...E To prevent dirt orforeign objects from getting into the pipes during installation do not remove the pinch pipe completely until you are ready to connect the piping Step 6 Cutting and flaring the pip...

Страница 10: ...e refrigerant tube to protect the condensate water on the outside of the pipe falling onto the floor and to improve the efficiency of the unit 3 Cut off any excess foam insulation 4 Make sure that the...

Страница 11: ...7 2000 requiring the use of sheaths insulation without using CFC and HCFC gases for health and the environment 2 Wind insulating tape around the pipes and drain hose avoiding compressing the insulatio...

Страница 12: ...ding construction condition Ceilings frequently exposed to moisture and cooling are not covered For example pipes installed at a corridor of a dormitory and studio or near an exit that opens and close...

Страница 13: ...re Drain hose Ceiling Do not give the hose an upward gradient beyond the connection port This will cause waterto flow backwards when the unit is stopped resulting in waterleaks Under gradient Ceiling...

Страница 14: ...rubber cap on the connection part of a flexible hose of the indoor unit and firmly tighten it with a band to prevent leakage c Check the leak test at the part where the adhesive forthe flexible hose a...

Страница 15: ...rop under10 The auxiliary circuit breaker ELCB MCCB ELB should be considered more capacity if many indoor units are connected from one breaker Connect F3 F4 for communication to the communication cabl...

Страница 16: ...ew mm B D d1 E F L d2 t Standard dimension mm Allowance mm Standard dimension mm Allowance mm Standard dimension mm Allowance mm Min Min Max Standard dimension mm Allowance mm Min 1 5 4 6 6 0 2 3 4 0...

Страница 17: ...mula k 9 AA9 NOTE X The capacity of ELB MCCB Rated currents Model Rating current A AM170TN4DKH 0 83 2 Decide the power cable specification and maximum length within10 voltage drop among indoor units n...

Страница 18: ...be Maximum length of power cables are decided within 10 of power drop If it exceeds you must consider another power supplying method The circuit breaker MCCB ELB should be considered more capacity if...

Страница 19: ...d be 8 0 Compression dimension After compressing it pull both sides of the wire to make sure it is firmly pressed Compress it 4 times 5 mm Method 1 Compress it 4 times 5 mm Method 2 5 Wrap it with the...

Страница 20: ...ies from the remote control and then insert them again b While holding down the High Temp and Low Temp buttons simultaneously insert the batteries into the remote control c Make sure that you are ente...

Страница 21: ...Press the Mode button Cool and On appear on the remote control display 3 Set the SEG4 and SEG5 values a Set the SEG4 value by pressing the Low Fan button repeatedly until the value you want to set ap...

Страница 22: ...remote control display SEG9 b Set the SEG10 value by pressing the High Fan button repeatedly until the value you want to set appears on the remote control display When you press the Low Fan or High Fa...

Страница 23: ...r SEG15 12 Press the Mode button Cool and Off appear on the remote control display 13 Set the SEG16 and SEG17 values a Set the SEG16 value by pressing the Low Fan button repeatedly until the value you...

Страница 24: ...e remote control display SEG21 b Set the SEG22 value by pressing the High Fan button repeatedly until the value you want to set appears on the remote control display When you press the Low Fan or High...

Страница 25: ...tton on the remote control twice Make sure that this command is received by the indoor unit When it is successfully received you can hear a short sound from the indoor unit If the command is not recei...

Страница 26: ...ion see the S NET Pro 2 Help From SEG13 to SEG18 is for setting MCU address A A k MCU S4NEK3N MCU S1NEK1N Option No foran indoorunit address 0AXXXX 1XXXXX 2XXXXX 3XXXXX Option SEG1 SEG2 SEG3 SEG4 SEG5...

Страница 27: ...ion value forthe SEG11 or SEG12 You cannot set the SEG11 or SEG12 to F value at the same time If the indoor unit is connected to the MCU you can set the SEG15 18 Ex If you want to set the indoorunit t...

Страница 28: ...n to 0 it is automatically set to 2 the drain pump is used with 3 minute delay If you set the Maximum filter usage time SEG18 option to a value otherthan 2 and 6 it is automatically set to 2 1000 hour...

Страница 29: ...g 2 4 Disuse Use Cooling 2 1 RPM compensation 5 Use Use Cooling 2 4 Use 10min 1 6 Disuse Use Heating Cooling 2 1 Use 7 Use Use Heating Cooling 2 8 Disuse Use CoolingUltra LowFan 2 2 Highceiling KIT 4w...

Страница 30: ...pedunit duringoilreturn defrostmode SettingtheMDSKitinstallationoption Indication andDetails Indication Details Indication Details Indication Details Indication Details Indication Details HeatingSetti...

Страница 31: ...the indoor unit heat exchanger Since the watervapor might be condensed on the indoor unit which may fall into a living space use this function to get rid of the water vapor out of the indoor unit by o...

Страница 32: ...s Indication Details 0 5 0 Follow product option 0 0 C 0 0 C 0 1 C 1 0 5 C 1 0 5 C 1 1 5 C 1 UseAuto Change Over forHR only 2 1 C 2 1 C 2 2 C 3 1 5 C 3 1 5 C 3 2 5 C 4 2 C 4 2 C 4 3 C 2 Use Cooling on...

Страница 33: ...minutes C 6 0 C No delay D 6 0 C 10 minutes E 6 0 C 20 minutes Option SEG19 SEG20 SEG21 SEG22 SEG23 SEG24 Explanation PAGE Forcing FAN Operation forHeating and Cooling Indication and Details Indicati...

Страница 34: ...tting 02 series SEG9 1 Setting 05 series SEG18 0 The hot water heater is turned on at the same time as the heating thermostat is on and turned off when the heating thermostat is off k k k compensation...

Страница 35: ...ption type 0 to F Tens position value 0 to 9 Units position value 0 to 9 New value 0 to F Example Changing the Buzzer control SEG17 option of the installation options to1 disuse Option SEG1 SEG2 SEG3...

Страница 36: ...Earth conductor connection Correct operation follow the steps below Afterfinishing the installation of the airconditioner you should explain the following to the user Referto appropriate pages in the...

Страница 37: ...Otheroutdoorunit sensorerrorthat is not on the above list for2 minutes E101 X X 2 Communication errorreceived from the outdoorunit E102 3 3 miniute tracking erroron outdoorunit E202 4 Communication e...

Страница 38: ...ion control E413 13 Compressordown due to lowpressure sensorprevention control_1 E410 14 Simultaneous opening of cooling heating MCU SOLvalve 1st detection E180 15 Simultaneous opening of cooling heat...

Страница 39: ...39 English Appendix MEMO...

Страница 40: ......

Отзывы: