background image

ENG-21

Connections

ENG-20

C

O N N E C T I O N S

Note

- Please turn the volume down when you turn on the Amplifier. Sudden loud sound may cause

damage to the speakers and your ears.

- Please set the audio in the menu screen according to the Amplifier. (See pages 61 to 62)

- The position of terminals may vary depending on the Amplifier. 

Please refer to the user's manual of the Amplifier.

- Please remove the dust cover before using the optical cable (not included) and put the cover on the cable

again when it's not used.

- DVD-AUDIO only plays back two channel audio through the Digital Audio out. 

Multi-channel DVD-Audio discs are output through the Analog outputs.

- SACD plays back only through the Analog outputs. (See pages 61 to 62)

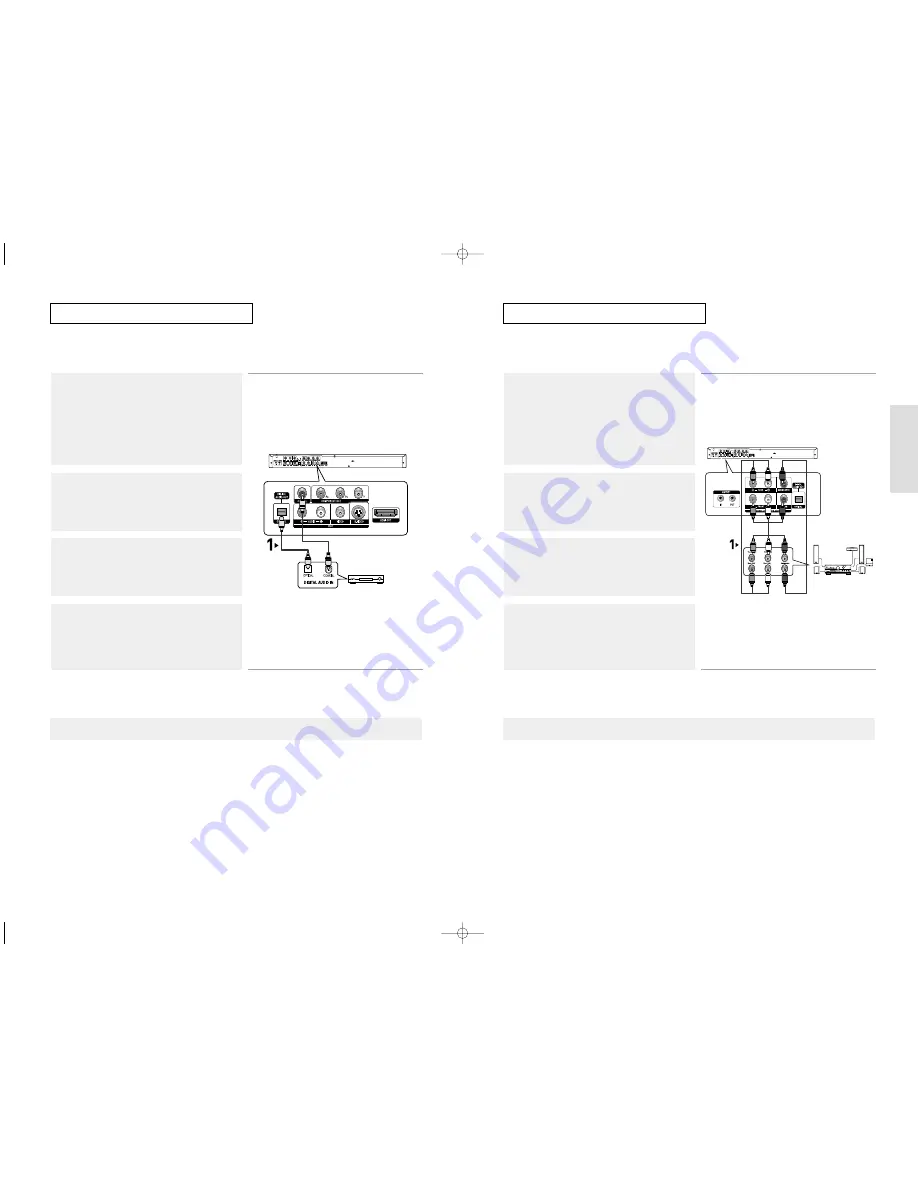
Connection to an Audio System (Dolby digital, MPEG2 or DTS Amplifier)

1

If using an optical cable (not included), connect the DIGITAL
AUDIO OUT (OPTICAL) 
terminal on the rear of the DVD player
to the DIGITAL AUDIO IN (OPTICAL) terminal of the Amplifier.
If using a coaxial cable (not included), connect the DIGITAL
AUDIO OUT (COAXIAL) 
terminal on the rear of the DVD player
to the DIGITAL AUDIO IN (COAXIAL) terminal of the Amplifier.

2

Using the video signal cable(s), connect the VIDEO, S-VIDEO,
COMPONENT or HDMI OUT terminals on the rear of the DVD
player to the VIDEO, S-VIDEOCOMPONENTHDMI or DVI IN
terminals of your TV as described on pages 12 to 16.

3

Turn on the DVD player, TV, and Amplifier.

4

Press the input select button of the Amplifier to select external
input 
in order to hear sound from the DVD player.
Refer to your Amplifier's user manual to set the Amplifier's
audio input.

Optical Cable 
(not included)

Coaxial Cable 
(not included)

or

Dolby digital or

DTS amp

C

O N N E C T I O N S

Note

- Please turn the volume down when you turn on the Amplifier. Sudden loud sound may cause

damage to the speakers and your ears.

- Please set the audio in the menu screen according to the Amplifier. (See pages 61 to 62)

- The position of terminals may vary depending on the Amplifier. 

Please refer to the user's manual of the Amplifier.

Connection to a 5.1CH Analog Amplifier

1

If using audio cables for 5.1 CH  Analog Amplifier (not included)
connect the 5.1CH ANALOG AUDIO OUT terminals on the rear
of the DVD player to the 5.1CH ANALOG AUDIO IN terminals
of the 5.1CH Analog Amplifier.

2

Using the video signal cable(s), connect the VIDEO, S-VIDEO,
COMPONENT or HDMI OUT terminals on the rear of the DVD
player to the VIDEO, S-VIDEOCOMPONENTHDMI or DVI IN
terminals of your TV as described on pages 12 to 16.

3

Turn on the DVD player, TV, and Amplifier.

4

Press the input select button of the Amplifier to select external
input 
in order to hear sound from the DVD player.
Refer to your Amplifier's user manual to set the Amplifier's
audio input.

WHITE

BLACK

GREEN

WHITE

BLACK

GREEN

5.1ch Analog

Amplifier

HD950-XSS-1  6/11/05  9:49 AM  Page 20

Содержание AK68-00640C

Страница 1: ...DVD Player DVD HD950 AK68 00640C ELECTRONICS HD950 XSS Cover 6 11 05 9 43 AM Page 2 ...

Страница 2: ...rs leave the player at room temperature until the inside of the player becomes dry and operational 4 Disc Do not clean record cleaning sprays benzene thinner or other volatile solvents that may cause damage to the disc surface Do not touch the disc s signal surface Hold by the edges or by one edge and the hole in the center Wipe the dirt away gently never wipe a cloth back and forth over the disc ...

Страница 3: ...Using the Function Menu 28 Repeat Play 29 Slow Repeat Play 30 Program Play Random Play 31 Chapter 4 Advanced Functions Adjusting the Aspect Ratio EZ View 32 Selecting the Audio Language 34 Selecting the Subtitle Language 35 Changing the Camera Angle 36 Using the Instant Replay Skip Function 36 Using the Bookmark Function 37 Using the Zoom Function 39 DVD AUDIO Playback 40 Super Audio CD Playback 4...

Страница 4: ...d by Macrovision Corporation and other rights owners Use of this copyright protection technology must be authorized by Macrovision Corporation and is intended for home and other limited viewing uses only unless otherwise authorized by Macrovision Corporation Reverse engineering or disassembly is prohibited PROGRESSIVE SCAN OUTPUTS 525p 625p CONSUMERS SHOULD NOTE THAT NOT ALL HIGH DEFINITION TELEVI...

Страница 5: ...nel Display 1 DVD DVD is loaded Audio DVD Audio disc is playing 2 Super Audio CD is loaded 3 DTS Digital Theater System output 4 Dolby Digital Disc 5 Progressive Scan Video output 6 DVD Audio Group number 7 DVD Video Title number 8 DVD Audio CD Video CD Super Audio CD Track number 9 DVD Video Chapter number 10 DVD Audio Index number 11 Disc type indicators SVCD Super VCD VCD CD 12 MPEG Audio outpu...

Страница 6: ...player is connected to a TV or display that is not compatible with the above format Refer to the TV s instruction manual for detailed information regarding the HDMI terminal See pages 65 67 to get more information on how to use the setup menu 3 1 2 3 4 5 6 6 7 8 SETUP Tour of the Remote Control 1 DVD POWER Button Turns the power on or off 2 NUMBER Buttons 3 PROG Button Allows you to program a spec...

Страница 7: ... the Video Output mode changes in the following sequence COMPOSITE S VIDEO COMPONENT I SCAN HDMI COMPONENT P SCAN When the Video Output in Setup menu is set to HDMI COMPONENT P SCAN the Video and S Video Outputs do not work RED WHITE YELLOW RED WHITE YELLOW Audio Cable Video Cable CONNECTIONS Connection to a TV S Video Connecting to your TV using an S Video cable You will enjoy high quality images...

Страница 8: ...I SCAN in the Display Setup menu See pages 65 to 67 You can use the VIDEO SEL button to change the Video Output mode See page 12 RED WHITE RED WHITE RED BLUE GREEN RED BLUE GREEN Audio Cable Component cable not included CONNECTIONS Connection to a TV Progressive Note What is Progressive Scan Progressive scan has twice as many scanning lines as the interlace output method Progressive scanning metho...

Страница 9: ...ture quality RED WHITE RED WHITE Audio Cable HDMI DVI cable HDMI cable CONNECTIONS HDMI High Definition Multimedia Interface HDMI is an interface to enable the digital transmission of video and audio data with just a single connector Using HDMI the DVD player transmits a digital video and audio signal and displays a vivid picture on a TV having an HDMI input jack HDMI connection description HDMI c...

Страница 10: ...function will not operate when Input and Output terminals are connected wrongly because the TV cannot communicate with external devices Anynet terminals are consisted of Input Green and Output Black terminals Match the color coded cables to terminals when you connect the Anynet cable CONNECTIONS Note Please turn the volume down when you turn on the Amplifier Sudden loud sound may cause damage to t...

Страница 11: ...nals of your TV as described on pages 12 to 16 3 Turn on the DVD player TV and Amplifier 4 Press the input select button of the Amplifier to select external input in order to hear sound from the DVD player Refer to your Amplifier s user manual to set the Amplifier s audio input Optical Cable not included Coaxial Cable not included or Dolby digital or DTS amp CONNECTIONS Note Please turn the volume...

Страница 12: ... you plug in the player for the first time If the language for the startup screen is not set the settings may change whenever you turn the power on or off Therefore make sure that you select the language you want to use Once you select a menu language you can change it by pressing the button on the front panel of the unit for more than 5 seconds with no disc in the unit Then the SELECT MENU LANGUA...

Страница 13: ...t from the actual playback speed No sound is hearing during search mode Except CD Skipping Tracks When playing a DVD if you press the SKIP button it moves to the next chapter If you press the SKIP button it moves to the beginning of the chapter One more press makes it move to the beginning of the previous chapter When playing a VCD 2 0 in Menu Off mode or a VCD 1 1 or a CD if you press the SKIP bu...

Страница 14: ... there is more than one movie on a DVD each movie will be identified Most DVD discs are recorded in chapters so that you can quickly find a specific passage similar to tracks on an audio CD Allows playback of the film from a desired time You must enter the starting time as a reference The time search function does not operate on some discs Refers to the film s soundtrack language In the example th...

Страница 15: ...as been set 3 To return to normal play press REPEAT button again then press the buttons to select Off and press ENTER button Note Depending on a disc the Repeat function may not work When VCD2 0 is in Menu Off mode only this function works Select Menu Off by pressing the DISC MENU buton REPEAT ENTER T REPEAT ENTER T D DVD VCD CD REPEAT ENTER T REPEAT ENTER T D DVD VCD CD BASIC FUNCTIONS Using the ...

Страница 16: ...peat scenes containing sports dancing musical instruments being played etc so you can study them more closely When playing a DVD VCD 1 During play press the PLAY PAUSE button 2 Press the SEARCH button to choose the play speed between 1 8 1 4 and 1 2 of normal during PAUSE or STEP mode 3 Press the REPEAT button on the remote control Press the buttons to select A B The disc will play from A to B rep...

Страница 17: ...pending on the screen setting in the Display Setup menu To ensure correct operation of the EZ VIEW button you should set the correct aspect ratio in the Display Setup menu See pages 65 to 67 If you are using a 16 9 TV For 16 9 aspect ratio discs WIDE SCREEN Displays the content of the DVD title in 16 9 aspect ratio SCREEN FIT The top and bottom portions of the screen are cut off When playing a 2 3...

Страница 18: ...TLE ADVANCED FUNCTIONS Selecting the Audio Language You can select a desired audio language quickly and easily with the AUDIO button Using the AUDIO button DVD VCD CD MPEG4 1 Press the AUDIO button The Audio changes when the button is pressed repeatedly The audio languages are represented by abbreviations 2 To remove the AUDIO icon press the CLEAR or RETURN button ENG DOLBYDIGITAL 5 1CH AUDIO DVD ...

Страница 19: ...can use the ANGLE function Using the ANGLE button DVD If the disc contains multiple angles the ANGLE appears on the screen 1 Press the ANGLE button then the ANGLE icon will appear with the current angle number and the number of angles available 2 Press the ANGLE button repeatedly to select the desired angle To remove the ANGLE icon press the CLEAR or RETURN button Note If the disc has only one ang...

Страница 20: ...in order Press the buttons to select Function then press the or ENTER button ADVANCED FUNCTIONS Recalling a Marked Scene 1 During play press the BOOKMARK button on the remote control 3 Press the PLAY PAUSE button to skip to the marked scene 2 Press the buttons to select a marked scene Clearing a Bookmark 1 During play press the BOOKMARK button on the remote control 3 Press the CLEAR button to dele...

Страница 21: ...me DVD AUDIO discs have Bonus groups If you want to play a Bonus group you must enter the Bonus Group code The code is usually on the DVD AUDIO disc case To access the desired Track when there is more than one on the DVD AUDIO disc If pages are included with the DVD AUDIO disc you can see this icon To access the desired page you can use this Function If a slide show is included with the DVD AUDIO ...

Страница 22: ... button If you want to convert to regular CD mode press the SACD CD button During play or stop mode you can change the 2CH or MULTI mode by using LEFT RIGHT buttons You can use this function when Super Audio CD disc includes both multi channel and 2 channel audio format ADVANCED FUNCTIONS REPEAT Play 1 Press the REPEAT button on the remote control Repeat screen appears 2 Press the buttons to selec...

Страница 23: ...CD button to playback the CD layer of a dual layer Super Audio CD disc Refer to the page 24 for setting CD playback Function Note Some Super Audio CD discs do not include a CD layer Depending on a disc this function may not work 01 0 00 13 ADVANCED FUNCTIONS 5 To make the screen disappear press the INFO button again Super Audio CD Clips Menu Off Play Function 1 In Stop mode press the DISC MENU but...

Страница 24: ...les into different folders Open the disc tray Place the disc on the tray Close the tray The tray closes and this screen displays R O O T W M A J P E G M P 3 M P E G 4 R O O T Parent Folder Current Folder and Peer Folders Folders and Files in Current Folder Name of currently playing file Current Playback Time Current Playback Mode There are four modes They can be selected in order by pressing the R...

Страница 25: ... below 64Kbps or over 192Kbps will not be played properly Do not try recording copyright protected MP3 files Certain secured files are encrypted and code protected to prevent illegal copying These files are of the following types Windows MediaTM registered trade mark of Microsoft Inc and SDMITM registered trade mark of The SDMI Foundation You cannot copy such files Important The above recommendati...

Страница 26: ...owing video compression formats within the AVI file format DivX 3 11 contents DivX 4 contents Based on MPEG4 Simple Profile DivX 5 contents MPEG4 simple profile plus additional features such as bi directional frames Qpel and GMC are also supported XviD MPEG4 compliant Contents This unit supports all resolutions up to maximum below ADVANCED FUNCTIONS Function Description Reference page Skip or Sear...

Страница 27: ...cture CD Playback for HD JPEG Must connect to HDMI or DVI Resolution should be 720p 768p 1080i and HD JPEG should be in HD mode See page 67 2 Select the desired folder 1 Set the HD JPEG to HD from Setup menu See page 67 3 Press the buttons to select a Picture file in the clips menu and then press the ENTER button R O O T W M A J P E G M P 3 M P E G 4 R O O T 1 2 3 R O O T W M A J P E G M P 3 M P E...

Страница 28: ...Setup of the Language Audio Setup Setup of the Audio Options Display Setup Setup of the Display Options Use to select which type of screen you want to watch and several display options Parental Setup Setup of the Parental Level Allows users to set the level necessary to prevent children from viewing unsuitable movies such as those with violence adult subject matter etc DivX R Registration Please u...

Страница 29: ...tup Setup Language Setup Audio Setup Display Setup Parental Setup DivX R Registration EZ Setup PLAYER MENU LANGUAGE Player Menu English Français Deutsch Español Thai CHANGING SETUP MENU 7 Press the buttons to select the PCM Down Sampling On or Off then press the ENTER button See page 62 8 If an AV Receiver is connected to the TV press the buttons to select Connected then press the ENTER button Pre...

Страница 30: ...rental Setup DivX R Registration EZ Setup AUDIO LANGUAGE English Français Audio Deutsch Español Thai Original Others CHANGING SETUP MENU Using the Disc Menu Language This function changes the text language only on the disc menu screens 4 Press the buttons to select Disc Menu then press the or ENTER button 5 Press the buttons to select the desired language then press the or ENTER button Select Othe...

Страница 31: ...hen press the or ENTER button 5 Press the buttons to select the desired language then press the or ENTER button Select Automatic if you want the subtitle language to be the same as the language selected as the audio language Select Others if the language you want is not listed Some discs may not contain the language you select as your initial language in that case the disc will use its original la...

Страница 32: ...HDMI output or Digital Audio Output Manufactured under license from Dolby Laboratories Dolby and the double D symbol are trademarks of Dolby Laboratories DTS and DTS Digital Out are trademarks of Digital Theater Systems Inc HDMI If your TV is not compatible with compressed multi channel formats Dolby Digital DTS MPEG you should set Digital Audio to PCM If your TV is not compatible with LPCM sampli...

Страница 33: ...outputs the bass frequencies of the speaker from the subwoofer Center None If you do not connect a center speaker select this Large Normally select this Small When the sound distorts select this This activates the Dolby Digital bass redirection circuitry and outputs the bass frequencies of the center speaker from other speakers Surround SL SR None If you do not connect a center speaker select this...

Страница 34: ...u TV Aspect 4 3 L Box Still Mode Auto Screen Messages On TV System PAL Video Output COMPOSIT S VID HDMI 576p Picture Quality DISPLAY SETUP DISPLAY SETUP COMPOSITE S VIDEO COMPONENT I SCAN HDMI COMPONENT P SCAN HDMI This setting is used when the unit is connected by HDMI or DVI to Display devices TV Projector etc Resolution 480p 576p 720 x 480 720 x 576 720p 1280 x 720 768p 1024 x 768 1080i 1920 x ...

Страница 35: ...udio Setup Display Setup Parental Setup DivX R Registration EZ Setup CHANGING SETUP MENU Setting Up the Parental Control The Parental Control function works in conjunction with DVDs that have been assigned a rating which helps you control the types of DVDs that your family watches There are up to 8 rating levels on a disc 3 Press the buttons to select Parental Setup then press the or ENTER button ...

Страница 36: ...rand 4 If the TV turns off setup is complete Enter other codes of the same brand if the first code does not work You can control the TV POWER CH VOL and TV VIDEO functions of another manufacturer s TV The remote control may not be able to control every model TV of the brands listed If you replace the remote control s batteries set the brand code again e g For Samsung 2 TVs While holding down the T...

Страница 37: ...no disc inside All settings including the password will revert to the factory settings Don t use this unless absolutely necessary Go to the contents and find the section of the instruction book that contains the explanations regarding the current problem and follow the procedure once again If the problem still cannot be solved please contact your nearest authorized service center Make sure that th...

Страница 38: ...inance Signal 0 3 Vp p 75 Ω load 576P 480p 720p 768p 1080i L 1 L R 2 R F L F R R L R R C T S W Optical Coaxial 48 kHz Sampling 4 Hz to 22 kHz 96 kHz Sampling 4 Hz to 44 kHz 110 dB 100 dB 0 004 General Disc Video Output Audio Output Nominal specification Samsung Electronics Co Ltd reserves the right to change the specifications with out notice Weight and dimensions are approximate REFERENCE No HDMI...

Отзывы: