background image

44

English

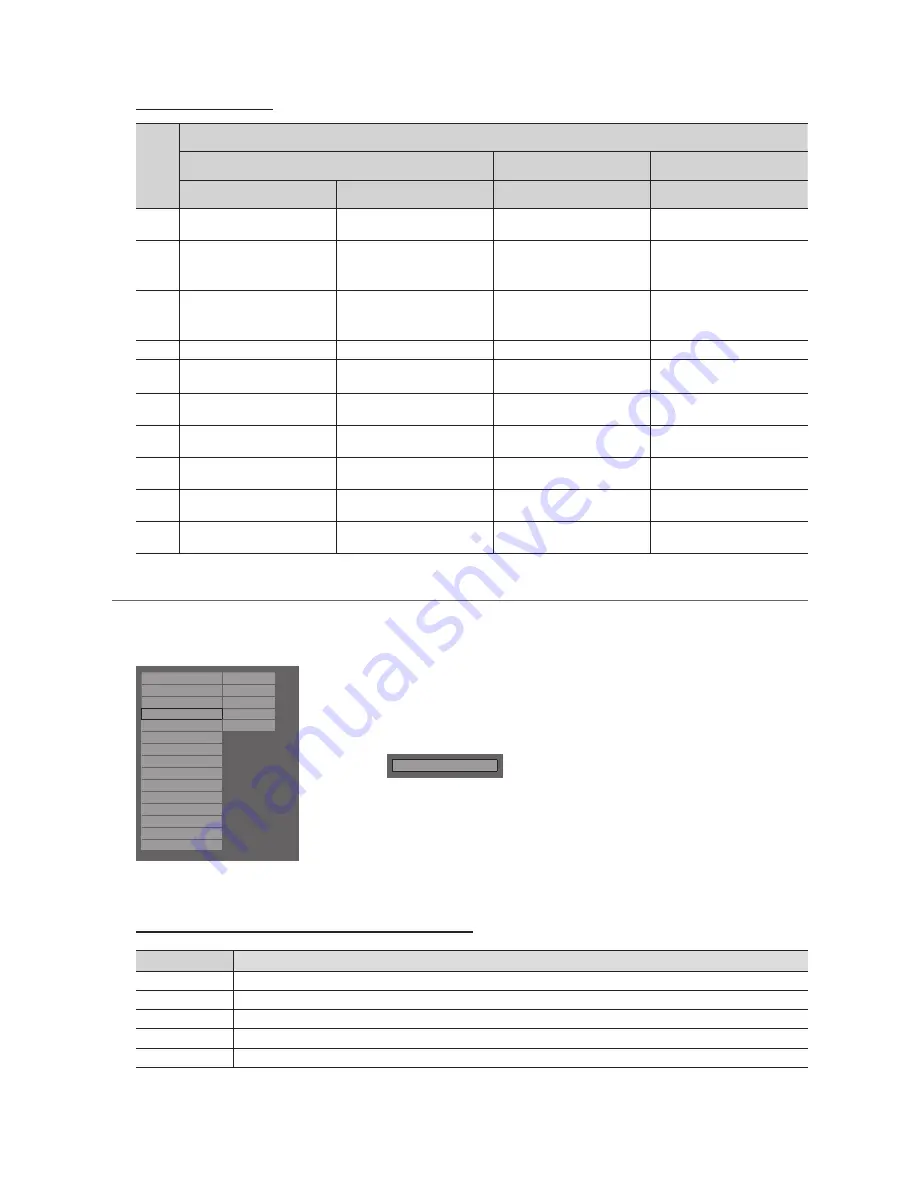
 Smoovie On sequence 

Step

Smovie TV used (Air/Cable )

Mixed Channel Map On (Air and Cable both used)

Only Air or Cable used

Only Air or Cable used

If the tv starts with Hotel P&P

If P&P alredy done

If the tv starts with Hotel P&P

If P&P alredy done

1

Do the P&P, except channel 
store

Enter Hotel menu

Do the P&P all (Air or Cable 
auto tune)

Enter Hotel menu

2

After P&P TV shows hotel menu

Setup Mixed Channel Map On

After P&P TV will show hotel 
menu

Select channel type
- ATV or ADTV for Air
- CATV or CDTV for cable

3

Setup Mixed Channel Map On

TV power off & on

Select channel type
- ATV or ADTV for Air
- CATV or CDTV for cable

Select smoovie TV in Hotel menu

4

Make TV power off & on

Enter Hotel menu

Select smoovie TV in Hotel menu Select Channel Setup

5

Enter Hotel menu

Select smoovie TV in Hotel menu

Select Channel Setup
(can be skipped)

Select "Air" or "Cable" to auto 
tune

6

Select smoovie TV in Hotel 
menu

Select Channel Setup

Select "Air" or "Cable" to auto 
tune (can be skipped)

setup CH Bank Editor

7

Select Channel Setup

Select "Air + Cable" to auto tune Setup CH Bank Editor

After power off & on, user can 
use TV

8

Select "Air + Cable" to auto 
tune

Setup CH Bank Editor

After power off & on, user can 
use TV

9

Setup CH Bank Editor

After power off & on, user can 
use TV

10

After power off & on, user can 
use TV


¦

Channel Editor

Channel Editor to edits channel number a and name.


– Use Channel Editor to sort the channels as user-desired channel numbers.

Hospitality Mode

Standalone

REACH Server

SI Vendor

OFF

Network

Power On

Widget

Channel

Door Eye

My Channel

Service

Menu OSD

Operation

Clock

Music Mode

External Device

External Source

Bathroom Speaker

Eco Solution

Logo/Message

Cloning

r

Channel Editor

<Depending on model and region, some menu items may not exist>

Simple Steps for channel Editor under Stand-alone Mode

Step

Broad Outline

1

Operate ‘Channel Auto Store’ in Hotel Option Menu

2

Enter ‘Channel Editor’ in Hotel Option Menu

3

Compile a table related to the final channel lists you want to have

4

Rearrange channels with the 

TOOLS

 Button based on the table you compiled 

5

Press the 

EXIT

 or 

RETURN

 Button to exit.

Содержание 690 Series

Страница 1: ...ED TV Installation manual imagine the possibilities Thank you for purchasing this Samsung product To receive more complete service please register your product at www samsung com register Model Serial No ...

Страница 2: ... Controller 12 y y Viewing the Remote Control 13 y y Using the Smart Touch Control 15 y y Connecting to the Network 19 y y Connecting the TV with SBB 22 y y Connecting the Bathroom Speakers 24 y y Connecting the MediaHub HD 27 y y Connecting the RJP Remote Jack Pack 29 y y Setting the Hotel Option Data 32 y y SIRCH 48 y y Installing the Wall Mount 49 y y Securing the TV to the Wall 50 y y Anti the...

Страница 3: ...unlock Still image warning Avoid displaying still images like jpeg picture files or still image element like TV Program logo panorama or 4 3 image format stock or news bar at screen bottom etc on the screen Constant displaying of still picture can cause uneven wear of screen phosphor which will affect image quality To reduce risk of this effect please follow below recommendations Avoid displaying ...

Страница 4: ...e of material resources Household users should contact either the retailer where they purchased this product or their local government office for details of where and how they can take these items for environmentally safe recycling Business users should contact their supplier and check the terms and conditions of the purchase contract This product and its electronic accessories should not be mixed...

Страница 5: ... X L12 32 inch x7 40 65 inch x8 B C A 1 2 3 O O O O X X X O O O O O X X X X or Place a soft cloth over the table to protect the TV and then place the TV on the cloth screen side down Insert the Stand Guide into the slot of TV bottom side B A C M4 X L12 x4 Top View DO NOT USE CHEMICALS DO NOT USE GREASE DO NOT USE OIL ATTENTION Rear Front ...

Страница 6: ...6 English 4 C C C M4 X L12 M4 X L12 M4 X L12 x3 x4 x4 32 40 55 65 ...

Страница 7: ... y y STAND BASE y y STAND SUPPORT y y Screws 1 2 3 4 5 6 x4 M4 X L12 C x4 M4 X L12 C Lay the TV on a soft surface screen side down Use the packing material to protect the screen Make sure to distinguish between the front and back of the Stand and the Stand Guide when assembling them Make sure that at least two people lift and move the TV ...

Страница 8: ... VIDEO DOOR EYE VIDEO OUT 6 7 8 0 9 DOOR EYE PC IN PC DVI AUDIO IN 1 2 3 4 COMPONENT AV IN VIDEO DOOR EYE 8 0 VARIABLE AUDIO OUT VOL CTRL HP ID HDMI IN 3 RJP DOOR EYE DATA HDMI IN 1 ARC CABLE AIR 2 4 5 1 0 6 9 SIDE VARIABLE AUDIO OUT VOL CTRL HDMI IN 3 HDMI IN 2 DVI HDMI IN 1 ARC SIDE VARIABLE AUDIO OUT VOL CTRL HDMI IN 3 HDMI IN 2 DVI RJP DOOR EYE 数字音频输出 光纤 1 2 3 4 5 AUDIO AV 输入 1 音频 视频 分量 AV 输入 ...

Страница 9: ...ional to the component jacks PR PB Y on the rear of your TV and the other ends to corresponding component video out jacks on the DVD If you wish to connect both the Set Top Box and DVD you should connect the Set Top Box to the DVD and connect the DVD to the component jacks PR PB Y on your TV The PR PB and Y jacks on your component devices DVD are sometimes labeled Y B Y and R Y or Y Cb and Cr Conn...

Страница 10: ...jack of a device with an HDMI output No sound connection is needed for an HDMI to HDMI connection Use the HDMI IN 2 DVI jack for DVI connection to an external device Use a DVI to HDMI cable or DVI HDMI adapter DVI to HDMI for video connection and the PC DVI AUDIO IN jacks for audio ANT IN AIR CABLE To view television channels correctly a signal must be received by the set from one of the following...

Страница 11: ...680 x 1050 31 469 37 861 37 500 37 879 48 077 46 875 48 363 56 476 60 023 67 500 63 981 79 976 45 000 49 702 62 795 60 000 47 712 55 935 70 635 65 290 59 940 72 809 75 000 60 317 72 188 75 000 60 004 70 069 75 029 75 000 60 020 75 025 60 000 59 810 74 934 60 000 60 015 59 887 74 984 59 954 25 175 31 500 31 500 40 000 50 000 49 500 65 000 75 000 78 750 108 000 108 000 135 000 74 250 83 500 106 500 ...

Страница 12: ... If you press it again the function menu screen disappears Using the Menu Selects the MENU m J by moving the controller in the function menu screen The OSD On Screen Display of your TV s feature appears Selecting the Source Selects the Source s by moving the controller in the function menu screen The Source list screen appears Selecting the SMART HUB With the Function menu visible select SMART HUB...

Страница 13: ...ttons in the Contents Home Swich to the HOME Screen Cut off the sound temporarily Electronic Programme Guide EPG display Have direct access to channels Alternately selects Teletext Double or Mix Adjust the volume Display channel list on the screen Quickly select frequently used functions Return to the previous menu Buttons in the Channel list Contents Home menu etc Select on screen menu items and ...

Страница 14: ...N PRE CH 立体声切换 闹钟 Turns the TV on and off Display and select available video sources Change channels View the My Downloads HB690 HB890 do not support this function Press to display information on the TV screen Exit the menu Use these buttons in the Contents Home Swich to the HOME Screen Cut off the sound temporarily Return to the previous channel Have direct access to channels Alternately selects ...

Страница 15: ...apter Controlling TV Using the Virtual Remote Control Changes channels VOICE Take your voice command and enter a text using your voice Turn on and off the cable set top box connected to the TV For this the Smart Touch Control must be configured as a universal remote control You can use the MIC to give Voice Recognition commands Simply press the VOICE button Voice Recognition function can be affect...

Страница 16: ...l channel s programming schedule including showtimes In addition sets a Schedule Viewing or Schedule Recording to press the touchpad on the programme entry scheduled to air later The colour buttons work differently depending on the function that the TV is currently performing Touchpad Drag on the Touchpad to move the focus on the screen Press the Touchpad to run activate or select the highlighted ...

Страница 17: ...ngs Tutorial to view an on screen guide to using the Smart Touch Control Tap Dragging HISTORY SEARCH TO TORY SEARCH HISTORY SEARCH HISTORY SEARCH TO TORY SEARCH HISTORY SEARCH Tap on the touchpad This selects the focused item When watching TV pressing and holding the touchpad displays the channel list On some apps pressing and holding the touchpad for over 2 seconds displays a list of functions av...

Страница 18: ...utton to display the virtual remote control on the screen The virtual remote control consists of a number panel a playback control panel and a quick access panel Use the touchpad to select numbers and buttons Changing the Virtual Remote Control Panel Choose the number panel playback control panel or quick access panel as the panel to be shown on the screen Use the touchpad to keep moving the focus...

Страница 19: ... b g and n communication protocols Samsung recommends using IEEE 802 11n When you play video over a network connection the video may not play smoothly Most wireless network systems incorporate a security system that requires devices that access the network through an access point or AP typically a wireless IP Sharer router or modem to transmit an encrypted security code called an access key Your T...

Страница 20: ... Modem ADSL VDSL Cable TV DOO VIAUDIOIN AV IN 2 VIDEO DOO VIAUDIOIN VIAUDIOIN AV IN 2 VIDEO V DOO DOO VIAUDIOIN AV IN 2 VIDEO DOO VIAUDIOIN VIAUDIOIN AV IN 2 VIDEO V DOO DOO VIAUDIOIN AV IN 2 VIDEO DOO VIAUDIOIN VIAUDIOIN AV IN 2 VIDEO V DOO The LAN Port on the Wall TV Rear Panel LAN Cable Not Supplied DOO VIAUDIOIN AV IN 2 VIDEO DOO VIAUDIOIN VIAUDIOIN AV IN 2 VIDEO V DOO DOO VIAUDIOIN AV IN 2 VI...

Страница 21: ...ll TV Rear Panel LAN Cable Not Supplied Modem Cable Not Supplied External Modem ADSL VDSL Cable TV DATA DATA DATA DATA DATA DATA DATA DATA DATA The LAN Port on the Wall TV Rear Panel LAN Cable Not Supplied DATA DATA DATA DATA DATA DATA DATA DATA DATA The Modem Port on the Wall TV Rear Panel LAN Cable Not Supplied Modem Cable Not Supplied LAN Cable Not Supplied External Modem ADSL VDSL Cable TV IP ...

Страница 22: ...ble Use data communication DOOR EYE PCIN PC DVIAUDIOIN AUDIO AV IN 1 AUDIO VIDEO COMPONENT AV IN 2 AUDIO VIDEO DOOR EYE VIDEO OUT PCIN PC DVIAUDIOIN PC DVIAUDIOIN AUDIO AV IN 1 AUDIO VIDEO COMPONENT AV IN 2 AUDIO VIDEO V DOOR EYE VIDEO OUT ETH MODEM TV Rear Panel Data Cable ETH MODEM DOOREYE DATA HDMIIN1 ARC DOOREYE DOOREYE DATA DATA HDMIIN1 HDMIIN1 ARC DATA TV Rear Panel Data Cable HG690 model HG...

Страница 23: ...st of Vendors and Compatible Data Cables Supplied with the TV Some area does not supply data cable with TV y y Confirm you are using the correct data cable for your vendor Refer to the code label on the data cables ...

Страница 24: ...DIO VIDEO DOOR EYE VIDEO OUT HDMIIN3 HDMIIN2 DVI HDMIIN1 ARC CABLE AIR HDD1 0A CLONING PCIN PC DVIAUDIOIN PC DVIAUDIOIN AUDIO AV IN 1 AUDIO VIDEO COMPONENT AV IN 2 AUDIO VIDEO V DOOR EYE VIDEO OUT HDMIIN3 HDMIIN2 DVI HDMIIN1 ARC CABLE AIR HDD1 0A CLONING VARIABLE AUDIOOUT VOR CTRL VOL VOL TV Rear Panel Volume Control Box Speaker 2 1 VARIABLE AUDIOOUT VOL CTRL HDD5V1A VARIABLE AUDIOOUT VOL CTRL HDD...

Страница 25: ...bathroom speakers The jack that connects the Volume Control Box to the TV is a 3 5mm normal Phone jack Volume Control Box switch is a Tact switch Setting the Sub AMP Mode 0 Turns the Sub AMP function off PWM off 1 Determines the Sub volume according to the main volume control the sub volume is determined according to the Power On Volume the Min Volume and the Max Volume values of Hotel Mode 2 Dete...

Страница 26: ...3 RJP HDM HDM A HP ID HEADPHON BOX TV Headphones jack Whitewire Audio L Shield Wire TV HP ID jack Red wire White wire Red Wire Audio R Shield wire TV Rear Panel TV Rear Panel Headphone Box Headphone Box Headphone Box HG690 model HG890 model Audio Loop In An addition Headphone Box can be installed on a bed or business desk for added convenience The installation procedures are given below y y Detail...

Страница 27: ...IO VIDEO COMPONENT AV IN 2 AUDIO B VIDEO VIDEO DOOR EYE VIDEO OUT CABLE AIR VARIABLE AUDIOOUT VOR CTRL HDD 1 0A CLONING HDMI USB RS 232 HDMIIN3 HDMIIN2 DVI HDMIIN1 ARC HDMI USB RS 232 RJP VARIABLE AUDIOOUT VOL CTRL HP ID HDMIIN3 RJP DOOREYE DATA HDMIIN1 ARC CABLE AIR HDD5V1A VARIABLE AUDIOOUT A VOL CTRL HP ID HDMIIN3 RJP RJP DOOREYE DOOREYE DATA DATA HDMIIN1 HDMIIN1 ARC CABLE AIR HDD5V1A HDMIIN3 R...

Страница 28: ...e corresponding output sources connect from MediaHub to the TV MediaHub communicates with the TV via RS232 Hot Plug Play is a function that allows hotel guests to connect an external source to the MediaHub MediaHub communicates with the TV by sending messages regarding Active Inactive sources The TV switches to the Active external source You have to connect the HDMI of the MediaHub to the HDMI IN ...

Страница 29: ... IN 2 AUDIO B VIDEO DOOR EYE VIDEO OUT PCIN PC DVIAUDIOIN COMPONENT AV IN 2 AUDIO B VIDEO HDMIIN3 HDMIIN2 DVI HDMIIN1 ARC USB HDMI VIDEO AUDIO AUDIO PC RS 232 USB HDMI VIDEO AUDIO AUDIO PC RS 232 RJP VARIABLE AUDIOOUT VOL CTRL HP ID HDMIIN3 RJP DOOREYE DATA HDMIIN1 ARC CABLE AIR HDD5V1A HDMIIN3 RJP HDMIIN1 ARC USB HDMI S VIDEO RCA RS 232 TV Rear Panel TV Rear Panel RJP Rear RJP Rear 5 1 D sub PC A...

Страница 30: ...HD Plus y y RJP Remote Jack Pack RJP stands for Remote Jack Pack The RJP is a hardware module that has different Audio Video inputs A V Audio PC and HDMI and corresponding outputs The corresponding output sources are connected from RJP to TV The RJP communicates with the TV via RS232 Hot Plug Play is a function that allows hotel guests to connect an external source to the RJP The RJP communicates ...

Страница 31: ...0 seconds to establish communications between the TV and the RJP y y The following table shows the approximate time in seconds to switch from the TV to the input source based on the priority Scenario 1 When no inputs are connected Source To Connect AV 2 Sec PC 0 7 Sec HDMI 3 9 Sec Scenario 2 When two or more inputs are connected and an Input source is disconnected and then reconnected Source Disco...

Страница 32: ...r On AC Power On Option Standby Stand By Mode Power On Power On Last Option Last Power On State 4 Channel Channel Setup User can set channel option Such as Auto Tunning Manual Tunning Antenna setting Channel Editor Provided option for editing Channel Name Number and video Mute settings for channels in channel List Mixed Channel Map ON Mix Air and Cable Channels Only for Hong Kong and China model O...

Страница 33: ...rted according to the jack priority 7610 Priority PC 2 If the jack priority is set the corresponding source is automatically set when a jack is inserted according to the jack priority HB890 model no PC 7610 Priority HDMI 3 If the jack priority is set the corresponding source is automatically set when a jack is inserted according to the jack priority 7610 AV Option AV1 Select RJP AV Source Source s...

Страница 34: ...hat whenSetting Auto Initialize is set to Off 16 REACH Server REACH Server update Time 1hour Standby REACH Server will be operated according to time setting REACH Update Immediate OFF Make TV operate REACH Server after 1 minute in Stand by mode REACH Server Channel 87 Set the default channel for REACH Server None After Auto Scan Operate REACH Server Channel value Operate REACH Server at the channe...

Страница 35: ...pears in the test picture select Yes and follow the directions on the screen Sound Test Use the built in melody sound to check for sound problems If the problem occurs during the test select Yes and follow the directions on the screen Self Diagnosis for HTV HD Function Check Menu On Executing Item Below OSD is displayed STB SI Vendor Setting SI Name Ok Failure Bathroom AMP Ok Failure Hotel EU SW U...

Страница 36: ...r Eco Solution Logo Message Cioning r Welcome Message ON Edit Welcome Message Hospitality Logo ON Hospitality Logo DL Logo Display Time message can be up to 25 characters and can be edited by changing the text in the Hotel Service menu The following is the list of characters supported by Welcome message In Capital letters from A Z The welcome message can be edited by using the navigation colour en...

Страница 37: ...nu items become accessible y y Hospitality LOGO DL This option lets you download the logo image to the TV s memory from a USB device A wait message appears while the image is being copied to the TV A completed message appears when the copy operation finishes successfully The word failed appears if the copy operation was unsuccessful No USB appears if no USB device is connected No File appears if t...

Страница 38: ...ored data in the USB device to TV set 1 Insert a USB drive into the USB port on the rear of the TV 2 Enter Hotel Option by pressing buttons in order MUTE 1 1 9 ENTER 3 Press the or button to select Clone USB to TV and then press the ENTER button 4 When the message Clone USB to TV is displayed then press the ENTER button 5 You can Make sure USB cloning behavior x x In Progress during copying data t...

Страница 39: ...that are restored to their cloned values when you set the Setting Auto Initialize function to on Menu Menu Item Picture Picture Mode Backlight Contrast Brightness Sharpness Colour Tint G R Picture Size Zoom Position Auto Adjustment PC Screen Adjustment 3D PIP Advanced Settings Picture Options Colour Tone Digital Clean View MPEG Noise Filter HDMI Black Level Film Mode Motion Plus Analog Clean View ...

Страница 40: ...tegories below Show Password Enter security key Auto Tuning Auto Tuning is finding channels for you Channel 10 5 Digital 0 TV 0 Radio 0 Data Other 0 Analogue 0 Stop Auto Tuning Aerial Air Channel Type Digital Analogue To receive channels configure the options below then select Scan Select the connected aerial that you want to use to get channels Scan TV Setup Complete OK Digital 0 TV 0 Radio 0 Dat...

Страница 41: ... Play is selected from Easy Set Up OSD Select Menu Language OSD is displayed Initial Highlight English Display time OSD timeout and operation are the same as Samsung s consumer TV models If ENTER button is pressed Select Area OSD is displayed y y Auto Search Mode OSD If skip option is selected it goes to Clock setting OSD If ENTER button is pressed auto searching of channels is performed The OSD D...

Страница 42: ...ode can be from 0 to 9 Press the RETURN MUTE over 7 seconds and then select the number button to set the code Set ID OSD will be displayed in central position The following words appear Remote control code is set to x If you want to change Remote control code Enter the digit you want to change X is the digit number This OSD displays until Exit is pressed For example TV and Remote will be set to ID...

Страница 43: ...1 Free channel Select the channel that will be used when remote doesn t have any card b BANK2 Family Card Green Select the channel that will be used when remote has a GREEN CARD c BANK3 Adult Card Red Select the channel that will be used when remote has a RED CARD b Select All Items on Column Deselect All Items on Column Select Deselect Return Registered Bank1 0 Bank2 0 Bank3 0 a 1 C1 a 2 C2 a 3 C...

Страница 44: ... to auto tune can be skipped setup CH Bank Editor 7 Select Channel Setup Select Air Cable to auto tune Setup CH Bank Editor After power off on user can use TV 8 Select Air Cable to auto tune Setup CH Bank Editor After power off on user can use TV 9 Setup CH Bank Editor After power off on user can use TV 10 After power off on user can use TV Channel Editor Channel Editor to edits channel number a a...

Страница 45: ...hannel mode by each country that master has managed in factory mode News O O Radio O O Entertainment O O Sport O O Hotel O O My Channel Current status Austria Sports Country Genre All Country All Austria News Belgium Radio China Entertainment Denmark Sports Finland Hotel Keep Previous nMove EEnter For the number of items to be displayed in the list refer to the design document Key Guide Button Act...

Страница 46: ...Mouse x x In Genre mode Guide Page channel list title named All Channels Elements No Name Description 1 Background Screen y y Displays the last memorized channel that appears when TV is turned on 2 Function Title y y This is name of the function 3 Current Status y y Display current settings the Country Genre 4 Country Items y y The item for the country list is displayed y y Displays the last selec...

Страница 47: ...vice Sound Bar Out On Connect an HDMI cable from the HDMI OUT port of Sound BAR to the HDMI1 port of hospitality TV After being connected to the 2013 hospitality TV via HDMI Cable when the TV turns on the Sound Bar automatically detects the TV and then converts to hotel mode by itself The change with power on volume max volume on TV is applied to the connected sound bar since TV boots twice y y Fe...

Страница 48: ...m in Hotel SIRCH Headend System for Hotel HD ENCODULATOR HD ENCODULATOR HD ENCODULATOR HD ENCODULATOR Satellite Receiver Independence AV Stream Cable STB Terrestrial Receiver RF Combiner y y Features SIRCH Windows Application SW 19 inch Rack Unit type PC embedded Modulator OpenCable Remote Upgrade TV Software Cloning Data Channel Map Operation can be controlled by key button extra key board monito...

Страница 49: ...crews that do not comply with VESA standard screw specifications x x Do not use screws longer than the standard dimensions as they may cause damage to the inside of the TV set x x For wall mounts that do not comply with the VESA standard screw specifications the length of the screws may differ depending on their specifications x x Do not fasten the screws too tightly This may damage the product or...

Страница 50: ...ot fall backwards It is safe to connect the string so that the clamps fixed on the wall are equal to or lower than the clamps fixed on the TV Untie the string before moving the TV 4 Verify that all connections are properly secured Periodically check connections for any sign of fatigue for failure If you have any doubt about the security of your connections contact a professional installer Anti the...

Страница 51: ... cm 65 inches 165 1 cm Power Consumption Normal operation Standby 153W 0 3W 235W 0 2W Sound Output 10W x 2 Dimensions WxDxH Body With stand 1250 37 x 48 5 x 724 64 mm 1250 37 x 227 62 x 798 15 mm 1470 1 x 49 9 x 848 2 mm 1470 1 x 375 3 x 935 8 mm Weight Without Stand With Stand 16 9 kg 19 8 kg 26 9 Kg 29 5 Kg HG890 Display Resolution 1920 x 1080 Environmental Considerations Operating Temperature O...

Страница 52: ...and more about power consumption refer to the label attached to the product The above specifications may differ depending on the model The terms HDMI and HDMI High Definition Multimedia Interface and the HDMI Logo are trademarks or registered trademarks of HDMI Licensing LLC in the United States and other countries ...

Страница 53: ... com HONG KONG 852 3698 4698 www samsung com hk www samsung com hk_en INDIA 1800 1100 11 3030 8282 1800 3000 8282 1800 266 8282 www samsung com INDONESIA 0800 112 8888 021 5699 7777 www samsung com JAPAN 0120 327 527 www samsung com MALAYSIA 1800 88 9999 www samsung com PHILIPPINES 1 800 10 SAMSUNG 726 7864 for PLDT 1 800 3 SAMSUNG 726 7864 for Digitel 1 800 8 SAMSUNG 726 7864 for Globe 02 5805777...

Отзывы: