background image

ŝ

157

Ş

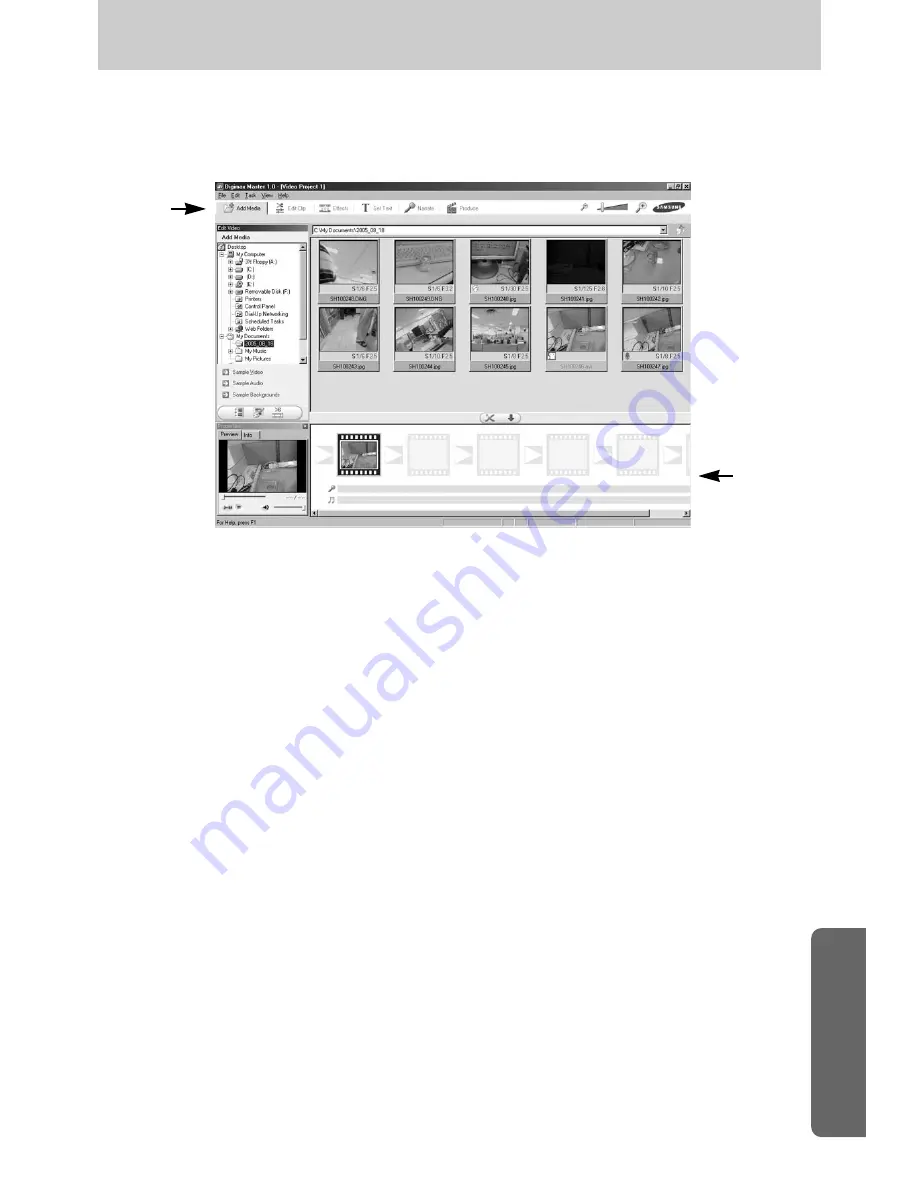
- Movie clip edit functions are listed below.

ڹ

Edit menu : You can select the following menus.

[Add Media] : You can add other media elements to a movie.
[Edit Clip] : You can change the brightness, contrast, colour and saturation.
[Effects] : You can insert an effect.
[Set Text] : You can insert texts.
[Narrate] : You can insert a narration.
[Produce] : You can save the edited multi media as a new file name.

You can select AVI, Windows media (wmv), Windows media (asf) and movie
clip for this camera (avi, MPEG-4) file types.

ں

Frame display window : You can insert multi media in this window.

ſ

Some movie clips that was compressed with a codec that is not compatible with the Digimax
Master can’t play back in the Digimax Master.

ſ

Refer to the [Help] menu in Digimax Master for further information.

ڹ

ں

Digimax Master

ƃ

Movie edit : You can have still images, movies, narration and music all in one movie file.

Содержание 120815 - Digimax Pro 815 8MP Digital Camera

Страница 1: ... you for buying a Samsung Camera This manual will guide you through using the camera including capturing images downloading images and using the application software Please read this manual carefully before using your new camera ...

Страница 2: ...amera s USB connection terminal p 144 Check the camera s power If the power is turned off press the camera button to turn it on Take a picture Check the camera s power Check Removable Disk Open Window s EXPLORER and search for Removable Disk p 145 ƃ If you use a card reader to copy the images on the memory card to your PC the images could be damaged When transferring the images taken with the came...

Страница 3: ...PROGRAM mode 30 ƈHow to use the APERTURE PRIORITY mode 30 ƈHow to use the SHUTTER PRIORITY mode 31 ƈHow to use the MANUAL mode 31 ƈHow to use the MySET mode 32 ƈHow to use the MOVIE CLIP mode 32 ƈHow to use the SCENE mode 33 ƃThings to Watch Out for When Taking Pictures 34 ƃUsing the camera buttons to adjust the camera 35 ƈPOWER button 35 ƈSHUTTER button 35 ƈJog dial Front Rear 35 ƃDrive button 36...

Страница 4: ...o turning off the LCD 114 ƃLanguage 115 ƃFormatting a memory card 116 ƃSetting up the Date Time 117 ƃSetting up the date type 117 ƃWorld time 118 ƃImprinting the recording date 119 ƃSound 120 ƃLCD brightness 120 ƃSelecting Video out type 121 ƃQuick view 122 ƃAuto rotating sensor 123 ƃConnecting an External Device USB 124 ƃInitialisation 124 ƃSetting up the MYCAM menu 125 ƃStart up image 126 ƃStart...

Страница 5: ...could result in death or serious injury CAUTION CAUTION indicates a potentially hazardous situation which if not avoided may result in a minor or moderate injury Correct Disposal of This Product Waste Electrical Electronic Equipment Applicable in the European Union and other European countries with separate collection systems This marking shown on the product or its literature indicates that it sh...

Страница 6: ...flash too close to your subject s eyes may cause eyesight damage ƈ When taking photographs never point the lens of the camera directly into very strong light This may result in permanent damage to your eyesight ƈ For safety reasons keep this product and accessories out of reach of children or animals to prevent accidents e g ҮSwallowing batteries or small camera accessories If an accident should o...

Страница 7: ...nuously It may cause burns ƈ If you are using the AC power adaptor be careful when moving the camera After use always switch off the camera before unplugging the adapter from the wall socket Then make sure that any connector cords or cables to other devices are disconnected before moving the camera Failure to do so may damage the cords or cables and cause a fire or electric shock ƈ The Lens is att...

Страница 8: ...ng dealer or Samsung service centre CF CompactFlash card p 20 DPOF compatible printer see p 103 Exclusive bounce flash Flash plate Camera case User manual Warranty card Camera strap Remote control Software p 137 AC cord AC adapter Battery charger Rechargeablebattery SLB 1974 Lens adapter Lens hood Lens cap Included items System chart ...

Страница 9: ...r is recommended ҮWindows 98 98SE 2000 ME XP ҮMinimum 64MB RAM XP 128MB Ү200MB of available hard disk space Over 1GB is recommended ҮUSB port ҮCD ROM drive Ү1024x768 pixels 16 bit colour display compatible monitor 24 bit colour display recommended ҮDirectX 9 0 or later For Macintosh ҮPower Mac G3 or later ҮMac OS 10 0 or later ҮMinimum 64MB RAM Ү110MB of available hard disk space ҮUSB port ҮCD ROM...

Страница 10: ... Focus area selection AF A button Focus mode selection button Speaker Connector cover Memory card slot cover Pop up flash OPEN button Flash compensation button AF lock AF L button Remote control sensor Microphone Shutter button Front Jog dial JOG 1 Self timer lamp Auto Focus lamp Microphone Lens Identification of features ...

Страница 11: ... Power button Power lamp Top LCD ISO button Metering button Hot shoe Flash status lamp Mode dial Speaker Shutter button EVC ExposureValue Compensation ring Focus ring Zoom ring Zoomscaleindicator Flash Hot shoe cap Identification of features ...

Страница 12: ... Card in use lamp LCD button Q XTIa 1VNWZUI QWV J WV Connector cover SCENE Delete button Back LCD Memory card slot cover Memory card eject lever Memory card slot 5 function button Play mode button Digital zoom Enlargement button Strap eyelet AE Lock AE L button Thumbnail button Rear Jog dial JOG 2 Identification of features ...

Страница 13: ...ŝ13Ş Bottom Battery chamber Battery chamber cover lock Tripod socket Battery holder Battery chamber Diopter adjustment ring Identification of features ...

Страница 14: ...ing When the LCD is turned off Charging is complete Pressing the shutter button half way down The flash is being charged When the memory card is being used Red Blinking PC mode When the data is transmitting When the USB cable is connected Card in use lamp ƈ Mode icon Mode AUTO PROGRAM A priority S priority MANUAL MySET MOVIE CLIP Icon Icon NIGHT PORTRAIT CHILDREN LANDSCAPE CLOSE UP TEXT SUNSET DAW...

Страница 15: ...CAUTION Model SLB 1974 Type Lithium Ion Voltage Capacity 7 4V 1900mAh Charging time Approx 180MIN Using the SBC L4 ƈ Number of images and battery life ſ These figures are measured under Samsung s standard conditions and Shooting conditions and may vary depending on the way of user s usage Still image Movie Battery life Number of images Recording time Approx 225MIN Approx 450 Approx 225MIN Using th...

Страница 16: ...y is inserted with the correct polarity 1 Turn the battery chamber lock in the direction of the arrow OPEN and open the battery chamber cover 2 Insert the battery taking note of the polarity 3 Close the battery chamber cover and turn the battery chamber lock in the direction of the arrow CLOSE Before using the camera ...

Страница 17: ...urn the battery chamber lock in the direction of the CLOSE mark Important information about battery usage ƃ When the camera is not used turn off the camera power ƃ Please remove the battery if the camera will not be used for long periods The battery can lose power over time and are prone to leaking if kept inside the camera ƃ Low temperatures below 0 C can affect the performance of the battery and...

Страница 18: ...attery is inserted with the correct polarity ſ Check the battery charging status with the Charging LED of the charger Status LED Being charged Red LED is on Charging is complete Green LED is on Charging is paused Yellow LED is on Charging error Yellow LED is blinking Charging LED ƈ How to charge the rechargeable battery 2 Place the battery in the charger as shown Before using the camera ...

Страница 19: ...ort on the camera before using an AC adaptor AC adapter SAC 81 DC 8 4V ƃ The proper operating temperature of the charger is 0 C 40 C When you charge the battery under over the proper operating temperature the charger may not operate Yellow LED is on Charging will restart at the operating temperature and this is not camera malfunction ƃ Samsung warrants the charger for a period of one year and the ...

Страница 20: ...se you may notice that the memory card is warm This is perfectly normal ƃ Do not use a memory card that is used in another digital camera To use the memory card in this camera first format the memory card by using the camera ƃ Do not use a memory card formatted by another digital camera or memory card reader ƃ If the memory card is subjected to any of the following the recorded data may become cor...

Страница 21: ...X2448 3 2 15 29 42 3264X2176 17 32 46 3264X1840 20 38 54 2400X1800 27 50 71 1632X1224 54 94 124 1024X768 111 169 205 640X480 292 450 548 640X480 1Min 10Sec 1Min 57Sec 320X240 3Min 31Sec 5Min 51Sec 160X120 8Min 12Sec 13Min 41Sec Still image Movie clip ƈ The camera can use CF CompactFlash I and II type card Some CF I and II type cards are not compatible with this camera We recommend a same kind of C...

Страница 22: ...rd slot cover until you hear a click If the memory card does not slide in smoothly do not attempt to insert it by force Check the direction of insertion and then insert it correctly Do not insert the memory card the wrong way round Doing so may damage the memory card slot 2 Insert the memory card as shown on the memory slot cover 1 Ensure the camera is off and pull the memory card slot cover in th...

Страница 23: ...t on the camera as shown alongside 3 Fasten the strap as shown 4 Repeat steps 1 3 to attach the other end of the strap to the other eyelet 2 Thread the strap back through the strap ring as shown alongside Attaching the strap Before using the camera ...

Страница 24: ... case use the lens hood 1 Attach the lens adapter to the camera by turning the lens adapter clockwise as shown alongside ſ You can use a general purpose filter Ґ 72mm after attaching the lens adapter 2 Attach the lens hood by turning it clockwise Using the lens hood Carrying the lens hood Attaching the lens hood Before using the camera ...

Страница 25: ...ŝ25Ş ƈ When you don t use the camera attach the lens cap You can attach the lens cap as show below Attaching the lens cap Before using the camera ...

Страница 26: ...kewarning p 49 34 7 Voice memo p 76 8 Contrast p 73 9 Saturation p 74 10 Image quality p 71 11 Sharpness p 75 12 Focus Lock p 47 13 Focus mode p 47 48 Image Full status ھ ڿ ۀ ہ ۂ ۃ ۄ ۅ ۆ ۇ ڽ ڼ ڻ ں ڹ ؐ ؑ ؒ ؓ ƈ The LCD displays information about the shooting functions and selections ƈ Refer to page 63 for more information about selecting the LCD Rear LCD Finder LCD LCD indicator ...

Страница 27: ...p 58 18 Date imprint p 119 19 Flash p 57 60 20 Macro p 55 56 21 White balance p 53 54 22 ISO p 42 23 Aperture value F2 2 p 30 31 24 Shutter speed 1 1600 p 30 31 25 Colour space p 77 27 Number of available shots remaining 25 p 21 28 Exposure lock p 51 29 Auto focus frame 30 Spot zone p 79 26 Recording mode LCD indicator p 29 33 ...

Страница 28: ...ing p 34 5 Exposure lock p 51 6 Aperture value F2 2 p 30 31 7 Saturation p 74 8 Sharpness p 75 9 Image size p 70 10 Image quality p 71 11 Number of shots remaining 25 p 21 12 Drive mode p 36 39 13 Metering p 43 14 Battery status p 17 15 Macro p 55 56 16 Focal length 28mm p 44 1 Recording mode p 29 33 Top LCD LCD indicator ...

Страница 29: ...the power button to turn on the camera Date Time will display for about 3 Sec and disappear 3 Select the AUTO mode by rotating the mode dial 4 Point the camera towards the subject and compose the image by using the LCD 5 Press the shutter button to capture an image ƈ How to use the AUTO mode AUTO mode ƃ If the auto focus frame turns to red when you press the shutter button down half way it means t...

Страница 30: ...ge PROGRAM mode Aperture priority mode ƈ How to use the APERTURE PRIORITY mode This mode will set the aperture value for automatic exposure depends on the brightness of the object by automatic shutter speed setting in the camera Steps 1 2 are the same as those for AUTO mode 3 Select the APERTURE PRIORITY mode by rotating the mode dial 4 Select the desired aperture value by rotating the Rear jog di...

Страница 31: ...utter Priority mode ƈ How to use the MANUAL mode The user can manually set both the aperture value and the shutter speed Steps 1 2 are the same as those for AUTO mode 3 Select the MANUAL mode by rotating the mode dial 4 Select the desired shutter speed or aperture value by rotating a jog dial Front jog dial JOG1 Selecting the shutter speed Rear jog dial JOG2 Selecting the aperture value 5 Point th...

Страница 32: ...re an image Please see page 78 for details of the MySET shooting mode and menus MySET mode ƈ How to use the MOVIE CLIP mode A movie clip can be recorded for as long as the available recording time of the memory capacity allows A movie clip sets as 640X480 movie size and 25fps frame rate can be taken up to 30 seconds Steps 1 2 are the same as those for AUTO mode 3 Select the MOVIE CLIP mode by rota...

Страница 33: ...SCENE mode by rotating the mode dial 4 Press the SCENE button and scene menu will display as shown alongside 5 Select the desired Scene sub menu by rotating the Rear jog dial JOG2 and press the OK button Please see page 65 for detailed descriptions for each scene 6 The current scene icon is displayed at the top right of the LCD 7 Point the camera towards the subject and compose the image by using ...

Страница 34: ...fill in flash see page 59 spot metering see page 43 or exposure compensation see page 50 ƈ Avoid obstructing the lens or the flash when you capture an image ƈ Using the Rear LCD extensively will drain the battery We recommend turning off the Rear LCD and using the Finder LCD and Top LCD as often as possible in order to extend battery life ƈ Under certain conditions the auto focus system may not pe...

Страница 35: ...movie clip Press the shutter button once and the movie clip is recorded for as long as the available recording time in the memory allows If you wish to stop recording press the shutter button again ƃ In STILL IMAGE mode Pressing the shutter button down halfway activates the auto focus and checks the settings of the flash Pressing the shutter button down fully takes the image and stores the relevan...

Страница 36: ... Use this menu if it is hard to decide exposure of the object The camera will take 3 or 5 shots with settings at below and above the set exposure ƃ Auto Focus Bracket Use this menu if it is hard to decide distance of the object The camera will take 3 or 5 shots at different focal points ƃ White Balance Bracket Use this menu if it is hard to decide white balance of the object The camera will take 3...

Страница 37: ...ots according to the selected exposure value ſ ƃ How to set the AFB 1 Select the AFB icon by rotating the Rear jog dial JOG2 ſ You can t select the AEB icon in the Auto recording mode and movie clip mode ƈ How to set the drive mode ƃ Selecting the various modes available 1 Press the Drive button and drive mode icon will display on the LCD 2 Select a desired drive mode by rotating the Rear jog dial...

Страница 38: ... button to capture an image You can take 3 or 5 shots depending on the selected white balance value ſ 3 Press the OK or Shutter button to set the focus value 4 Press the shutter button to capture an image You can take 3 or 5 shots according to the selected focus value ſ Number of shots Selectable focus value 3 ť1 ť2 ť3 ť4 ť5 ť6 5 ť1 ť2 ť2 ť4 ť3 ť6 ſ You can t select the AFB icon in the Auto record...

Страница 39: ... to set the setting 5 Select the Interval Number menu 6 Press the Right button and select a desired menu by pressing the Up Down button the interval can be set to any number of shots between 2 and 99 7 Press the OK button to set the setting ƃ If you press the power button during the interval shooting camera power is off the interval shooting is cancelled ƃ You can t select the interval shooting in...

Страница 40: ... timer function will be maintained after taking an image rotating the mode or pressing the play mode button cancels the self timer function ƈ Self timer Remote mode Off Self timer function is off 2 Sec Self timer Pressing the shutter button will allow an interval of 2 seconds before the image is taken 10 Sec Self timer Pressing the shutter button will allow an interval of 10 seconds before the ima...

Страница 41: ...remote control Rotate the cover as shown The remote control takes a CR 2025 3V battery ƃ If you operate the Mode dial and Self timer button during the self timer operation the self timer function is cancelled ƃ Use a tripod to prevent the camera from shaking INFORMATION ƃ Though you select a remote control icon you can still take an image by using the shutter button of the camera ƃ If you select t...

Страница 42: ...ed in high luminance The higher the ISO value the higher the camera s sensitivity to light is and therefore the greater its capacity to take pictures in dark conditions However the noise level in the image will increase as the ISO value increases making the image appear coarse ƈ How to set the ISO 1 Press the ISO button and an ISO icon will display on the LCD 2 Select a desired icon by rotating th...

Страница 43: ...towards the centre of the image area This is suitable for taking a picture of small object like a flower or insects Spot metering Only the cross marked area in the centre of the LCD will be metered for light This is suitable when the subject in the centre is exposed correctly regardless of the back lighting ſ The mark will be displayed when spot metering has been selected ƈ How to set the metering...

Страница 44: ... Using both will offer a total zoom ratio of 30X or 60X Wide Tele Tele Wide ƃ Optical Zoom WIDE Rotate the Zoom ring to left This will zoom out from the subject i e the subject will appear further away ƃ Optical Zoom TELE Rotate the Zoom ring to the right This will zoom into the subject i e the subject will appear nearer Zoom operation ...

Страница 45: ...warning indicator will display When you select a higher optical or digital zoom we recommend using the Finder LCD and the tripod ƃ Take care not to press the lens as this may cause a camera malfunction ƃ Do not pull the lens by hand and do not rotate the zoom ring quickly It may cause a camera malfunction Please be careful when using the lens INFORMATION ƃ Digital zoom Pressing the Digital zoom bu...

Страница 46: ...range of frame Fixed spot AF The frame White will be fixed at the centre of the LCD Modifying the Spot AF position The frame will be yellowed and blink The frame position can be changed its position Setting the Spot AF position The frame turns yellow and the frame position will be set Focusing Moving the frame to the left or right Moving Up Down the frame Wide AF Setting Spot AF Yellow Blinking Fi...

Страница 47: ...on This function is available in the AF S mode How to use the focus lock 1 Ensure the subject is in the centre of the auto focus frame 2 Press the AF L button The frame turns green and Focus lock icon will display It means the camera is focused on the subject 3 Recompose the picture and press the shutter button After taking an image the Focus lock function will be cancelled ƃ AF S Single Auto Focu...

Страница 48: ...tton and select Direct MF menu by pressing the Up Down button 3 Press the Right button and select a desired sub menu by pressing the Up Down button Off You can t change the focus manually On You can change the focus manually 4 Select the On sub menu Press the OK button to set the change and the DM icon will display on the Rear LCD 5 Pressing the shutter button half way down change the focus by rot...

Страница 49: ...Note that the noise level in the image will increase when you use the high speed shutter as the high speed shutter use higher ISO value ƃ If you select the high speed continuous mode or ultra high speed continuous mode the high speed shutter mode will be cancelled ƃ This function isn t available in the Shutter priority Manual and Movie clip mode ƃ If you change the camera mode a high speed shutter...

Страница 50: ...e that a positive exposure compensation value increases the exposure and the LCD will appear white or you may not get good pictures ƃ How to set the Exposure Value Compensation 1 Press and hold the AE L button And then rotate the EVC ring The Exposure Compensation menu will display Rotating to right 0 2EV 1 3 EV step Rotating to left 0 2EV 1 3 EV step 2 Select an Exposure Value by rotating the EVC...

Страница 51: ... Exposure Value Compensation 1 Ensure the subject is in the centre of the auto focus frame 2 Move the focus frame to a subject that has the desired exposure value 3 Press the AE L button and the exposure value will be fixed An exposure lock icon will display on the LCD 4 Recompose the picture and press the shutter button After taking an image the Focus lock function will be cancelled Scene for sho...

Страница 52: ...n makes the cursor shift to the left tab When the menu is not displayed on the LCD monitor the Left button operates as the FLASH button Right button When the menu is displayed on the LCD monitor pressing the Right button makes the cursor shift to the right tab When the menu is not displayed on the LCD monitor you can execute a function that was set in the Custom menu by pressing this button MENU O...

Страница 53: ...ting conditions DAYLIGHT For taking images outside CLOUDY For taking images under a cloudy and overcast sky Fluorescent H For shooting under daylight fluorescent types of three way fluorescent lighting Fluorescent L Shooting under white fluorescent lighting TUNGSTEN For shooting under tungsten standard light bulb lighting CUSTOM Allows the user to set the white balance according to the shooting co...

Страница 54: ...main effective until it is overwritten ƃ How to set the colour temperature Colour temperature is a simplified way to characterize the light source Low colour temperature implies warmer light more red while high colour temperature implies a colder light more blue 1 Select the colour temperature K by rotating the Rear jog dial JOG2 2 Select a desired colour temperature K by rotating the Front jog di...

Страница 55: ...at the S MACRO of the Zoom bar 2 Press the Macro Down button and the macro icon will display on the LCD 3 Select the super macro icon by rotating the Rear jog dial JOG2 4 Press the Macro Down button to set the setting ƃ How to set the super macro ƃ How to set the macro ƈ Types of focus modes and focus ranges Macro icons Selecting the super macro Unit cm Wide Tele Wide Tele Wide Tele Wide Tele Focu...

Страница 56: ...d it is possible that camera shake will occur If this is the case use a tripod to eliminate this ƃ When you take a picture within 10cm MACRO focus select the FLASH OFF mode ƃ When you take a picture within 5cm the AF may take a time to get exact focus range INFORMATION O O O O O O O O O O O O O O O O O O O O X O O O O O O O Mode Auto Macro Super macro Auto macro Mode Auto Macro Super macro Auto ma...

Страница 57: ...cally To use the flash press the Pop up flash button 4 Press the OK button to set the setting ƃ How to set the flash mode 1 Press the Flash button Left and flash mode icons display on the LCD 2 Select a desired flash icon by rotating the Rear jog dial JOG2 3 Press the Flash button to set the setting Color Space Save Myset Flash Synchro Flash Pop up Direct MF Spot AE point Size Auto Manual Color Sp...

Страница 58: ...p up Direct MF Spot AE point 1st Curtain 2nd Curtain Custom Color Space Save Myset Flash Synchro Flash Pop up Direct MF Spot AE point 1st Curtain 2nd Curtain 1 Press the Menu button and select the P menu tab 2 Press the Right button and select the Flash Synchronization menu by pressing the Up Down button 3 Press the Right button and select a desired menu by pressing the Up Down button 1st curtain ...

Страница 59: ...xposure When you take an image in a condition with poor light the camera shake warning indicator will display on the LCD We recommend using the tripod The flash fires regardless of available light The intensity of the flash will be controlled according to the prevailing conditions and it will reduce the red eye effect by firing the pre flash The flash does not fire Select this mode when capturing ...

Страница 60: ...e batteries are weak the charging time will be longer ƃ During the continuous shot movie clip mode the flash function will not operate ƃ Take photographs within the flash range ƃ The image quality is not guaranteed if the subject is too close or highly reflective ƃ If you attach the supplied lens hood it may block the flash ƃ When you select the Fill in flash the shutter speed can be selected betw...

Страница 61: ...ng the rigged wheel of flash as shown alongside 3 The external flash icon will display on the LCD as shown alongside When using the external flash check the flash range displayed on the LCD panel of the flash before taking a picture With attaching the external flash you can change the intensity of the flash by pressing the Flash compensation button The camera may not function properly when using a...

Страница 62: ...OK button to set the setting ƈ You can save your preferences in the Custom menu and load it by pressing the Custom button ƃ How to use the Custom button 1 After selecting a desired sub menu in the Custom menu press the Custom button 2 The selected menu will display on the LCD 3 Select a desired sub menu by rotating the Rear jog dial JOG2 and press the OK button to set the setting Voice Memo Interv...

Страница 63: ...D is off Pressing the LCD button Pressing the LCD button Pressing the LCD button Rear LCD is off Top LCD is on Icon Finder LCD is on Rear LCD is off Top LCD is on Icon Pre view Finder LCD is off 28 25 ſ When using the Rear LCD set the shutter speed over 1 250 ſ If you select the Play mode or PictBridge when the top LCD is on the top LCD is turned off and the Rear LCD is turned on automatically LCD...

Страница 64: ...are higher on the left the image may be too dark If the lighting conditions are too bright to check the subject by using the LCD checking the histogram will enable more precise exposure control for the shots ƈ Current and last shot comparison The last captured image displays on the left side of the LCD and the pre view image displays on the right side of the LCD You can compare the two images to t...

Страница 65: ...r example children Portrait To take a picture of a person Night Use this for shooting still images at night or in other dark conditions Close up shooting for small objects such as plants and insects For taking pictures of sunsets To take pictures of distant scenery Daybreak scenes Portrait without shadows caused by backlight Firework scenes Text Use this mode to shoot a document For ocean lake bea...

Страница 66: ...diopter ƈ The range is from 4 to 2 dpt ƃ Diopter 1 Select the Finder LCD by pressing the LCD button p 63 2 While looking though the Finder LCD rotate the diopter to the left or the right 3 When you can see the Finder LCD clearly adjustment is complete Diopter ...

Страница 67: ... the following circumstances When another button is being operated While image data is being processed when the Card in use lamp blinks When there is no battery capacity INFORMATION Main menu Sub menu Camera working mode Page 3264X2448 3264X2176 3264X1840 2400X1800 1632X1224 1024X768 640X480 640X480 320X240 160X120 RAW TIFF Super Fine Fine Normal 25 fps 15 fps Frame Rate p 70 p 71 Size Quality Usi...

Страница 68: ...l Pics Interval Time 1 60 min Interval Number 2 99 pics Sharpness sRGB Adobe RGB Myset 1 Myset 2 Myset 3 Myset 1 Myset 2 Myset 3 Sharpness Voice memo p 72 p 73 p 74 p 75 p 76 p 39 p 62 p 77 p 78 Effect Custom Color Space Save Myset Load Myset Effect LCD Brightness Size Quality Voice memo Using the LCD monitor to adjust the camera settings ...

Страница 69: ...ode Page 1st Curtain 2nd Curtain Auto Manual Off On Center Focus Area Menus are subject to change without prior notice p 58 p 57 p 48 p 79 Flash Synchro Flash Pop up Direct MF Spot AE Point Using the LCD monitor to adjust the camera settings ...

Страница 70: ...S1 640X480 S2 640X480 640 320X240 320 160X120 160 Still image Movie clip ƃ The higher the resolution the lower the number of available shots will be because high resolution images require more memory than lower resolution images INFORMATION Mode Size Flash Pop up Direct MF Spot AE point Size Quality Effect Contrast 1024Ŧ768 640Ŧ480 3264Ŧ Ŧ2448 3264Ŧ2176 3264Ŧ1840 Program mode Size ...

Страница 71: ...layed while saving a RAW or TIFF file to the memory card ƃ When you select a RAW or TIFF file type the image size is fixed as 3264X2448 ƃ The RAW and TIFF file format can t be selected in the SCENE mode ƃ This file format complies with the DCF Design rule for Camera File system ƃ JPEG Joint Photographic Experts Group JPEG is the image compression standard developed by the Joint Photographic Expert...

Страница 72: ...mage to black and white Sepia Captured images will be stored in a sepia tone a gradient of yellowish brown colours Negative Saves the image in negative mode Program mode Movie clip mode Spot AE point Size Quality Effect Contrast Saturation Sharpness Negative Normal B W Sepia Size Frame Rate Effect Contrast Saturation Custom Negative Normal B W Sepia Effect ...

Страница 73: ... Menu button and select the P menu tab 2 Press the Right button and select the Contrast menu by pressing the Up Down button 3 Press the Right button and select a desired menu by pressing the Up Down button You can see the changes by pressing the Up button Setting range 2 0 2 4 Press the OK button to set the setting Size Quality Effect Contrast Saturation Sharpness Voice Memo 1 Size Quality Effect ...

Страница 74: ...utton and select the Saturation menu by pressing the Up Down button 3 Press the Right button and select a desired menu by pressing the Up Down button Setting range 2 0 2 4 Press the OK button to set the setting Quality Effect Contrast Saturation Sharpness Voice Memo Interval Time 1 Quality Effect Contrast Saturation Sharpness Voice Memo Interval Time 0 Saturation ...

Страница 75: ...ory Sub menu Icon Description The edges of the image are softened This effect is suitable for editing images on your PC The edges of the image are sharp This is suitable for printing The edges of the image are emphasised The edges will appear sharp but noise may occur in the recorded image Vivid Normal Soft Program mode Effect Contrast Saturation Sharpness Voice Memo Interval Time Interval Number ...

Страница 76: ...ge 4 Press the OK button to set the setting 5 If the voice memo indicator is displayed on the LCD the setting is complete Press the shutter button The picture is stored on the memory card 6 Voice memo will be recorded for ten seconds from the moment the picture is stored In the middle of the sound recording pressing the shutter button will stop the voice memo ƃ A distance of 40cm between you and t...

Страница 77: ... and select the P menu tab 2 Press the Right button and select the Color space menu by pressing the Up Down button 3 Press the Right button and select a desired menu by pressing the Up Down button sRGB Adobe RGB 4 Press the OK button to set the setting Interval Time Interval Number Custom Color Space Save Myset Flash Synchro Flash Pop up Adobe RGB sRGB Interval Time Interval Number Custom Color Sp...

Страница 78: ...n the Mode dial to select the MySET shooting mode and press the Menu button 2 Press the Menu button and select the menu 3 Press the Right button and select the Load Myset menu by pressing the Up Down button 4 Press the Right button and select a MySET slot number to load by pressing the Up Down button 5 Press the OK button and a confirmation window will display Select the Yes menu and press the OK ...

Страница 79: ...n and select a desired menu by pressing the Up Down button Center The brightness is calculated based on the marked area placed on the centre of the Rear LCD Select this menu when the subject is in the backlight shooting condition or in the shadow Focus Area The brightness is calculated based on where the auto focus frame is placed If there is a gap of brightness between the subject and centre part...

Страница 80: ... play mode button with turning on the Top LCD the last image stored on the memory is displayed on the Rear LCD ƃ Playing back a still image 1 Select the PLAY mode by pressing the play mode button 2 The last image stored on the memory is displayed on the LCD 3 Select an image that you want to view by pressing the LEFT RIGHT button ſ Press and hold the LEFT or RIGHT button to play back the images qu...

Страница 81: ... the Play Pause button will reduce the speed To stop playback of the movie clip press the Play Pause button and then press the Left or Right button ƃ How to capture the movie clip Steps 1 2 are the same as those for playing back a still image 3 Select the recorded movie clip that you want to play back by using the Left Right button 4 Press the Play Pause button to play back the movie clip 5 Press ...

Страница 82: ...Time 13 00 PM p 117 6 Contrast p 73 7 Saturation p 74 8 Quality p 71 9 Sharpness p 75 10 Focal Length 28mm p 44 11 Exposure compensation p 50 ƈ The LCD displays shooting information about the displayed image ƈ Refer to page 63 for more information about selecting an LCD Rear LCD Finder LCD Image Full information ۂ ۃ LCD monitor indicator ...

Страница 83: ...4 15 ISO p 42 16 Aperture value F2 2 p 30 31 17 Shutter speed 1 30 p 30 31 18 Colour space p 77 19 Play mode p 80 20 FoldernameandStoredimagenumber 100 0009 p 112 No Description Icon 1 Play mode 2 Battery status 3 Remote control Top LCD ڹ ں ڻ LCD monitor indicator ...

Страница 84: ...t will increase the number of thumbnails 4 Rotate the Rear jog dial JOG2 or press the Up Down Left Right button to move to a desired image ƃ Image enlargement 1 Select an image that you want to enlarge and press the Enlargement button 2 You can change the enlargement rate by rotating the Rear jog dial JOG2 or pressing the Thumbnail Enlargement button Rotating the Rear jog dial to the right or pres...

Страница 85: ...ed After completing the enlargement the image will be rotated horizontally INFORMATION ƃ Trimming You can extract part of the image that you want and save it separately 1 Enlarge an image by rotating the Rear jog dial JOG2 and press the Menu button 2 Press the Menu button and a message will display to crop the image 3 Select a desired sub menu by pressing the Up Down button and press the OK button...

Страница 86: ...lay mode button ƈ Pressing the Display Information button in the PLAY mode will change the display as shown below ƈ Refer to page 82 for more information about the shooting information ƈ The following is playing back information Shooting information Playing back information Image only Voice memo DPOF indicator Protect indicator Display Information button ...

Страница 87: ...ting the album 1 In the play mode press the Album Up button 2 Select the menu by pressing the Up Down button and press the Right button 3 Select a desired album by pressing the Up Down Left Right buttons and press the OK button ƃ Inserting still images into the album 1 Select an album 2 Select the menu by pressing the Up Down button and press the Right button Exit OK Move Exit OK Move Set OK Selec...

Страница 88: ...he Right button 3 Select a desired sub menu and press the OK button Select Specific still images in the album can be removed All All of the still images in the album will be removed ſ If Select is selected Select images that you want to remove by pressing the Left Right buttons and rotate the Front jog dial JOG1 V marks are displayed on the selected images 4 Press the OK button and a confirmation ...

Страница 89: ...repeat the slide show after finishing the first cycle Effect Unique screen effects can be used for the slide show 3 Select the Start menu by pressing the Up Down button and press the OK button to start the slide show 4 To stop the slide show press the MENU OK button Ƅ Playing a desired album 1 Select a desired album and press the OK button 2 Select the menu by pressing the Up Down button and press...

Страница 90: ...howing press the Left button to select the menu tab to the left of the cursor When the menu is not displayed press the Left button to select the previous image RIGHT button While the menu is showing press the Right button to select the menu tab to the right of the cursor When the menu is not displayed press the Right button to select the next image Menu OK button When the menu is displayed on the ...

Страница 91: ...ted image In the thumbnail mode the number of thumbnails are reduced by pressing this button Selectable number of thumbnails 4 9 16 25 Thumbnail button If an image is enlarged pressing this button will reduce the enlargement rate In play mode you can view multiple pictures by pressing this button In the thumbnail mode the number of thumbnails are increased by pressing this button Selectable number...

Страница 92: ...ongside on the LCD 3 Select the Yes and press the OK button to delete the selected image Delete Yes No Delete OK Display Information button In play mode you can view the information of the selected image by pressing this button Up Down Left Right button In play mode you can select a still image or movie clip by pressing the Left Right button In play mode different parts of the enlarged image can b...

Страница 93: ...er button Menu tab Main menu Sub menu Secondary menu Page Off On Slide Show p 98 p 99 p 100 p 96 97 1 3 5 10 sec Off On Off Effect 1 2 3 Right 90ŭ Left 90ŭ 180ŭ Interval Repeat Start DPOF Standard DPOF Index DPOF Size Select All Pics Cancel No Yes Select All Pics Cancel Protect Delete Voice Memo Effect Select All Pics Select All Pics Unlock Lock Cancel Resize Rotate p 101 p 102 p 103 104 7M 6M 5M ...

Страница 94: ...a sold separately with a USB cable Menu tab Main menu Sub menu Secondary menu Page Auto Postcard Card 4X6 L 2L Letter A4 A3 Auto Full 1 2 4 8 9 16 Auto Plain Photo Fastphoto Auto Set Custom Set Images p 107 p 107 p 106 No Yes Paper Size Layout Paper Type One Pic All Pics Setting up the play back function using the LCD monitor ...

Страница 95: ...ity Menu tab Main menu Sub menu Secondary menu Page Auto Draft Normal Fine Auto Off On Auto Off On Standard Index No Yes No Yes Print Custom Set p 108 p 108 p 109 p 107 File Name Date Print DPOF Print Reset Setting up the play back function using the LCD monitor ...

Страница 96: ...sired interval 3 Press the OK button to set the setting ƃ Repeat setting setting the slide show to repeat after the first cycle 1 Select the Repeat menu by pressing the Up Down button and press the Right button 2 Select a desired sub menu by pressing the Up Down button Off Selected The slide show is closed after one cycle On selected The slide show is repeated until cancelled 3 Press the OK button...

Страница 97: ...is displayed slowly from the centre outwards 3 Press the OK button to set the setting ƃ Start the slide show The slide show can start only in the Start menu 1 Select the Start menu by pressing the Up Down button 2 Press the OK button to start the slide show Press the Play Pause button to pause the slide show Press the Play Pause button again to resume the slide show To stop the slide show press th...

Страница 98: ...og dial JOG1 Protect release the image OK Button Your changes will be saved and the menu will disappear All Pics Protect release all saved images Lock Protect all saved images Unlock Unprotect all save images Cancel The confirmation window will disappear OK button The changed settings are saved and menu will disappear Set OK Select JOG1 Move Pic JOG2 If you protect an image the protect icon will b...

Страница 99: ... Select a desired sub menu by pressing the Up Down button and press the Right button Select Selection window for an image to delete is displayed Rear jog dial JOG2 Select an image Front jog dial JOG1 Select the image for deletion OK button Press the OK Button to display the confirmation message Select the Yes menu and press the OK Button again to delete marked images All Pics Displays confirmation...

Страница 100: ...ndow will be displayed as shown alongside 7 The recording can be stopped by pressing the shutter button again 8 The icon will be displayed on the LCD by pressing the Display Information button after voice memo recording has finished Voice memos can t be recorded onto movie clip files A distance of 40cm between you and the camera microphone is the best distance to record sound The voice memo will b...

Страница 101: ...64X1840 16 9 image size files RAW TIFF and Movie clip AVI files can t be resized ƃ You can change the resolution of only those files compressed in the JPEG 4 2 2 format ƃ The resized image will have a new file name The User Image image is stored not on the memory card but on the internal memory ƃ If the memory capacity is insufficient to store the resized image a Card Full message will display on ...

Страница 102: ... picture in a counter clock wise direction 180 Rotate picture 180 degrees Right 90 180 Left 90 4 Press the OK button and a confirmation window will display 5 Select the Yes menu and press the OK button A rotated image will display on the LCD and the menu will disappear There will be empty space to the left and right of the rotated image Delete Voice Memo Resize Rotate DPOF Standard DPOF Index DPOF...

Страница 103: ... 1 In play mode press the Menu button 2 Select Ȟ menu tab and press the Right button 3 Select the DPOF Standard menu by pressing the Up Down button and press the Right button 4 Select a desired sub menu by pressing the Up Down button and press the Right button Select Selection window for an image to print is displayed Rear jog dial JOG2 Select an image to print Front jog dial JOG1 Select the numbe...

Страница 104: ...s the Menu button 2 Select Ȟ menu tab and press the Right button 3 Select the DPOF Size menu by pressing the Up Down button and press the Right button 4 Select a desired sub menu by pressing the Up Down button and press the Right button Select Selection window for an image to be changed printed size is displayed Rear jog dial JOG2 Select an image Front jog dial JOG1 Change the print size OK button...

Страница 105: ... set up the following settings from the PictBridge menu Images Select the pictures to be printed Auto Set Custom Set Setting up printing Print Printing pictures DPOF Print Printing the DPOF files Reset Initialising the PictBridge functions ƃ Connecting the Camera to a Printer 1 Press the POWER button to turn on the camera 2 Press the Menu button and select the set up menu tab 3 Press the Right but...

Страница 106: ... Up Down button to select the number of prints When you select One Pic menu use the Left Right button to select another picture and select the number of prints for another picture After setting the number of prints press the OK button to save Move Pic Ȝ Ȟ Set OK ƃ Setting the Number of Copies to Print Select One Pic or All Pics A screen where you can set the number of copies to print will appear a...

Страница 107: ...Press the OK button again and all values in the Custom Set are automatically changed ſ Some menu options are not supported in all manufacturer and printer models ſ If the setting values are not changed in the automatic manual setting the setting values are automatically kept Connect the camera to your printer The USB menu must be set to Printer before you connect the camera to the printer See p 10...

Страница 108: ...sing the Up Down button and press the OK button No Cancel the printing Yes Directly print the file with the DPOF information ſ Some menu options are not supported in all manufacturer and printer models 3 The screen shown on the right will appear and the picture will be printed If no picture is selected the No image message will be displayed Press the Menu OK button while printing to cancel the pri...

Страница 109: ...ired sub menu by pressing the Up Down button If No is selected Settings will not be reset If Yes is selected Press the OK button and a confirmation window will display Press the OK button again and all print and image settings will be reset ſ Default print setting varies depending on the printer manufacturer For your printer s default setting refer to the user s guide that came with your printer P...

Страница 110: ... 114 ENGLISH ጥૹ FRANÇAIS DEUTSCH ESPAÑOL ITALIANO P CCK PORTUGUÊS DUTCH DANSK SVENSKA SUOMI BAHASA Magyar POLSKI No Yes Date Time 2005 07 01 13 00 yy mm dd Date Type mm dd yy dd mm yy Cape Verde Tashkent London Almaty Rome Paris Berlin Bangkok Jakarta Athens Helsinki Beijing Hong Kong Moscow Seoul Tokyo Abu Dhabi Guam Sydney File Language Format World Time p 112 p 115 p 116 p 117 p 118 Type A Type...

Страница 111: ...ka Buenos Aires LA San Francisco Mid Atlantic Off Date Date Time Off Low Medium High Main LCD EVF Top LCD NTSC PAL Quick View Off 0 5 1 3 5 sec Off On Computer Printer No Yes World Time Video Out Imprint Sound Brightness Reset Auto Rotating USB p 118 p 119 p 120 p 120 p 121 p 122 p 123 p 124 p 124 Bright Normal Dark Menus are subject to change without prior notice Setup menu ...

Страница 112: ... the reset function the next file name will be set from 0001 even after formatting deleting all or inserting a new memory card 4 Press the OK button to set the setting ƃ The first stored folder name is 100SSCAM and the first file name is SH100001 ƃ File names are assigned sequentially from SH100001 ƍ SH100002 ƍ ƍ SH109999 But files that was saved as the Adobe RGB type are assigned as _H1xxxxx ƃ Th...

Страница 113: ...and select the menu tab 2 Press the Right button and select the Power Off menu by pressing the Up Down button 3 Press the Right button and select a desired sub menu by pressing the Up Down button 1 3 5 min The power will turn off automatically if not used for the period of time specified 4 Press the OK button to set the setting ƈ This function switches the camera off after a set amount of time in ...

Страница 114: ...b 2 Press the Right button and select the LCD Off menu by pressing the Up Down button 3 Press the Right button and select a desired sub menu by pressing the Up button Off The LCD will not turn off 10 20 30 60 sec The LCD will turn off automatically if not used for the period of time specified 4 Press the OK button to set the setting ƈ This function switches the LCD off after a set amount of time i...

Страница 115: ... S Chinese T Chinese Japanese Russian Portuguese Dutch Danish Swedish Finnish 4 Press the OK button to set the setting ƈ There is a choice of languages that can be displayed on the LCD Even if the battery or AC adapter are removed and inserted again the language setting will be preserved File Power Off LCD Off Language Format Date Time Date Type BAHASA ENGLISH ጥૹ FRANÇAIS ƃ Type A or B language ca...

Страница 116: ...ry card If you run Format on the memory card all images including the protected images will be deleted Be sure to download important images to your PC before formatting the memory card ƃ Be sure to run Format on the following types of memory card A new memory card or an unformatted memory card A memory card that has a file this camera can t recognise or one that has been taken from another camera ...

Страница 117: ...ng Setting up the date type ƈ You can change the date type that will be displayed on the captured images ƃ How to set the date type 1 Press the Menu button and select the menu tab 2 Press the Right button and select the Date Type menu by pressing the Up Down button 3 Press the Right button and select a desired sub menu by pressing the Up Down button Up Down Changes the date type yy mm dd mm dd yy ...

Страница 118: ...World Time menu by pressing the Up Down button 3 Press the Right button and a world map will display as shown alongside Left Right or Rear jog dial JOG2 moves the red line to check the time of various cities 4 Press the OK button to set the setting Format Date Time Date Type World Time Imprint Sound Brightness Seoul Tokyo Set OK Seoul Tokyo 2005 07 01 13 00 PM World time ...

Страница 119: ...d on the image file Date Time The DATE TIME will be imprinted on the image file 4 Press the OK button to set the setting ƃ The Date Time are imprinted at the bottom right side of the still image ƃ The date will be imprinted as a DATE TYPE setting ƃ TIME is imprinted in the following way Hour Minute and hours are shown using the 24 hour clock ƃ The imprint function is applied only to still images e...

Страница 120: ...to set the setting LCD brightness ƈ You can adjust the Rear Finder and Top LCD brightness ƃ How to set the brightness 1 Press the Menu button and select the menu tab 2 Press the Right button and select the Brightness menu by pressing the Up Down button 3 Press the Right button and select a desired LCD by pressing the Up Down button 4 Press the Right button and select a desired sub menu Brightness ...

Страница 121: ...Sweden Switzerland Thailand Norway ƃ When using a TV as an external monitor you will need to select the external or AV channel of the TV ƃ There will be a digital noise on the external monitor but it is not a malfunction ƃ If the image is not in the centre of the screen use the TV controls to centre it ƃ When the camera is connected to an external monitor the menu will be visible on the external m...

Страница 122: ...elect the menu tab 2 Press the Right button and select the Quick View menu by pressing the Up Down button 3 Press the Right button and select a desired sub menu by pressing the Up Down button Off The quick view function can t be activated 0 5 1 3 5 sec The captured image is briefly displayed during the selected time 4 Press the OK button to set the setting Sound Brightness Video Out Quick View Rot...

Страница 123: ...2 Press the Right button and select the Auto Rotating menu by pressing the Up Down button 3 Press the Right button and select a desired sub menu by pressing the Up Down button On The image will be rotated automatically Off The image will not be rotated automatically 4 Press the OK button to set the setting Brightness Video Out Quick View Auto Rotating USB Reset All File On Off ſ Selecting the On s...

Страница 124: ... button to set the setting Initialisation ƈ All camera menu and function settings will be restored to their default values However values for DATE TIME LANGUAGE and VIDEO OUT will not be changed ƃ How to set the initialisation 1 Press the Menu button and select the menu tab 2 Press the Right button and select the Reset All menu by pressing the Up Down button 3 Press the Right button and select a d...

Страница 125: ... default settings Menus are subject to change without prior notice Menu tab Main menu Sub menu Page Off Logo User Image Off Sound 1 Sound 2 Sound 3 Off Shutter 1 Shutter 2 Shutter 3 Off Effect 1 Effect 2 Effect 3 Start Image Start Sound Shutter Sound Sound Effect p 126 p 126 p 127 p 127 Setting up the MYCAM menu ...

Страница 126: ...y mode ƃ The start up image will not be deleted by deleting all images or Format function ƃ The User images will be deleted by Reset menu INFORMATION Sound Effect Start Image Start Sound Shutter Sound Set OK ƈ You can select the sound that is activated whenever the camera is turned on ƃ How to set the start up sound 1 Press the Menu button and select the menu tab 2 Press the Right button and selec...

Страница 127: ...Start Sound Shutter Sound Sound Effect Start Image Off Sound 1 Sound 2 Sound 3 Shutter Sound Sound Effect Start Image Start Sound Effect 3 Off Effect 1 Effect 2 ƈ You can select a type of sound when the sound is activated ƃ How to set the type of sound 1 Press the Menu button and select the menu tab 2 Press the Right button and select the Sound Effect menu by pressing the Up Down button 3 Press th...

Страница 128: ...es coastal dunes or other areas where there is lots of sand Doing so may result in failure or may permanently render the unit unusable ƈ Handling the camera Never drop the camera or subject it to severe shocks or vibrations This camera is not waterproof To avoid dangerous electrical shocks never hold or operate the camera with wet hands If you use this camera in wet places such as beach or pool do...

Страница 129: ...a body with a soft cloth Do not allow this camera to come into contact with solvent materials such as benzol insecticide thinners etc This may damage the body shell of the camera and also affect its performance Rough handling can damage the LCD monitor Take care to avoid damage and keep the camera in its protective carry case at all times when not in use ƈ Do not attempt to disassemble or modify t...

Страница 130: ...card ƍ Insert the memory card again ƍ Turn off the camera power and turn it on again Card Full ϛThere is insufficient memory capacity to take an image ƍ Insert a new memory card ƍ Delete unnecessary image files to free up some memory No Image ϛThere are no images stored on the memory card ƍ Take images ƍ Insert a memory card that is holding some images File Error ϛFile error ƍ Format the memory ca...

Страница 131: ... doesn t switch on ϛThere is low battery capacity ƍ Insert charged battery The camera power ceases while in use ϛThe battery is exhausted ƍ Insert charged battery ϛThe Camera is turned off automatically ƍ Turn on the camera power again Battery drain quickly ϛThe Camera is being used in low temperatures ƍ Keep the camera in warm conditions i e inside a coat or jacket and only remove it in order to ...

Страница 132: ...out setting an appropriate macro mode ƍ Select an appropriate macro mode to take a clear image ϛTaking a picture beyond the flash range ƍ Take a picture within the flash range ϛThe lens is smudged or dirty ƍ Clean the lens ϛThe focus is not correct in the manual focus mode ƍ Set the correct focus in the manual focus mode ϛThere was camera shake when using a high rate zoom ƍ Use a tripod when using...

Страница 133: ...roperly with the camera ƍ Check the connection cables ϛThere are incorrect files in the memory card ƍ Insert a memory card that has correct files When using the PC s explorer the Removable Disk file does not show ϛCable connection is incorrect ƍ Check the connection ϛThe camera is off ƍ Turn the camera on ϛThe operating system is not Windows 98 98SE 2000 ME XP Mac OS 10 0 or later Alternatively th...

Страница 134: ...le 1 5 3 0m ISO 100 Recharging Time Approx 5 sec ExternalFlash optional SEF 42A DC 6V 4 x AA Alkaline Sharpness Soft Normal Vivid Normal B W Sepia Negative Contrast adjust Saturation adjust Color Space sRGB Adobe RGB Auto Daylight Cloudy Fluorescent_H Fluorescent_L Tungsten Custom 1 Custom 2 Color temperature adjust Voice Recording Voice Memo in Still Image max 10 sec Date Imprinting Date Time Dat...

Страница 135: ...USB 2 0 Audio Stereo Video output NTSC PAL user selectable DC power input connector 7 4V Rechargeable battery 7 4V Li ion battery SLB 1974 Charger SBC L4 AC Adaptor DC 8 4V 1 5A SAC 81 optional Included battery may vary depending on sales region Dimensions WxHxD 135 5x87x78 6mm 144 6mm including lens protrusion Weight 870 5g without battery and card Operating Temperature 0 40 C Operating Humidity ...

Страница 136: ...PC and OS that has not been guaranteed by the manufacturer is not covered by the Samsung warranty ϛBefore reading this manual you should have a basic knowledge of computers and O S Operating Systems System Requirements For Windows For Macintosh Power Mac G3 or later Windows 98 98SE 2000 ME XP Mac OS 10 0 or later Minimum 64MB RAM XP 128MB Minimum 64MB RAM 200MB of available hard disk space 110MB o...

Страница 137: ...use the camera with Mac OS 10 0 or later ƈ Digimax Master This is the all in on multi media software solution You can download view edit and save your digital images and movie clips with this software This software is only compatible with Windows ƈ Digimax Reader Text recognition program You can save an image file that was captured in the TEXT mode as a text file with this program This software is...

Страница 138: ...r is installed automatically ƃ Close other programs before installing the application software ƃ Before installing the application software disconnect the USB connection INFORMATION 2 Installation is complete Click the Finish button 3 The Software License Agreement window for DirectX will be displayed If you agree to this select I accept the agreement and click Next button the window will then mov...

Страница 139: ...dow will open Click the Next N button 5 DirectX Installation is completed Click the Finish button and then the Digimax Master installation will be started The system will not reboot even if you click the Finish button The screen shot of step 5 can can be different from the illustration depending on the system requirements ƃ If you select Exit at step 6 the application program installation will be ...

Страница 140: ...ll I button and Digimax Master starts installing 10 A window will open asking you to choose a folder to which program icons will be added Click Next button If you want to choose another folder click Browse and choose a folder you want ƃ If you select Cancel at step 7 a window for installing Digimax Reader will be displayed INFORMATION Click Click Click Click Setting up the application software ...

Страница 141: ... window will open Click the Next button Click 15 The Software License Agreement window will be displayed If you agree to this click Yes the window will then move to the next step If you disagree click No and the installation program will be cancelled 12 Digimax Master installation is successfully completed Click the Finish button to install Digimax Reader The screen shot of step 12 can be differen...

Страница 142: ...n the system requirements 18 To apply changes you must restart the computer Select Yes I want to restart my computer now and then click the OK button 19 After restarting the computer connect the PC to the camera with the USB cable 20 Turn the camera power on The Found New Hardware Wizard will open and the computer will recognise the camera If your OS is Windows XP an image viewer program will open...

Страница 143: ...his case cancel the Found New Hardware Wizard and disconnect the camera Install the camera driver and connect the camera to the PC again ƃ Should the computer not find the camera driver after installation please try one or more of the following measures 1 Delete the camera driver p 147 and re install the driver 2 Refer to FAQ p 160 to check for a possible solution to the problem 3 If your PC s cen...

Страница 144: ...ess the OK button 7 Connect the PC and the camera via the USB cable Insert the small plug of the USB cable into the camera USB connection terminal Insert the large connector of the USB cable into the USB port of the PC The plugs must be firmly inserted ƃ The camera driver must be installed before using PC mode ƃ To save battery power it is recommended that you use an AC adapter Optional when conne...

Страница 145: ...ownload the still images stored on the camera to your PC s hard disk and print them or use a photo editing software to edit them 1 Connect the camera to your PC with the USB cable 2 On your computer s desktop display select My computer and double click Removable Disk ƍ DCIM ƍ 100SSCAM The image files will then be displayed 5 Click a folder where you want to paste the file Starting PC mode ...

Страница 146: ...pop up menu will open Click Paste 7 An image file is transferred from the camera to your PC By using Digimax Master you can see the stored images in the memory directly on the PC monitor and you can copy or move the image files Starting PC mode ...

Страница 147: ...ck Start ƍ Settings and click Control Panel 4 Click the OK button The camera is removed from the system 2 Double click System 3 Select Device manager ƍ Hard Disk Controller ƍ Samsung Digital Camera and click the Remove button Click Removing the USB Driver for Windows 98SE ...

Страница 148: ...lick Add Remove programs 6 The Add Remove Programs Properties window will open Click Pro 815 and click the Add Remove button 7 Uninstallation is complete Click the Finish button and the window will disappear Click Click Removing the USB Driver for Windows 98SE ...

Страница 149: ...w them Opening images directly from the removable disk may be subject to unexpected disconnection ƃ When uploading images from the PC to the camera ensure that the uploaded file names are not the same as those already stored on the memory ƃ When you upload a file that is not taken by this camera to the Removable Disk the File Error message will be displayed on the LCD monitor in the PLAY mode and ...

Страница 150: ... O S 1 Check whether the camera and PC is transferring a file If the Card in use lamp blinks you have to wait until the lamp is turned off 2 Double click the Unplug or Eject Hardware icon on the task bar 3 The Unplug or Eject Hardware window will open Select the USB Mass Storage Device and click the Stop button 4 The Stop a Hardware device window will open Select the USB Mass Storage Device and cl...

Страница 151: ...e MAC Using the USB Driver for MAC Setting up the USB Driver for MAC 1 Double click a new icon on the desktop and the folder in the memory will be displayed 2 Select an image file and copy or move it to MAC ƃ For Mac OS 10 0 or later First complete uploading from computer to camera and then remove the removable disk with the Extract command CAUTION 6 A Unplug or Eject Hardware window will open Cli...

Страница 152: ...ster ƃ Downloading images 1 Connect the camera to your PC 2 A window for downloading images will display after connecting the camera and your PC To download the captured images select the Select All A button Select desired folder in the window and click the Select All A button You can save captured images and selected folder If you click the Cancel button downloading will be cancelled 3 Click Next...

Страница 153: ... be downloaded Folder names can be made as you want and images will be downloaded After selecting a folder that was made before images will be downloaded 5 Click Next N button 6 A window will open as shown alongside The destination of the selected folder will be displayed on the upper side of the window Click the Start button to download the images Click Digimax Master Click ...

Страница 154: ... type selection menu You can select image viewer image edit movie edit functions in this menu ڼ Preview window You can preview a image or a movie clip and check the multi media information ڽ Zoom bar You can change preview size ھ Folder display window You can see the folder location of the selected image ڿ Image display window Images of the selected folder are displayed ſ Refer to the Help menu in...

Страница 155: ...change image or insert effects on the image See the Help menu ں Drawing tools Tools for editing an image ڻ Image display window a selected image displays in this window ڼ Preview window You can preview the changed image ſ A still image edited with Digimax Master can t be played back on the camera ſ Refer to the Help menu in Digimax Master for further information ڹ ں ڻ ڼ Digimax Master ƃ Image edit...

Страница 156: ...n edit the RAW dng files as you want White Balance You can edit the colour temperature and saturation of the image Exposure You can edit the Exposure value Contrast and gamma value Sharpness You can edit the Sharpness of the image ڻ File format You can convert the RAW dng file into a file format as you want jpg tiff etc ſ Refer to the Help menu in Digimax Master for further information ڹ ں ڻ Digim...

Страница 157: ...an save the edited multi media as a new file name You can select AVI Windows media wmv Windows media asf and movie clip for this camera avi MPEG 4 file types ں Frame display window You can insert multi media in this window ſ Some movie clips that was compressed with a codec that is not compatible with the Digimax Master can t play back in the Digimax Master ſ Refer to the Help menu in Digimax Mast...

Страница 158: ... the program click Start ƍ Programs ƍ Digimax Reader The following screen will appear ƈ How to use the Digimax Reader 1 Connect the camera and the PC with a USB cable and download the images that were stored in the camera to the PC Please see page 145 146 152 153 for details on Connecting a camera and PC Downloading images 2 Run the Digimax Reader 3 Click the Open icon as shown alongside Digimax R...

Страница 159: ... Click the Area Analysis icon to scan the image 6 Part of the image you selected will be displayed as shown 7 Click the Character Recognition icon The part selected in the previous step will be recognized as text 8 To save the section as a text click the Save icon A window as shown alongside will be displayed Digimax Reader ...

Страница 160: ...g if the USB connection malfunctions Case 1 The camera power is off ƍ Turn the camera power on Case 2 USB Driver is not installed correctly ƍ Install the USB Driver correctly Refer to page 138 Case 3 The USB cable is not connected or you are using a cable with an incorrect specification ƍ Use a USB cable with the correct specification Case 4 The camera is not recognized by your PC Sometimes the ca...

Страница 161: ...evice Manager ƍ Universal Serial Bus controllers There must be USB Host Controller and USB root hub under Universal Serial Bus controllers In addition double click on the USB Universal Host Controller and the USB Root Hub to check if the Device Status states This device is working properly If the Device Status says the device is not working properly click the Driver tab and then click Update Drive...

Страница 162: ...ere areèUnknown DeviceséorèOther Devicesé entries with a yellow question mark beside them or devices with an exclamation mark beside them ƍ Right click on the entry with the question or exclamation mark and select Remove Restart the PC and connect the camera the again For Windows 98 PC remove the camera driver also restart the PC and then reinstall the camera driver ƍ Double click on the entry wit...

Страница 163: ... Support to disable and re start the PC The Legacy USB Support is in the BIOS setup menu The BIOS setup menu differs from the PC manufacturers and some BIOS menus don t have Legacy USB Support If you can t change the menu by yourself contact to the PC manufacturer or BIOS manufacturer ƈ If the movie clip can t be deleted removable disk can t be extracted or an error message displays during the fil...

Страница 164: ...nly UKServiceHotline 01932455320 www samsungcamera co uk SAMSUNGOPTO ELECTRONICSGMBH AMKRONBERGERHANG6 D 65824SCHWALBACH TS GERMANY TEL 49 0 6196665303 FAX 49 0 6196665366 www samsungcameras de SAMSUNGFRANCES A S BP51TOURMAINEMONTPARNASSE 33 AV DUMAINE 75755 PARISCEDEX15 FRANCE HOTLINEPHOTONUMÉRIQUE 0080022263727 NuméroVert AppelGratuit TEL 33 1 4279 2200 FAX 33 1 4538 6858 www samsungphoto fr SAM...

Отзывы: