background image

8

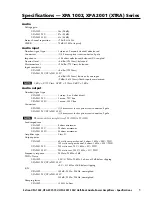
Guided Tour - Servo-260 / Servo-170 Rear Panel

1:  AC input -  Connect the supplied standard 3-pin “IEC” plug here.

2:  Fuse holder - In the Servo-260, insert a 6 amp, 250 volt fuse here for 115
volt operation, or a 3 amp, 250 volt fuse for 230 volt operation.  In the Servo-170,
insert a 5 amp, 250 volt fuse here for 115 volt operation, or a 2.5 amp, 250 volt
fuse for 230 volt operation. In both models, we recommend the use of normal (as
opposed to slow-blow) fuses.

3:  Push-Spring output connectors (left/right) - Use these to connect the
Servo Amplifier to loudspeakers.  Wiring is red hot, black ground—be sure to
observe these to maintain correct phase correlation.

4:  1/4" Unbalanced output connectors (left/right) - Alternatively, these can be
used to connect the Servo Amplifier to loudspeakers.  Wiring is tip hot, sleeve
ground—be sure to observe these to maintain correct phase correlation.

5:  Heat sink - Make sure this anodized aluminum heat sink is unobstructed
when the amplifier is powered on.  In particular, when the Servo Amplifier is rack-
mounted, we recommend that you keep the rear of the rack open in order to
release heat.  If your rack does not have a removable rear, space should be left
open on the front of the rack cabinet, especially immediately above the Servo
Amplifier—remember, heat rises!

6: Unbalanced input connectors (left/right) - If you are using unbalanced
wiring and connectors, connect incoming signal to these unbalanced RCA-type
jacks (wiring is tip hot, sleeve ground).  The Servo Amplifier accepts input levels
of any strength but needs at least 0 dBu to achieve maximum power.

7: Balanced input connectors (left/right) - Connect incoming signal to these
electronically balanced 1/4" TRS (Tip/Ring/Sleeve) jacks, wired as follows: Tip
hot, Ring cold, and Sleeve ground.  Use balanced three-conductor cabling and
TRS plugs wherever possible (unbalanced two-conductor plugs can also be
inserted into these inputs, but you’ll get better signal quality and less outside
noise and hum if you use balanced lines).  The Servo Amplifier accepts input
levels of any strength but needs at least 0 dBu to achieve maximum power.

TO PREVENT SHOCK DO NOT 
OPEN. NO USER SERVICABLE 
PARTS INSIDE. REFER SERVICING 
T O   Q U A L I F I E D   S E R V I C E  
PERSONNEL. TO PREVENT FIRE 
O R   S H O C K   H A Z A R D   D O   N O T  
EXPOSE TO RAIN OR MOISTURE. 

RISK OF ELECTRIC SHOCK

DO NOT OPEN

S/N

FUSE

6A/250V

CAUTION

!

~AC INPUT

115V/60Hz, 490W

USE CLASS 2 WIRING MINIMUM LOAD IMPEDANCE 4

RIGHT

LEFT

+RIGHT

LEFT+

GROUND

SERVO 260 STUDIO AMPLIFIER

RIGHT

LEFT

INPUTS

(BALANCED 10K

/0dBM)

7

5

4

3

2

1

CAUTION ; REPLACE WITH
THE SAME TYPE FUSE AS
INDICATED. UTILISER UN
FUSIBLE DE RECHANGE DE
MEME TYPE.

CAUTION

HEATSINK MAY BE HOT!

DO NOT BLOCK AIRFLOW

OR OVERHEATING MAY 

OCCUR.

SAMSON

(UNBALANCED 10K

/0dBM)

R

L

6

Содержание 170

Страница 1: ...OWNERS MANUAL S T E R E O AMPLIFIER SERVO 170 260 550...

Страница 2: ...60 Servo 170 Rear Panel 8 Setting Up and Using the Servo Amplifier 9 Suggested Applications 10 Appendix A Compatible Studio Nearfield Monitors 11 Appendix B Linearity and THD vs Frequency Sweep 12 App...

Страница 3: ...monitors providing amplification for small and medium sized public address systems driving small and medium bi amped and tri amped speaker systems as an extension to a home hi fi system and as the ma...

Страница 4: ...an use the Servo Amplifier with a single power strip into which a mixer or other audio devices are connected without danger of damage to connected speakers The incorporation of high current output pow...

Страница 5: ...t This light goes on for approximately five seconds when ever the Servo Amplifier is powered on and fades slowly when the amp is pow ered off When lit 0 volts DC are provided to all connected speakers...

Страница 6: ...o amplifier sections for mono usage with full 550 watt power output place this switch at its down Bridged Mono position For more information see Appendix E on page 13 in this manual WARNING Due to the...

Страница 7: ...tion light This light goes on for approximately five seconds whenever the Servo Amplifier is powered on and fades slowly when the amp is powered off When lit 0 volts DC are provided to all connected s...

Страница 8: ...mber heat rises 6 Unbalanced input connectors left right If you are using unbalanced wiring and connectors connect incoming signal to these unbalanced RCA type jacks wiring is tip hot sleeve ground Th...

Страница 9: ...the same power strip that other audio devices such as a mixing console are connected to You can then turn on all devices at once with the single power strip on off switch with no danger of damaging co...

Страница 10: ...l and medium size bi amped and tri amped speaker systems It is particularly suitable for driving high and mid range speaker components because of their lesser power requirements MIDI rack monitoring M...

Страница 11: ...differ from consumer hi fi speakers in that they are designed for accuracy rather than subjective enhancing of sound Samson Technologies has no connection with any of these manufacturers nor do we end...

Страница 12: ...arity 0 dB Ref and THD N vs frequency sweep 10 Hz 50 kHz 5 0000 4 0000 3 0000 2 0000 1 0000 0 0 1 000 2 000 3 000 4 000 5 000 10 100 1k 10k 50k Ap AUDIO PRECISION Servo 170 LEVEL dBr THD N x vs FREQ H...

Страница 13: ...6000 5000 4000 1000 3000 150 00 135 00 120 00 105 00 90 000 75 000 60 000 45 000 30 000 15 000 0 0 Ap 20 1k 10k 50k 1 000 9000 2000 0 0 100 AUDIO PRECISION Servo170 THD N LEVEL W vs FREQ Hz THD Watts...

Страница 14: ...Servo Amplifier receives adequate ventilation on all sides see page 7 for more information in extreme environmental conditions you may also want to consider the use of cooling fans Severe overcurrent...

Страница 15: ...the right channel connected to the negative input of the speaker Do not use the ground output terminal of either channel the speaker load must float away from the amplifier chassis 15 BRIDGED MONO STE...

Страница 16: ...dB 5 Input Sensitivity all models 0 dBu 1 dB to achieve rated power Attenuator set to maximum 6 Crosstalk at 7 kHz sine wave all models 85 dB typical 7 Residual Noise VR min all models 73 dB typical...

Отзывы: