background image

4

Questions?


samsara.com/support

MOUNTING

VS2 INSTALLATION GUIDE

BEFORE GETTING STARTED 

Mounting Considerations

Before selecting a mounting bracket and mounting the camera, take the following 
considerations into account to ensure an easy installation process. 

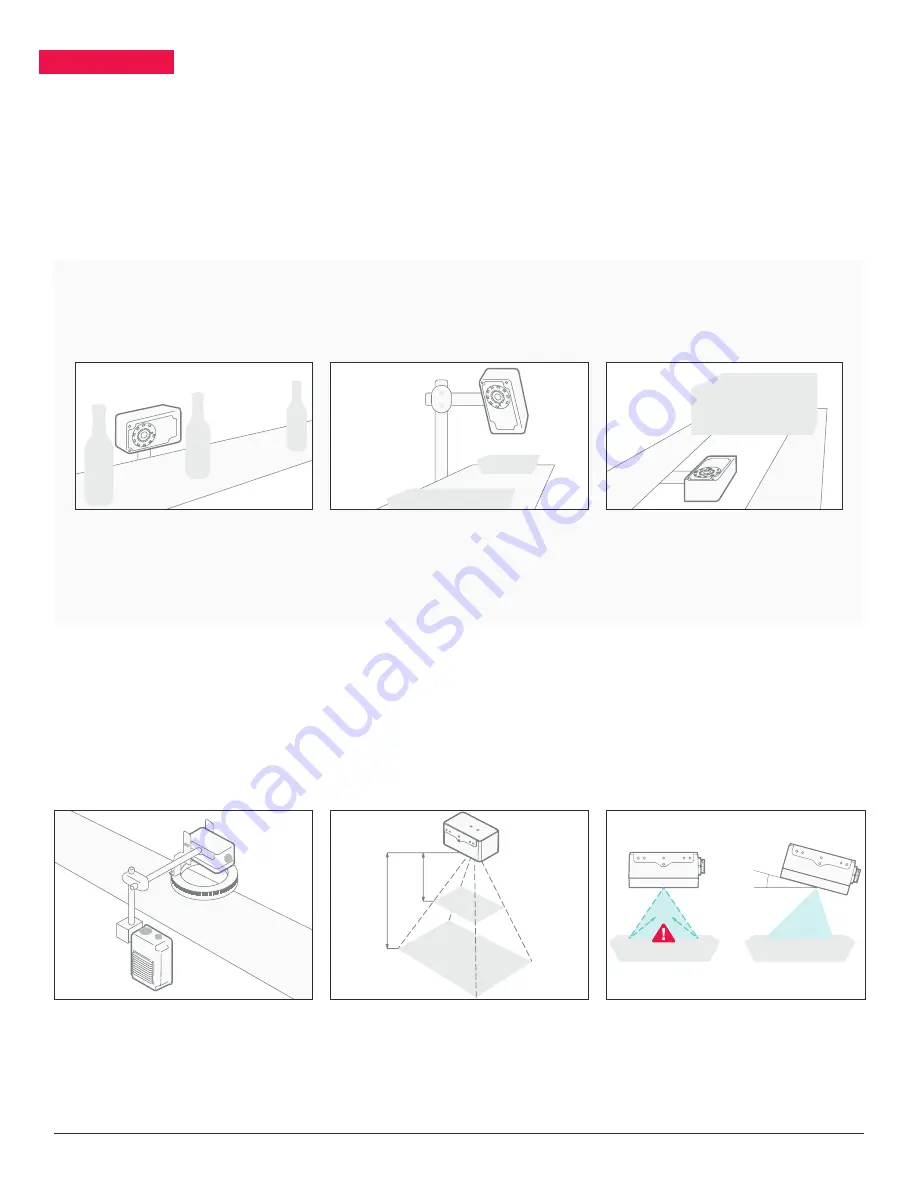
Beside the line


Mounted beside a conveyor line for 
barcode inspection. 

Above the line

Mounted above a conveyor line for 
label matching. 

Under the line

Mounted below a hugger belt conveyor  
for package inspection. 

MOUNT POINT

Identify where the camera should be positioned so it lines up with the product feature 
you plan to inspect. Some of the most common mount points are shown below.  

MOUNT STABILITY

Ensure that the camera and mount 
are easy to clean without shifting 
position. Use shock mounts to minimize 
movement and maintain camera 
alignment where necessary.  

A camera mounted on grooveless rods in a food 
manufacturing facility makes cleaning easy.

WORKING DISTANCE

The camera should be mounted between 
6 and 11 inches away from the feature you 
are inspecting depending on the feature’s 
size. Use the diagram in Appendix 1 to 
determine the ideal distance. 

GLARE

In order to minimize glare when 

inspecting reflective products, tilt the 

camera at a 10° to 20° angle. Samsara 
may also recommend external lighting to 

reduce glare in specific applications. 

Tilt the camera to minimize glare. See Appendix 2 for 
details on external lighting.  

10° – 20°

6″

11″

5.7″

4.1″

7.3″

9.6″

When mounted 6″ away, the camera has a field of 
view of 5.7″ x 4.1″.

Содержание VS2

Страница 1: ...m INSTALLATION AND DEPLOYMENT GUIDE What s included 1x Controller Mounting Plate 4x Self Tapping Screws 4x Flat End Screws 1x Camera Controller 1x Controller Breakout Cable 1x Camera Cable 1x Camera 1x Camera Mount 1x 20 Flat End Screw 4x M4 Flat End Screws ...

Страница 2: ...VS series machine vision system is a complete solution for streamlining quality control across the factory floor Once the system is installed it can be programmed and updated remotely via the Samsara dashboard This guide will walk you through the steps for deploying the system ...

Страница 3: ...126 x 71 x 58mm 5 0 x 2 8 x 2 3 inches Materials Controller UV stabilized polycarbonate aluminum Mounting brackets Powder coated corrosion resistant stainless steel Ingress protection IP67 camera controller and cable connections are all washdown rated Industrial connectors Power IO Camera Bayonet locking IP67 Ethernet RJ45 with included waterproof cap Integrated illumination White LEDs 5000K 48mm ...

Страница 4: ...ow MOUNT STABILITY Ensure that the camera and mount are easy to clean without shifting position Use shock mounts to minimize movement and maintain camera alignment where necessary A camera mounted on grooveless rods in a food manufacturing facility makes cleaning easy WORKING DISTANCE The camera should be mounted between 6 and 11 inches away from the feature you are inspecting depending on the fea...

Страница 5: ... 20 mounting screw or the included swivel mount and M4 screws 1 3 2 Using the self tapping screws install the controller mounting plate in your electrical enclosure If you plan to connect the system via Wi Fi the plate and controller should be mounted outside of the enclosure near the inspection point Align the controller with the mounting bracket and attach using the flat head screws Mounting Ste...

Страница 6: ... systems consult your Samsara representative Controller connectors Connector Name Function 1 Camera Connects the controller to the camera 2 Power IO Connects the breakout cable which provides power as well as connections to the input trigger and output 3 Ethernet Connects the controller to the network Breakout cable pin out Pin Signal Name Wire Color Voltage Specification 1 Power Red 12V 2 Ground ...

Страница 7: ...e red POS and black NEG wires to the correct terminals on the unplugged power supply Connect the controller to the camera using the camera cable Red 10 17VDC Black CMN Connect the controller to an active internet connection via ethernet Note Contact Samsara if you would like to receive units pre configured with Wi Fi credentials 1 3 2 ...

Страница 8: ...ommon wire white to 0 3VDC and the Trigger wire green to the output of the trigger Connect for a PNP line Connect Output Common wire gray to the positive supply voltage and connect the Output wire blue to the desired device Triggering from an NPN device Connect the Input common wire white to 10 30VDC and the Trigger wire green to the output of the trigger Connect for an NPN line Connect the Output...

Страница 9: ...ivation This section walks you through the steps you should take to set up your hardware in the Samsara dashboard Go to cloud samsara com create an account and follow the on screen steps to activate your hardware You can find your serial number on the back of the controller or its box Your newly activated controller will populate in the dashboard Click Settings to rename the controller Your camera...

Страница 10: ... GUIDE VS2 Ring Light and Mount Samsara offers an externally mounted ring light for applications where additional lighting is required to reduce glare and provide a clear image Consult your Samsara representative for additional details 166 mm 160 18 mm 166 mm ...

Отзывы: