3
Warning!
When the surface of the solar panel / array is exposed to sunlight, a DC voltage appears at the
output terminals turning it into a live voltage source. For example, a 24 V nominal solar panel my
put out an open circuit voltage of around 45 VDC that may produce electrical shock. Multiple so-
lar panels connected in series (to increase the output voltage) will put out higher lethal voltages
To avoid any electrical shock hazard during installation, make sure that the solar panel / array is
covered with an opaque (dark) material to block solar irradiation.
INSTALLATION
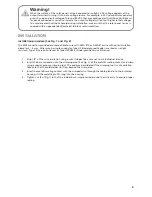
Installation procedure (See Fig. 1 and Fig. 2)
The MC4 connectors provided are compatible for use with AWG #10 or AWG #12 wire with outer insulation
diameter 3 – 6 mm. Wires may be single conductor, Type UF (Underground Feeder - marked as sunlight
resistant), Type SE (Service Entrance) or Type USE/USE-2 (Underground Service Entrance).
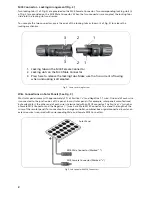
1. Strip 1/4” of the wire insulation using a wire stripper. Take care not to cut individual strands.
2. Insert the bare conductor into the crimping area (4 of Fig. 1) of the metallic mating contact and crimp
using a special purpose crimping tool. The end may be soldered if the crimping tool is not available.
Take care that the solder does not fl ow beyond the crimp area.
3. Insert the metallic mating contact with the crimped wire through the cable gland into the insulated
housing, till the metallic pin fi ts snug into the housing.
4. Tighten nut (3 of Fig.1) so that the rubber bush is compressed around the wire entry to ensure proper
sealing.


