background image

Operating manual 

Tractor mounted snow plow 

PSV, PSV Up, PSV Up H 

- 7- 

Construction of the PSV plow 

A. – Mount*. 

G. – Rotational actuator. 

B. – Suspension system. 

H. – directional valve, 

C. – Right moldboard. 

I. –  Support leg. 

D. – Left modlboard. 

J. – Rubber blade insert. 

E. – Plowshare. 

K. – Side bumper.

F. – Hydraulic connection terminals. 

            -

Transport points

* - According to the requirements of the client types of mounts available are: frame PSV cat. I, frame PSV 
cat.  II,  frame  PSV  cat.  I/II  with  unattached  lugs,  frame  PSV  EURO,  frame  PSV  SMS,  or  plate  PSV  for 
individual development 

or frames adjusted to different types of excavator/loaders full list of which is 

available at the Manufacturer. 

3.2. 

PSV Up (H) plows 

PSV Up

 means that the plow has no own  electric pomp has to be part of a vehicle (needs to 

have 2 pairs of hydraulic connectors) while 

PSV Up H

 Plow has its own hydraulics, and in result 

cooperation with any truck is possible. 

Thoroughly tested construction and the right choice of materials ensure a high reliability and 

durability of our products. More detailed construction of the plow has been presented on 

Fig. 4

.  

PSV  Up  Snow  Plow

  generally  comprises  linkage  with  replaceable  hitch  (

G

)  designed  for 

cooperation  with  vehicles  featuring  front  linkage  and  adjustable  right  (

C

)  and  left  shield  (

D

controlled  by  hydraulic  cylinders  (

B

).  Dual  directional  actuators  are  controlled  using  the tractor's 

hydraulic system with a controllable directional valve (

H

).  

As an  option  support  wheels  or  skids  can  be  purchased,  thanks  to  which  we  can  reduce 

the pressure  of  the  plow  on  the  ground  and  extend  the  life  of  the  rubber  insert  or  the  metal 
HARDOX blade insert.  

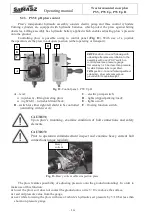
Fig. 4. 

Construction of the PVS Up H plow 

H

G

A

F

K

E

D

C

J

B

Содержание PSV 161

Страница 1: ...fax 48 85 664 70 41 e mail samasz samasz pl www samasz pl OPERATING MANUAL MEDIUM DUTY SNOW PLOWS PSV 161 PSV 181 PSV 201 PSV 231 PSV 271 PSV 301 PSV 231 Up PSV 271 Up PSV 301 Up PSV 231 Up H PSV 271...

Страница 2: ...serviced and repaired only by personnel familiar with its technical characteristics and with rules of safe conduct Regulations regarding accident prevention and all basic regulations regarding safety...

Страница 3: ...parts 8 5 PLOW OPERATION 9 5 1 Connecting the plow to the tractor 9 5 2 Plow control 13 5 3 Transport and parking positions of the plow 15 5 4 Preparing the plow for operation 16 5 5 Operation 18 6 OP...

Страница 4: ...el D date of manufactuer E device weight F quality control mark G the CE symbol signifies that the product conforms to the 2006 42 WE Directive and harmonized standards H country of manufacture ATTENT...

Страница 5: ...re starting work conduct a check of the device and especially the condition of the main connections of the plow and the connection of the plow to the tractor Prior to work commencement check whether s...

Страница 6: ...they should be replaced Labels can be purchased from the manufacturer ATTENTION Any replaced parts should posses all warning signs required by the manufacturer Tab 1 Warning labels located on the plo...

Страница 7: ...some elements of risk so called residual risk are unavoidable during plow use ATTENTION Existing residual risk mainly result from inappropriate behavior of the snow plow operator and not adhering to...

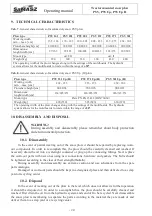
Страница 8: ...in conformity with PN EN 15432 DIN76060 3 1 PSV plows Thoroughly tested construction and the right choice of materials ensure a high reliability and durability of our products Thoroughly tested const...

Страница 9: ...a vehicle needs to have 2 pairs of hydraulic connectors while PSV Up H Plow has its own hydraulics and in result cooperation with any truck is possible Thoroughly tested construction and the right cho...

Страница 10: ...kage cat II Euro SMS Frame warranty card operating manual and spare parts catalogue rubber or metal Hardox blade inserts hydraulic plowshare steering protection inclined shield own independent hydraul...

Страница 11: ...facilitate transport the plows have turned away safety bumpers which need to be reversed before operation as shown in Fig 5 Fig 5 Proper mounting of safety bumpers 5 1 1 Conditions for connecting the...

Страница 12: ...to the ground after lifting the plow the support foot should be lifted and secured with a pin if the plow has been equipped with support wheels or skids they should be adjusted to the correct height...

Страница 13: ...ing the machine lift the plow by means of vehicle s hydraulics and close the valve on connector hose located nearby EURO plug lower the plow to 5 10 cm above the ground so it does not touch the surfac...

Страница 14: ...any responsibility for machine s damages resulting from improper mounting to vehicle Plow s disconnection may cause its damage as a result of a collision with the vehicle Plow s proper mounting on li...

Страница 15: ...To turn the marker lights on or off use the smaller switch B1 which is also present on the control panel B Fig 10 Controlling the PSV plow A Cigarette lighter outlet B Control panel B1 marker light s...

Страница 16: ...s on off F floating function switch CAUTION Upon plow s mounting examine condition of bolt connections and safety elements CAUTION Prior to operation commencement inspect and examine heavy current bol...

Страница 17: ...w in a parking position b transport position 5 3 2 Preparing the plow for operation In the event of plows with lifting and hydraulic assembly PSV Up H for transport purposes lift the plow with hydraul...

Страница 18: ...e determined if the plow has worn blade inserts bumpers or loose bolts If necessary replace worn elements and tighten the bolts If the plow is ready for use it should be placed in the desired position...

Страница 19: ...wing the snow left c e moving the snow d plowing the snow to both sides simultaneously For PSV Up H Plow transport and operation dsimount support legs S as provided on Fig 20 Also turn clearance light...

Страница 20: ...light diagonal bumps by adjusting to them Plow construction allows the plowshare to tilt right or left by 6 in relation to the mount Fig 21 Fig 21 Lateral coping of the PSV 301 Up plow the second are...

Страница 21: ...udden hitting of a solid obstacle Factory set hydraulic accumulator Fig 23 is for 9 MPa pressure and whenever this value is exceeded the cylinder is not able to handle it and in result is retracted ba...

Страница 22: ...NTION The link connecting the moldboards with the suspension body has self lubricating bushings and does not require additional lubrication Every time before starting work make certain that the plow i...

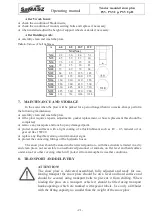
Страница 23: ...tect the connecting fittings of the hydraulic hoses The snow plow should be stored in the retracted position with the actuators retracted in a dry and clean place not accessible to unauthorized person...

Страница 24: ...or the moldboards to rotate within the range of 30 10 DISASSEMBLY AND DISPOSAL WARNING During assembly and disassembly please remember about body protection and environmental protection 10 1 Disassemb...

Страница 25: ...re lifetime of the plow please be careful not to allow the oil to leak out of the hydraulic system which could cause contamination of the natural environment 11 WARRANTY 11 1 Warranty card This produc...

Страница 26: ...lements of the snow plow as a result of overloading damages resulting from overloading the plow evident through the breaking of the securing bolts or plastic deformation of the pressure plates of the...

Страница 27: ...Date seal and signature of the person performing the repair Date seal and signature of the person performing the repair Date seal and signature of the person performing the repair 12 PARTS LIST The p...

Страница 28: ...plow use control lever for tractor s front 3 point linkage Hydraulics control lever is used to rotate shield Switching between right and left plow s shield is possible thanks to switch B2 on control...

Страница 29: ...ntrol panel AlpS 1 Switching clearance lights on off 2 Setting of left shield 3 Setting of right shield 4 Setting of both shields for clearing snow away to the right or to the left 5 Setting of both s...

Отзывы: