background image

8

Read all the instructions before using the disposer.

REMEMBER! Always keep hands away from a disposer when it is running.

1

Always keep your hands away from disposer when it is running.

3

Keep safety baffle over throat of disposer.

2

Push STOP button on control panel and shut off electrical power to the panel before attempting
to clear a jam.

4

To reduce risk or injury by materials that may be expelled from the unit, do not put the following
items into a disposer:

A.

Clam or oyster shells

B.

Drain cleaner or corrosive detergents

C.

Glass, china or plastics

D.

Metal such as bottle caps, tin or aluminum cans, etc.

6

When attempting to clear a jam in a disposer use a Salvajor dejamming tool or a long wooden
object to reverse rotation

5

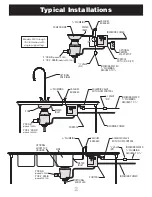
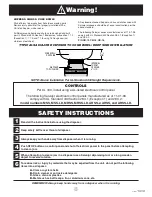
TYPICAL SALVAJOR DISPOSER TO CONE BOWL / DEEP SINK INSTALLATION

NOTE: Above Installation Per UL Standard 430 Height Requirements.

Warning!

SAFETY INSTRUCTIONS

INTERNAL
THROAT
OPENING
6

1

/

2

" ID

CONE BOWL/

DEEP SINK

DISPOSER

TOP HOUSING

5

3

/

8

"

MIN.

CONTROLS

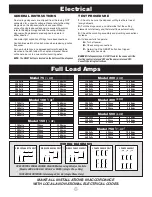
Per UL 430, install using a UL-listed electrical control panel.

The following Salvajor electrical control panels manufactured as of 11-01-96

comply with UL Standard 430 Section 28.3.1 (Exception 1) and 28.3.2:

model numbers MSS, MSS-LD, MRSS, MRSS-LD, ARSS-2, ARSS, and ARSS-LD.

HOPPERS, SINKS & CONE BOWLS

Risk of injury to persons from hazardous moving parts.
Serious injury possible if not properly installed with a
UL-listed hopper, sink or cone.

All Salvajor cone bowls and chutes are designed and built
per UL Standard 430 Section 7 Enclosures, subsection 7.1.2
(Exception 1), 7.1.3, and 7.1.6 using 16 Gauge nominal
stainless steel sheet.

All replacement cones/ hoppers, sinks and chutes used with
Salvajor disposers should be of equal construction per the
above standard.

The following Salvajor cones manufactured as of 11-01- 96
comply with UL Standard 430 Section 28.3.1 (Exception 1)
and 28.3.2:

P/N CB-12, CB-15, CB-18.

Printed in USA

Form No. II-DISP-9-BH

Содержание 75

Страница 1: ... Commercial Food Waste Disposing Systems since 1944 Salvajor Commercial Disposers For All Models 75 100 150 200 300 500 750 Installation Operating I N S T R U C T I O N S 2 Typical Installations 3 Installation of Cone Bowl or Sink Collar 4 Attaching Disposer to Cone Bowl or Sink Collar 5 Plumbing 6 Electrical 7 Operating Instructions 8 Warning and Safety Instructions FOR PRODUCT WARRANTY REGISTRAT...

Страница 2: ...ITH FLOW CONTROL VACUUM BREAKER WATER INLET OPTIONAL PRE RINSE CONE INCOMING WATER 3 4 PLUMBING REDUCED TO 1 2 1 2 VALVE NF 1 2 PLUMBING 2 DRAIN models 75 200 2 OR 3 DRAIN models 300 750 Typical Installations INCOMING POWER CONTROL WITH P OR PP OPTIONAL REMOTE START STOP VACUUM BREAKER WATER INLET CONE OR SINK INCOMING WATER 3 4 PLUMBING REDUCED TO 1 2 1 2 VALVE NF 1 2 PLUMBING P PP 2 DRAIN models...

Страница 3: ...stainless steel adaptor in the sink hole 3 Place the gasket over the stainless steel adaptor UNDER SINK 4 Place the hex metal washer over the stainless steel adaptor up against the gasket 5 Place the sink collar with O ring inserted over the stainless steel adaptor up against the hex metal washer 6 Slip the spring steel snap ring over the bottom of the stainless steel adaptor and slide up until it...

Страница 4: ...ttom of the top housing to floor 5 Turn the disposer on its side and install the leg support optional on Models 75 200 standard on Models 300 750 on the bottom of the disposer and adjust the leg extension so the disposer will stand approximately 1 2 below the bottom of the top housing 6 Carefully balancing the disposer on the leg support walk it under the top housing aligning the ears on the shred...

Страница 5: ... installed in areas where pressure exceeds the recommended maximum of 80 psi WATER SUPPLY 6 Connect COLD WATER ONLY to disposer TYPICAL CONE LAYOUT TYPICAL SINK LAYOUT Water volume can be controlled by a properly rated flow control valve or hand operated valve Nos 7 9 below for NEW INSTALLATIONS ONLY 7 Plumb 3 4 IPS line and reduce to 1 2 at the hand valve Install the factory supplied solenoid val...

Страница 6: ...e 12 1 Amps 230 Volts 1 Phase 12 0 Amps 208 Volts 3 Phase 6 6 Amps 230 Volts 3 Phase 6 0 Amps 460 Volts 3 Phase 3 0 Amps Model 300 208 Volts 3 Phase 8 8 Amps 230 Volts 3 Phase 8 0 Amps 460 Volts 3 Phase 4 0 Amps Model 500 208 Volts 3 Phase 13 8 Amps 230 Volts 3 Phase 12 5 Amps 460 Volts 3 Phase 6 3 Amps Model 750 208 Volts 3 Phase 19 8 Amps 230 Volts 3 Phase 18 0 Amps 460 Volts 3 Phase 9 0 Amps Mo...

Страница 7: ...sposer is jammed above See The disposer motor overload is tripped above Turn the disposer control off and press the reset button on the disposer If the disposer was running allow the unit to cool for 3 5 minutes before pressing the reset button Never strike the reset button with an object The water flows continuously before the controls are turned on Reinstall so that the arrow on the solenoid is ...

Страница 8: ...s Warning SAFETY INSTRUCTIONS INTERNAL THROAT OPENING 61 2 ID CONE BOWL DEEP SINK DISPOSER TOP HOUSING 53 8 MIN CONTROLS Per UL 430 install using a UL listed electrical control panel The following Salvajor electrical control panels manufactured as of 11 01 96 comply with UL Standard 430 Section 28 3 1 Exception 1 and 28 3 2 model numbers MSS MSS LD MRSS MRSS LD ARSS 2 ARSS and ARSS LD HOPPERS SINK...

Отзывы:

Похожие инструкции для 75