3
Installation of CONE BOWL or SINK COLLAR
Application
Cutout Size
12" Cone Bowl
12
7
⁄
8
" Diameter
15" Cone Bowl
15
7
⁄
8
" Diameter
18" Cone Bowl
18
7
⁄
8
" Diameter
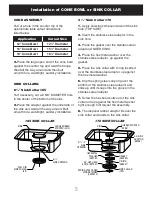
CONE ASSEMBLY
1.
Cut a hole in the counter top of the
appropriate table cutout dimensions
listed below.
2.
Place the large open end of the cone bowl
against the counter top and weld the flange.
Weld all the way around and then buff
smooth for a watertight, sanitary installation.
SINK COLLARS:
6
1
⁄
2
" Sink Collar #65
1.
If necessary, cut a 6 5/8" DIAMETER hole
in the center of the bottom of the sink.
2.
Place the adaptor against the underside of
the sink and weld all the way around. Buff
smooth for a watertight, sanitary installation.
3
1
⁄
2
" Sink Collar #70
1.
Apply caulking compound around the sink
hole (TOP SIDE).
2.
Insert the stainless steel adaptor in the
sink hole.
3.
Place the gasket over the stainless steel
adaptor (UNDER SINK).
4.
Place the hex metal washer over the
stainless steel adaptor, up against the
gasket.
5.
Place the sink collar with O-ring inserted
over the stainless steel adaptor, up against
the hex metal washer.
6.
Slip the spring steel snap ring over the
bottom of the stainless steel adaptor and
slide up until it snaps into the groove in the
stainless steel adaptor.
7.
Screw the hex head bolts out of the sink
collar and up against the hex metal washer
tight enough to firmly set the assembly.
8.
The disposer rubber adaptor fits over the
sink collar and bands to the sink collar.
6
5
/
8
"
SINK OPENING
WELD IN
SINK COLLAR
(65)
SINK
LARGE RUBBER
STOPPER (LRS)
SINK
3
1
/
2
" - 4"
SINK
OPENING
HEX METAL
WASHER
(S5028F)
SPRING STEEL SNAP
RING RETAINER
(S5028LS)
S.S. HEX HEAD
BOLTS (997031)
RUBBER STOPPER
(5088)
S.S. SINK
ADAPTOR
(S5028)
GASKET
(S5028G)
O-RING
(568237)
SINK COLLAR
(70C)
#65 SINK COLLAR
#70 SINK COLLAR


