background image

English

   - 4 -

  Headphone connection
  Automatic programming system
  Manual tuning
  Automatic power down after up to eight hours
  Sleep timer
  Child lock
  Automatic sound mute when no transmission
  NTSC playback
  AVL (Automatic Volume Limiting)
  PLL (Frequency Search)
  PC input
  Game Mode (Optional)
  Picture off function
  Programme recording
  Programme timeshifting
  Ethernet (LAN) for Internet connectivity and service
  802.11 a/b/g/n WLAN Support via USB dongle (not 

supplied)

  Audio Video Sharing
  HbbTV

Accessories Included

  Remote Control
  Batteries: 2 x AAA
  Instruction Book

Standby Notifications

If the TV does not receive any input signal (e.g. from 

an 

aerial  or  HDMI  source)  f

or  3  mi

nutes,  it  will  go 

into standby. When you next switch-on, the following 

message will be displayed: 

TV switched to stand-by 

mode automatically because there was no signal 

for a long time.” 

The 

Auto  TV  OFF

  option(in  the 

Settings

>

System 

>

More 

menu) could have been set to a value between 

1 and 8 hours by default. If this setting is not set as 

Off


and the TV has been left on and not been operated 

during the set time, it will switch into standby mode 

after the set time has expired. Wh

en you next switch-on 

the TV

, the following message will be displayed. 

TV 

switched to stand-by mode automatically because 

no operation was made for a long time.” 

Before the 

TV switches into standby mode a dialogue window will 

be displayed. If you do not press any button the TV 

will switch into the standby mode after a waiting period 

of about 5 minutes. You can highlight 

Yes

 and press 

OK

 to switch the TV into standby mode immediately. 

If you highlight 

No 

and press 

OK

, the TV will remain 

on. You can also choose to cancel the 

Auto TV OFF


function  from  this  dialogue.  Highlight 

Disable

  and 

press 

OK

, the TV will remain on and the function will 

be cancelled. You can enable this function again by 

changing the setting of the 

Auto TV OFF

 option from 

the 

Settings>System>More

 menu. 

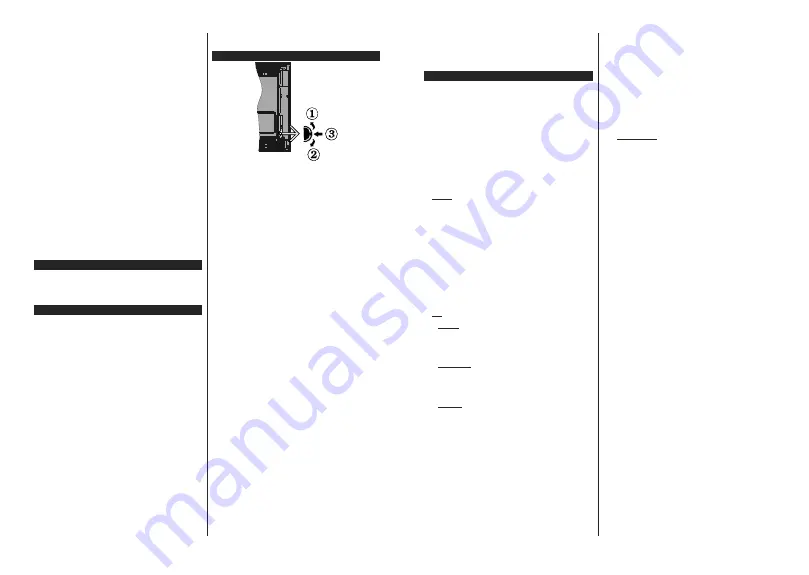
TV Control Switch & Operation

1. 

Up direction

2. 

Down direction

3. 

Volume  /  Info  /  Sources  L st  select on  and 

Standby-On sw tch

The Control button allows you to control the Volume 

/ Programme / Source and Standby-On functions of 

the TV.

To change volume:

 Increase the volume by pushing 

the button up. Decrease the volume by pushing the 

button down.

To change channel:

 Press the middle of the button 

in, the information banner will appear on the screen. 

Scroll  through  the  stored  channels  by  pushing  the 

button up or down.

To change source:

 Press the middle of the button in 

twice(for the second time in total), the source list will 

appear  on  the  screen.  Scroll  through  the  available 

sources by pushing the button up or down.

To turn the TV off:

 Press the middle of the button in 

and hold it down for a few seconds, the TV will turn 

into standby mode.

To turn on the TV:

 Press the middle of the button in, 

the TV will turn on.

Notes:


If you turn the TV off, this cycle starts again beginning with 
the volume setting.
Main menu OSD cannot be displayed via control button.

Operation with the Remote Control

Press  the 

Menu

  button  on  your  remote  control  to 

display main menu. Use the directional buttons and 

OK

 button to navigate and set. Press 

Return/Back 

or 

Menu

 button to quit a menu screen.

Input Selection

Once you have connected external systems to your 

TV, you can switch to different input sources. Press the 

Source

 button on your remote control consecutively 

to select the different sources.

English

   - 5 -

Changing Channels and Volume

You can change the channel and adjust the volume 

by using the 

Programme


+/- 

and 

/-

 buttons 

on the remote. 

Using Main TV Menu

When the 

Menu

 button is pressed, the main TV menu 

will  appear  at  the  bottom  of  the  screen.  You  can 

navigate through the menu items using the directional 

buttons on the remote. To select an item or see the 

sub-menu options of the highlighted menu press 

OK


button. When you highlight a menu option some of the 

sub-menu items of this menu may appear on the upper 

side of the menu bar for quick access. To use a quick 

access item highlight it, press 

OK

 and set as desired 

using the Left/Right directional buttons. When finished 

press 

OK

 or 

Back/Return

 button to exit.

Press 

Exit

 button to close the main menu.

1. Home

When  main  menu  is  opened 

Home

  menu  bar  will 

be highlighted. The content of the 

Home

 menu can 

be customised by adding options from other menus. 

Just highlight an option and press the Down direction 

button on the remote. If you see 

Add to Home

 option 

you  can  add  it  to  the 

Home

  menu.  Same  way  you 

can delete or change the position of any item in the 

Home

  menu.  Press  the  Down  direction  button  and 

select 

Delete 

or 

Move

 option and press 

OK

. In order 

to move a menu item use the Right and Left direction 

buttons to select the position that you want the item 

to move to and press 

OK

.

2. TV
2.1. Guide

You can access the electronic programme guide menu 

using  this  option.  Refer  to 

Electronic  Programme 

Guide

 section for more information.

2.2. Channels

You can access the 

Channels

 menu using this option. 

Refer  to 

Using the Channel List

  section  for  more 

information.

2.3. Timers

You can set timers for future events using the options of 

this menu. You can also review the previously created 

timers under this menu.
To add a new timer select the 

Add Timer

 tab using the 

Left/Right buttons and press 

OK

. Set the sub-menu 

options as desired and when finished press 

OK

.


A new 

timer will be created. 
To edit a previously created timer, highlight that timer,  

select  the 

Edit Selected Timer

  tab  and  press 

OK

Change the sub-menu options as desired and press 

OK

 to save your settings.

To  cancel  an  already  set  timer,  highlight  that  timer, 

select 

Delete Selected Timer

 tab and press 

OK

. A 

confirmation message will be displayed. Highlight 

Yes


and press 

OK

 to proceed. The timer will be cancelled.

It is not possible to set timers for two or more events 

that will broadcasted in different channels at the same 

time interval. In this case you will be asked to choose 

one of these timers and cancel others. Highlight the 

timer you want to cancel and press 

OK

,

 Options 

menu 

will be displayed. Then highlight 

Set/Cancel

 and press 

OK

 to cancel that timer. You will have to save changes 

after that. In order to do that press 

OK

, highlight 

Save 

Changes

 and press 

OK

 again.

2.4. Recordings

You can manage your recordings using the options 

of this menu. You can playback, edit, delete or sort 

previously recorded events. Highlight a tab by using 

the Left or Right direction button and press 

OK

 to see 

available options.

Recording Settings

You can also configure your recording preferences 

using  the 

Settings

  tab  in  the 

Recordings

  menu. 

Highlight 

Settings

 tab by using 

Left

 or 

Right

 button 

and press 

OK

. Then select 

the desired 

item in the 

sub-menu and set by using 

Left

 or 

Right

 button.

Start early:

 You can set recording timer’s starting 

time to start earlier by using this setting.

End late:

 You can set recording timer’s end time to 

end later by using this setting.

Max Timeshift:

 This setting allows you to set the 

maximum  duration  for  the  timeshift  recording. 

Available  options  are  approximate  and  the  actual 

recording time may change in practice depending on 

the broadcast. The reserved and free storage space 

values will change according to this setting. Make 

sure  that  you  have  enough  free  space  otherwise 

instant recording may not be possible.

Auto  discard:

 You  can  set  the 

Discard

  type  as 

None

Oldest

Longest

  or 

Shortest

.  If  it  is  not 

set to 

None

, you can set the 

Unplayed

 option as 

Included

  or 

Excluded

. These  options  determine 

the preferences for deleting the recordings in order 

to obtain more storage space for ongoing records.

Hard  disk  information:

  You  can  view  detailed 

information about the USB storage device connected 

to your TV. Highlight and press 

OK

 to see and press 

Back/Return

 to close.

Format Disk: 

If you want to delete all files on the 

connected USB storage device and convert the disk 

format to FAT32, you can use this option. Press 

OK


button while the 

Format Disk

 option is highlighted. 

A  menu  will  appear  on  the  screen,  requiring  you 

to  enter  the  PIN

(*)

. After  you  enter  the  PIN,  a 

confirmation message will be displayed. Select 

Yes


and press 

OK

 to start formatting the USB storage 

device. Select 

No

 and press 

OK

 to cancel. 

Содержание 22FSB6502

Страница 1: ......

Страница 2: ......

Страница 3: ...een gematigd of tropisch klimaat Het televisietoestel is bedoeld voor huishoudelijk en gelijkaardig algemeen gebruik maar het mag ook in openbare ruimten worden gebruikt Voor ventilatiedoeleinden moe...

Страница 4: ...Merk op dat bepaalde beeldin stellingen niet kunnen worden gewijzigd Als de Rechtse knop wordt ingedrukt verschijnt het bericht Scherm schakelt u t n 15 seconden op het scherm Selecteer Doorgaan en d...

Страница 5: ...lingen U kunt uw opname voorkeuren ook configureren in de tab Instellingen in het menu Opnames Selecteer de tab Instellingen in het menu met de Links of Rechts knop en druk op OK Selecteer daarna het...

Страница 6: ...symbool niet met het gewone huisvuil mogen weggeworpen worden De producten dienen naar een verzamelpunt gebracht te worden waar de recyclage correcte behandeling verzameling van elektrisch en elektro...

Страница 7: ...informatie weer over de inhoud op het scherm geeft verborgen informatie weer openbaar maken in TXT modus 23 Menu Geeft het tv menu weer 24 Programma 25 Tekst Geeft de teletekst weer indien beschikbaa...

Страница 8: ...K om door te gaan Opmerking De duur van de zoekopdracht hangt af van de geselecteerde Zoekstap Analoog Als de zoekoptie analoge uitzending ingeschakeld is zal de tv op zoek gaan naar analoge kabeluitz...

Страница 9: ...Geluidsinstellingen is beschikbaar tijdens het afspelen van geluidsbestanden Lus Willekeurige weergave bediening De weergave starten en inschakelen Alle bestanden in de lijst worden doorlopend afgespe...

Страница 10: ...dere malen te proberen Reset Om het beeldformaat terug op de fabrieksmatige standaardinstelling te zetten Behalve Spelmodus In VGA pc modus zijn sommige opties in het menu Beeld niet beschikbaar In pl...

Страница 11: ...kijken Deze functie is enkel beschikbaar als de uitzender ze ondersteunt Opmerking Het is mogelijk dat de audio beschrijving geluidsfunctie niet beschikbaar is in de opname of time shifting modus Netf...

Страница 12: ...druk op OK om naar de onderstaande opties te gaan Selecteer Genre Geeft het menu Genre markeren weer Selecteer een genre en druk op OK De gebeurtenissen in de programmagids die Nederlands 20 overeens...

Страница 13: ...70Hz 9 1024x768 75Hz 10 1152x864 75Hz 11 1280x768 60Hz 12 1360x768 60Hz 13 1280x960 60Hz 14 1280x1024 60Hz 15 1280x1024 75Hz 16 1400x1050 60Hz 17 1440x900 60Hz 18 1440x900 75Hz 19 1920x1080 60Hz Onder...

Страница 14: ...aad apparaat configureren Netwerk type Het netwerktype kan worden geselecteerd als bedraad apparaat draadloos apparaat of Uitgeschakeld in overeenstemming met de actieve verbinding op het televisietoe...

Страница 15: ...g provider Opmerking Het is mogelijk dat deze functie niet wordt ondersteund op alle mobiele apparaten Nederlands 26 Wake ON facultatief Wake on LAN WoL en Wake on Wireless LAN WoWLAN zijn normen die...

Страница 16: ...in de webbrowser Om de browser opties balk weer te geven verplaatst u de cursor naar boven of drukt u op de knop Terug Nederlands 28 Geschiedenis Tabs en Bladwijzers opties en de browser balk die de...

Страница 17: ...tisch verbonden met de laatst verbonden tv en slaat het tv zoekscherm over TV wijzigen Enkel in IOS Geeft de momenteel verbonden tv weer U kunt drukken op deze instelling om naar het Tv zoeken scherm...

Страница 18: ...m trockenen Standort und in Regionen mit gem igtem oder tropischem Klima vorgesehen Das Ger t ist f r den Einsatz im Haushalt und vergleichbare Nutzung vorgesehen jedoch ist der Einsatz an ffentlichen...

Страница 19: ...dliche Funktionsweise Wert gelegt Um den Energieverbrauch zu senken gehen Sie wie folgt vor Wenn Sie die Energiespar Option auf Minimum Medium Maximum oder Auto einstellen wird das TV Ger t seinen Ene...

Страница 20: ...gen und dr cken Sie OK Stellen Sie die Untermen optionen wie gew nscht ein und dr cken Sie OK wenn Sie fertig sind Ein neuer Timer wird erstellt Um einen zuvor erstellten Timer zu bearbeiten markieren...

Страница 21: ...lte zuzugreifen Falls das Ger t die Beschr nkungen bez glich der Verwendung von Inhalten nicht ordnungsgem durchsetzen kann k nnen die Inhaltseigent mer von Microsoft fordern die F higkeit des Ger ts...

Страница 22: ...sst angezeigte Men s oder kehrt zum vorherigen Bildschirm zur ck 22 Info Zeigt Informationen ber auf dem Bildschirm gezeigte Inhalte zeigt versteckte Informationen reveal im TXT Modus 23 Men Zeigt das...

Страница 23: ...ach digitalen Kabelsendern sobald die Ersteinstellungen vorgenommen worden sind Bevor Sie mit der Suche beginnen wird eine Meldung angezeigt in der Sie Deutsch 12 gefragt werden ob Sie eine Kabelnetzw...

Страница 24: ...ie en Schlie en Sie ein USB Speicherger t an einen der USB Eing nge an der Seite des Fernsehers an Deutsch 14 Nachdem Sie ein USB Speicherger t an Ihr Fernsehger t angeschlossen haben wird das Medienb...

Страница 25: ...hwach oder verrauscht ist k nnen Sie mit der Option Rauschreduktion das Bildrauschen verringern Farbtemperatur Stellt den gew nschten Farbtemperaturwert ein Die Optionen Kalt Normal Warm und Benutzerd...

Страница 26: ...en Wake On Aktivieren oder deaktivieren Sie diese Funktion indem Sie sie auf Ein oder Aus setzen Hinweis Ein WLAN Adapter WLAN USB Dongle ist erforderlich um die Funktionen des drahtlosen Netzwerks nu...

Страница 27: ...Einstellungsoptionen f r das TV Ger t an Men Zeitlimit Ver ndert die Timeout Zeit zwischen den Men bildschirmen Standby LED If set as Off the standby LED will not light up when the TV is in standby mo...

Страница 28: ...m die Registerkarten Optionen auf der oberen Seite des Bildschirms zu verwenden Deutsch 22 Zeitleiste In dieser Layout Option werden alle Ereignisse der aufgelisteten Kan le nach Timeline angezeigt Mi...

Страница 29: ...ien leer Ersetzen Sie diese M glicherweise wurden die Batterien nicht richtig eingesetzt Lesen Sie dazu den Abschnitt Einlegen der Batterien in die Fernbedienung Signal an der Eingangsquelle Es ist m...

Страница 30: ...P8 Key Frame Versionsnummer Unterst tzung 0 3 Verlustfreie Kompression Audiodateiformate Erweiterung Formatieren mp3 mp3 ac3 ac3 aac AAC wma WMA amr AMR NB AMR WB wav MPEG La AAC PCM flac FLAC Deutsch...

Страница 31: ...eschlossen werden USB Hubs werden n cht unterst tzt S e k nnen Ihren Dongle n e n Erwe terungs Dock stecken wenn d e Netzwerkqual t t schlecht st und der Dongle an e nem Ort m t besserer S gnalqual t...

Страница 32: ...hen Fall w rd d e MAC Adresse jedes Mal authent f z ert wenn S e Verb ndung zum Internet Deutsch 30 aufnehmen D es st e ne Vors chtsma nahme gegen unbefugten Zugr ff Da Ihr Fernseher ber e ne e gene M...

Страница 33: ...ne von ihnen Hat die Plattform keine betriebsbereite Breitband Verbindung kann die Plattform immer noch dieAnwendungen ber Broadcast bermitteln Deutsch 32 Die roten Autostart Punkt Anwendungen liefern...

Страница 34: ...mart Remote Funktion Sie k nnen Ihr Mobilger t als Fernbedienung f r Ihr TV Ger tbenutzen sobaldesmitdemFernseherverbunden ist Um das Smart Fernbedienung Funktionsfeature zu nutzen tippen Sie auf die...

Страница 35: ...rea s contain s user replaceable coin or button cell batteries Class 1 Laser Product This product contains Class 1 lasersourcethatissafeunder reasonably foreseeable conditions of operation English 3 W...

Страница 36: ...ghlight it press OK and set as desired using the Left Right directional buttons When finished press OK or Back Return button to exit Press Exit button to close the main menu 1 Home When main menu is o...

Страница 37: ...l property including copyrighted content This device uses PlayReady technology to access PlayReady protected content and or WMDRM protected content If the device fails to properly enforce restrictions...

Страница 38: ...m displayed menus or returns to previous screen 22 Info Displays information about on screen content shows hidden information reveal in TXT mode 23 Menu Displays TV menu 24 Programme 25 Text Displays...

Страница 39: ...played at the bottom of the screen After all the available stations are stored Channels menu will be displayed You can edit the channel list according to English 11 your preferences using the Edit tab...

Страница 40: ...in the same random order To use the functions on the information bar highlight the symbol of the function and press OK To change the status of a function highlight the symbol of the function and pres...

Страница 41: ...ded to the Picture menu while in PC mode English 15 Sound Menu Contents Volume Adjusts the volume level Equalizer Selects the equalizer mode Custom settings can be made only when in User mode Balance...

Страница 42: ...tify your TV Note RU Y GHR VWUHDP QJ D P Q PXP 0E V QWHUQHW FRQQHFW RQ VSHHG V UHTX UHG RU DQ H DPSOH RI WKH UHTX UHPHQWV IRU VWUHDP QJ FRQWHQW RX PD I QG PRUH QIRUPDW RQ RQ WKH 1HWIO ZHEV WH KWWSV KH...

Страница 43: ...genre will be highlighted Guide Search Displays searching options Using these options you can search the programme guide database in accordance with the selected criteria Matching results will be lis...

Страница 44: ...0 60Hz AV and HDMI Signal Compatibility Source Supported Signals Available Back AV PAL O SECAM O NTSC4 43 O NTSC3 58 O YPbPr 480i 480p 60Hz O 576i 576p 50Hz O 720p 50Hz 60Hz O 1080i 50Hz 60Hz O HDMI 4...

Страница 45: ...ice Wireless Device or Disabled in accordance with the active connection to the TV set Select this as Wired Device if you are connecting via an Ethernet cable Internet Speed Test Highlight Internet Sp...

Страница 46: ...ations In order to use this feature the TV and the remote device should be connected at least once while the TV is on If the TV is powered off the connection should be re established the next time it...

Страница 47: ...ccess to Internet only services for consumers using connected TVs and set English 27 top boxes Services delivered through HbbTV include traditional broadcast TV channels catch up services video on dem...

Страница 48: ...V Note Not all image file formats are supported This function will not work if Audio Video Sharing feature is not supported Smart Remote Feature You can use your mobile device as a remote control for...

Страница 49: ...d entretien important Fran ais 3 Symboles sur le produit Les symboles suivants sont utilis s sur le produit pour marquer les instructions relatives aux restrictions aux pr cautions et la s curit Chaq...

Страница 50: ...ctionnement de la TV 1 Direction pr c dente 2 Direction suivante 3 Volume Info L ste des sources Commutateur de s lect on et de m se en ve lle Le bouton de commande vous permet de contr ler le volume...

Страница 51: ...le code PIN que vous aviez d fini 3 R glages Vous pouvez g rer les param tres de votre t l viseur l aide des options de ce menu Reportez vous la section Contenu du menu Param tres pour plus d informat...

Страница 52: ...313 Aff chage 22 Temp rature de fonctionnement et humidit 0 C 40 C soit 85 d humidit maximale Fran ais 9 T l commande 1 Veille Met le t l viseur sous hors tension 2 Boutons num riques Changez de cha...

Страница 53: ...nfirmer un code PIN Le code PIN choisi ne saurait tre 0000 Vous devez le saisir si l on vous demande de le faire pour toute op ration dans le menu plus tard Vous pouvez activer l option Mode de Stocka...

Страница 54: ...e cordon d alimentation courant alternatif est d branch pendant que le r glage de la minuterie de l enregistrement USB est actif cette action est annul e Le support multipartition est disponible Un ma...

Страница 55: ...t prendre en charge la fonction de Contr le du Syst me Audio et l option CEC doit tre r gl e sur Activ E Manuel Vous pouvez acc der aux instructions relatives aux fonctions de votre t l viseur partir...

Страница 56: ...nstallation Recherche en mode de veille Votre t l viseur recherche de nouvelles cha nes ou cha nes manquantes en mode veille Toutes les cha nes d tect es s affichent l cran Mise jour de cha nes dynami...

Страница 57: ...s pouvez faire plusieurs choix Vous pouvez galement utiliser l option Tag Untag tous pour s lectionner tous les canaux de la liste Appuyez ensuite sur le bouton Pr c dent Retour pour revenir aux optio...

Страница 58: ...l texte num rique Appuyez sur la touche Text pour afficher les informations relatives au t l texte num rique Utilisez les touches color es les touches du curseur et la touche OK La m thode de fonctio...

Страница 59: ...une inconsistance au niveau des normes de l quipement source DVD d codeur etc Si vous rencontrez ce type de probl me veuillez contacter votre fournisseur et le fabricant de l appareil source Fran ais...

Страница 60: ...TRAGE DVD lrc Sous titrages internes Extension Sp cifications mkv VOBSub mkv ASS SSA TEXTE dat mpg mpeg vob Sous titrage DVD mp4 Sous titrage DVD TEXTE Fran ais 25 R solutions DVI prises en charge Rep...

Страница 61: ...at on d accue l fourn e dans le cas o la qual t du r seau est pauvre et la cl w f do t tre plac e un endro t pr sentant une me lleure qual t du s gnal La cl USB sans fil prend en charge les modems de...

Страница 62: ...t on un que de votre PC ou modem a t r gul rement enreg str e l se peut que votre t l v seur ne so t pas connect Fran ais 29 Internet Dans ce cas l adresse MAC est authent f e chaque fo s que vous tes...

Страница 63: ...ication peut tre interrompue L application peut tre interrompue et une autre application du bouton rouge de d marrage automatique peut tre lanc e Fran ais 31 HbbTV permet aux applications d tre r cup...

Страница 64: ...s les sources du t l viseur et du navigateur m dia Remarques Il est noter que seules les cha nes num riques DVB T C S SD et HD sont prises en charge Le support audio multilingue et la fonctionnalit d...

Страница 65: ...Y Nederlands VESAWANDMONTAGEMETINGEN Groottebooropening mm Schroefgroote Lengte X Draad Y Suomi VESA SEIN ASENNUKSENMITAT Reik kuvionkoot mm Ruuvinkoot Pituus x Kierre Y Norsk VESAVEGGMONTERINGSM L Hu...

Страница 66: ...orsk Produktinformasjon Kommersiell merkevare Produkt nr Modell nr Energieffektivitet klasse Synlig skjermst rrelse diagonal ca tommer cm Portugu s Ficha do produto Marca Comercial Produto N Modelo N...

Страница 67: ...Fran ais Hrvatski Nederlands Espa ol Svenska Italiano Polski Magyar Norsk Portugu s Rom n Srpski Sloven ina Sloven ina Bosanski T rk e Shqip Lietuvi Latvie u Eesti Energy consumption kWh per year base...

Страница 68: ...a TFT IDTV t pus r di berendez s megfelel a 2014 53 EU ir nyelvnek Az EU megfelel s gi nyilatkozat teljes sz vege el rhet a k vetkez internetes c men doc vosshub com IT Il fabbricante VESTEL Elektroni...

Страница 69: ......

Страница 70: ......

Страница 71: ......

Страница 72: ......

Отзывы: