background image

26

Screen 5.9

Use this screen to set the minimum time the battery must remain 
at float before allowing a battery test to be initiated.

Screen 5.10

Use to consult and modify the batteries’ float voltage compensa-
tion, according to the temperature.

Screen 5.11

Use to consult and modify the batteries fast charge voltage com-
pensation, according to the temperature.

Screen 5.12

Sets the maximum and minimum temperature threshold for the 
battery temperature compensation.

Screen 5.13

Enable or disable fast charging and periodic battery charging.

Screen 5.14

Enable or disable exceptional battery charging.

Screen 5.15

Use this screen to consult and modify the batteries’ fast charging 
voltage.

Screen 5.16

Use to consult and modify the batteries’ maximum fast charging 
time.

Screen 5.17

Use to adjust the battery tail current for return to float.

Screen 5.18

Use to consult and modify the batteries’ fast manual charging 
time.

Screen 5.19

Use to consult and modify the batteries’ periodic charging time.

Screen 5.20

Use to specify the interval of days between periodic loads.

Screen 5.21

Use this screen to consult and modify the batteries’ exceptional 
charging voltage.

Screen 5.22

Use to consult and modify the batteries’ maximum exceptional 
charging time.

Screen 5.23

Use this screen to consult and modify the batteries’ maximum 
charging interval, between exceptional battery charging regimes.

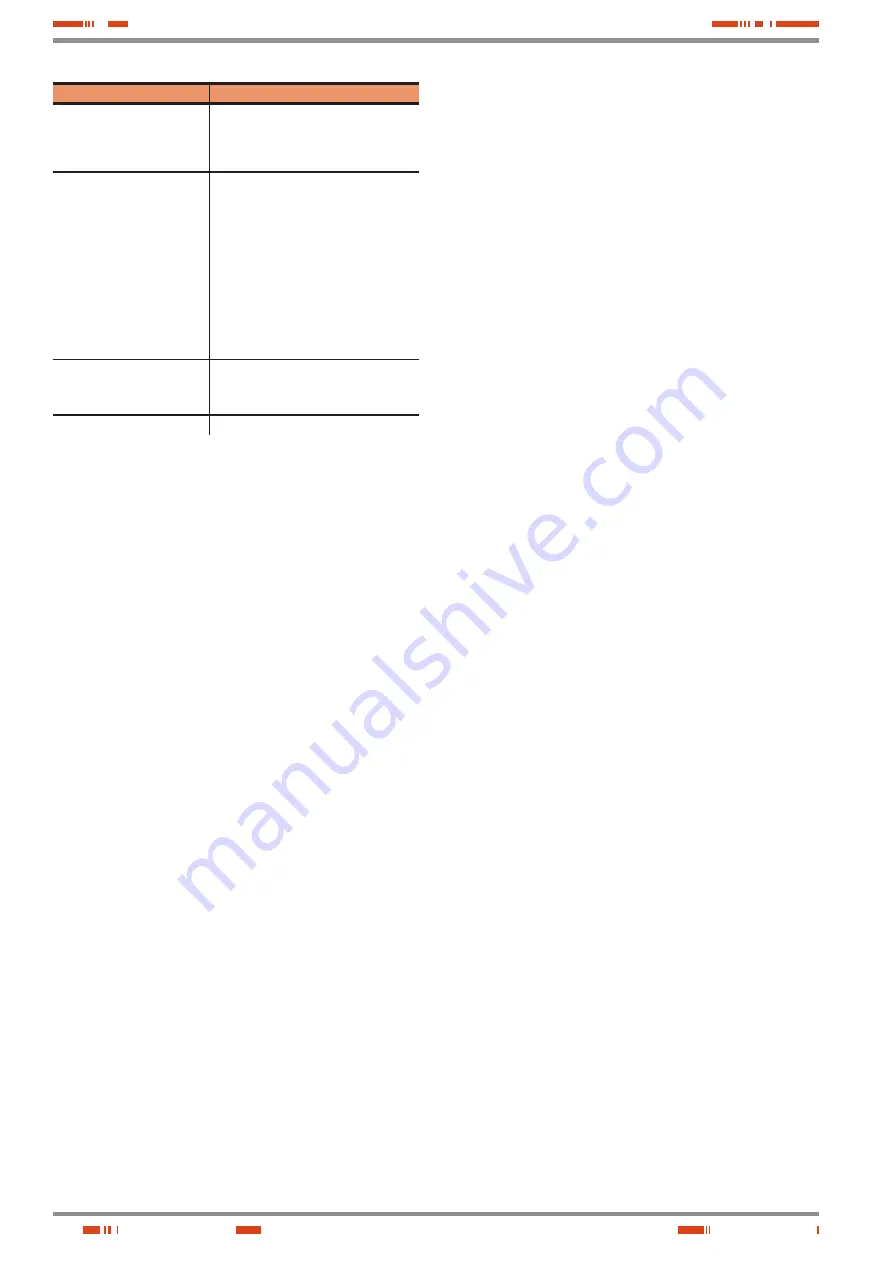
RELAY

ASSOCIATED ALARMS

RELE 1: (AC Input failure)

Input overvoltage.

Input undervoltage.

Input switch open.

AC input failure.

Phase rotation error.

RELE 2: (EMERGENCY fault)

Output overvoltage.

Output undervoltage.

High battery voltage.

Low battery voltage.

Battery fuse blown.

Rectifier fuse blown.

Input switch open.

Output switch open.

Reducer overheating (ventilation fault).

Battery disconnected.

Battery failure.

Rectifier overheating (SCR sink)

Battery overheating.

File system fault.

Charger fault.

RELE 3: (NON-EMERGENCY 

fault)

Battery leakage current (+)

Battery leakage current (-)

Fault Battery temperature sensor.

Surge protector triggered.

RELE 4: (End of backup)

End of battery backup.

Table 8. 

Table of activation conditions for external indication relays.

9.3.6.  ‘Battery Settings’ menu.

To access this menu from the home screen, press the forward 
key 

(

)

 five times. Use key 

(

)

 to access the screens of the 

different sub-menus and move freely from one to the other by 
means of keys 

(

)

 and 

(

)

.

Screen 5.1

This is the gateway to the Battery Settings menu. If you enter the 
correct ‘Password’ on Screen 7.1, you can see and modify the 
parameters of the batteries in the adjacent screens. Otherwise, 
none of the screens in this menu will be displayed.

Screen 5.2

Use this screen to change the capacity of the installed battery 
and the maximum charging current.

Screen 5.3

Use this screen to change the value of the float voltage.

Screen 5.4

Use this screen to consult and modify low battery voltage alarms.

Screen 5.5

Use to consult and modify the battery unit’s low voltage cut-off.

Screen 5.6

Use this screen to change the value of the battery unit’s high 
voltage alarm.

Screen 5.7

Use to consult and modify the battery unit’s high voltage cut-off.

Screen 5.8

Use this screen to modify the value of the battery high voltage 
alarm.

USER MANUAL

Содержание DC POWER-L Series

Страница 1: ...P DOWN LIGHT DIMMERS ILUEST POWER SOURCES STATIC INVERTERS PHOTOVOLTAIC INVERTERS LINE VOLTAGE STABILISERS MANUAL EE671774 1 DC POWER SUPPLY DEVICE THYRISTOR CONTROLLED CHARGER RECTIFIER 12 PULSE DC P...

Страница 2: ...2 USER MANUAL...

Страница 3: ...eception and unpacking 6 2 Packing list and contents 6 3 Storage 7 Installation 7 1 Look after your safety 7 2 Considerations to take into account 7 3 Earth connection terminal or strip 7 4 Connection...

Страница 4: ...fied per sonnel Although no effort has been spared to ensure that the information in this user manual is complete and accurate we accept no liability for any errors or omissions that may exist The ima...

Страница 5: ...e device is installed and operating it is recom mended to keep the documentation pendrive in a safe and easy to access location for future reference If a system differs from that shown in the figures...

Страница 6: ...plies d c output Part 7 Safety requirements Reference standard IEC EN 60950 1 Information technology equipment Safety Part 1 General requirements IEC EN 61204 3 Low voltage power supply devices d c ou...

Страница 7: ...o earth the protection will always be single pole so as not to disconnect the pole from earth The entry of connection cables is through the base of the cab inet Optionally and on request cable entry c...

Страница 8: ...ker Q2 Battery circuit breaker Q3 Input terminals R S T Battery terminals Output terminals Cable input gland Earth Terminal Alarm interface X32 see Table 2 Interface Aux Contacts X34 refer to Table 3...

Страница 9: ...ck format with a 623 x 803 mm base The dimensions of the rectifier and battery cabinets are the same and the only external difference is the control panel on the device The device can operate with PbC...

Страница 10: ...ltage 110 Rated output voltage with positive to earth 110 Rated output voltage with negative to earth L Device series standard version only single phase devices with 5 ripple and no Schuko socket LP D...

Страница 11: ...n the event of input mains failure or output overloads 5 2 2 AC input For greater versatility the system can be either single phase or three phase Regardless of the topology of the mains protection el...

Страница 12: ...erride con trol the control is transferred to another current PID when one of the current limits is exceeded batteries or rectifier A selective control enables automatic switching between the two curr...

Страница 13: ...event of input wave voltage and frequency variations The output current of each charger is equal to the current de manded by 100 of the loads plus the maximum charging cur rent of the battery accordi...

Страница 14: ...tions Each automatic deactivation automatically recalculates the next periodic trip Table 5 Activation and deactivation of fast charging Exceptional charging Automatic Manual Periodic Activation No Vi...

Страница 15: ...if re quested in the order cardboard box expanded polystyrene EPS corners polyethylene cover and polyester strapping All of these materials are recyclable so any disposal must be carried out in accord...

Страница 16: ...6 3 Storage The device should be stored in a dry ventilated room and pro tected from rain dust and water or chemical splashes It is advisable to keep devices and batteries in their original pack agin...

Страница 17: ...up operations The surface on which the system is to be installed must be properly prepared to support its weight and level to prevent the metal structure from having to withstand unnecessary and harmf...

Страница 18: ...e accumulator bank with the resultant risk It should never be forgotten that the DC Power L with batteries is a generator of electrical power regardless of whether the batteries are installed in the s...

Страница 19: ...phase or three phase AC power supply network All of the protections or disconnectors of the system must be in the Off position and in particular that of the the batteries of the device Q3 and its cou...

Страница 20: ...bles red for positive and black for negative and the polarity indicated on the labelling of the device Connect the load or loads to the earth terminal or strip It is recommended to distribute the outp...

Страница 21: ...tically or manually Exceptional charging Exceptional charging is forced manually at the will of the operator via the control panel 8 1 Startup procedure Set battery circuit breaker Q3 to On In systems...

Страница 22: ...main screen of the system which appears when the device starts up It is also the screen that appears when is pressed to exit any of the other menus or sub menus of the control panel with LCD The first...

Страница 23: ...Screen 2 1 This is the gateway to the device s switching menu Screen 2 2 Manual and forced activation of fast charging 9 3 4 User Parameters menu To access this menu from the home screen press the fo...

Страница 24: ...MP C MIN T COMP C QUICK CHARGING MAX T min PERIODIC CHARGING INTERVAL Days BATT FLOAT CHARGE TIME h LOW BATTERY VOLTAGE x x x x V OUTPUT VOLTAGE LOW V INSULATION ALARM Kohm INSULATION MEASUREMENT S N...

Страница 25: ...auxiliary contact closed Urgent 5 Current leakage alarm Isol res approx 5 K Isol res approx 5 K Not urgent 5 Electrolyte level low alarm Electrolyte low level Electrolyte normal level Not urgent 1 Ch...

Страница 26: ...C input failure Phase rotation error RELE 2 EMERGENCY fault Output overvoltage Output undervoltage High battery voltage Low battery voltage Battery fuse blown Rectifier fuse blown Input switch open Ou...

Страница 27: ...lower than the nominal setting of the device Screen 6 6 Use this screen to set the rectifier s overload alarm threshold Screen 6 7 Use this screen to activate or deactivate the rectifier output isola...

Страница 28: ...itors The service life of the capacitors in the DC bus and those used for input and output filtering depends on use and environmental conditions Preventative replacement by authorised technical person...

Страница 29: ...Batteries in system cabinet Fuses Batteries in external cabinet Fuses General output switch Disconnector Soft start Yes COMMUNICATION AND ALARMS Slot Yes one pre connected as standard SNMP Remote mai...

Страница 30: ...y depending on their temperature they can function as insulators or conductors It is a one way device because it only transmits the current in a single direction It is generally used to control electr...

Страница 31: ...31 SALICRU...

Страница 32: ...R EGYPT PHILIPPINES NETHERLANDS INDONESIA IRELAND JORDAN KUWAIT MALAYSIA PERU POLAND CZECH REPUBLIC RUSSIA SWEDEN SWITZERLAND THAILAND TUNISIA UAE URUGUAY VENEZUELA VIETNAM REST OF THE WORLD Product r...

Отзывы: