background image


24

4.  Use the mouse to complete the fields and click OK to save changes. 


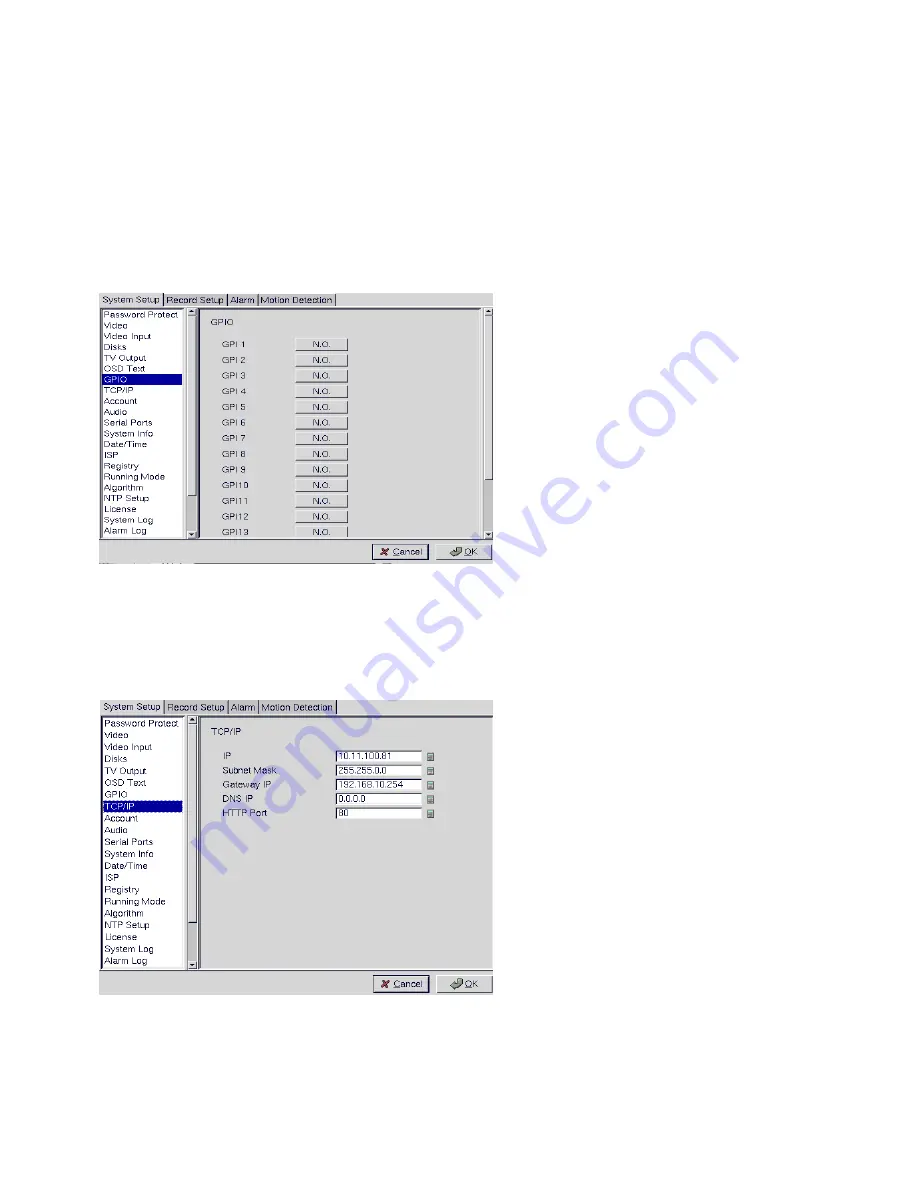
3.15.7  GPIO 

The GPIO (general purpose input output) menu enables you to view the status of the input and output 

devices such as switches, sensors, LEDs, and so on and view their status. These devices can be attached 

to the unit to turn external alarms (outputs) on or off when the specified input changes. When an alarm 

has been triggered, the GPI and GPO that are connected will show the status of the input or output device. 

GPI devices will show NC (normally closed) or NO (normally open) as the status of the switch. 

Depending on the input, you can change the status of the GPO devices to On or Off as required. 


Change the GPO status as needed. Make sure that the devices are working by checking the actual physical 

status of the inputs and outputs after making changes in this menu. 


3.15.8  TCP/IP 

Use the TCP/IP menu to enter TCP/IP address details for the VP-100. 


3.15.9  Account 

Use the Account menu to set up an administrator name and password as well as the super user name and 

passwords. You can also use this menu to set up to 256 additional users, their passwords and their 

permissions on the system. Select the user number and assign a Name and password to it. Click the PTZ, 

Содержание VP-100

Страница 1: ...User Manual Version 2 0 Introduction Installation Graphic User Interface GUI Configuration Operation Via IR Advance Network Appendix...

Страница 2: ...equilateral triangle alerts the user to the presence of a shock hazard within the product s enclosure CE Warning FCC Warning GUARANTEE Every care has been taken in the preparation of this manual if yo...

Страница 3: ...5 POS button 10 3 6 PTZ Control panel 10 3 7 Play button 11 1 play buttons 13 2 Split screen display buttons 13 3 Brightness Contrast Sharpness Digital Zoom in playback 13 4 Status button 14 3 8 Bookm...

Страница 4: ...fault settings 32 3 15 25 Revise firmware 33 3 15 26 Reboot system 33 Record setup 3 16 1 DVR setup 34 3 16 2 Record schedule 34 3 16 3 GPI Trigger 34 3 16 4 Pre Alarm 35 Alarm 3 17 1 Alarm Setup 35 3...

Страница 5: ...Registry server 56 4 3 16 Running mode 57 4 3 17 Algorithm 57 4 3 18 NTP setup 57 4 3 19 License setup 58 4 4 Record Setup 58 4 4 1 DVR setup 58 4 4 2 Record schedule 59 4 4 3 Motion detection 60 4 4...

Страница 6: ...r authority 75 5 6 12 DVR setup 75 5 6 13 Record schedule 76 5 6 14 Motion Detection 76 5 6 15 GPI Trigger Recording 77 5 6 16 Set Pre Alarm 77 5 6 17 Playback 77 5 6 18 Search 78 5 6 19 Send mail 79...

Страница 7: ...ndix A Recommend Motherboard I Appendix B Guide to Revise Firmware of DVR II Appendix C Remote camera control II Appendix D Voice Modem III Appendix E View video by PDA or Cell phone III Appendix F NE...

Страница 8: ...C is ready as a DVR When power up it starts local DVR functions such as monitoring through VGA output and recording to hard disk if it is configured to do that For remote monitoring or access to histo...

Страница 9: ...rt searching function for more user friendly Weight recording Water mark support Modify POS License to three versions Selectable 30 days recorded files auto deletion function Network Neighbor function...

Страница 10: ...r connecting to host PC 3 A VGA or TV monitor for display PC for installing VP100 NOT EVERY PC PLATFORM CAN BE USED FOR VP100 INSTALLTION PLEASE REFER TO MOTHER BOARD SUPPORTING LIST IN APPENDIX PC fo...

Страница 11: ...LAN card on the PC for remote access The VGA LAN cards use on the PC shall both be compatible to the supporting list too Maximum of two hard disk units install on secondary IDE slot is recommended Yo...

Страница 12: ...stall 512MB DDR memory Step 4 Installing VGA Card We recommend VGA cards as in supporting list Please check appendix We carry VGA cards for system integrators Insert the VGA card into the AGP slot Not...

Страница 13: ...w IDE cable to the CD RW and the other end to the primary IDE channel The yellow IDE cable must be used with the VP 100 DVR module and not any generic IDE cable Then attach the power connector from th...

Страница 14: ...ration mode is GUI mode DVR provides a GUI mode with mouse support Be sure to plug in a PS2 mouse at the back of the unit before or when it starts to boot Go to the running mode in the system settings...

Страница 15: ...rd disk size and LAN status Camera status R M Color Recording Mode Gray No video signal Blue No recording Red Full recording G Color Status of each DI and DO device Gray DI or DO not detected Red DI o...

Страница 16: ...nnected to the VP 100 1 First please change to single screen as following 2 Press the set quality button you can see the Brightness Contrast Saturation Hue Quality All control panel Brightness adjusts...

Страница 17: ...rs will change on the GPIO panel when the corresponding GPIO points are activated 3 5 POS button Click the POS button and the screen will show as below 1 Firstly please change to single screen as foll...

Страница 18: ...D menu to control PTZ The button is ok button is cancel Pan and tilt buttons Adjust the pan and tilt of the selected camera include 45 degree directional PTZ control at upper right upper left button r...

Страница 19: ...g file Step1 Select a date from calendar Step2 Select an hour from time line Step3 Select camera to playback Step4 Click anywhere on recording data score bar to start playback from the required point...

Страница 20: ...h split screen is displayed on screen Selectable 4 9 16 split screen display The arrow buttons to cycle through all connected cameras 3 Brightness Contrast Sharpness Digital Zoom in playback When paus...

Страница 21: ...k from that point 3 8 Bookmark User can have bookmarks at the specific time during playback 3 9 Alarm log Any alarm will be written into alarm log including motion trigger GPIO trigger Disk error Vide...

Страница 22: ...2 Using a simple time selector and built in image viewer you can check out the results with the built in viewer Previous Search forward Next Search backward Zoom in The whole Thumbnail search was div...

Страница 23: ...n or a GPI Trigger that occurred within the specified time interval Search by GPI Trigger 1 Rule Selection choose one of GPI 1 16 2 All Time Range Select All Time Range Today Yesterday or User Define...

Страница 24: ...day Yesterday or User Define for quicker searching 2 Click ok to start search motion files in that specific time 3 And then define search area 4 Click ok to start searching motion files in that specif...

Страница 25: ...n of specified text 1 After define POS text select search starting time and camera 2 Search results are as follow Note Click the search result list button to playback the pos data Previous search resu...

Страница 26: ...s you to enable password protection set administrator and user passwords set the auto lock period and lock the system immediately Enabling password protection prevents unwanted users from accessing or...

Страница 27: ...ameters such as the video standard and so on for each of the connected cameras Select the camera from the Camera drop down box and fill in the details in each field as required using mouse Standard se...

Страница 28: ...w the maximum number of connections Max Bandwidth sets the maximum bandwidth in bytes second that can be used by users connecting to the VP 100 over the Internet Max Conn Bandwidth sets the maximum ba...

Страница 29: ...sks that the DVR uses to record data If no disk is connected No Device appears in the Disk Device field Use keyboard or mouse to enter the IP address and Volume of any connected network disk Click on...

Страница 30: ...the display becoming unreadable and very difficult to correct 3 15 6 OSD Text Use the OSD Text menu to assign text for each of the connected cameras For instance you may like to have text saying c1 on...

Страница 31: ...ally closed or NO normally open as the status of the switch Depending on the input you can change the status of the GPO devices to On or Off as required Change the GPO status as needed Make sure that...

Страница 32: ...io Use the Audio menu to set parameters such as Mic Gain Speaker Mic Timeout and Speaker Timeout You can also perform a self test to test if the microphone and speaker are working correctly There are...

Страница 33: ...meters TCP IP properties firmware information and so on on the screen There are no configurable fields on this page Click OK or Cancel to leave the screen 3 15 13 Date Time Use the Date Time menu to s...

Страница 34: ...rnet Service Provider 3 15 15 Registry The Registry menu enables you to set up the registry server for your device If you are using a dynamic IP address for the VP 100 you can set up the device to pos...

Страница 35: ...ch between Network Mode and ISP Mode and between Mouse Mode and IR Remote Control Mode 3 15 17 Algorithm H 263 frame size is small and suitable for Network surveillance MPEG4 Video quality good and fr...

Страница 36: ...ou don t need to key in the license number again in the license setup menu 2 There are three POS License to three levels Level 1 Single POS unit Can connect ONLY one cash register Single POS only one...

Страница 37: ...can try to send out some data from POS machine then POS text should show up with video 3 15 20 Network Neighbor User can copy the recorded files of VP 100 to other PC through network neighbor 1 Enabl...

Страница 38: ...or restore system record alarm and motion detection setup data Backup configuration data 1 Connect a USB flash to DVR for backup or restore configuration data DVR will auto detect flash 2 Select back...

Страница 39: ...enu to ask you to over write data Select ok to start to restore configuration data 4 When restore data action was done system will ask you to reboot DVR Press ok to reboot DVR 5 After restart DVR user...

Страница 40: ...rrent settings 3 15 25 Revise firmware Use the Revise Firmware menu to upgrade the VP 100 firmware Click Revise Firmware Yes No to start the firmware upgrade process Click Cancel or No to abort the at...

Страница 41: ...the oldest records Click OK to save changes 3 16 2 Record schedule Use the Record Schedule menu under the Record Setup tab to set up automatic recording schedules for each camera and audio You can set...

Страница 42: ...to determine how many frames are record before an alarm event occurs Each camera can be set separately and you can record up to 300 frames Alarm 3 17 1 Alarm setup Use the Alarm Setup menu under the...

Страница 43: ...rial port setup menu Make sure that a voice modem is enabled in device field in the Serial Ports menu item in order to place voice calls Voice call features A voice call message can be recorded using...

Страница 44: ...xt data from POS machine 6 Beep beeps when the event was occurred 7 E mail sends e mail to the specified address when the event was occurred 8 Voice call dial a voice call to the specified number when...

Страница 45: ...al over which the GPI is monitored for an alarm to be generated For the Voice Call option specify two telephone numbers where the call may be placed along with the voice file For the E mail option spe...

Страница 46: ...ce is insufficient to record data This alarm is generated only when the DVR mode is set to Auto Stop You can set up the alarm through a message beep voice call video popup or E mail Use the keyboard o...

Страница 47: ...save changes 3 17 7 POS event Select the POS event function and start to sep up reaction when receiving the text data from POS machine You can set up the alarm through a beep a voice call or E mail 3...

Страница 48: ...Sensitivity Select motion sensitivity level 4 Directly drag the square on the screen to a desired location for Motion Detection Each small square on the displayed grid can be set to detect motion Use...

Страница 49: ...reen Use the Up and Down arrow buttons to select one of the four options and press OK button to confirm your choice 4 3 System setup The System Setup menu enables you to change many different paramete...

Страница 50: ...ord User Pass sets the user password Auto lock After enables password protection after the specified time interval Lock Now enables password protection immediately To set the user or admin password 1...

Страница 51: ...he system immediately 1 Highlight the Lock Now Function in the Password Protect menu 2 Use the Left or Right arrow buttons to confirm the operation 4 3 2 Video Use the Video menu to set all the video...

Страница 52: ...m connections Dimension sets 320x240 or 640x480 resolution for each camera Water Mark Sets water mark on the video image Local Display enables viewing the selected camera video signal on the local dis...

Страница 53: ...view of the subject FOCUS adjust the focus of the camera Speed Adjust the speed of the selected PTZ camera Pan and tilt Adjust the pan and tilt of the selected camera 4 3 3 Video input This function...

Страница 54: ...he Test option 2 Press the OK button to confirm the choice The test result will appear on the screen To save disk parameters 1 Use the Up and Down arrow buttons on the remote control to highlight the...

Страница 55: ...g the value of Y moves the text down the screen Increasing the value of X moves the text to the right To alter the text position 1 Use the Up and Down arrow buttons on the remote control to highlight...

Страница 56: ...soft Windows network neighbor Then user can copy files in that directory to PC or do remote back up automatically if user has the proper software installed on the PC Note when you setup server name an...

Страница 57: ...ol to display the on screen keyboard 4 Use the Arrow buttons to select the letters you require and the OK button to confirm 5 When the field is correct press the Key Pad button to turn off the on scre...

Страница 58: ...ich camera mapping to which audio channels Audio1 is the audio input from motherboard The other audio inputs are from video capture card Note Make sure that audio is enabled when recording signals fro...

Страница 59: ...tions for that field 3 Press the OK button when the field is set correctly Note 1 You can use the Prev Page and Next Page buttons on the remote control to toggle between the COM1 menu and COM2 menu 2...

Страница 60: ...ted you can set the alarm notification through a beep a message a video popup voice call or E mail The Alarm menu has the following submenus E Mail enables you to set up an E mail address and verify i...

Страница 61: ...e Voice Call options enable you to set up a voice modem that will make a call when the selected event such as a GPI or motion alarm or video lost from a camera occurs You must install a voice fax mode...

Страница 62: ...0 when an event occurs The following options are available Video Lost generates an alarm when the video from the selected camera is not available Disk Space Low generates an alarm when the disk space...

Страница 63: ...ns to select a field to change 2 Press the Right arrow button to confirm 3 Press the Key Pad button on the remote control to display the on screen keyboard 4 Use the Arrow buttons to select letters an...

Страница 64: ...the Algorithm menu 2 Use the Right and Left arrow buttons to toggle the available options 3 Press the OK button when the fields are set correctly 4 3 18 NTP setup Use the NTP Network Time Protocol Set...

Страница 65: ...tup menu Use the License menu to key in the license number There are three POS License to three levels Level 1 Single POS unit Can connect ONLY one cash register Single POS only one cash register This...

Страница 66: ...rol 2 Use the Left and Right buttons to select either Cyclic Recording or Auto Stop 3 Press the OK button to save changes 4 4 2 Record schedule You can set up to 16 record schedules that automatically...

Страница 67: ...the Motion Detection option from the Alarm menu and press the OK button 2 When the motion detection menu appears uses the Up and Down Arrow buttons to select one of the following options Enable confi...

Страница 68: ...tails if you want an E mail to be sent when an alarm occurs 4 4 4 GPI Trigger Use the GPI Trigger function to enable recording video from specified cameras when triggered by an external alarm GPI conn...

Страница 69: ...the Up and Down arrow buttons to select a recording to play back The alarm condition which caused the file to be recorded is indicated in the list For instance in the screen shot shown here the letter...

Страница 70: ...the next motion detection or alarm trigger event press the Right Left arrow buttons Motion Detection The yellow bars represent where motion detection was set off Searching for a file The VP 100 playb...

Страница 71: ...the Up or Down arrows 5 Modify the settings as required using the Left and Right arrow buttons Note If you select the Search by Event option choose an event from GPI 1 16 If you choose the Select by T...

Страница 72: ...VP 100 will begin to collect data as soon as the above screens are displayed When the required data has been collected the backup can begin 4 6 System Maintenance Press the Menu button on the remote...

Страница 73: ...of the searching way user can see the log and press ok button to enter submenu to get more detail information of log 4 6 2 System log Any operation will be written into system log include local operat...

Страница 74: ...buttons to select either Backup or Restore Configuration 4 6 5 Revise firmware Use the Revise Firmware option to upgrade the firmware in the VP 100 The firmware can be revised through an external read...

Страница 75: ...twork running mode To access the VP 100 from remote browser 1 Open a browser window on a terminal that has network access to the VP 100 2 Type the IP address of the VP 100 in the browser address bar T...

Страница 76: ...he Surveillance Screen Panel is very similar to the one on the local GUI See Surveillance screen panel on page 8 There is no Sequence button on the network GUI This feature is only available on the lo...

Страница 77: ...and date in the From field and clicking Play file on this time Search for files between particular times and dates by entering the dates in the To and From fields and clicking Query 5 5 PTZ panel The...

Страница 78: ...nformation page No information on this page is changeable 5 6 2 Camera setting Use the Camera Setting page to change the video settings for each of the connected cameras Refer to Video on page 20 for...

Страница 79: ...ne which audio mapping to which camera Audio1 is audio input from motherboard Other audio inputs are from video capture cards Audio out is from motherboard 5 6 4 Set time and date Use the Set Time and...

Страница 80: ...Configuration page to set the following parameters for the VP 100 Running mode sets the operation and control mode TCP IP setting configures TCP IP Fill in the IP address and subnet mask settings ISP...

Страница 81: ...serial Ports menu to set the following parameters Click the Done button to save the new settings 5 6 9 Alarm and remote control GPI devices will show NC normally closed or NO normally open as the sta...

Страница 82: ...t appears on the display for each camera 5 6 11 Set user s authority Use the Set User s Authority page to set the individual privileges of up to 256 users Enter the user number in the User field Assig...

Страница 83: ...ed Enable Audio if you want to record audio also Weight recording is setting special recording frame rate when an alarm of one of camera was triggered Select a Frame Rate of recording for each camera...

Страница 84: ...the new setting 5 6 16 Set Pre Alarm The Set Pre Alarm page on the network GUI enables you to set the number of frames that are recorded from each camera before a trigger is generated Up to 300 frames...

Страница 85: ...local disk Select Data Motion or GPI to view the status of the recorded file and the instances where the recording was triggered by motion detection or GPI Note The playback start time can be changed...

Страница 86: ...s subject and content of the E mail Enable a snapshot of the camera video to be attached to the E mail by selecting cameras in the Snapshot option Under the Global Settings fill in the mail server det...

Страница 87: ...video to be uploaded by selecting cameras in the Snapshot option 5 6 21 Alarm log Any alarm will be written into alarm log including motion trigger GPIO trigger Disk error Video loss POS event etc Use...

Страница 88: ...25 View video without plug ins You can view video even if the machine you are working on does not have the plug ins necessary for video monitoring Click the View Video Without Plug ins link to view t...

Страница 89: ...a applet to display the video 6 2 Configuring Static IP addresses Static IP addresses can be public or private Public IP addresses allow access to the DVR from the Internet Private IP addresses only a...

Страница 90: ...oes not support PPPoE Regardless of whether you use a static IP address or a dynamic IP address you will need to set the DHCP server IP address and IP forwarding but if you use a static IP address you...

Страница 91: ...nternet by using a dialup modem The DVR must be working under Network mode 1 Connect a dial up modem and phone line to the DVR COM1 port 2 Set COM1 to modem device in the DVR system menu 3 On the remo...

Страница 92: ...upport TV OUT PCI Express VGA Cards nVidia Geforce NX62 00 NX6600 mouse mode only ATI X300SE VGA Monitor only Motherboard Socket 478 Motherboards M B Motherboard Brand Model Chipset Asus P4P800 SE Int...

Страница 93: ...and Internet browsers are transparent to both configurations VP 201 and VP 202 are considered as external devices to DVR Remote Camera Control using VP 201 and VP 202 If you are using traditional CCT...

Страница 94: ...ice Max Communication Protocol V 90 V 92 Communication Buses RS 232 Serial Appendix E View video by PDA or Cell phone User can get the DVR video by typing the IP address http DVR IP pdamain htm on the...

Страница 95: ...r one device is VP 204Q NET I O device for connecting four cash registers at the same time If you hope sixteen cash registers to connect to one DVR you need sixteen VP 204 devices or four VP 204Q devi...

Страница 96: ...u wish POS transaction data to integrate with Select Rescan option and select ok button to redetect NET I O device again to make sure your setting is correct DVR will reboot after setting up and exit...

Страница 97: ...ot access DVR from browser 1 Verify network cable is well connected to hub and the network is good 2 Make sure you are using IP in the same subnet of DVRN 3 Clear the ARP list 4 If you are running MS...

Страница 98: ...se video MIME types video x nficwmh263 and video x nficwmhjpeg of DVR to be granted by your firewall or proxy server Also check if they allow large data transmission 2 Disable proxy server settings of...

Отзывы: