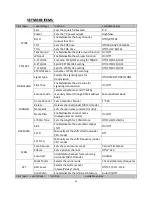
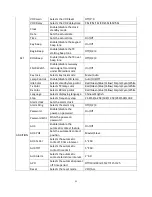
SainSonic RST599 Скачать руководство пользователя страница 34


29 


into  second-layer  menu.  Press 

  key  to  select  item  “Alarm  Clock”, 

press 

[MENU]

  to  enter.  Use 

  key  select  the  one  of  the  three  alarm 

clock. Press 

[MENU]

 to enter into alarm clock setting. Press [# A/B] key to go to 

different setting items After all the settings are completed, press 

[MENU]

 key to 

confirm and exit. 


Alarm ring selecting 

The alarm ring can be set as OFF/1/2/3.   
OFF: No alarm ring will sound to indicate the alarm clock. 
1/2/3: Different rings are selective, and will sound the ring to indicate the alarm 
clock. 
Press 

[MENU]

 key, then press 

[MENU]

 again to enter into first-layer menu. Press 

  key to select group “ADDITION”, press 

[MENU]

 to confirm and enter 

into second-layer menu. Press 

  key to select item “Alarm Ring”, press 

[MENU]

 to enter into parameter setting. Use 

  key select the desired 

alarm ring. Press 

[MENU]

 to confirm and exit. 


Power-on password setting (Password) 

Power-on password  can be  set for this  transceiver.  If  it  is turned  on,  when  you 
power on the transceiver, a password of 6 digits is required before you  get into 
the transceiver. Enter the 6-digit password and press 

[MENU]

 to confirm and get 

into the transceiver. 
To disable the password, turn this function off. 
Press 

[MENU]

 key, then press 

[MENU]

 again to enter into first-layer menu. Press 

  key to select group “ADDITION”, press 

[MENU]

 to confirm and enter 

into  second-layer  menu.  Press 

  key  to  select  item  “Password”,  press 

[MENU]

  to  enter  into  parameter  setting.  Use 

  key  select  ON/OFF. 

Press 

[MENU]

 to confirm and exit. 


Power-on password editing   

There are 6 digits for the power-on password, which can be set by the numeric 
keys. 
Press 

[MENU]

 key, then press 

[MENU]

 again to enter into first-layer menu. Press 

  key to select group “ADDITION”, press 

[MENU]

 to confirm and enter 

into  second-layer  menu.  Press 

  key  to  select  item  “Password  Edit”, 

press 

[MENU]

  to  enter.  Use  numeric  keys  to  select  the  desired  numbers  to 

compose  the  password.  Press  [#  A/B]  key  to  delete  current  digit  and  go  to  last 
digit. After the password editing is completed, press 

[MENU]

 to confirm and exit. 


Automatic contact feature (AUC) 

This  transceiver  provides  a  characteristic  Automatic  Contact  feature  which  will 
help  you  identify whether  you are out  of  the  communication  range  or  not,  and 
alert you to return to areas within the communication range. 
Set  a  transceiver  as  “Master”,  the  other  transceivers  as  “Slave”.  The  “Mater” 

Содержание RST599

Страница 1: ...purchase of this transceiver and encourage you to read this manual thoroughly so as to learn about the many exciting features of your exciting new handheld transceiver This transceiver is innovative i...

Страница 2: ...FCC Warning RF Exposure Compliance and Control Guidelines and Operating Instructions To control your exposure and ensure compliance with the occupational controlled dhere to the following procedures G...

Страница 3: ...njury Do not attempt to disassemble the radio maintenance work should be done by technical expert only To avoid troubles caused by electromagnetic interference or electromagnetic compatibility please...

Страница 4: ...ual repeater shift CTCSS DCS setting CTCSS DCS code display when TX CTCSS DCS scanning Priority channel scanning Power on password setting 7 backlight colors selective Time Date setting displaying Ala...

Страница 5: ...TTERY 6 Charger 7 Optional charging way 7 FUNCTIONS AND OPERATION 8 GETTING FAMILIAR 9 LCD display 9 Radio illustration 11 KEYPAD FUNCTIONS 12 SHORTCUT MENU 13 FULL MENU ITEMS 14 DETAILED MENU ITEMS D...

Страница 6: ...items listed in the following table If any item is missing or damaged during shipment pls contact your local dealer immediately Standard accessories Optional accessories are available upon need Consul...

Страница 7: ...battery to the radio until it is well connected then push up the battery buckle and a click tone is heard the battery is installed To remove battery first make sure the radio is shut off Pull up the b...

Страница 8: ...rt the threaded end of the antenna into the large threaded hole reserved in the top of your walkie talkie and turn the antenna clockwise until it is fully tightened Turn the antenna counterclockwise t...

Страница 9: ...clip with the battery slot parallelly pushing into it until a click sound is heard the belt clip is installed To remover belt clip hold down the activate snap of it with one hand and lift up the bele...

Страница 10: ...5 Connecting to Optional Earphones Open the earphone cap from the top right Corner to expose earphone jack and insert the earphone plug into the jacket for normal use...

Страница 11: ...lowed but in theism case the walkie talkie must be shut off to ensure efficient charging Do not leave your walkie talkie and battery on the charger when not charging the battery Continuous charging wi...

Страница 12: ...lkie is in good contact with the charger The indicator light turns red when the charger starts charging and turns green when the battery is full Optional charging way Remove the wall charger On the si...

Страница 13: ...8 FUNCTIONS AND OPERATION We encourage you to read this section as thoroughly as possible so you ll get the most out of this fantastic new transceiver Now let s get operating...

Страница 14: ...gs which display on LCD Rx signal strength power meter Keypad lock Alarm clock Signaling CTCSS activated DCS activated VOX VOX function activated FM FM radio activated R Reverse frequency activated A...

Страница 15: ...10 23 59 Time display Current frequency display Channel number...

Страница 16: ...11 Radio illustration...

Страница 17: ...Squelch setting No action Frequency step setting No action Switches to the Home channel favorite frequency No action Select signaling type No action Transmits signaling call No action Reverses the tx...

Страница 18: ...13 SHORTCUT MENU Press MENU key it provides a Shortcut menu item setup You can input the numeric keys 0 9 to get the corresponding shortcut menu items as shown in the above table...

Страница 19: ...roups Therefore you will see a First layer menu and a Second layer menu When you need any specific menu item you can go to the corresponding first layer and second layer menu and find it easily Press...

Страница 20: ...Alarm Clock TOT Batt Saver Alarm Ring TOA A B Watch Password Talk around VOX Delay Password Edit Whisper Clock AUC CTC DCS C CTC DCS Date AUC POS R CTC DCS Time AUC TxPer T CTC DCS Key beep AUC TOT C...

Страница 21: ...ls on this transceiver They are High Mid Low The exact power output may vary somewhat depending on the voltage supplied to the transceiver Press MENU key then press MENU again to enter into first laye...

Страница 22: ...o second layer menu Press key to select item TOA press MENU to enter into parameter setting Use key to set the TOA time Press MENU to confirm and exit Talk Around When talk around function is activate...

Страница 23: ...press MENU again to enter into first layer menu Press key to select group CTC DCS press MENU to confirm and enter into second layer menu Press key to select item T CTC DCS press MENU to enter into par...

Страница 24: ...PTT key to transmit DTMF decode If the signaling for the RX frequency or channel is set as DTMF and the transceiver s self ID has also been set via software when a signal is received the DTMF code wil...

Страница 25: ...to select item Home Channel press MENU to enter into parameter setting Use key to select the desired channel then press MENU to fix it as Home channel and exit To activate the Home channel press short...

Страница 26: ...up REPEATER press MENU to confirm and enter into second layer menu Press key to select item 1750Hz Tone press MENU to enter into parameter setting Use key to select OFF 1s 2s 3s 4s 5s Press MENU to co...

Страница 27: ...lower than RX frequency this called negative direction Manual repeater shift frequency setting SFT Freq It works only under frequency VFO mode Similar to the shift direction the repeater shift frequen...

Страница 28: ...the desired priority channel Press MENU to confirm and exit Scan channel adding deleting Scan Add This function only works in Channel VFO mode or Memory mode You can add or delete any channel from the...

Страница 29: ...rs to the auto switch of the TX arrow upon receipt of signal It works like this ON The TX arrow will automatically switch to the A or B frequency which has a coming in signal and will stay on that You...

Страница 30: ...xit Clock Time Date displaying standby When the transceiver is in standby mode it also provides the Clock displaying when the Clock function is turned on If there is no operation for more than 20 seco...

Страница 31: ...key to transmit the transceiver will sound the beep tone to prompt transmission starting You can talk to transmit after the Begin Beep tone is over If this feature is turned OFF it will not sound bee...

Страница 32: ...it Auto Auto lock is turned on After 30 seconds without any operation the keypad will automatically be locked Press 7 key to unlock keypad Manu Keypad can only be locked manually by hand Press 7 key t...

Страница 33: ...ing language are Chinese English We can also change the displaying language to other different languages as per the dealers needs For more details pls contact with us Press MENU key then press MENU ag...

Страница 34: ...word and press MENU to confirm and get into the transceiver To disable the password turn this function off Press MENU key then press MENU again to enter into first layer menu Press key to select group...

Страница 35: ...ss MENU to enter Press key to select MASTER SLAVE Press MENU to confirm and exit Automatic contact transmitting time interval AUC TxPer This feature is only for the MASTER transceiver It is to set the...

Страница 36: ...reset period of time within which there has been no operation to the transceiver The available selections for the time before power off are 10m 20m 30m 1h 2h 12h as well as APO OFF Press MENU key then...

Страница 37: ...r FM radio mode press MENU key to enter setting mode press key to select item SAVE press MENU to enter setting then press key to select the desired channel among 1 20 for storing the FM radio station...

Страница 38: ...old side key PF2 to activate emergency alarm call Press PTT key or side key PF2 to stop it IP 67 waterproof Adopting the waterproof gasket and waterproof structure the transceiver can reach IP67 water...

Страница 39: ...n On Off Encode Mode Selects whether to send DTMF by manually dial or through DTMF address book Manu Address Book CHANNEL Home Channel Sets a favorite channel 1 240 Delete Deletes channels under MR CH...

Страница 40: ...Color Selects TX lamp color Red Green Blue Yellow Purple Cyan White Rx Color Selects RX lamp color Red Green Blue Yellow Purple Cyan White Language Selects displaying language Chinese English Step Se...

Страница 41: ...36 QT DQT sheet...

Страница 42: ...use of the product 2 Any defect or damaged caused but incorrect use accidents water spillage or negligence of the user 3 Ant defect or damaged caused incorrect test operation maintenance assembly refi...

Отзывы: