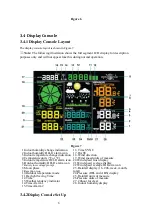
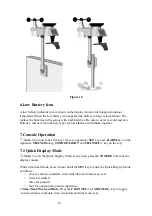
Sainlogic FT0835 Скачать руководство пользователя страница 15

15 


2.

Rainfall. 

Press the 

C

 or 

MIN/MAX/- 

key to toggle between 1h, 24h, week, 

month and total. 


To clear the total rain, press the 

C

 or 

MIN/MAX/- 

button until total rain is 

displayed. The total rain will flash. Press and hold the 

SET 

button for three seconds until 

total rain reads 0.0. 

3.

Absolute Pressure and Relative Pressure. 

Press the 

C

 or MIN/MAX

/-

 key 

to toggle between absolute pressure and relative pressure. 

4.Outdoor dew point .

Press the 

C

 or 

MIN/MAX/-

 key to toggle between 

temperature, dew point and feels like


7.2 Set (Program) Mode 

While in Normal Mode, Press

 and hold 

the 

SET

 key for at least three seconds to enter the 

Set Mode. The first setting will begin flashing. You can press the 

SET

 key again to skip 

any step, as defined below.  

Note:

 In the Set mode, press the [+] key or [

-

] key to change or scroll the value. Hold 

the [+] key or [

-

] key for three seconds to increase/decrease rapidly.   

Note: 

To exit the Set mode at any time, press the 

SNOOZE

 button of the display 

console. 
1.


12/24 Hour Format (default: 24h):

.Press the 

SET

 key again to adjust the 12/24 hour 

format setting (FMT). Press the [+] key or [

-

] key to change between 12 hour and 24 

hour format. 

2.


Change Hour. 

press the 

SET

 key again to set the hour. Press the [+] key or 

[-]

key to 

adjust the hour up or down. Note the PM icon is present during afternoon hours. 

3.


Change Minute. 

Press the 

SET 

key again to set the minute. Press the [+] key or [

-

] key 

to adjust the minute up or down. 

4.


Date Format (default: MM-DD): Press 

the 

SET

 key again to enter the day/month 

format mode. Press the [+] key to switch between 

M-D, D-M

.


5.


Change Month. 

Press the 

SET

 key again to set the calendar month. Press the [+] key 

or [

-

] key to adjust the calendar month.  

6.


Change Day. 

Press the 

SET

 key again to set the calendar day. Press the [+] key or [

-

key to adjust the calendar day.  

7.


Change Year. Press

 the 

SET

 key again to set the calendar year. Press the [+] key or 

[

-

] key to adjust the calendar year.  

8.


Max/Min Clearing (default: ON)

. Press the 

SET

 key again to set the max/min 

clearing mode (CLR).  The Max/Min can be programmed to clear daily (at midnight) or 
manually. Press the [+] key or [

-

] key to switch between “Clears 24h” and Clears 

Manually. 

9.


Temperature Units of Measure (default: 

°C

):

. Press the 

SET

 key again to change the 

temperature units of measure (the 

UNITSET

 icon will be displayed). Press the [+] key 

or [

-

] key to switch between °F and °C units of measure. 

10.


Barometric Pressure Display Units(default: hPa)

. Press the 

SET 

key again to 

change the pressure units of measure. Press the [+] key or [

-

] key to toggle the pressure 

units between mmHg, inHg or hPa. 

11.


Pressure Threshold Setting (default level 2)

. Press the 

SET

 key again adjust the 

Pressure threshold setting. Press [+] key or [

-

] key to adjust the pressure threshold 

setting up or down. 

12.


Weather Forecast Icon Setting (default: partly cloudy)

. Press the 

SET

 key again to 

set the weather forecast icon initial conditions (based on the current weather 
conditions). Press the [+] key or [

-

] key to toggle weather icons between sunny, partly 

cloudy, cloudy, or rainy. 

Содержание FT0835

Страница 1: ...in a storm Warning Installing your weather station in an elevated location may result in injury or death Safety goes first Make sure your setup and preparation is secure and take no risks 3 Getting St...

Страница 2: ...pole insert Dimensions 84x 152 x 216mm 1 Mounting Bracket Back Plate pole mount Dimensions 76 x 102 x 38mm 1 Mounting Pole Dimensions 76 x 76 x 25mm 2 Pole mounting nuts M3 bolts 3 4 Pole mounting nut...

Страница 3: ...table Wrench Hammer and nail for Foot Mounting 3 3 Sensor Assembly Set Up The following illustration shows the full segment for Thermo Hygrometer WIND and RAIN transmitter purposes only as shown in Fi...

Страница 4: ...4 Figure 3 Remove the battery door on the back of the sensor by removing the set screw as shown in Figure 4 Figure 4 Inserting 3xAA batteries in the battery compartment as show in Figure 5...

Страница 5: ...does not charge the batteries so rechargeable batteries are not needed or recommended Note We recommend installing Lithium AA batteries for sensors The sensor LED indicator will light for 3 seconds an...

Страница 6: ...mperature HI LO alarm icon 6 Outdoor humidity HI LO alarm icon 7 Battery low voltage prompt 8 Moon phase 9 Reception icon 10 Outdoor temperature mode 11 Daylight Saving Time 12 Time 13 Weather tendenc...

Страница 7: ...r contrast is best from a slightly elevated viewing angle Figure 8 Replace the battery door and fold out the desk stand and place the console in the upright position The unit will instantly display in...

Страница 8: ...DC jack on the left as shown in Figure 10 Figure 10 2 Insert the DC plug correctly as shown in Figure 11 Figure 11 3 If you want to put it on a table or cabinet opened the desk stand and turn the DC p...

Страница 9: ...d hear a clicking sound within the rain gauge Verify the rain reading on the display console is not reading 0 00 Each click represents 0 3mm of rainfall 2 Verify proper operating of the wind speed Rot...

Страница 10: ...ere are no interfering obstacles such as buildings trees vehicles high voltage lines Wireless signals will not penetrate metal buildings Most applications will only reach 30m due to building obstructi...

Страница 11: ...e only Step 1 There is a S indicator on the wind vane that indicates South as shown in Figure 14 Align this S marker in the direction of South Step 2 Console operation is set to Northern Hemispheres N...

Страница 12: ...rth Step 2 Console operation is set to Southern Hemispheres SOU in the time area in Location division Note Console has to be location division setting so that the directions on the sensor are matching...

Страница 13: ...13 Figure 15 Tighten the mounting pole to your mounting pole purchased separately with the four 5 Bolts and M5 Nuts assembly or fix on the wall with four tapping screw as shown in Figure16...

Страница 14: ...has five keys for easy operation SET key and ALARM key on the right side MIN MAX key SNOOZE LIGHT and CHANNEL key on the top 7 1 Quick Display Mode Note To exit the Quick Display Mode at any time pre...

Страница 15: ...or key to adjust the minute up or down 4 Date Format default MM DD Press the SET key again to enter the day month format mode Press the key to switch between M D D M 5 Change Month Press the SET key...

Страница 16: ...re and humidity maximum values The maximum values will now display the current values Press the MIN MAX key again do not hold and the MIN icon will be displayed Press the SET key to view pressure ABS...

Страница 17: ...els Like Temperature Outdoor Dew Point Hourly Rainfall 24 Hour Rainfall Absolute Pressure Relative Pressure Indoor Temperature Indoor Humidity 8 1 Alarm Operation When an alarm condition is exceeded t...

Страница 18: ...ew point low alarm 15 Rainfall 1h high alarm 16 Rainfall 24h high alarm 17 Absolute pressure high alarm ABS 18 Absolute pressure low alarm ABS 19 Absolute pressure high alarm REL 20 Absolute pressure...

Страница 19: ...loudy to rain The weather forecast is an estimation or generalization of weather changes in the next 24 to 48 hours and varies from location to location The tendency is simply a tool for projecting we...

Страница 20: ...alling and the previous condition is cloudy 9 3 Moon Phase The following moon phases are displayed based on the calendar date Figure 52 9 4 Pressure Threshold Setting The pressure threshold the negati...

Страница 21: ...here the air pressure is typically stagnant 9 5 Feels Like Temperature Feels like temperature is a combination of Heat Index and Wind Chill At temperatures less than 4 4C 40 F the wind chill is displa...

Страница 22: ...Humidity 10 to 99 5 only guaranteed between 20 to 90 1 Rain 0 to 9999mm 15mm 1 mm 15mm to 9999mm 7 1000mm 0 3mm 1000mm 1mm Wind Direction 0 360 45 8 point compass 45 8 point compass Wind Speed 0 to 50...

Страница 23: ...ain gauge and wind transmitter once every 3 months Unscrew the rain collector funnel by turning it 30 counter clockwise Gently remove the rain collector funnel Clean and remove any debris or insects I...

Страница 24: ...nvironments install lithium batteries Make sure the remote sensors are not transmitting through solid metal acts as an RF shield or earth barrier down a hill Move the display console around electrical...

Отзывы: