


Settings · Configure Paper Settings
41
EN
CONFIGURE PAPER SETTINGS
Modifying the Basic Settings
SET PAPER WEIGHT
1 Press
OK
,
201
and
OK
.
2 Using
[
select the weight of the inserted paper.
3 Confirm with
OK
.
SET PAPER SOURCE
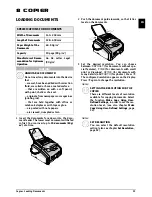
Introduction
You can insert normal printing paper or printed doc-
uments (forms) into the paper tray. You can insert
special paper formats, envelopes, slides, sheets of
labels or printed documents into the manual paper
feed.
1 Press
OK
,
202
and
OK
.
2 Using
[
select the paper source.
3 Confirm with
OK
.
Spaltenumbruch
SETTING THE PAPER FORMAT
1 Press
OK
,
203
and
OK
.
2 Using
[
select whether you would like to config-
ure the paper format for the paper tray or whether
you would like to use the manual feed.
3 Confirm with
OK
.
4 Use
[
to select the desired paper format. Follow
the specifications in the technical data.
5 Confirm with
OK
.
SET RESOLUTION
SETTING THE RESOLUTION FOR
SCANNING
1 Press
OK
,
303
and
OK
.
2 Select the desired resolution using
[
:
DRAFT
—Greyscale scan with low resolution, for
instance, for using on the Internet.
TEXT
—Black and white scan with medium resolu-
tion for text documents
GREY
—Greyscale scan with medium resolution
PHOTO
—Greyscale scan with high resolution, for
instance, for photographs
3 Confirm with
OK
.
SET RESOLUTION FOR FAX
TRANSMISSION
1 Press
OK
,
4013
and
OK
.
2 Select the desired resolution using
[
:
DEFAULT
—For documents without special fea-
tures
FINE
—For texts with small print or drawings
SFINE
—For documents with many details
PHOTO
—For photos
3 Confirm with
OK
.
SETTING THE RESOLUTION FOR THE
COPIER
1 Press
OK
,
103
and
OK
.
2 Select the desired resolution using
[
:
AUTO
—Optimised adjustment for all types of doc-
uments
TEXT
—For texts with small print or drawings
QUALITY
—For documents with many details
PHOTO
—For the highest resolution
3 Confirm with
OK
.
SETTING THE CONTRAST
SETTING THE CONTRAST FOR THE
SCANNER
1 Press
OK
,
304
and
OK
.
2 Set the desired contrast using
[
.
-
/
1
—Reduces the contrast / typeface appears
lighter
4
(Factory settings)—Optimized adaptation for all
documents
+
/
7
—Increases the contrast / typeface appears
darker (for example, documents with faint print)
3 Confirm with
OK
.
SET THE CONTRAST FOR FAXES AND
COPYING
1 Press
OK
,
104
and
OK
.
2 Set the desired contrast using
[
.
-
/
1
—Reduces the contrast / typeface appears
lighter
4
(Factory settings)—Optimized adaptation for all
documents
+
/
7
—Increases the contrast / typeface appears
darker (for example, documents with faint print)
3 Confirm with
OK
.
Notice
MODIFYING THE BASIC SETTINGS
The changed settings are stored as new
default settings. If you select a special
function for a one-time process, take care
to restore the default settings or factory
settings after that.