background image

Chapter 3:  Wiring

Firmware – S1043

Revision:  2  (9/98)

52

© Saftronics, Inc.

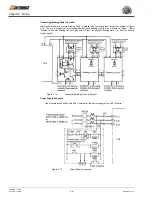
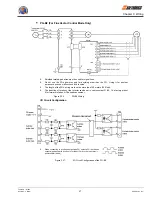
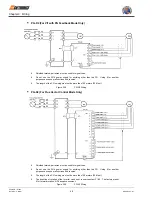
Figure 3.34

PG-X2 Connection Example

Содержание VG52011

Страница 1: ...www saftronics com TECHNICAL MANUAL VG5 REV2 9 98 P N 027 2040 1998 ...

Страница 2: ...l rights reserved No part of this publication may be reproduced stored in a retrieval system or transmitted in any form or by any means mechanical electronic photocopying recording or otherwise without the prior written permission of Saftronics No patent liability is assumed with respect to the use of the information contained herein Moreover because Saftronics is constantly striving to improve it...

Страница 3: ...cate certain types of information for easier reference EXAMPLE Indicates application examples NOTE Indicates important information that should be memorized General Precautions The diagrams in this manual may be indicated without covers or safety shields to show details Be sure to restore covers or shields before operating the units and run the units according to the instructions described in this ...

Страница 4: ...20 Be sure to ground the ground terminal 200 V class Ground to 100 or less 400 V class Ground to 10 or less Otherwise an electric shock or fire can occur 20 Always check the operation of any emergency stop circuits after they are wired Otherwise there is the possibility of injury Wiring is the responsibility of the user 20 Never touch the output terminals directly with your hands or allow the outp...

Страница 5: ...If the alarm is cleared the machine may start moving suddenly Also design the machine so that human safety is ensured even when it is restarted Injury may occur 86 Provide a separate emergency stop switch the Digital Operator STOP key is valid only when the function is set Injury may occur 86 Reset alarms only after confirming that the RUN signal is OFF If an alarm is reset with the RUN signal tur...

Страница 6: ...ormance maintenance or inspections The capacitor will remain charged and is dangerous 276 Maintenance inspection and replacement of parts must be performed only by authorized personnel Remove all metal objects such as watches and rings before starting work Always use grounded tools Failure to heed these warnings can result in electric shock 276 CAUTION Page A CMOS IC is used in the control board H...

Страница 7: ...Saftronics Inc How to Change the Digital Operator Display from Japanese to English If the Digital Operator displays messages in Japanese change to the English mode using the following steps This manual provides descriptions for the English mode ...

Страница 8: ...ion 23 3 4 Wiring Main Circuit Terminals 24 3 4 1 Applicable Wire Sizes and Closed Loop Connectors 24 3 4 2 Main Circuit Terminal Functions 29 3 4 3 Main Circuit Configurations 30 3 4 4 Standard Connection Diagrams 32 3 4 5 Wiring the Main Circuits 33 3 5 Wiring Control Circuit Terminals 39 3 5 1 Wire Sizes and Closed loop Connectors 39 3 5 2 Control Circuit Terminal Functions 40 3 5 3 Control Cir...

Страница 9: ...1 01 E1 02 E2 01 114 6 3 2 V f Pattern Selection E1 03 115 6 4 Flux Vector Control 121 6 4 1 PG Speed Option Card Settings 121 6 4 2 Setting the Zero Speed Operation Constants 124 6 4 3 Auto Tuning 126 6 4 4 Speed Control ASR Structure 128 6 4 5 Speed Control ASR Gain 130 6 5 V f Control with PG 132 6 5 1 Motor Constants E1 01 E1 02 E2 01 E2 04 132 6 5 2 V f Pattern Selection E1 03 133 6 5 3 PG Sp...

Страница 10: ...Direction of the Motor Rotation is Reversed 270 9 2 4 If the Motor Does Not Put Out Torque or If Acceleration is Slow 270 9 2 5 If the Motor Does Not Operate According to Reference 270 9 2 6 If the Slip Compensation Function Has Low Speed Precision 270 9 2 7 If There is Low Speed Control Accuracy at High speed Rotation in Open Loop Vector Control Mode 271 9 2 8 If Motor Deceleration is Slow 271 9 ...

Страница 11: ...ers Belts and Chains 290 12 3 Peripheral Device Application Precautions 291 12 4 Wiring Examples 292 12 4 1 Using a Braking Resistor Unit 292 12 4 2 Using a Braking Unit and a Braking Resistor Unit 293 12 4 3 Using Three Braking Units in Parallel 296 12 4 4 Using a JVOP 95 o 96 o VS Operator 299 12 4 5 Using an Open collector Transistor for Operation Signals 300 12 4 6 Using Open collector contact...

Страница 12: ... of the VG5 Inverter and describes its functions and components 1 1 Outline and Functions 2 1 1 1 VG5 Inverter Models 2 1 1 2 Outline of Control Methods 3 1 1 3 Functions 3 1 2 Nomenclature 6 1 2 1 VG5 Components 6 1 2 2 Digital Operator Components 7 ...

Страница 13: ...0111q 20 15 24 VG52015 Remove the top and bottom covers from the models listed at the right 20151q 25 18 5 30 VG52018 20180q 20181q 30 22 37 VG52022 20220q 20221q 40 30 50 VG52030 20300q 20301q 50 37 61 VG52037 20370q 20371q 60 45 70 VG52045 20450q 20451q 75 55 85 VG52055 20550q 20551q 200 V Class 100 75 110 VG52075 20750q 20751q Immediate delivery Available from factory Manufactured upon order VG...

Страница 14: ...cteristics for each mode are shown in Table 1 2 Table 1 2 Control Method Characteristics Vector Control V f Control Characteristic Open Loop Flux Vector Without PG With PG Feedback Speed Control Range 1 100 1 1000 1 40 1 40 Speed Control Precision 0 2 0 02 2 to 3 0 03 Initial Drive 150 at 1 Hz 150 at 0 r min 150 at 3 Hz 1 1 3 Functions Auto Tuning Auto Tuning is effective for Vector Control It sol...

Страница 15: ...tive with a PG An optional PG Speed Option Card can be used to enable feedback control for speeds thereby improving speed control accuracy Dwell Function By holding the output frequency for a constant time during acceleration and deceleration acceleration and deceleration can be performed without stepping out even when driving a motor with a large startup load Low Noise The output transistor of th...

Страница 16: ...e Modified Constants For referencing or monitoring changed constants after shipment Groups Classified by application Functions Classified by function See user constants Constants Individual user constant settings The VG5 allows the following three access levels to be set in order to further simplify setting user constants An access level is a range of user constants that can be referenced or set Q...

Страница 17: ...and the components and functions of the Digital Operator 1 2 1 VG5 Components The appearance of Inverter and the names of its components are shown in Figure 1 2 Figure 1 2 Appearance of VG5 Model VG520P4 200 V 0 4 kW 0 5HP A 200 V Class Inverter with 0 4 kW Output is shown below with the front cover removed Figure 1 3 Terminal Arrangement ...

Страница 18: ...eration mode FWD Lit when there is a forward run command input REV Lit when there is a reverse run command input SEQ Lit when the run command from the control circuit terminal is enabled REF Lit when the frequency reference from control circuit Terminals 13 and 14 is enabled Data Display Two line LCD that displays data for monitoring user constants and set values with 16 characters per line Keys E...

Страница 19: ...Digital Operator RESET Key Sets the number of digits for user constant settings Also acts as the reset key when a fault has occurred Increment Key Selects menu items groups functions and user constant names and decrements set values Decrement Key Selects menu items groups functions and user constant names and decrements set values DATA ENTER Key Enters menu items functions constants and set values...

Страница 20: ... 2 Exterior and Mounting Dimensions 12 2 3 Checking and Controlling the Installation Site 14 2 3 1 Installation Site 14 2 3 2 Controlling the Ambient Temperature 14 2 3 3 Protecting the Inverter from Foreign Matter 14 2 4 Installation Orientation and Space 15 2 5 Removing Attaching the Digital Operator and Front Cover 16 2 5 1 Inverters of 15 kW or Less 16 2 5 2 Inverters of 18 5 kW or Higher 17 ...

Страница 21: ...oose Use a screwdriver or other tools to check for tightness If you find any irregularities in the above items contact the agency from which you purchased the Inverter or your Saftronics representative immediately 2 1 1 Nameplate Information Example Nameplate Standard domestic Inverter 3 phase 200VAC 0 4 kW IEC IP20 and NEMA 1 standards Inverter Model Numbers INPUT AC 3PH 200 230 V 50Hz 200 230 V ...

Страница 22: ...erter is shielded from the exterior and can thus be mounted to the interior wall of a standard building not necessarily enclosed in a control panel The protective structure conforms to the standards of NEMA 1 in the USA Enclosed Wall Mounted IEC iP20 NEMA 1 1 No 2 4 Voltage Class AC input 3 phase 200 V AC input 3 phase 400 V No 0P4 0P7 to 075 Max Motor Capacity 0 75 kW to 75 kW P indicates the dec...

Страница 23: ...rter Remove the top and bottom covers when mounting 200 V 400 V class Inverters of 15 kW or lower in a control panel 200 V 400 V Class Inverters of 18 5 kW and Higher The following diagram shows a 200 V class 18 5 kW Inverter Mounting Dimensions for 400 V Class Inverters of 185 to 300 kW W5 W6 W4 W3 W2 W1 Max Applicable Motor Capacity kW W1 W2 W4 W3 W5 W6 185 220 300 750 440 310 850 285 565 750 44...

Страница 24: ... 160 126 266 7 0 3 140 280 160 126 266 7 0 3 M5 1 5 4 4 2 2 3 7 140 280 180 126 266 7 0 4 5 140 280 180 126 266 7 0 4 5 M5 5 5 7 5 200 300 205 186 285 8 0 6 200 300 205 186 285 8 0 6 M6 11 15 250 380 225 236 365 7 5 11 250 380 225 236 365 7 5 11 M6 Option 18 5 29 32 22 325 450 285 275 435 7 5 31 330 610 285 275 435 87 5 34 M6 30 37 785 87 5 45 325 625 285 275 610 7 5 44 330 850 285 275 610 152 5 4...

Страница 25: ... less in a panel Install the Inverter in a clean location free from oil mist and dust It can be installed in a totally enclosed panel that is completely shielded from floating dust When installing or operating the Inverter always take special care so that metal powder oil water or other foreign matter does not get into the Inverter Do no install the Inverter on combustible material such as wood In...

Страница 26: ... heat dissipation Figure 2 1 VG5 Installation Orientation and Space NOTE The same space is required horizontally and vertically for both open chassis IP00 and enclosed wall mounted IP20 NEMA 1 Inverters Always remove the protection covers before installing a 200 or 400 V class Inverter with an output of 15 kW or less in a panel Always provide enough space for suspension eyebolts and the main circu...

Страница 27: ...arrow 2 to remove the Digital Operator as shown in the following illustration Figure 2 2 Removing the Digital Operator Removing the Front Cover Press the left and right sides of the front cover in the directions of arrows 1 and lift the bottom of the cover in the direction of arrow 2 to remove the front cover as shown in the following illustration Figure 2 3 Removing the Front Cover Mounting the F...

Страница 28: ...cover using methods other then those described above otherwise the Inverter may break or malfunction due to imperfect contact Never attach the front cover to the Inverter with the Digital Operator attached to the front cover Imperfect contact can result Always attach the front cover to the Inverter itself first and then attach the Digital Operator to the front cover 2 5 2 Inverters of 18 5 kW or H...

Страница 29: ...3 4 3 Main Circuit Configurations 30 3 4 4 Standard Connection Diagrams 32 3 4 5 Wiring the Main Circuits 33 3 5 Wiring Control Circuit Terminals 39 3 5 1 Wire Sizes and Closed Loop Connectors 39 3 5 2 Control Circuit Terminal Functions 40 3 5 3 Control Circuit Terminal Connections All Models 41 3 5 4 Control Circuit Wiring Precautions 42 3 6 Wiring Check 42 3 7 Installing and Wiring PG Speed Opti...

Страница 30: ...to be sure that the voltage of the main AC power supply satisfies the rated voltage of the Inverter Injury or fire can occur if the voltage is not correct Do not perform voltage withstand tests on the Inverter Otherwise semiconductor elements and other devices can be damaged Connect braking resistors Braking Resistor Units and Braking Units as shown in the I O wiring examples Otherwise a fire can ...

Страница 31: ...Connections to Peripheral Devices Examples of connections between the VG5 and typical peripheral devices are shown in Figure 3 1 Use this illustration to gain an understanding of the overall equipment configuration Figure 3 1 Example Connections to Peripheral Devices VG5 ...

Страница 32: ... 22 Saftronics Inc 3 2 Connection Diagram The connection diagram of the VG5 is shown in Figure 3 2 When using the Digital Operator the motor can be operated by wiring only the main circuits Figure 3 2 Connection Diagram Model VG527P5 shown above VG5 ...

Страница 33: ...alog outputs to the control system 5 Disable the Stall Prevention during deceleration set constant L3 04 to 0 when using a Braking Resistor Unit If this user constant is not changed to disable Stall Prevention the system may not stop during deceleration 6 Enable protection for the internal DB resistor model ERF set constant L8 01 to 1 when using an internal braking resistor The braking resistor wi...

Страница 34: ...21P5 M4 12 10 3 5 5 5 L1 L2 L3 1 2 B1 B2 T1 T2 T3 VG522P2 M4 12 10 3 5 5 5 L1 L2 L3 1 2 B1 B2 T1 T2 T3 10 VG523P7 M4 5 5 L1 L2 L3 1 2 B1 B2 T1 T2 T3 8 8 VG525P5 M5 10 8 5 5 8 L1 L2 L3 1 2 B1 B2 T1 T2 T3 8 8 VG527P5 M5 10 8 5 5 8 L1 L2 L3 1 2 3 T1 T2 T3 4 22 VG52011 M6 8 8 L1 L2 L3 1 2 3 T1 T2 T3 M8 3 30 VG52015 M6 8 8 L1 L2 L3 1 2 3 T1 T2 T3 3 30 M8 6 14 VG52018 r s M4 20 10 0 5 5 5 L1 L2 L3 1 2 3...

Страница 35: ... x 2P 60 100 M8 4 22 VG52045 r s M4 20 10 0 5 5 5 L1 L2 L3 3 T1 T2 T3 M10 1 0 x 2P 100 M8 3 30 VG52055 r s M4 20 10 0 5 5 5 L1 L2 L3 3 T1 T2 T3 M12 4 0 x 2P 100 200 M8 1 50 Main Circuits VG52075 r s M4 20 10 0 5 5 5 Power cables e g 600V vinyl power cables Control Circuits All models 1 to 33 M3 5 20 16 0 5 2 Shielded twisted pair wires NOTE The wire thickness is set for copper wires at 75 C ...

Страница 36: ... 10 3 5 5 5 L1 L2 L3 1 2 B1 B2 T1 T2 T3 VG545P5 M4 12 10 3 5 5 5 L1 L2 L3 1 2 B1 B2 T1 T2 T3 VG547P5 M5 8 6 8 14 L1 L2 L3 1 2 B1 B2 T1 T2 T3 M5 8 6 8 14 VG54011 M6 8 88 L1 L2 L3 1 2 B1 B2 T1 T2 T3 M5 8 6 8 14 VG54015 M6 8 8 L1 L2 L3 1 2 3 T1 T2 T3 M6 6 14 M8 8 8 VG54018 r s M4 20 10 0 5 5 5 L1 L2 L3 1 2 3 T1 T2 T3 M6 4 22 M8 8 8 VG54022 r s M4 20 10 0 5 5 5 L1 L2 L3 1 2 3 T1 T2 T3 4 22 M8 8 8 VG54...

Страница 37: ...2 4 0 x 2P 100 x 2P M8 1 50 VG54160 r s 200 s 400 M4 20 10 0 5 5 5 L1 L2 L3 1 3 T1 T2 T3 M16 650MCM x 2P 325 X 2p M8 1 50 VG54185 r s 200 s 400 M4 20 10 0 5 5 5 L1 L2 L3 1 3 T1 T2 T3 M16 650MCM x 2P 325 M8 1 0 60 VG54220 r s 200 s 400 M4 20 10 0 5 5 5 L1 L2 L3 1 3 T1 T2 T3 M16 650MCM x 2P 325 x 2P M8 1 0 60 Main Circuits VG54300 r s 200 s 400 M4 20 10 0 5 5 5 Power cables e g 600 V vinyl power cab...

Страница 38: ...5 5 8 M5 8 5 M6 8 6 8 8 M8 8 8 M6 14 6 6 14 M8 14 8 M6 22 6 4 22 M8 22 8 3 2 30 38 M8 38 8 M8 60 8 1 1 0 50 60 M10 60 10 3 0 80 80 10 4 0 100 M10 100 10 4 0 100 100 12 300MCM 150 150 12 400MCM 200 M12 200 12 M12 X 2 325 12 650MCM 325 M16 325 16 NOTE Determine the wire size for the main circuit so that line voltage drop is within 2 of the rated voltage Line voltage drop is calculated as follows if ...

Страница 39: ...011 to 2075 D030 to D075 Cooling fan power input r s 2018 to 2022 Cooling fan power input control power input r s 2030 to 2075 D030 to D075 Ground 20P4 to 2075 D030 to D075 all models NOTE Models VG52030 to 2075 do not support DC power input Table 3 5 400 V Class Main Circuit Terminal Functions Purpose Terminal Symbol Model VG5 Main circuit power input L1 L2 L3 R S T 40P4 to 4300 Inverter outputs ...

Страница 40: ...o 5 5 kW VG52011 to 2015 11 15 kW VG52018 to 2022 18 5 22 kW VG52030 to 2075 30 to 75 kW VG5D030 to D075 30 to 75 kW 1 Prewired at the factory 2 Remove the short circuit bar from between 1 and 2 when connecting a DC reactor to Inverters of 15 kW or less 3 Prewired at the factory When supplying power to the main circuits from the DC power supply remove the wiring from R r and S s Figure 3 4 200 V C...

Страница 41: ... to 4160 55 to 160 kW VG54185 to 4300 185 to 300 kW 1 Prewired at the factory 2 Remove the short circuit bar from between 1 and 2 when connecting a DC reactor to Inverters of 15 kW or less 3 Prewired at the factory When supplying power to the main circuits from the DC power supply remove the wiring from R r and S s Figure 3 5 400 V Class Inverter Main Circuit Configurations ...

Страница 42: ...is built in VG54055 to 4160 VG54185 to 4300 The DC Reactor is built in 1 Input the control circuit power supply from r s for 200 V class Inverters of 30 to 75 kW and from r s 400 for 400 V class Inverters of 55 to 300 kW For other models the control power supply is supplied internally from the main circuit DC power supply 2 The r R s s 400 S terminals are short circuited for shipping Remove the sh...

Страница 43: ... special purpose ground fault interrupter for Inverters choose a ground fault interrupter with a sensitivity amperage of at least 30 mA per Inverter When using a general ground fault interrupter choose a ground fault interrupter with a sensitivity amperage of 200 mA or more per Inverter and with an operating time of 0 1secondsor more Installing a Magnetic Contactor If the power supply for the main...

Страница 44: ...uctive loads include Magnetic Contactors electromagnetic relays solenoid valves solenoids and magnetic brakes Wiring the Power Terminals of Inverters with 18 5 to 300 kW Outputs For 200 V class Inverters of 18 5 to 75 kW or 400 V class Inverters of 18 5 to 45 kW connect the r and s terminals to the R and S terminals respectively These are shorted by a short circuit bar for shipping For 400 V class...

Страница 45: ...urrent will actuate the overcurrent protective circuit in the Inverter Installing a Thermal Overload Relay This Inverter has an electronic thermal protection function to protect the motor from overheating If however more than one motor is operated with one Inverter or a multi polar motor is used always install a Thermal Overload Relay between the Inverter and the motor and set L1 01 to 0 no motor ...

Страница 46: ...Table 3 6 For details refer to the user constant settings Table 3 6 Cable Length between Inverter and Motor Cable Length 50 m max 100 m max More than 100 m Carrier Frequency 15 kHz max 10 kHz max 5 kHz max Set value C6 01 15 0 10 0 5 0 Set value C6 02 15 0 10 0 5 0 Set value C6 03 0 0 0 Ground Wiring Always use the ground terminal of the 200 V Inverter with a ground resistance of less than 100 Ω a...

Страница 47: ...sing the Inverter with the Braking Resistor Unit connected Set L8 01 to 1 before operating the Inverter with the braking resistor without Thermal Overload Relay trip contacts The Braking Resistor Unit cannot be used and the deceleration time cannot be shortened by the Inverter if L3 04 is set to 1 i e if Stall Prevention is enabled for deceleration To prevent the unit from overheating design the s...

Страница 48: ...here are connectors for selecting whether each Braking Unit is to be a Master or Slave Select Master for the first Braking Unit only and select Slave for all other Braking Units i e from the second Unit onwards Figure 3 16 Connecting Braking Units in Parallel Power Supply Sequence Use a transformer with 200 and 400 V outputs for the power supply of the 400 V Inverter Figure 3 17 Power Supply Seque...

Страница 49: ... 7 Table 3 7 Terminal Numbers and Wire Sizes Same for all Models Terminals Terminal Screws AWG Sizes Wire Thickness mm 2 Wire Type 1 to 11 13 to 33 M3 5 20 16 Stranded wire 0 5 to 1 25 Single wire 0 5 to 1 25 Shielded twisted pair wire 12 G M3 5 20 14 0 5 to 2 Shielded polyethylene covered vinyl sheath cable The closed loop connectors and tightening torques for various wire sizes are shown in Tabl...

Страница 50: ... mA 10 to 10 V 100 to 100 0 to 10 V 100 10 to 10 V 20 kΩ 0 to 10 V 20 kΩ 13 Master speed frequence reference 4 to 20 mA 100 10 to 10 V 100 to 100 0 to 10 V 100 4 to 20 mA 250 Ω 16 Multi function analog input 10 to 10 V 100 to 100 0 to 10 V 100 Auxiliary analog input H3 05 10 to 10 V 20 kΩ 0 to 10 V 20 kΩ 17 Control common Analog input signals 12 Shield wire optional ground line connection point 9 ...

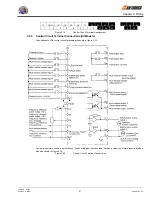
Страница 51: ...ntrol Circuit Terminal Arrangement 3 5 3 Control Circuit Terminal Connections All Models Connections to VG5 control circuit terminals are shown in Figure 3 20 Factory presets are shown in parentheses When driving an inductive load such as a relay coil always insert a flywheel diode as shown in Figure 3 18 Figure 3 20 Control Circuit Terminal Connections ...

Страница 52: ...d pair or shielded twisted pair cables for control circuits to prevent operating faults Process cable ends as shown in Figure 3 21 Connect the shield wire to Terminal 12 G Insulate the shield with tape to prevent contact with other signal lines and equipment Figure 3 21 Processing the Ends of Twisted Pair Cables 3 6 Wiring Check Check all of the wiring after wiring has been completed Do not perfor...

Страница 53: ...ave it OFF for at least one minute before removing the front cover of the Inverter or at least three minutes for Inverters of 30 kW or more Check to be sure that the CHARGE indicator is OFF 3 Insert the spacer which is provided into the spacer hole in the Inverter s mounting base For Inverters of 3 7 kW or lower there are two adjacent holes Insert the spacer into the 7CN hole The spacer cannot be ...

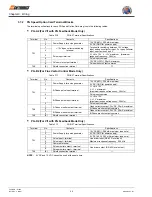
Страница 54: ... maximum 2 Power Supply for pulse generator 0 VDC GND for power supply 3 H 8 to 12 V L 1 V maximum maximum response frequency 30 kHz 4 A Phase pulse input terminal Pulse input common 5 H 8 to 12 V L 1 V maximum maximum response frequency 30 kHz TA1 6 B Phase pulse input terminal Pulse input common 1 Open collector output 24 VDC 30 mA maximum 2 A Phase monitor output terminal A Phase monitor output...

Страница 55: ...driver input RS 422 level input maximum response frequency 300 kHz TA1 10 Common terminal 0 VDC GND for power supply 1 A Phase output terminal 2 A Phase output terminal 3 B Phase output terminal 4 B Phase output terminal 5 Z Phase input terminal 6 Z Phase input terminal Line driver output RS 422 level output TA2 7 Control circuit common Control circuit GND TA3 E Shield connection terminal NOTE 5 V...

Страница 56: ...signal lines Do not use the PG s power supply for anything other than the PG Using it for another purpose can cause malfunctions due to noise The length of the PG s wiring must not be more than 100 meters 328 feet Figure 3 24 Wiring an Open Collector Input I O Circuit Configuration Figure 3 25 I O Circuit Configuration of the PG A2 ...

Страница 57: ...ue to noise The length of the PG s wiring must not be more than 100 meters 328 feet The direction of rotation of the Inverter can be set in user constant F1 05 The factory preset if for forward rotation A Phase advancement Figure 3 26 PG B2 Wiring I O Circuit Configuration When connecting to a voltage output type PG select a PG that has an output impedance with a current of at least 12 mA to the i...

Страница 58: ...st not be more than 100 meters 328 feet Figure 3 28 PG D2 Wiring PG X2 For Flux Vector Control Mode Only Shielded twisted pair wires must be used for signal lines Do not use the PG s power supply for anything other than the PG Using it for another purpose can cause malfunctions due to noise The length of the PG s wiring must not be more than 100 meters 328 feet The direction of rotation of the Inv...

Страница 59: ...ion terminal M3 5 0 5 to 2 20 14 Shielded twisted pair wire Shielded polyethylene covered vinyl sheath cable Solderless Terminals for Control Circuit Terminals The use of solderless terminals for the control circuit terminals is recommended because solderless terminals are easy to connect securely Table 3 15 Straight Solderless Terminal Sizes Wire Thickness mm 2 AWG Sizes Model d1 d2 Manufacturer ...

Страница 60: ...block 3 Tighten the terminal screws firmly Figure 3 31 Connecting Wires to Terminal Block NOTE Wiring Precautions 1 Separate PG Speed Option Card control circuit wiring Terminals TA1 and TA2 from main circuit wiring and other high power lines 2 Use twisted pair or shielded twisted pair cables to connect the PG to prevent operating faults Process cable ends as shown in Figure 3 32 The maximum cable...

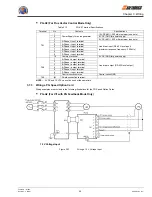
Страница 61: ...y Output Hz 1800 600 18 000 1500 800 20 000 1200 1000 20 000 900 1200 18 000 NOTE 1 The motor speed at maximum frequency output is expressed as the sync rotation speed 2 The PG power supply is 12 V 3 A separate power supply is required if the PG power supply capacity is greater than 200 mA If momentary power loss must be handled use a backup capacitor or other method Figure 3 33 PG B2 Connection E...

Страница 62: ...Chapter 3 Wiring Firmware S1043 Revision 2 9 98 52 Saftronics Inc Figure 3 34 PG X2 Connection Example ...

Отзывы: