background image

Globalis International                                             


PR9 SERVICE MANUAL-VER1.1                          Page 102 of 112 


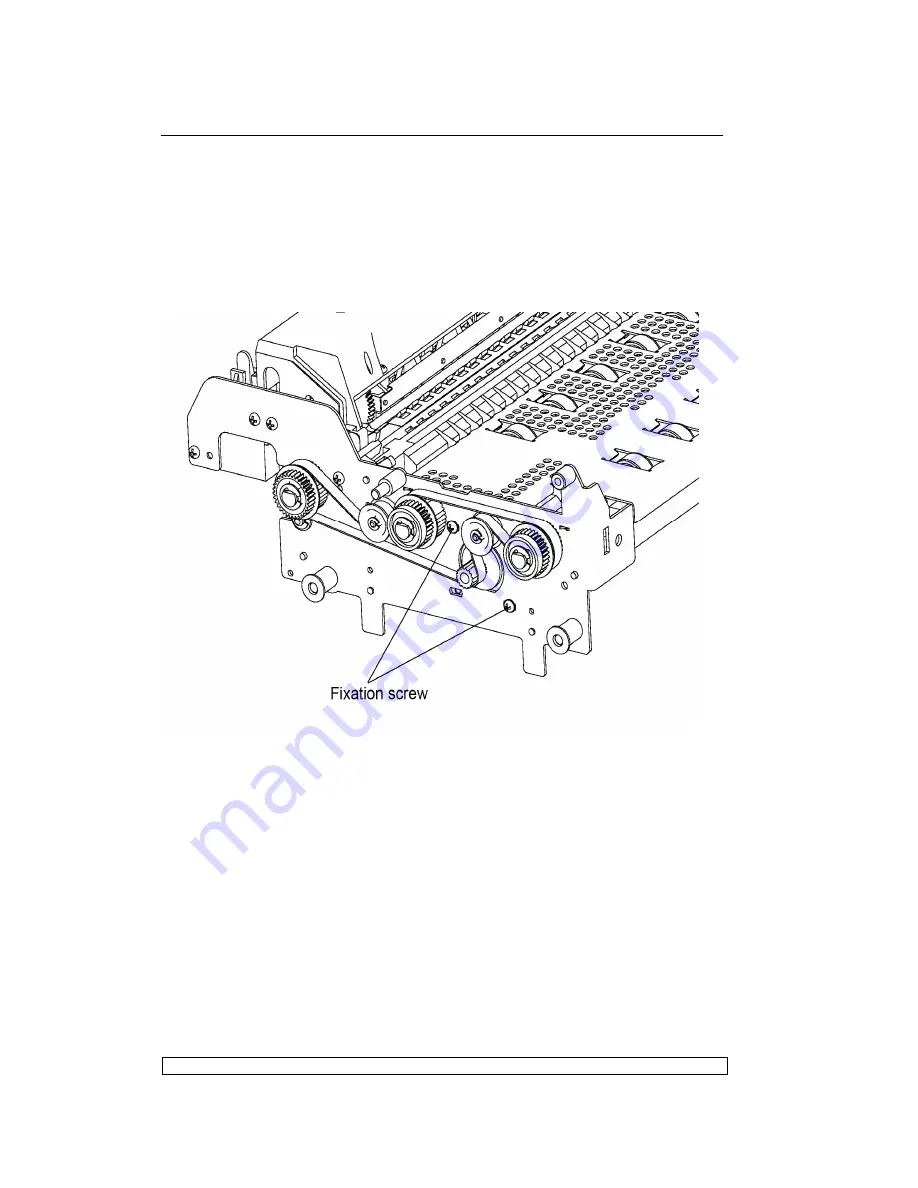
6.3.9.  PAPER FEED MOTOR DISASSEMBLY/REASSEMBLY 


Remove the printer case (6.3.1) 


Remove the mechanical assembly. 


Loosen  the  two  nuts  that  secure  the  motor  and  then  release  the 
document feed belt. 


Remove the paper feed motor. 


Fig. 6-6 


Note: 

After reassembly, adjust the tension of the document feed belt. 


6.3.10. 

PRINTHEAD MOVEMENT MOTOR   

DISASSEMBLY/REASSEMBLY 


Remove the upper part of the mechanical assembly (6.3.5). 


Loosen  the  screw  (1)  that  secures  the  return  pulley  support  and  then 
release the carriage movement belt from the motor. 


Unscrew  the  two  special  securing  screws  (2)  and  then  remove  the 
printhead  movement  motor  being  careful  to  avoid  damaging  the  ribbon 
feed gears. 


Содержание PR90

Страница 1: ...Globalis International PR9 SERVICE MANUAL VER1 1 Page 1 of 112 Safer PR90 Passbook Printer Maintenance Manual...

Страница 2: ...ng horizontal magnetic stripes This printer model can also be configured with different interfaces and emulations If requires it can be configured to print on continuo forms with a rear tractor The PR...

Страница 3: ...RS 232C serial with the possibility of installing the following interface cards RS 232C serial USB Centronics parallel 2nd RS232C serial DIMENSIONS Width 398 mm Depth 296 mm Height 215mm Weight 9 1 Kg...

Страница 4: ...ITY OF COPY Number of copies carb 1 6 original medium weight 40g mm 60g mm carbon paper weight 20g mm 40g mm multicopy carbon paper weight 380g mm 1 3 3 DOCUMENT HANDLED Single forms fanfold paper mul...

Страница 5: ...pages Cover thickness 0 2mm 0 5mm 1 4 ACCESSORIES This section describes the accessories available for the PR9 printer BLACK NYLON SNUG CART RIBBON CARTRIDGE Ribbon cartridge specific for the PR9 s pr...

Страница 6: ...Globalis International PR9 SERVICE MANUAL VER1 1 Page 6 of 112 1 5 LOCATING THE PRINTER S MAJOR COMPONENTS...

Страница 7: ...9 SERVICE MANUAL VER1 1 Page 7 of 112 Fig 1 3 Major Components of PR9 Note The max open angle of top cover is 90 for a better view the open angle is 180 in the figure above 1 6 LOCATING THE PRINTER S...

Страница 8: ...Globalis International PR9 SERVICE MANUAL VER1 1 Page 8 of 112 Fig 1 4 PR9 s Major Internal Components 1 7 GENERAL BLOCK DIAGRAM...

Страница 9: ...ENSOR 1 8 OPERATING COMMANDS PR9 operating commands are the following power switch upper mechanical assembly green lifting lever LCD operating panel 1 8 1 POWER SWITCH The printer is equipped with a t...

Страница 10: ...nterface of the PR9 is mainly consisted of the operating panel it has 5 keys 4 LEDS and 160 32 LCD You can access the different machine states operating guide and etc By powering on the printer you ca...

Страница 11: ...in normal condition Top cover is closed and no key is pressed STOP MODE In the on line mode pressing STOP key or opening the cover the printer will enter STOP MODE OFF LINE OPERATION In the ON LINE m...

Страница 12: ...in printer pressing the key the paper will feed the next page automatically Pressing the key and power on the printer the printer can ignore the status of cover open Invalid Menu move backward to the...

Страница 13: ...ON2 ST OP In Data backup mode of HEX PRINTING pressing these two simultaneously the printer will save the last 8K byte data which it received into flash memory Invalid Invalid FEED EJECT COMPRESS In D...

Страница 14: ...devices and so on Common office equipment calculating machines typewriters terminals and personal computers can share the same outlet as long as they do not cause excessive electrical noise or voltage...

Страница 15: ...Ribbon cartridge Fig 2 1 Package Contents Unpacking and Setting Up the Printer Remove the machine from its protective bag Open the printer s top cover completely Remove the soundproofing that are loc...

Страница 16: ...urned off and then power on the printer Make sure that the printer powers on by checking the mechanical reset and the lighting of the ON LED on the operating panel 2 3 OFF LINE TESTS A print test can...

Страница 17: ...mply inserts a new of paper To stop the print test power off the machine 2 3 2 PRINT TEST CONTENTS The print test provides the following information The release and version of the firmware and charact...

Страница 18: ...Globalis International PR9 SERVICE MANUAL VER1 1 Page 18 of 112...

Страница 19: ...f 112 2 4 CONNECTION TO THE SYSTEM In its basic configuration the printer is equipped with an on board standard RS232C interface and a slot for the installation in field of an optional interface card...

Страница 20: ...RFACE STANDARD Attach the serial cable to the interface located on the rear of the printer Via Set up Section 3 2 program the following interface parameters BAUD RATE BIT CHAR PARITY STOP BIT and DSR...

Страница 21: ...Globalis International PR9 SERVICE MANUAL VER1 1 Page 21 of 112 Fig 2 4 Parallel Interface Card Fig 2 5 Parallel Interface Pin out...

Страница 22: ...Using a screwdriver break off the slot cover of the optional serial interface on the rear of the printer Insert the interface card in the slot and slide it along the guideways until it plugs into the...

Страница 23: ...PERATOR After installation the field engineer has the responsibility of informing the operator on how to use the printer how to replace the cartridge and how to clear paper jams It is suggested that a...

Страница 24: ...MENT WITH AUTOMATIC ALIGNMENT The front shelf on the case helps to insert the document in the printer With the printer powered on place the document at the center of the front slot and then insert it...

Страница 25: ...ased from the feed rollers The documents are 100mm long or longer they will remain gripped by the last set of rollers to avoid that the document tails off the front shelf 2 6 4 REPLACING THE RIBBON CA...

Страница 26: ...chanical Assembly Push the ribbon guide downwards make it withdraw from print head Take out the used ribbon casket Fig 2 9 Remove Ribbon Cartridge Insert the cartridge into the feed gears hooking it o...

Страница 27: ...lastic pins on the carriage s open slots behind the printhead platen a clack sound is heard Fig 2 11 Hooking the Ribbon Guide Turn the carriage knob counterclockwise until the ribbon is taut and then...

Страница 28: ...not remove the printhead manually 2 6 5 PAPER JAMS The paper could jam along its path inside the machine Jamming could be caused by one of the following Obstructed paper path for example residual piec...

Страница 29: ...ing the upper mechanical assembly lifting green lever Remove the jammed document by carefully pulling it from the printer Fig 2 14 Removing a Document from Inside the Printer If pieces of paper are ja...

Страница 30: ...Page 30 of 112 again 2 6 5 3 PAPER JAMS AT THE REAR OUTPUT SLOT To remove a document from the rear output slot without opening the cover carefully pull the document outward trying not to tear it Fig 2...

Страница 31: ...d into 7 classes and 4 levels by different functions and objects Classification Status Contents of LCD Off line Opera tion Menu setup Menu setup Menu parameters of current level and next level Menu pr...

Страница 32: ...the parameters of the printer configuration including each emulation different macro and different language Object All the operators who need to modify the menu parameters such as engineer users and s...

Страница 33: ...Adjustment Debug test 1 Photosensor value 2 Left Marg 3 Top Marg 4 Run in test 5 Bidirection Align 6 Print Photo Value 7 Inquire photosensor Value 8 Resume Hw parameters 1 User s guide 2 Chinese chara...

Страница 34: ...nt macro The operator can select the language condition of printer when entering the module LANGUAGE and you can select CHINESE or ENGLISH The content the LCD displays on the first line is the current...

Страница 35: ...nter saving parameter LCD will show If pressing STOP key saving parameters LCD will show After saving the printer will reset automatically and the modified parameters will be saved into the Flash If p...

Страница 36: ...Macro to setup Enter OLIV ETTI MENU Press STOP key Press FEED E J E C T key Press STATION1 key Press C O M P R E S S key Press STATION2 key 1 2 3 5 4 3 3 3 1 2 2 2 1 1 1 2 5 3 5 5 5 5 Enter LEVEL3 Sav...

Страница 37: ...shows After pressing STOP key the printer will save the modified parameters into the RAM and return to the upper level LCD show Then if you want to setup other parameters you can press COMPRESS key or...

Страница 38: ...sing STATION 2 key and hold it down then power on the printer after it resets Insert the A4 sheet the printer will print current menu parameters 3 3 2 1 DESCRIPTION Entering the off line operation sel...

Страница 39: ...Globalis International PR9 SERVICE MANUAL VER1 1 Page 39 of 112...

Страница 40: ...Globalis International PR9 SERVICE MANUAL VER1 1 Page 40 of 112 3 3 3 PRINTING TEST After entering printing test LCD shows...

Страница 41: ...er inserting the paper it will feed the paper automatically and begin printing LCD shows After finishing printing the paper will be ejected automatically LCD shows And now if you insert paper again th...

Страница 42: ...Globalis International PR9 SERVICE MANUAL VER1 1 Page 42 of 112 3 3 3 2 CHARACTER SET PRINTING After entering printing test classification LCD shows...

Страница 43: ...e paper automatically and begin printing after finishing printing the paper will be ejected automatically LCD shows And now if you insert paper again the printer will print it again if you press STATI...

Страница 44: ...Globalis International PR9 SERVICE MANUAL VER1 1 Page 44 of 112 3 3 3 3 Dr Grauert PRINTING After entering printing test classification LCD shows...

Страница 45: ...eed the paper automatically and begin printing after finishing printing the paper will be ejected automatically LCD shows And now if you insert paper again the printer will print it again if you press...

Страница 46: ...Globalis International PR9 SERVICE MANUAL VER1 1 Page 46 of 112 3 3 4 ADJUSTMENT ONLY FOR PROFESSIONAL ENGINEER Entering the off line operation and selecting adjustment LCD will show...

Страница 47: ...e paper will be ejected automatically and the current modified value will be saved LCD shows If you want to print the current photosensor value pressing STOP key to accept and LCD shows When you inser...

Страница 48: ...national PR9 SERVICE MANUAL VER1 1 Page 48 of 112 3 3 4 2 LEFT MARGIN SETUP NOTE Press FEED EJECT key means to reduce the current value moving leftwards Press COMPRESS key means to increase the curren...

Страница 49: ...rrent value moving leftwards Press COMPRESS key means increase based on the current value moving rightwards If you want to check the print effect Insert a sheet it will print it the LCD show After sel...

Страница 50: ...er selecting the value you want you must press STOP key to save and the printer will exit the left margin setup and enter the classified selection of adjustment LCD shows If you press STATION2 key it...

Страница 51: ...ing mm means the times of run in printing finished You just can skip run in printing by pressing STATION2 key or turning off the printer Press STATION2 key it will exit the run in print and enter the...

Страница 52: ...Globalis International PR9 SERVICE MANUAL VER1 1 Page 52 of 112 3 3 4 5 BIDIRECTION ALIGNMENT ADJUSTMENT You can select different CPI and quality for adjusting in the bidirection...

Страница 53: ...EJECT key until the LCD shows the CPI and quality which you want to align press STOP key to accept and LCD shows If you want to see the print effect insert A4 sheet the printer will feed the paper au...

Страница 54: ...TICE Press FEED EJECT means reduce based on current value move leftwards Press COMPRESS key means increase based on the current value move rightwards The adjustment is limited during a range That is t...

Страница 55: ...Globalis International PR9 SERVICE MANUAL VER1 1 Page 55 of 112 3 3 4 6 PRINT PHOTOSENSOR VALUES Entering the adjustment LCD shows...

Страница 56: ...CD shows After inserting the paper the printer will feed the paper automatically It will print it and eject the sheet automatically LCD shows Press STATION2 key it will exit the photosensor values pri...

Страница 57: ...Globalis International PR9 SERVICE MANUAL VER1 1 Page 57 of 112 3 3 4 7 INQUIRE PHOTOSENSOR VALUES NOTICE...

Страница 58: ...EJECT key until the LCD shows Press STOP key to accept LCD shows If you want to inquire the photosensor values Press STOP key to accept LCD shows Press COMPRESS key means move downwards or FEED EJECT...

Страница 59: ...MAGNEITC 3 3 5 2 HEX PRINTING NOTICE HEX printing can classified into Data backup Printing backup data and Directly Dump Data backup The printer can be used for normal operation while all the codes r...

Страница 60: ...y to accept it LCD shows After inserting the paper the printer will print the data saved in RAM in HEX format during the process LCD show If the sheet is not long enough it will be eject automatically...

Страница 61: ...will be ejected automatically If printing finished the sheet was did not ejected automatically you have to press FEED EJECT to eject the sheet LCD shows Then the printer id still in the Directly DUMP...

Страница 62: ...Globalis International PR9 SERVICE MANUAL VER1 1 Page 62 of 112 3 3 5 3 MAGNEITC TEST This test just will be valid when there is the optional magnetic stripes exist...

Страница 63: ...ial emulation such as IBM9068 SHINKO HITACHI etc special version ID and FPGA version HARDWARE CONFIGURE Chinese character set horizontal magnetic stripe USB card parallel card SPROCKET SCANCER etc PRI...

Страница 64: ...AL INTERFACE SERIAL1 CX Select interface you want to use DUAL or CX will be selected only if optional interface card is installed RS1 EMULATION O OL LI IV VE ET TT TI I OKI IBM LQ1600K IBM9068 SELECT...

Страница 65: ...has been selected SB CURRENCY SYMBOL NO YES This parameter is effective under Chinese mode CHINESE CODE STD GB18030 GBK GB2312 PNS4003 of PR2E This parameter is effective only under Chinese mode DRAFT...

Страница 66: ...version alw ays NO NEEDLE COMPENSATIO N NO YES Select needle compensation or not when the needle is broken HIGH SPEED COMPENSATIO N NO YES HIGH SPEED COMPENSATION or not BROKEN NEEDLE NO 1 2 3 4 5 6 7...

Страница 67: ...MM 0x0C is treated as FORM FEED command otherwise 0x0C is treated as ejecting paper SINGLE SHEET 0x0C is treated as ejecting paper PNS4002K of PR2E PNS 2001K 200 300 400 500 600 700 800 900 1000 DIGIT...

Страница 68: ...TING MODE CHINESE LATIN BIG 5 UNICODE ASCII CHARACTER SET GB MINCHO ROMAN OPTION1 OPTION2 LATIN Selecting the font of ASCII characters when the print mode is Chinese This parameter is effective only u...

Страница 69: ...ION DRAFT LQ OCR A OCR B Selecting font DRAFT draft LQ letter quality OCR A OCR B LF CR NO YES NO LF LF YES LF LF CR LEFT MARG 1 60 6 5 4 3 2 1 0 1 2 3 4 5 6 Adjusting left margin in unit of 1 60 inch...

Страница 70: ...850 LATIN 1 851 GREEK 852 LATIN 2 855 CYRILLIC 857 LATIN 5 858 LATIN EURO 860 P 862 IL 863 CAN FR 864 ARABIC 865 NORDIC 866 CYRILLIC DK N DK 1252 PC WIN LATIN1 1250 PC WIN LATIN2 CHINA CHN2 990 pc 88...

Страница 71: ...PI 72 96 Setting the default DPI dot per inch of the graphic printing under 8 needles graphics VERT RESOLUTION 1 216 1 240 Setting the vertical resolution as 1 216 inch or 1 240 inch LINE LENGTH 80 90...

Страница 72: ...t but the feed paper value exceed the bottom limit And PR9 report ESC r X when it receive the command ESC j Relative with the PNS7015K of PR2E PNS 2023K NO YES Selecting the special function of the co...

Страница 73: ...rsion DISPLACEMEN T STANDARD 10 20 Selecting the position displacement of magnetic record It is used for PR9 K V1 07 T9 and later version POSITION ADJUST 7 6 5 4 3 2 1 0 1 2 3 4 5 6 7 Selecting the ad...

Страница 74: ...E 70 133 LINE 65 144 LINE 60 157 LINE 55 170 LINE 50 Select the proportion of automatically on the condensation mode FAN FOLD LEFT MARG 1 10 0 1 2 3 4 5 6 7 Select the left margin for the columns fan...

Страница 75: ...termine whether always use Draft quality to print upon to the paper width LPI 5 6 8 CHARACTER DEFINITIONS DRAFT LQ Select default character quality LF CR NO YES No LF LF YES LF LF CR CR LF NO YES No C...

Страница 76: ...ng items PNS 2060K NO YES Process of command ESC 9 n1 n2 NO when n2 0 set line spacing to zero YES when n2 0 ignore this command Relative with the PNS7020K of PR2E PNS 2061K NO YES Process of command...

Страница 77: ...OPTION1 OPTION2 LATIN This parameter only effect on Chinese Version HIGH SPEED PRINTING NO A4 SHEET FAN FOLD PAPER YES Selecting high speed printing mode NO Forbid auto high speed printing A4 SHEET t...

Страница 78: ...MARG 1 60 6 5 4 3 2 1 0 1 2 3 4 5 6 Adjusting top margin in unit of 1 60 inch IBM CHARACTER SET PC ISO Selecting the IBM character set as PC or ISO PC CHARACTER SET 437 INT 210 GR 220 E 850 LATIN 1 85...

Страница 79: ...P LIKE NO YES Setting the bottom margin NO 2 3mm YES 10mm TOF IBM PP LIKE NO YES Setting the top margin NO the physical top margin adjustable YES 7 4mm ZERO SLASH NO YES Determines the printout of 0 0...

Страница 80: ...2 CPI when Double height printing or bold printing Relative the PNS4001K of PR2E PNS 2081K NO YES This parameter only effect on Chinese Version LQ CONFIGU RE AUTO COMPRESSION NO YES Determine whether...

Страница 81: ...r not PRINTING MODE CHINESE LATIN BIG 5 UNICODE This parameter only effect on Chinese Version ASCII CHARACTER SET GB MINCHO ROMAN OPTION2 This parameter only effect on Chinese Version HIGH SPEED PRINT...

Страница 82: ...LATIN EURO 860 P 862 IL 863 CAN FR 864 ARABIC 865 NORDIC 866 CYRILLIC DK N DK 1252 PC WIN LATIN1 1250 PC WIN LATIN2 CHINA CHN2 990 PC 866 BG 991 PC GER select PC character set ISO CHARACTER SET CPOLUN...

Страница 83: ...DJUS TMENT 1 60 5 4 3 2 1 0 1 2 3 4 5 Top margin adjust in n 60inch ZERO SLASH NO YES Determines if 0 s zeros are crossed out with s slash when they are printed LINE LENGTH 80 90 94 Select 10CPI chara...

Страница 84: ...ESC ESC ESC v NO ESC p2 YES ESC p Note This PNS is only valid on version 1 08 T6 or upper version IBM9006 CONFIGU RE PRINTER ID 1D 1E Selecting printer ID as required 1D 4748 1E 9055 001 SERIAL PROTC...

Страница 85: ...4 5 6 Adjust top margin in unit of 1 60 inch about 0 4mm negative value to decrease top and positive value to increase top BOF ADJUST 0 5mm 10 9 8 7 6 5 4 3 2 1 0 1 2 3 4 5 6 7 8 9 10 Adjust the BOF...

Страница 86: ...CPI OF COMPRESS 17 1 18 17 1 17 1CPI in condensed mode 18 18CPI in condensed mode CPI 10 12 15 The printing character numbers per inch LINE LENGTH 82 5 94 Select line length in unit of characters numb...

Страница 87: ...osed to direct sun light Make sure that the machine s internal ventilation slots are not blocked especially if the printer is installed in furniture Forms documents or office equipment located Make su...

Страница 88: ...ating as normal 4 2 FAULT CLASSIFICATION To make the search easier the faults have been classified as follows 4 3 Power on faults 4 4 Document printout faults 4 5 Document handling faults Each fault c...

Страница 89: ...4 DOCUMENT PRINTOUT FAULTS FAILURE POSSIBLE CAUSE does not print Failed printing Stained printing Incomplet e printing Incline printing Deformed printing with irregular spacing Ribbon cartridge not i...

Страница 90: ...X X X Paper photosensor adjustment X X X Print bar adjustment X X Front pressure roller adjustment X Carriage movement belt adjustment X X 4 5 DOCUMENT HANDLING FAULTS FAILURE POSSIBLE CAUSE The print...

Страница 91: ...rrect printer operation it is suggested that the internal components of the machine be cleaned periodically and whenever the machine is serviced 4 6 2 CLEANING THE CASE Power off the machine unplug it...

Страница 92: ...e shafts x Carriage felt x Ribbon feed gear x reed support pin x Hole of the contact bushing between roller shaft and strap shaft x Center pressure device in shaft contact area x Bushings in the shaft...

Страница 93: ...d to ensure good kinematic operation PROCEDURE Describes the operations to be performed for the adjustment Notes Indicates any reference to adjustment sequences or to tests to be performed once the ad...

Страница 94: ...gently Repeat this procedure on the other screw located on the opposite side of the frame Fig 5 2 5 3 DISTANCE ADJUSTMENT BETWEEN THE PRINT BAR AND PRINTHEAD NEEDLES MACHINE CONDITION Power off the ma...

Страница 95: ...nal PR9 SERVICE MANUAL VER1 1 Page 95 of 112 Fig 5 3 5 4 CARRIAGE MOVMENT BELT ADJUSTMENT MACHINE CONDITION Unimportant OBJECTIVE ADJUSTMENT make sure the belt moved smoothly ADJUSTMENT METHOD Adjust...

Страница 96: ...rmed during assembly restore the correct conditions if necessary Reassembly must be performed by following the disassembly procedures in reverse order Before disconnecting the cables make sure to take...

Страница 97: ...clench the 2 rear snap features partly lift the case off the base and remove the case from the machine Fig 6 1 6 3 2 DISASSEMBLY REASSEMBLY the console of liquid crystal Display LCD Open the printer s...

Страница 98: ...aise the upper part of the mechanical assembly by using the specific green lever 1 Push the snap features 2 aside and untie the photosensor box 4 Lift the photosensor box about 30 degree Pull the phot...

Страница 99: ...ft the front part of the mechanical assembly partly rotating it until you are able to reach the connectors on the main board Remove the soundproofing and unplug all the cables connecting the mechanica...

Страница 100: ...le from the main board Remove the console cable connector 1 from the left rear side of the frame Remove the two rear side screws 2 so as to detach the upper part of the mechanical assembly Fig 6 4 6 3...

Страница 101: ...hotosensor from the ribbon protector Unplug the photosensor cable from its connector on the printhead 6 3 8 PRINTHEAD CABLE DISASSEMBLY REASSEMBLY Remove the printer case 6 3 1 Remove the printhead se...

Страница 102: ...he paper feed motor Fig 6 6 Note After reassembly adjust the tension of the document feed belt 6 3 10 PRINTHEAD MOVEMENT MOTOR DISASSEMBLY REASSEMBLY Remove the upper part of the mechanical assembly 6...

Страница 103: ...s on the main board Unplug the services motor connection cable from the main board Remove the two screws 1 that secure the motor in left hand side of the frame and remove the services motor from the m...

Страница 104: ...EASSEMBLY Power off the machine and unplug the power cord from the electrical outlet Remove the mechanical assembly 6 3 4 Unplug the power supply cable that connects the main board to the power supply...

Страница 105: ...emove another in the opposite Remove the plastic axle sleeve that secures the square shaft Remove the clasp that secures the paper feed roller in left and right Remove the black plate and the gear Rem...

Страница 106: ...mechanical assembly off the base of the printer partly rotating it until you are able to reach the connectors on the main board Unplug all the cables with the exception of the printhead cables Unscre...

Страница 107: ...tances flash IC on the main board is blank firmware updating is broken accidentally unsuccessful updating by using normal parallel board Steps to update firmware are as following 1 Using normal parall...

Страница 108: ...mand to copy firmware to parallel port and type ENTER For example firmware is stored in D partition Type the command as showing below And LCD of PR9 shows as Then updating begins LCD shows as After up...

Страница 109: ...se delete data in PC s LPT port before updating for detailed operation pls refer to NOTE 1 2 Turn on PR9 LCD shows as Don t press any key and wait till LCD shows as Now PR9 enters the updating mode an...

Страница 110: ...rallel board and PR9 will work normally after power on NOTE1 If PC s LPT port which is to be transmit firmware data to PR9 already has data in its buffer then updating is forbidden and please delete t...

Страница 111: ...ith standard 9 pins of RS232 serial port and PR9 communication cable HOST 9 PINS DB 9S PRINTER 9 PINS DB 9S 1 2 3 4 5 6 7 8 9 1 3 2 6 5 4 8 7 9 RXD DCD TXD DTR GND DSR RTS CTS DCD TXD RXD DSR GND DTR...

Страница 112: ...21 8 22 9 22 10 23 11 23 12 24 13 25 14 15 16 17 1 19 2 20 3 21 4 22 5 23 6 24 7 25 8 26 9 27 10 28 11 29 12 30 13 16 14 32 31 36 HOST 25 PINS PR9 36 PINS PSTB GND LPD0 GND LPD1 GND LPD2 GND LPD3 GND...

Отзывы: