background image


39 


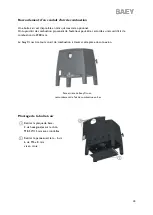
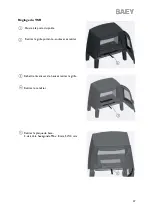
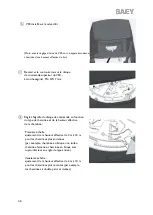
          Pour un réglage exact, utilisez les marques de  
          réglages "D" respectives sous l'échelle  
          numérique. 


          Par exemple, pour régler une ancienne cheminée  
          dont la hauteur effective est d'environ 4 m,  
          le pointeur       du disque de commande est placé  
          sur le premier repère D. 


          Par exemple, pour régler une ancienne cheminée  
          dont la hauteur effective est d'environ 8 m, le 
          pointeur       du disque de commande est placée  
          sur le repère D en dessous de 8. 


         Après le réglage, resserrez le contre-écrou        
         du disque de commande supérieur du VSR. 


Air de combustion 


Pour une combustion optimale il doit être fourni de 

suffisamment d’air frais. L’oxygène nécessaire est 

fourni par l’ouverture à l’arrière et celui

-

ci vient de préférence de l’extérieur de la maison.


CONSEIL: tenez compte d’autres foyers ou installations de sortie d’air dans la même pièce ou la même 

connexio

n d’air de combustion. Ceux

-ci peuvent avoir un effet perturbateur sur le fonctionnement du 

poêle. 

Si 15 minutes après l’allumage vous avez encore toujours une rechute des gaz de combustion, causé par 
des conditions météorologique (brouillard, tempête, …),


l’allumage doit être interrompu jusqu’à ce que 

le temps c’est amélioré.


ATTENTION: Dans aucun cas il est autorisé de prendre de l’air dans un local ou cave ou des substances 

volatiles ou inflammables sont présentes.  


         Les réglages décrits supposent un raccordement arrière et un connecteur d'une longueur 
         d'environ 80 cm. 
         Avec un connecteur plus court, il est possible de franchir une hauteur effective de plus de     
         10 mètres. Avec des longueurs de raccordement plus importantes, il faut tenir compte de    
         l'émission de chaleur plus élevée des gaz de combustion en amont de la cheminée. 


Содержание CROSS

Страница 1: ...SAEY CROSS HOUT BOIS WOOD NL Installatie en gebruiksaanwijzing FR Notice d installation et d utilisation EN Installation and user manual ...

Страница 2: ...2 ...

Страница 3: ...3 ...

Страница 4: ...ngen 26 FRANÇAIS 1 Introduction 27 2 Emballage 27 3 Garantie 27 4 Caractéristiques technique 28 5 Informations générales et consignes de sécurité 29 6 Consignes d installation 31 7 Consignes d utilisation et recommandations 41 8 Entretien 44 9 Pannes causes et solutions 48 ENGLISH 1 Introduction 49 2 Packaging 49 3 Warranty 49 4 Technical information 50 5 General information and security precautio...

Страница 5: ...e zorg om uw nieuwe kachel in de best mogelijke verpakking te leveren om zo de kans op beschadiging te verkleinen Bedankt om daarom bij ontvangst zeker uw kachel te controleren op schade en volledigheid Meld eventuele ontbrekende onderdelen onmiddellijk aan uw installateur De verpakking van uw kachel is onschadelijk voor het milieu Het karton en het hout kunnen bij het gemeentelijke containerpark ...

Страница 6: ...gen en gewicht Hoogte mm 764 Breedte onderaan bovenaan mm 784 634 Diepte onderaan bovenaan mm 540 452 Aansluiting boven of achter Ø mm 130 Verbrandingsluchtaansluiting Ø mm 80 Gewicht kg 212 Brandstof Brandstof Brandhout houtbriketten Max capaciteit brandhout kg 1 6 Verbruik bij nominaal vermogen kg h 2 Max capaciteit houtbriketten kg 1 5 Verbruik bij nominaal vermogen kg h 1 9 Max lengte houtblok...

Страница 7: ...ndbare of explosieve materialen in dezelfde of naburige ruimten gebruiken Dit toestel is geen allesbrander Gebruik enkel de geschikte brandstoffen Er mogen geen wijzigingen aan het toestel worden aangebracht Gebruik enkel de originele wisselstukken van de fabrikant Deze kachel is niet geschikt om te installeren op een rookkanaal waarop meerdere kachels zijn aangesloten De Saey Cross is enkel gesch...

Страница 8: ...omstandigheden sterke wind nevel storm kan dit tot slecht functioneren van uw schoorsteen leiden Dit onderdeel is bij de inwerkingstelling van uw toestel zeker noodzakelijk Bij lange inactiviteit van uw kachel kunnen er in uw schoorsteen afvoerkanaal of andere leidingen verstoppingen voorkomen Let erop dit regelmatig na te kijken Jaarlijkse reiniging van uw rookkanaal is wettelijk verplicht Correc...

Страница 9: ...oet gecontroleerd worden of de afmetingen en de kwaliteit van de schoorsteen beantwoorden aan de lokaal geldende voorschriften De afmetingen moeten desgevallend berekend worden De kachel kan direct op de schoorsteen aangesloten worden De diameter van de afvoerbuis moet overeenkomen met de diameter van het verbindingspijpstuk aan de kachel Wij kunnen u een goede werking van het toestel garanderen a...

Страница 10: ...som van alle individuele drukken Alle individuele waardenmoeten behaald worden De totale toevoerdruk moet voor elke kachel afzonderlijk worden bepaald afhankelijk van het onderwerp van het systeem De volgende individuele waarden moeten in elk geval behaald worden Toevoerdruk voor de verbrandingsluchttoevoer met verbrandingsluchttoevoer via een externe leiding sterk aanbevolen de vereiste opvoerdru...

Страница 11: ... op het Ø 80 mm verbrandingsluchtaansluitstuk De Saey Cross zuigt al zijn verbrandingslucht aan via dit verbindingsstuk Achterzijde Saey Cross verbrandingsluchtaansluiting aan de onderzijde Montage van de airbox Verwijder de onderplaat 2 zeskantige schroeven aan de zijkant M8 SW 13 mm met sluitringen Verwijder het achterwand 6 schroeven M6 x 8 mm kruisschroeven ...

Страница 12: ...n het toestel 4 inbusschroeven M5 SW 3 mm met sluitringen Indien nodig kan een platte dichting worden geplaatst of gelijmd tussen de luchtinlaatkast en de onderkant van het toestel Bevestig de onderplaat opnieuw 2 zeskantige schroeven aan de zijkant M8 SW 13 mm met sluitringen Breek de voorgesneden uitsnijding onder in het achterwandpaneel uit indien nodig vijl de afgebroken gedeelten glad Plaats ...

Страница 13: ...eden uitsparing lichtjes heen en weer De achterwand kan hiervoor ook worden verwijderd 6 schroeven M6 x 8mm kruisschroeven Voorbereiding van de bovenste uitgang Demonteer de achterwand 6 schroeven M6 x 8 mm kruisschroeven Maak het blinddeksel in de afdekplaat los en verwijder het draai de schroef door de achterste uitlaat los bevestig dwarsbalk met 1 zeskantige schroef Maak het achterste gietijzer...

Страница 14: ...berekende bewijs van werking volgens DIN EN 13384 met succes is geleverd moet de schoorsteen door de werking van de kachel op de hoogte die overeenkomt met de noodzakelijke toevoerdruk voor de verbrandingsluchttoevoer voor de kachel en het verbindingsstuk met ten minste een schouwtrek opbouwen De berekende schouwtrek komt niet overeen met de vereiste schouwtrek maar is een gemiddelde waarde Als de...

Страница 15: ...e VSR Open de deur van de kachel Verwijder het staande rooster omhoog tillen en verwijderen Klap de voorkant omhoog en verwijder het rooster Verwijder de aslade Verwijder de bodemplaat 2 inbusschroeven M6 x 8 mm SW 4 mm ...

Страница 16: ...afhankelijk van het type schoorsteen en de effectieve hoogte van de schoorsteen eerste bereik van de schaal aanpassing van de effectieve hoogte van 4 m tot 10 m voor oudere schoorstenen bv bakstenen ongeïsoleerde schoorsteen gevormde schoorsteen bakstenen schoorsteen met kleibinnenpijp van een ouder type tweede bereik van de schaal aanpassing van de effectieve hoogte van 4 m tot 10 m voor nieuwere...

Страница 17: ...bij voorkeur van buiten de woning TIP Hou rekening met andere haarden of luchtafvoerinstallaties in dezelfde ruimte of met dezelfde verbrandingsluchtverbinding Deze kunnen een storend effect hebben op de werking van de kachel Indien er 15 minuten na het ontsteken nog steeds terugslag is van de rookgassen door de weersomstandigheden mist storm dient men het aansteken te stoppen tot er weersverbeter...

Страница 18: ... achterzijde van de kachel Deze leiding dient beschermd te worden van condens door deze te isoleren op die plaatsen waar ze nog onderhevig is aan warmere lucht De gebruikte isolatiematerialen moeten vanzelfsprekend vochtafstotend zijn of met een dampscherm voorzien zijn Te respecteren afstanden rond de kachel Achter voor en zijdelings moeten bepaalde veiligheidsafstanden gerespecteerd worden tot b...

Страница 19: ...ltiplex en geperst hout wat schors kan bevatten Alle kunststoffen en chemische bestanddelen kunnen bij het verbranden zeer giftig zijn en schade berokkenen aan de omgeving maar ook bepaalde onderdelen van uw kachel alsook de schoorsteen vervuilen of beschadigen Gekliefd Enkel hout met mooie grote oppervlakten kunnen effectief en zuiver branden Kleinere compactere blokken daarentegen branden slecht...

Страница 20: ...e kan inbranden in de verf De kachel nooit met blote handen aanraken Algemeen gebruik kacheldeur handgreep kacheldeur bedieningshengel voor de verbrandingslucht De kacheldeur is gesloten tijdens de werking De bedieningshengel van de kacheldeur staat verticaal in gesloten stand Zorg ervoor dat het slot goed is vastgedraaid De kachel en bedieningshendel kunnen bij gebruik heel warm worden Wij raden ...

Страница 21: ... kleine 5 minuutjes geopend op een kleine kier Wanneer het vuur voldoende vertrokken is sluit u de kachel deur stevig met de bedieningshendel Vergeet zeker niet een hittebestendige handschoen te gebruiken Verder branden Hoe verder we gaan in de verbranding hoe meer de regeling van de verbrandingslucht naar links zal staan Wanneer we hout willen bijvullen plaatsen we de verbrandingslucht weer helem...

Страница 22: ...voorzien Bij regelmatig gebruik van de kachel is het aangewezen om kleine reinigingsbeurten te voorzien zoals het ledigen van de aslade rooster en het schoonmaken van de ruit Een jaarlijks onderhoud laat u best via uw installateur gebeuren Er kunnen nog houtskoolresten overblijven van vorige verbranding Het is niet altijd nodig deze te verwijderen Bij een volgende verbranding zullen deze gewoon me...

Страница 23: ...derd met behulp van de meegeleverde hendel De aslade mag niet meer dan de bovenrand met as gevuld zijn Er mag zich geen askegel vormen omdat anders de koeling van het rooster onmogelijk wordt Open de kacheldeur Haak de hendel met de bocht in het lipje op de aslade Trek de aslade eruit ...

Страница 24: ...e voorkant eenvoudig naar boven worden verwijderd Om het as compartiment schoon te maken kan het rooster eenvoudig worden opgeklapt en verwijderd Hiervoor is een handvat aan de voorkant van het rooster gemaakt Als de aslade is uitgetrokken kunnen de aslade en de bodemplaat onder de aslade worden gereinigd ...

Страница 25: ...rookomleidingskanaal tot aan rookomleidingsaansluiting worden gereinigd met een geschikte borstel Vliegas en roet zetten zich af in het onderste gedeelte van het rookomleidingskanaal Deze resten kunnen het best worden verwijderd met een geschikte asstofzuiger Reinigen van kachelruit De Saey Cross beschikt over een zelfreinigend systeem waarbij vervuiling van de kachelruit zo lang mogelijk uitgeste...

Страница 26: ...nen Glas wordt snel vuil Vochtig hout Droog hout gebruiken vochtigheidsgraad max 20 Verkeerde brandstof Brandstof niet klein genoeg Alleen geschikt hout gebruiken Te veel hout Niet meer dan 2 3 stukken max bijvullen Te weinig verbrandingslucht Goede doorgang in toevoerbuis controleren Extra leiding met verbrandingslucht voorzien Ventilatiesystemen van de woning uitzetten Rookontwikkeling bij eerst...

Страница 27: ...ir partager ensemble des moments privilégiés auprès de la chaleur de votre poêle 2 EMBALLAGE Nous prenons grand soin de livrer votre poêle dans un emballage exceptionnel afin de réduire le risque d endommagement Merci de bien vouloir contrôler votre poêle à la réception pour d éventuelle dommage ou intégralité L emballage de votre poêle n est pas nocif pour l environnement Le carton et le bois peu...

Страница 28: ... 8 Dimensions et poids Hauteur mm 764 Largeur bas haut mm 784 634 Profondeur bas haut mm 540 452 Connexion au dessus ou derrière Ø mm 130 Raccordement de l air de combustion Ø mm 80 Poids kg 212 Carburant Carburant Bûches ou briquette de bois Capacité max bûches kg 1 6 Consommation à puissance nominal kg h 2 Capacité max briquettes de bois kg 1 5 Consommation à puissance nominal kg h 1 9 Longueur ...

Страница 29: ...s adjacentes Cet appareil n est pas un brûleur polyvalent N utilisez que des combustibles appropriés Aucune modification ne peut être apportée à l appareil N utilisez que des pièces de rechange d origine du fabricant Ce poêle ne convient pas à une installation sur une cheminée à laquelle sont raccordés plusieurs poêles Le Saey Cross est uniquement approprié à brûler des bûches et briquettes de boi...

Страница 30: ...ransition automne ou printemps ou lorsque les conditions météorologiques sont défavorables vent fort brouillard tempête cela peut entraîner un dysfonctionnement de votre cheminée Cette partie est essentielle lors de la mise en service de votre appareil Si votre poêle est resté inactif pendant une longue période votre cheminée votre conduit de fumée ou d autres tuyaux peuvent se boucher Veillez à l...

Страница 31: ... le poêle soit raccordé à la cheminée on doit vérifier si les dimensions et qualités sont conformes aux réglementations locales Les mesures doivent être calculées Le poêle peut directement être raccordé à la cheminée Le diamètre du conduit de sortie doit correspondre au diamètre du conduit de raccordement au poêle Nous pouvons vous assurer un bon fonctionnement du poêle quand le tirage est entre 1...

Страница 32: ...de toutes les pressions individuelles Toutes les valeurs individuelles doivent être réalisées La pression d alimentation totale doit être déterminée séparément pour chaque poêle en fonction du sujet du système Les valeurs individuelles suivantes doivent être atteintes dans tous les cas Pression d alimentation de l air de combustion avec une alimentation en air de combustion provenant de l extérieu...

Страница 33: ...re raccordé au raccord d air de combustion de Ø 80 mm Le Saey Cross tire tout son air de combustion à travers cette pièce de connexion Face arrière du Saey Cross raccordement de l air de combustion en bas Montage de la boîte à air Retirer la plaque de base 2 vis hexagonales sur le côté M8 SW 13 mm avec rondelles Retirer le panneau arrière 6 vis 6 vis M6 x 8 mm vis en croix ...

Страница 34: ...er la boîte à air sur le fond de l appareil 4 vis à tête cylindrique M5 SW 3 mm avec rondelles Si nécessaire un joint plat peut être placé ou collé entre la boîte à air et le fond de l appareil Remonter la plaque de base 2 vis hexagonales sur le côté M8 SW 13 mm avec rondelles Découpez la prédécoupe ci dessous dans le panneau arrière limez si nécessaire les parties cassées Remontez le panneau arri...

Страница 35: ...cez légèrement la prédécoupe den avant et en arrière Le panneau arrière peut également être retiré à cette fin 6 vis M6 x 8mm vis en croix Préparation de la sortie supérieure Démontez le panneau arrière 6 vis M6 x 8 mm vis en croix Desserrer et retirer le cache dans la plaque de recouvrement desserrer la vis à travers la sortie arrière fixer la traverse avec 1 vis hexagonale Desserrer et retirer l...

Страница 36: ...de fonctionnement calculée selon la norme DIN EN 13384 est réussie la cheminée doit se construire en faisant fonctionner le poêle à la hauteur correspondant à la pression d alimentation nécessaire pour l alimentation en air de combustion pour le poêle et la pièce de raccordement avec au moins une pression de travail Le tirage de cheminée calculée ne correspond pas au tirage de la cheminée requis m...

Страница 37: ... VSR Ouvrez la porte du poêle Retirer la grille portante soulever et retirer Rabattre l avant vers le haut et retirer la grille Retirer le cendrier Retirer la plaque de base 2 vis à tête hexagonale M6 x 8 mm SW 4 mm ...

Страница 38: ...de commande en fonction du type de cheminée et de la hauteur effective de la cheminée Première échelle ajustement de la hauteur effective de 4 m à 10 m pour les cheminées plus anciennes par exemple cheminée en brique non isolée cheminée façonnée cheminée en brique avec tuyau intérieur en argile de type ancien deuxième échelle ajustement de la hauteur effective de 4 m à 10 m pour les cheminées plus...

Страница 39: ...SEIL tenez compte d autres foyers ou installations de sortie d air dans la même pièce ou la même connexion d air de combustion Ceux ci peuvent avoir un effet perturbateur sur le fonctionnement du poêle Si 15 minutes après l allumage vous avez encore toujours une rechute des gaz de combustion causé par des conditions météorologique brouillard tempête l allumage doit être interrompu jusqu à ce que l...

Страница 40: ...onduit est directement raccordé à l arrière du poêle Ce tuyau doit être protégé de la condensation en l isolant aux endroits où ils sont encore soumis à l air chaud Les matériaux d isolation utilisés doivent évidemment être hydrofuge ou prévu avec pare vapeur Distances à respecter autour du poêle Pour l avant l arrière et les côtés certaines distances doivent être respectées envers les matériaux i...

Страница 41: ...Pas de bois collé contreplaqué pressé qui peut contenir de l écorce Brûler du plastique ou produits chimiques est strictement interdit ils peuvent être toxique et nuire à votre santé et l environnement mais aussi détériorer certaines parties du poêle et cheminée Bûches Seul le bois avec de grandes surfaces peut brûler efficacement Des bûches plus petites et compactes brûlent plus lentement Les tem...

Страница 42: ... elle ne puisse brûler dans la peinture Ne touchez jamais le poêle à mains nues Utilisation générale porte du poêle poignée du poêle régulateur de l air de combustion La porte du poêle est fermée pendant le fonctionnement Le régulateur de la porte du poêle est verticale en position fermée Assurez vous que la serrure est bien serré Le poêle et le régulateur peuvent devenir très chauds pendant le fo...

Страница 43: ...allume feu Vous laissez les portes environs 5 minutes entre ouvertes durant l allumage du feu Quand le feu à bien démarré vous refermez bien la porte avec le levier N oubliez pas de mettre un gant résistant à la chaleur Combustion Au plus vous avancez dans la combustion au plus le réglage de l air de combustion se mets vers la gauche Quand vous remplissez de bois mettez le réglage de l air de comb...

Страница 44: ...fondi Pour usage régulier du poêle il est conseillé d effectuer plusieurs petits nettoyages comme vider le cendrier grille et nettoyage de la vitre Il est conseillé de faire faire l entretien annuel par votre installateur obligation pour votre assurance incendie Il est possible que la combustion précédente laisse des restes de charbon de bois Il n est pas nécessaire de les retirer à chaque fois Ce...

Страница 45: ...à l aide du levier fourni Le tiroir à cendres ne doit pas être rempli plus que le bord supérieur Aucun cône de cendres ne doit se former sinon le refroidissement de la grille sera impossible Ouvrez la porte du poêle Accrochez la poignée avec le coude de la languette sur le cendrier Retirer le cendrier ...

Страница 46: ...ment retiré vers le haut Pour nettoyer le compartiment à cendres la grille peut être facilement repliée et retiré Une poignée située sur le devant de la grille est à l avant de la grille Lorsque le tiroir à cendres est sorti le tiroir à cendres et la plaque inférieure sous le tiroir à cendres peut être nettoyée ...

Страница 47: ... Maintenant la zone de postcombustion et le conduit de fumée jusqu au raccord du conduit de fumée peuvent être nettoyés avec une brosse appropriée Les cendres volantes et la suie se déposent dans la partie inférieure du conduit de fumée Ces résidus sont mieux enlevés avec un aspirateur à cendres approprié Nettoyage de la vitre Le Saey Cross dispose d un système autonettoyant ce qui vous évite un n...

Страница 48: ...ent la fenêtre Vitre vite sale Bois humide Utiliser du bois sec taux d humidité max 20 Mauvais combustible Le combustible n est assez petit utilisez que du bois Trop de bois Ne remplir que 2 3 bûches max Trop peu d air de combustion Contrôlez le diamètre de la sortie ou arrivée des fumées Prévoir un conduit d air de combustion supplémentaire Eteindre la ventilation de l habitation Fumées au premie...

Страница 49: ...tmost care of delivering your new stove in the best packaging possible in order to reduce any chance of damage Thanks for checking your stove for damage and complete content as soon you receive it Please report any missing parts immediately to your point of sale The packaging of your stove is harmless to the environment The carton and wood will get accepted at your local recycling park 3 WARRANTY ...

Страница 50: ... 22 Fresh air supply m h 17 8 Dimensions and weight Height mm 764 Width at bottom top mm 784 634 Depth at the bottom top mm 540 452 Connection above or behind Ø mm 130 Combustion air connection Ø mm 80 Weight mm 212 Fuel Fuel Wood and briquettes Max capacity wood kg 1 6 Nominal consumption kg h 2 Max load wood briquettes kg 1 5 Nominal consumption kg h 1 9 Max log length cm 25 Max diameter size cm...

Страница 51: ...uring company This stove is not equipped to be connected with other ones on the same conduct De Saey Cross is solely made to burn wood and briquettes and only to work in a closed environment Risks of fire The main parts of the Saey Cross especially the door front upper side and fume conducts can become really hot A heat resistant glove should be used for controlling the stove Pay attention that al...

Страница 52: ...ke sure to check chimney and other conducts for clogging Check this frequently The law prescribes to clean the fume conducts on annual basis Things to do in case of chimney fire We advise you to take the following steps in case of chimney fire Seal off the air supply Call the fire brigade When cleaning entrances are foreseen make sure they are well accessible e g basement attic Remove all inflamma...

Страница 53: ...e chimney Before connecting the stove to a chimney please check the dimensions and quality so that they correspond to local directives If necessary the dimensions must be calculated The stove can be connected on the chimney in a direct way The diameter of the exhaust pipe must correspond with the outlet of the stove A proper functioning of the stove can be guaranteed with a chimney draft between 1...

Страница 54: ...ove is the sum of all individual pressures All individual values must be achieved The total supply pressure must be determined separately for each stove depending on the subject of the system The following individual values must be achieved in any case Supply pressure for combustion air with combustion air supply from external pipework strongly recommended the required supply pressure for the exte...

Страница 55: ...the Ø 80 mm combustion air connection piece The Saey Cross draws all of its combustion air through this connection piece Rear side Saey Cross combustion air connection at the bottom Assembly of the airbox Remove the bottom plate 2 hexagonal screws on the side M8 SW 13 mm with washers Remove the back panel 6 screws M6 x 8 mm cross head screws ...

Страница 56: ... on the underside of the the unit 4 Allen screws M5 SW 3 mm with washers If necessary a flat seal can be placed or glued between the airbox and the bottom of the unit Reattach the bottom plate 2 hexagonal screws on the side M8 SW 13 mm with washers Break out the pre cut cut out below in the rear wall panel if necessary file the broken off parts smooth Reinstall the rear panel 6 screws M6 x 8mm cro...

Страница 57: ... the pre cutout slightly back and forth The rear panel can also be removed for this purpose 6 screws M6 x 8mm cross head screws Preparation of the upper outlet Dismantle the rear panel 6 screws M6 x 8 mm cross head screws Loosen and remove the blind cover in the cover plate loosen the screw through the rear outlet fix crossbar with 1 hexagonal screw Loosen and remove the rear cast iron connecting ...

Страница 58: ...ney proof according to DIN EN 13384 is successfully provided the chimney must build up by the operation of the stove at the height corresponding to the necessary supply pressure for the combustion air supply in front of the stove and the connection piece with at least one chimney draft The calculated chimney draft does not correspond to the required chimney draft but is an average value If the chi...

Страница 59: ...59 Setting the VSR Open the stove door Remove the standing grille lift up and remove Lift up the front and remove the grille Remove the ashtray Remove the base plate 2 Allen screws M6 x 8 mm SW 4 mm ...

Страница 60: ... of the control disc according to the type of chimney and the effective height of the chimney first range of the scale adjustment of the effective height from 4 m to 10 m for older chimneys e g brick uninsulated chimney shaped chimney brick chimney with clay inner pipe of an older type second range of the scale adjustment of the effective height from 4 m to 10 m for newer chimneys e g double walle...

Страница 61: ...e premises HINT Keep in mind that the presence of other stoves or venting installations in the same room s will have disruptive effect on the functioning of your stove If there are still fumes coming back from the chimney due to bad weather conditions fog storm and within 15 minutes after detonating you should stop trying to light up the fire until better weather conditions have arrived ATTENTION ...

Страница 62: ...e of the stove This conduct should be protected from moisture by isolating it in these places where it is still subject to hot air The isolation used must of course be repulsive to fluids or at least a protective screen must be present Safety distances around the stove to be respected At the back front and sides certain safety distances must be observed from flammable materials These distances are...

Страница 63: ...sed wood which may contain cortex All plastics and chemical components can be very toxic when burning and may endanger the environment as well as polluting or damaging certain parts of your stove and chimney Chopped Only logs with nice big surfaces can burn in an efficient and clean way Smaller logs burn on the other hand burn very bad and slow It is a fact that the temperature that arises in thes...

Страница 64: ...r touch the stove with your bare hands General use stove door stove door handle control handle for combustion air The stove door is closed during operation The operating handle of the stove door is vertical in the closed position Ensure that the lock is securely fastened The stove and operating handle can become very hot during operation We therefore recommend that you always use a suitable heat r...

Страница 65: ... firmly with the control handle Use heat resistant gloves Continuing to burn To refill the stove with wood please re open the air control lever to the right You may refill wood through the filling door on the side as long as there are no more flames visible Always open the door in a gentle manner If necessary you can keep the filling door open for a little while until the flames flare up After 3 m...

Страница 66: ...arly check up and maintenance When it is frequently used it is advisable to do little cleaning chores on frequent basis such as emptying the ash tray grill and cleaning the window Annual maintenance is best executed by your technical installing company Remains of carbon may remain on the grill after having burnt the last time It is not always necessary to remove those completely as in the next com...

Страница 67: ...an be removed using the lever provided The ash tray must not be filled with more than the top edge No cone of ash may form otherwise cooling of the grate will be impossible Open the stove door Hook the handle with the bend in the tab on the ash tray Pull out the ash tray ...

Страница 68: ... on the front can be easily removed upwards To clean the ash compartment the grid can be easily folded up and removed A handle on the front of the grate is provided for this purpose When the ashtray is pulled out the ashtray and the bottom plate under the ashtray can be cleaned ...

Страница 69: ...if necessary To do this open the stove door and unscrew the hexagonal head nut M6 x 20 The hexagonal head nut is screwed in with an M6 nut and 2 washers socket spanner size 10 mm After removing the bolt nut washer and stone holder the deflector plates can be removed one by one downwards Now the post combustion zone and the smoke duct up to the smoke duct connection can be cleaned with a suitable b...

Страница 70: ...lean the window Use some wet newspaper and peel it in the white ashes of the cold stove Rub it on the glass The ashes give a grinding result without really making deep scratches Clean up the window with another humid piece of cloth and shine it up gently with a dry and clean towel You can also find other cleaning products in regular shops It is not forbidden to use them of course but be careful to...

Страница 71: ...wood Don t refill more than 2 3 pcs max Too little combustion air Check that there is a good passage in the supply pipe Install an extra air supply conduct Shut down the ventilation system of the house Signs of smoke at first use of the stove The base paint is drying out Disappears after a while Is harmless Moisture High temperature difference Open the door of the stove a little when starting to h...

Страница 72: ... te contacteren Veuillez contacter votre installateur en cas de problèmes d entretien ou de fonctionnement Please contact your installer in case of maintenance or operation problems Industriepark De Bruwaan 17 9700 Oudenaarde Belgium www belgofire be Versie 07 2022 ...

Отзывы: