background image

2

ENGLISH

IMPORTANT: The instruction manual you are holding includes essential information on the safety measures to 

be implemented for installation and start-up. Therefore, the installer as well as the user must read the instruc-

tions before beginning installation and start-up.

Keep this manual for future reference.

To achieve optimum performance of the Floodlamp follow the instructions provided below:

1.   VERIFY THE CONTENTS OF THE PACKING:

The following accessories are included inside the box: 


Housing body 


Floodlamp unit 


2 watertight joints 

 Clamp 


Bag of screws: 


2 DIN 7981 A2 4,8x16 screws 


16 DIN 7982 5,5x25 screws

2. GENERAL CHARACTERISTICS:

This floodlamp has been designed to be used fully submerged underwater in fresh water swimming pools. It 

is a Class III electric apparatus with very low safety voltage (12V with alternating current). 

The floodlamp compiles with IPX8 degree of protection (resistance to penetration of dust, solid bodies and 

humidity) at a nominal immersion depth of 2 m. 

This floodlamp compiles with international safety standards for lights, especially the EN 60598-2-18 

standard. LIGHTS PART 2: SPECIFIC REQUIREMENTS SECTION 18 LIGHTS FOR SWIMMING POOLS AND 

SIMILAR APPLICATIONS. 

The manufacturer is not responsible in any circumstances for assembly, installation or start-up of any electric 

components which have been inserted or handied at locations other than its own premises.

3. INSTALLATION:

• Never install in vertical positlon with the lamp facing downwards,

•To correctly light a swimming pool we recommend you:

Install a lamp in the range PAR56 V1 every 20 m² of water surface.

Note: Recommendation valid for light coloured pools. In darker coloured pools or stainless steel pools we 

recommend oversizing the proportion of projectors per m².

• In order to prevent glare, the floodlamps should be installed so that they face away from the residence or 

usual view of the swimming pool.

• In the event that lighting is used in training or competition pools, the floodlamps should be installed on the 

sides to prevent glare on the swimmers.

• To avoid the need to empty the pool to change the lamp, we recommend that the floodlamp be installed in 

areas which are accessible from the upper edge of the pool.

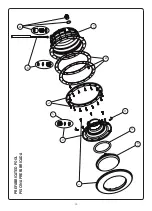
Prior to installation verify that the gland seal (nº 8) has been fully tightened. 

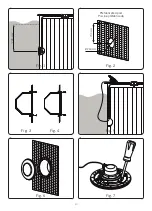
The floodlamp should be placed on the wall of the pool at approximately 400-700 mm from the water surface 

(Fig. 1). 

Prefabricated pool

To install a fioodlamp in prefabricated swimming pool make a circular hole with a diameter of 240 mm (Fig. 2). 

Install the housing (nº 11) and one of the adhesive joints (nº 6) on the outer side of the pool. Install the other 

adhesive joint on the inner side and use two screws DIN 7981 4,8x16 (nº 6) to secure the three components. 

(Fig. 3). Make sure that the cable outlet of the housing remains on the upper part. 

To install the clamp on the inner side of the swimming pool, make sure that the heads of the screws DIN 

7981 4,8x16, which have been installed previously, coincide with the área reserved for them on the back 

part of the clamp. 

Содержание PAR56

Страница 1: ...RO SUBACQUEO LED PAR56 UNTERWASSER SCHEINWERFER LED PAR56 FARO SUBACQUEO LED PAR56 INSTALLATION AND MAINTENANCE MANUAL MANUEL D INSTALLATION ET D ENTRETIEN MANUAL DE INSTALACI N Y MANTENIMIENTO MANUAL...

Страница 2: ...install in vertical positlon with the lamp facing downwards To correctly light a swimming pool we recommend you Install a lamp in the range PAR56 V1 every 20 m of water surface Note Recommendation val...

Страница 3: ...to Connect the cable terminals to the lamp using the 2 screws supplied with the lamp Fig 9 Fully centre the 110x11 O ring n 2 in its seat Firmly tighten the nuts Attention Before any handling ensure...

Страница 4: ...ulation ou rajout de composants lectriques qui ne se seraient pas produits chez lui 3 INSTALLATION Ne jam is installer le projecteur en positlon verticale avec la lampe orient e vers le bas Afin d cla...

Страница 5: ...ter les cosses du c ble la lampe en utilisant les 2 vis fourmes avec la lampe Fig 9 Placer le joint torique 110x11 n 2 bien centr dans son logement Bien serrer tous les crous Attention Avant toute man...

Страница 6: ...esponsabiliza del montaje instalaci n o puesta en funcionamiento de cualquier manipulaci n o incorporaci n de componentes el ctricos que no se hayan llevado a cabo en sus instalaciones 3 INSTALACI N N...

Страница 7: ...punto 4 de montaje teniendo especial cuidado en Conectar los terminales del cable a la l mpara utilizando los 2 tornillos suministrados con la l mpara Fig 9 Poner la Junta t rica 110x11 n 2 bien cent...

Страница 8: ...componenti elettrici che sono stati manipolati o introdotti al di fuori dei suoi stabilimenti 3 INSTALLAZIONE Non installare mal in posizione verticale con la lampada verso il basso Per illuminare co...

Страница 9: ...cura di Collegare i terminali del cavo alia lampada usando le due viti fornite con la lampada Fig 9 Metiere a guarnizione tonca 110x11 n 2 ben centrata nel suo allogglamento Stnngere bene tutti i dadi...

Страница 10: ...ei Verantwortung f r die Montage Installation oder Inbetriebnahme sofern irgendeine Art Handhabung oder Einbau von Elektrokomponenten nicht in seinem Betrieb durchgef hrt worden sind 3 INSTALLATION De...

Страница 11: ...ie oben im Punkt 4 beschrieben wobei auf folgendes besonders geacntet werden mu Die Kabelschuhe werden an der Lampe angeschlossen wof r die beiden mit der Lampe mitgelieferten Schrauben zu verwenden s...

Страница 12: ...onamento por qualquer manipula o ou incorpora o de componentes el tricos que n o tenham sido realizadas nas suas instala es 3 INSTALA O N o instalar nunca na posi o vertical com a l mpada para baixo P...

Страница 13: ...o l mpada utilizando os 2 parafusos fornecidos com a l mpada Fig 9 Para assegurar uma perfeita estanqueidade dever limpar o assento da junta t rica n 2 da l mpada ou substituir a junta se observar alg...

Страница 14: ...14 1 10 2 4 3 7 5 9 11 8 6 PREFABRICATED POOL PISCINA PREFABRICADA...

Страница 15: ...eur 3 4403010305 Niche d ampoule de projecteur 4 4403014304 Clip fixation projecteur 5 4403013506 Bride fixation projecteur Parker 6 4403013501 Joint adhesif projecteur 7 4403010312 Presse etoupe proj...

Страница 16: ...4 4403014304 Befestigungsclipsatz uws 5 4403013506 Flansch mit schrauben uws Parker 6 4403013501 Dichtungen f r flansch uws 7 4403010312 Quetschverschraubung geh use uws M 25 8 4403010313 Wanddurchf h...

Страница 17: ...17 Fig 1 Fig 3 Fig 6 Fig 2 Fig 5 Fig 4 Fig 7 Prefabricated pool Piscina prefabricada 700 mm 700 mm 240mm...

Страница 18: ...18 Fig 8 Fig 9...

Страница 19: ...atibilit lectromagn tique 2004 108 CEE La Directive des appareils basse tension 2006 95 CEE La R glementation Europ enne EN 60598 1 EN 60598 2 18 dans toutes ses modifications DICHIARAZIONE CE DI CONF...

Страница 20: ...serviamo il diritto di cambiare totalmente o parzialmente le caratteristiche tecniche dei nostri prodotti ed il contenuto di questo documento senza nessum preavviso Wir behalten uns das recht vor die...

Отзывы: