


EN - 17
MAINTENANCE SCHEDULE
Perform these required maintenance procedures at the
frequency stated in the table. These procedures should
also be a part of any seasonal tune-up. Some maintenance
procedures may require special tools or skills. If unsure
about these procedures, take the unit to a qualified service
dealer.
NOTE:
Please read the California/EPA statement that came with
the unit for a complete listing of terms and coverage for the
emissions control devices, such as the muffler, carburetor,
etc.
Frequency
Maintenance Required
Every 10
hours
• Clean and re-oil the air filter. Refer to
MAINTAINING THE AIR FILTER.
After the
first 10
hours and
at 38 hours
• Change the oil. Refer to CHANGING THE
OIL.
• Have the rocker arm clearance checked by
a qualified service dealer.
• Check the spark plug condition and gap.
Refer to MAINTAINING THE SPARK
PLUG.
CHECKING THE OIL LEVEL
WARNING:
OVERFILLING THE CRANKCASE MAY CAUSE
SERIOUS PERSONAL INJURY. Check the
oil level before each use. The importance
of maintaining the proper oil level cannot be
overemphasized.
1. Stop the engine and allow it to cool.
2. Set the unit on a flat, level surface, such as a workbench
or table.
NOTE:
Failure to keep the engine level may result in oil overfill.
3. Clean the area around the oil tank cap to prevent debris
from entering the oil fill hole.
4. Unscrew the oil tank cap.
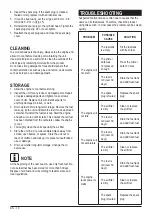
5. Look into the oil fill hole, use a flashlight if necessary.
Add oil to the oil fill hole until the oil level is visible on
the first thread of the oil reservoir (Fig.11).
CHANGING THE OIL
Change the oil while the engine is still warm. The oil will
flow freely and carry away more impurities.
1. Unscrew the nut in oil drain hole (Fig.12).
2. Tip the unit vertically to pour the oil out of the oil drain
hole and into a container. Allow ample time for complete
drainage.
3. Clean the area around the oil drain hole and reinstall the
nut for closing the oil drain hole.
4. Clean up the area around the oil fill hole to prevent the
debris from entering oil tank.
5. Unscrew the oil tank cap.
6. Pour 170 ml(5.7 fl.oz.) oil into the oil fill hole. DO NOT
overfill. Refer to CHECKING THE OIL LEVEL.
7. Wipe up any oil that may have spilled.
NOTE:
Dispose of the old oil according to federal, state and local
regulations.
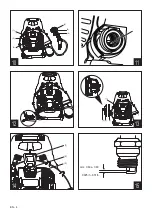
MAINTAINING THE AIR FILTER
1. Pull up the choke lever(1) to close the choke. This
prevents dirt from entering the carburetor throat when
the air filter is removed. Clean up accumulated dirt from
air filter area (Fig.13).
2. Unscrew the air filter cover knob(2) and remove the air
filter cover(3). Clean up dirt from inside cover.
3. Remove the air filter(4).
4. Inspect the air filter and check if it can be reused.
5. Replace the filter if it is damaged, fuel soaked, very dirty,
or the rubber sealing edges are deformed.
6. If the air filter can be reused, clean up debris or dirty
from it. Reinstall air filter and the air filter cover.
NOTE:
Be certain that it fits tightly in the air filter cavity and it is
installed with the original side out.
MAINTAINING THE SPARK PLUG
If the engine will not idle properly:
1. Stop the engine and allow it to cool.
2. Open the spark plug cover(1) and remove the spark
plug cap(2). Then take out the spark plug(3)(Fig.14).
WARNING:
Do not sand blast, scrape or clean spark plug
electrodes. Grit in the engine could damage the
cylinder.
WWW.SABREITALIA.COM
Содержание 4SISON BLB4QL-M
Страница 2: ...1 2 3 4 5 6 7 8 9 10 11 12 15 17 16 14 13 1 2 3 IT 2 WWW SABREITALIA COM...
Страница 3: ...4 6 9 7 5 8 IT 3 ABREITALIA COM WWW S...
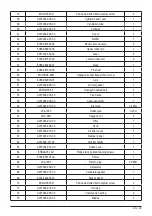
Страница 21: ...IT 21 ESPLOSO RICAMBI WWW SABREITALIA COM...
Страница 26: ...1 2 3 4 5 6 7 8 9 10 11 12 15 17 16 14 13 1 2 3 EN 2 WWW SABREITALIA COM...
Страница 27: ...4 6 9 7 5 3 EN 8 WWW SABREITALIA COM...
Страница 28: ...1 4 5 6 2 3 1 2 3 4 1 2 3 10 11 13 15 12 14 EN 4 0 025 in 0 31 in WWW SABREITALIA COM mm 0 60 a 0 80...
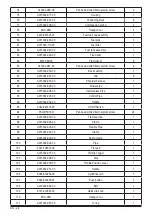
Страница 45: ...EN 21 PARTS VIEW WWW SABREITALIA COM...


