background image

8 12 832 511

Saab 9-3 CV M04-

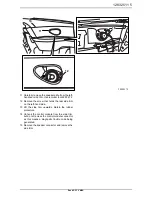
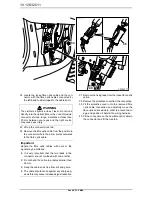
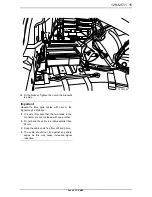
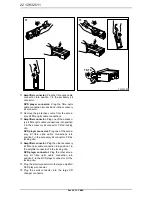
25 Locate the green marked fibre optic cable by the

amplifier.

If there is no colour marking and if there is
no console by the REC:

 Follow the description

in steps 49 and 50 in these installation instruc-
tions, shine a light onto the fibre optic cable by
the amplifier and note the fibre optic cables in
the luggage compartment in order to identify the
fibre optic cable in question. Mark using a piece
of tape.

26 Remove the fibre optic cables' connector (the

small connector) from the amplifier's connector.

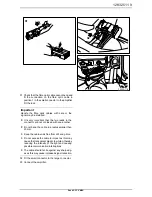
27 Remove the fibre optic cable connected to

position 1 by opening the connector locking clip
and carefully lifting the hook.

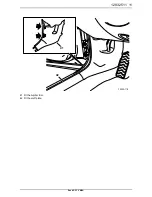
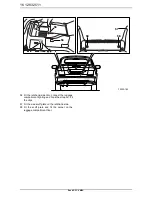
28 Position the kit's fibre optic cable along the car's

existing wiring harness from the amplifier to the
REC.

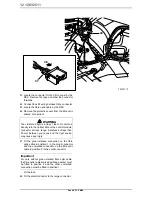
29 Remove the protector from the connection on

the kit's fibre optic cable.

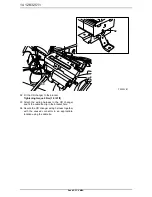
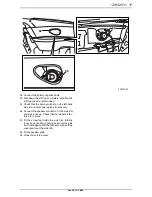
30 Fit the protective cover onto the removed fibre

optic cable connection and carefully move the
fibre optic cable aside in order to prevent
damage.

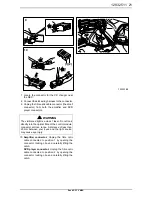
Important

Handle the fibre optic cables with care or the
signal may be distorted.

·

It is very important that the two leads in the
connector are not confused with one another.

·

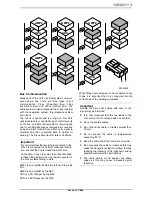
Do not bend the cable in a radius smaller than
25 mm.

·

Keep the cable ends free from dirt and grime.

·

Do not expose the cable to impact as this may
cause the transparent plastic to whiten, thereby
reducing the intensity of the light and causing
possible communication interruptions.

·

The cable should not lie against any sharp edg-
es as this may cause increased signal reduction.

F930A175

26

27

27

28

28

Содержание 12 832 501

Страница 1: ...lt MONTERINGSANVISNING INSTALLATION INSTRUCTIONS MONTAGEANLEITUNG INSTRUCTIONS DE MONTAGE SITdefault Saab 9 3 CV M04 CD changer luggage compartment Accessories Part No Group Date Instruction Part No R...

Страница 2: ...nt 7 Fibre optic cable used only if there is other equipment in the luggage compartment console In addition the following items are required ordered separately To fit For cars without console by the R...

Страница 3: ...that it is connected into the correct side of the existing equipment Important It is very important that everything connected to the O bus is connected in a specific order see illustra tion and that...

Страница 4: ...up both of the rear head restraints to the highest position 6 Press in the lock on the head restraints sleeves Hold the lock pressed in and remove the head restraints 7 Remove the screws for the seat...

Страница 5: ...w that holds the rear side trim on the left hand side 13 Lift the side trim upwards Retain the rubber protectors 14 Unhook the control module from the side trim but do not remove the control module co...

Страница 6: ...he luggage compart ment floor and remove the luggage compart ment scuff plate 19 Remove the side scuff plate on the left hand side 20 Remove the clips for the left hand side trim and fold the trim asi...

Страница 7: ...he left hand side of the car 22 Remove the lower section of the A pillar trim on the left hand side 23 Position the left hand front seat in its most forward position and fold the backrest forwards 24...

Страница 8: ...bre optic cable along the car s existing wiring harness from the amplifier to the REC 29 Remove the protector from the connection on the kit s fibre optic cable 30 Fit the protective cover onto the re...

Страница 9: ...e or the signal may be distorted It is very important that the two leads in the connector are not confused with one another Do not bend the cable in a radius smaller than 25 mm Keep the cable ends fre...

Страница 10: ...er to prevent dam age and position it behind the wiring harness 40 Fit the connection on the new fibre optic cable in the connector and fit the lock tab WARNING The visible red light is a class 1 lase...

Страница 11: ...12832511 11 Saab 9 3 CV M04 41 Fit the A pillar trim 42 Fit the scuff plate F930A178 41 42...

Страница 12: ...d the unmarked connection on the fibre optic cable in position 2 in the small connector Fit the lock 48 Fit the small connector to the large connector WARNING The visible red light is a class 1 laser...

Страница 13: ...fuses from the CD changer 50 Check the CD changer fitting position setting Both sides of the CD changer must be set to position H 51 Fit the bracket clip nut in the square hole near the REC and place...

Страница 14: ...ightening torque 2 Nm 1 5 lbf ft 53 Attach the wiring harness to the CD changer and fit the cable tie clip in the bracket hole 54 Secure the CD changer wiring harness together with the unused connecto...

Страница 15: ...e or the signal may be distorted It is very important that the two leads in the connector are not confused with one another Do not bend the cable in a radius smaller than 25 mm Keep the cable ends fre...

Страница 16: ...and side trim connect the luggage compartment lighting and hook the strap on Fit the clips 57 Fit the side scuff plate on the left hand side 58 Fit the scuff plate and fit the carpet on the luggage co...

Страница 17: ...intact and replace if necessary 62 Connect the speaker connector fit the side trim and press it down Check that the rubber protec tors are in place 63 Fit the screw that holds the side trim fold the...

Страница 18: ...onise remote control code by inserting the key into the ignition 74 Activate window lift pinch protection function by operating the side windows up and down twice An audible confirmation will sound wh...

Страница 19: ...e soft top must be raised 2 Remove the carpet on the luggage compart ment floor and remove the luggage compart ment scuff plate 3 Remove the side scuff plate on the left hand side 4 Remove the clips f...

Страница 20: ...he bracket near the REC and move it aside for better access 6 Amplifier fitted to the bracket near the REC Unplug the amplifier connector DVD player only fitted to the bracket near the REC Unplug the...

Страница 21: ...ble connected to position 1 by opening the connector locking clip and carefully lifting the catch DVD player connector Unplug the fibre optic cable connected to position 2 by opening the connector loc...

Страница 22: ...ssory kit connector Fit the locking clip DVD player connector Plug one of the acces sory kit fibre optic cable connections into position 1 in the accessory kit connector Fit the locking clip 14 Amplif...

Страница 23: ...511 23 Saab 9 3 CV M04 17 Remove the three red transport fuses from the CD changer 18 Check the CD changer fitting position setting Both sides of the CD changer must be set to position H F930A190 18 1...

Страница 24: ...it the cable tie clip in the bracket hole 21 Amplifier fitted to the bracket near the REC Plug in the amplifier connector DVD player only fitted to the bracket near the REC Plug in the DVD player conn...

Страница 25: ...e or the signal may be distorted It is very important that the two leads in the connector are not confused with one another Do not bend the cable in a radius smaller than 25 mm Keep the cable ends fre...

Страница 26: ...Activate window lift pinch protection function by operating the side windows up and down twice An audible confirmation will sound when activa tion is complete 31 Connect the diagnostic tool select ca...

Отзывы: