


21
REPLACEMENT PROCEDURES—COUNTERWEIGHT STRAP REPLACEMENT
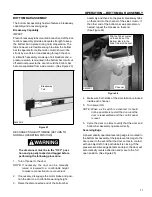
13. Attach the new strap to the counterweight by routing
the strap through the clamp bars in the same man-
ner as the old strap. Tighten the hex screws to
clamp the strap to the weight. (See Figure 51)
Serrated-Flange
Hex Screws
Clamp
Bars
Counterweight
Strap
Counterweight
A8500116
Figure 51
14. Remove the blocking from under the counterweight.
15. Adjust the counterweight as required. (See “COUN-
TERWEIGHT ADJUSTMENT” on page 18)
16. Wrap tape around the loose end of the strap to pre-
vent it from fraying. Cut off any excess strap hang-
ing past the taped end. Then, to hold the loose end
of the strap out of the way, tape it to the main length
of strap.
Take precautions to prevent the door from
being operated as you perform the follow-
ing procedure. Also, be cautious around
moving parts exposed in the side columns.
17. Turn on the power to the door.
18. Cycle the door several times to verify that the strap
is operating correctly. Verify that the counterweight
is properly adjusted. Then make any necessary
adjustments (with power turned off).
19. After all adjustments are complete, reinstall the
hood and the side covers (if hood and covers were
installed) and the side column cover.


