Ryobi 155VP Скачать руководство пользователя страница 17

TROUBLESHOOTING

17

C A U S E

A C T I O N

Cutting attachment bound with grass

Stop the unit and clean cutting attachment

Cutting attachment out of line

Refill with new line

Inner reel bound up

Replace the inner reel

Cutting attachment dirty

Clean inner reel and outer spool

Line welded

Disassemble, remove the welded section 
and rewind the line

Line twisted when refilled

Disassemble and rewind the line

Not enough line is exposed

Push the Bump Knob and pull out line until 
4 inches (102 mm.) of line is outside of the 
cutting attachment

C A U S E

A C T I O N

Battery is not charged

Charge battery. See

Charging the Unit

, page 8.

Overload protection switch has popped

Reset overload protection switch

Add-On Attachment not fully inserted into coupler

Re-insert attachment lower boom until release button 
engages coupler hole, page 9.

MOTOR OPERATES SLOWLY OR WILL NOT OPERATE

BATTERY WILL NOT CHARGE

C A U S E

A C T I O N

No power to charger or battery

Check charger and charging station. See 

Charging 

the Unit

, page 8.

Battery has failed

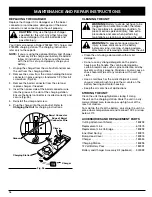
Replace battery. See 

Battery Pack Replacement

page 15.

CUTTING ATTACHMENT WILL NOT ADVANCE LINE

SPECIFICATIONS

Motor . . . . . . . . . . . . . . . . . . . . . . . . . . . . . . . . . . . . . . . . . . . . . . . . . . . . . . . . . . . . . . . . . . . . . . 12 Volt DC, 15 Amps
Battery  . . . . . . . . . . . . . . . . . . . . . . . . . . . . . . . . . . . . . . . . . . . . . . . . . . . . . . . . . . . . . . . . . Sealed Lead-Acid, 12 Volt
Motor Wire Housing Tube  . . . . . . . . . . . . . . . . . . . . . . . . . . . . . . . . . . . . . . . . . . . . . . . . . . . Aluminum Tube, Coupler
Unit Weight (With battery, trimmer add-on attachment, cutting attachment shield and D-handle) . 10.2 lbs. (4.63 kg.)
Trimmer Add-On Attachment:
Cutting Mechanism  . . . . . . . . . . . . . . . . . . . . . . . . . . . . . . . . . . . . . . . . . . . . . . . . . . . . . . . . . . . . . . . . . . .Bump Head
Line Spool Diameter  . . . . . . . . . . . . . . . . . . . . . . . . . . . . . . . . . . . . . . . . . . . . . . . . . . . . . . . . . . . . . . . 3 in (76.2 mm)
Trimming Line Diameter  . . . . . . . . . . . . . . . . . . . . . . . . . . . . . . . . . . . . . . . . . . . . . . . . . . . . . . . . . 0.080 in (2.03 mm.)
Cutting Path Diameter  . . . . . . . . . . . . . . . . . . . . . . . . . . . . . . . . . . . . . . . . . . . . . . . . . . . . . . . . . . . . . 10 in. (254 mm)
Blower Add-On Attachment:
Blower Output  . . . . . . . . . . . . . . . . . . . . . . . . . . . . . . . . . . . . . . . . . . . . . . . . . . . . . . . . . . . . . . . . . . . . up to 120 MPH
Unit Weight (Blower Add-On Attachment Only))  . . . . . . . . . . . . . . . . . . . . . . . . . . . . . . . . . . . . . . . . 2.4 lbs. (1.09 kg.)

BATTERY, MOTOR, TRIMMER ADD-ON ATTACHMENT & BLOWER ADD-ON ATTACHMENT

Содержание 155VP

Страница 1: ...155VP 12 Volt Battery Trimmer Blower OPERATOR S MANUAL FOR QUESTIONS CALL 1 800 345 8746 in U S or 1 800 265 6778 in CANADA www ryobi com IMPORTANT MANUAL DO NOT THROW AWAY...

Страница 2: ...d understood before starting or operating this equipment THIS PRODUCT IS COVERED BY ONE OR MORE US PATENTS OTHER PATENTS PENDING INTRODUCTION TABLE OF CONTENTS 2 I Rules for Safe Operation 3 6 A Impor...

Страница 3: ...tract your attention to possible dangers The safety symbols and their explanations deserve your careful attention and understanding The safety warnings do not by themselves eliminate any danger The in...

Страница 4: ...r size to provide the best grip Use the unit only in daylight or good artificial light Use the right tool Only use this tool for the purpose intended Do not overreach Always keep proper footing and ba...

Страница 5: ...HROWN OBJECTS AND ROTATING CUTTER CAN CAUSE SEVERE INJURY WARNING Do not operate without the cutting attachment shield in place Keep away from the rotating cutting attachment Keep clear of blower outl...

Страница 6: ...d Protection Switch Battery Housing APPLICATION Use the Trimmer Attachment for Cutting grass and light weeds decorative trimming around trees fences etc Use the Blower Attachment to Clean walkways dri...

Страница 7: ...NTING THE CHARGING STATION NOTE Mount the charging unit and allow the unit to charge for at least 36 hours prior to first use This unit may stay on the charging station continuously without overchargi...

Страница 8: ...he unit See Replacing the Charger if not page 16 NOTE The battery will heat up while the unit is being charged Be sure the air vents on the battery housing are kept cleared for proper ventilation Fig...

Страница 9: ...the use of both trimmer and blower Removing Add On Attachments WARNING Battery tools do not have to be plugged into an electrical outlet therefore they are always in operating condition To prevent se...

Страница 10: ...h the Blower Attachment The blower is parallel to the ground and is positioned so debris is blown away from operator Fig 12 2 Depress and hold trigger 3 Release the lock off button TO STOP UNIT Releas...

Страница 11: ...r lengths produces best results Trim only when grass and weeds are dry The life of your cutting line is dependent upon following the previous trimming techniques what is being cut and where the cuttin...

Страница 12: ...s away from people animals glass and solid objects such as trees automobiles walls etc 1 Use around buildings and for normal cleaning Fig 15 Fig 16 Fig 17 OPERATING TIPS WHEN USING THE BLOWER To reduc...

Страница 13: ...ne Wipe off the unit with a clean dry soft cloth Keep air vents free from debris at all times LINE INSTALLATION Always use genuine Ryobi 0 080 in 2 03 mm replacement line Using line other than specifi...

Страница 14: ...clean the inner surface of the outer spool Fig 18 Pg 13 5 Insert the end of the line on the prewound reel through the eyelet in the outer spool Fig 22 6 Place inner reel and spring inside the outer sp...

Страница 15: ...ing the battery housing door closed until the two latches snap into place For Best Performance When reinstalling the battery Check battery terminals for corrosion and clean if necessary Clean terminal...

Страница 16: ...barrel connector or cord become damaged or if the barrel connector is not connecting to the unit properly CAUTION Only use the type of charger specified for this unit Any other type may cause damage t...

Страница 17: ...Re insert attachment lower boom until release button engages coupler hole page 9 MOTOR OPERATES SLOWLY OR WILL NOT OPERATE BATTERY WILL NOT CHARGE C A U S E A C T I O N No power to charger or battery...

Страница 18: ...ble judgement of RYOBI to be defective in material or workmanship will be repaired or replaced by an authorized RYOBI service dealer without charge for parts and labor The RYOBI Product including any...

Отзывы: