


MAINTENANCE AND REPAIR INSTRUCTIONS
13
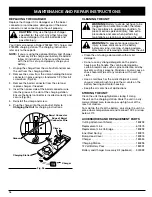
Outer Spool
Spring
Inner Reel
PRESS TABS
Bump Head
Cover
WARNING:
Battery tools do not have to be
plugged into an electrical outlet; therefore,
they are always in operating condition. To
prevent serious personal injury, take extra
precautions and care when performing
maintenance, service or for changing the
cutting attachment or other attachments.
WARNING:
To prevent serious personal
injury, remove or disconnect the battery
before servicing, cleaning, changing add-on
attachments or removing material from the unit.
GENERAL RECOMMENDATIONS
The warranty on this unit does not cover items that have
been subjected to operator abuse or negligence. To
receive full value from the warranty, the operator must
maintain the unit as instructed in this operator’s manual.
BEFORE EACH USE CHECK FOR
DAMAGED/WORN PARTS
• Bump head — Replace bump head parts
that are bent, warped, cracked, or damaged in any
way.
AFTER EACH USE CLEAN UNIT
AND LABELS
• Clean the unit using a damp cloth with a mild
detergent.
NOTE: Do not use any strong detergents on the plastic
housing or the handle. They can be damaged by
certain household cleaners that contain aromatic
oils such as pine and lemon, and by solvents
such as kerosene.
• Wipe off the unit with a clean, dry, soft cloth.
• Keep air vents free from debris at all times.
LINE INSTALLATION
Always use genuine Ryobi 0.080 in. (2.03 mm.)
replacement line. Using line other than specified may
cause the unit to overheat or fail.
WARNING:
Never use metal-reinforced line,
wire, or rope, etc. These can break off and
become a dangerous projectile.
There are two methods to replace the trimmer line:
• Wind the inner reel with new line.
• Install a prewound inner reel.
Winding the Existing Reel
1. Remove the bump head cover by pressing in both
bump head cover tabs visible on either side of the
bump head outer spool (Fig. 18).
NOTE:
The spring will push the cover up when the tabs
release.
2. Remove the inner reel and spring (Fig. 18).
3. Use a clean cloth to clean the inner surface of the
outer spool (Fig. 18).
Fig. 18
Indexing Teeth
Inner Reel Hole
4. Check the indexing teeth on the inner reel and outer
spool for wear (Fig. 19). If necessary, remove burrs
or replace the reel and spool.
NOTE:
Always clean the inner reel, outer spool, and
shaft before reassembling the bump head.
5. Take approximately 12 feet (3.6 m) of new trimming
line, insert one end of the line into the hole in the
inner reel (Fig. 20).
6. Wind the line, in even and tight layers, onto the reel
(Fig. 20). Wind the line in the direction indicated on
the inner reel.
NOTE:
Failure to wind the line in the direction indicated
will cause the bump head to operate incorrectly.
Fig. 19
Fig. 20