Russound TCH1 Скачать руководство пользователя страница 12

12

Russound TCH1 Installation Manual

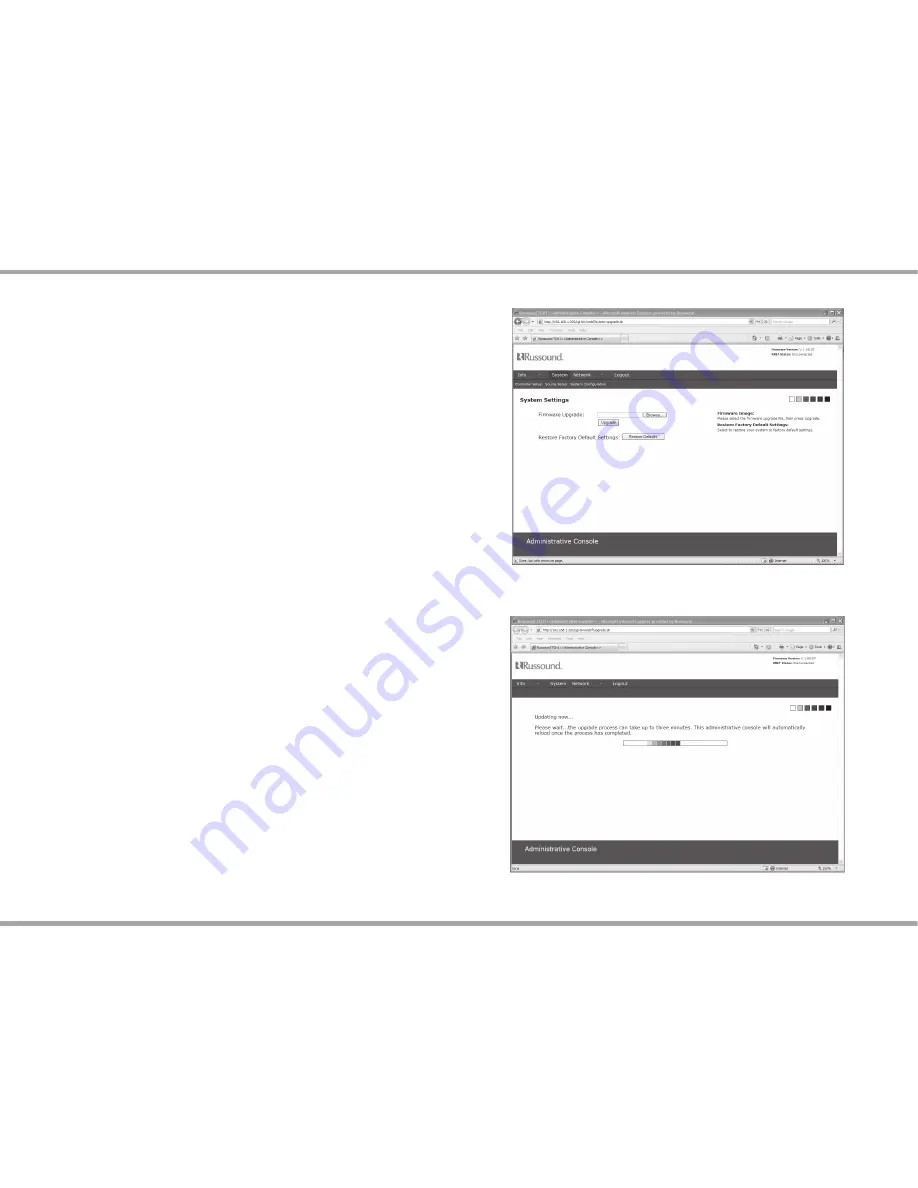
Update Procedure or Restore Defaults

The TCHS1 may be field upgraded to provide additional features and 

functionality. It may also be restored to factory default settings.

To  update  the  TCH1  you  will  need  the  Firmware  Image  file  from 

the  Russound  Document  Center,  and  a  PC,  MAC,  or  Linux  computer 

connected to your home network.    

Download  the  file  to  a  known  location  on  your  computer  from 

1. 

which you can retrieve the file.
Connect to the TCH1 administrative console: http://<IP Address of 

2. 

the TCH1>/admin.html
Enter the user name (admin) and password (russound)

3. 

Select  System  Configuration  from  the  main  menu  of  the 

4. 

Administrative Console.
Click  the  Browse  button  and  locate  the  Firmware  Image  file 

5. 

previously downloaded.
Click the Upgrade button. The update can take up to 3 minutes.

6. 

When  the  update  is  complete,  the  TCH1  displays  a  message 

7. 

indicating  that  the  upgrade  was  successful  and  will  then  reboot. 

The new version number shows in the Administrative Console on 

the top right corner of the Web page.

Alternate Method to Restore Defaults

If  the  IP  address  is  not  readily  available,  an  alternate  method  to 

restore defaults is to press and hold the EZ Setup button on the back 

of the unit and cycle power at the same time. Continue to hold the 

button  down  for  90  seconds  until  the  RNET  LED  illuminates  for  two 

seconds. Release button.

FIRmWARE UpdATE

Firmware Update screen

Firmware Update progress screen

Содержание TCH1

Страница 1: ...TCH1 RNET Touchpoint Installation Manual ...

Страница 2: ...ikely to be walked on or pinched by items placed upon or against them paying particular attention to cords at plugs receptacles and the point where they exit from the appliance Cleaning The appliance should be cleaned only 12 as recommended by the manufacturer Non Use Periods The power cord of the 13 appliance should be unplugged from the outlet when left unused for a long period of time To remove...

Страница 3: ...Front and rear views 5 Installation connections 6 7 Configuration 8 11 Firmware update 12 User interface 13 Zone selection and settings 14 Source selection 15 Technical specifications 16 Warranty 17 TABLE OF CONTENTS Agency Approvals TCH1 Touchpoint Station ...

Страница 4: ...ms included are 6 CAT 5 network patch cable for connection from the TCH1S to the existing LAN USB to RS232 Serial adapter DB9 extension cable required for connection to the Russound multi room audio system Antenna Power supply product OVERVIEW Features Compatible with the Apple iPhone and iPod touch Supports all Russound RNET enabled and CAA66 controllers Controls any zone and any source in the sy...

Страница 5: ...ty of corresponding back panel ports WAN Not used Antenna Screw to the ANT jack for WiFi communication to the home network router USB Use supplied adapter to connect to the controller s RS232 serial port DC Connect interface power supply and plug into 120VAC outlet EZ Setup Will restore the unit s IP address back to factory default LAN 1 2 3 4 10 100 Ethernet switches RJ45 connectivity to home net...

Страница 6: ...te with the router via a WiFi connection The TCHS1 must be on the same network as any Ethernet connections to RNET controllers or components Connect the supplied adapter to the USB port on the TCHS1 and 2 connect the serial extender cable to the RS232 port on the RNET controller on ACA E5 multiroom controller use RS232 port A If it is a multiple controller system the TCHS1 must be connected to con...

Страница 7: ...AT 5 cable between the TCHS1 and the home network router the wireless capability can be enabled during setup There must be a hard wired connection from the TCHS1 to the computer to perform the setup installation and Connections Basic Installation cont d Connect the computer to a TCHS1 LAN port WAN port is not 4 used with an Ethernet cable either directly or through a switch on the home network If ...

Страница 8: ...lt gateway For a PC running Windows either check the settings in the TCP IP properties or type ipconfig in the command line prompt For a Mac under System Preferences select Network To set up the TCH1 from your computer make sure it is on the 192 168 1 x network You may have to temporarily change this on your computer to first configure the IP address of the TCHS1 to the required settings of the lo...

Страница 9: ...network e g if your PC is configured to use 192 168 1 20 use the default IP address of 192 168 1 200 Enter the netmask for your existing home network The default is 2 255 255 255 0 Enter the default gateway IP address This is the IP address of your 3 home router Click Save Changes 4 IP Address Enter an unused static address on your network Netmask Mask indicates what addresses are included in your...

Страница 10: ...Check the settings on your 4 access point to make sure you have the correct ESSID Enter the encryption settings of your home network If you are not 5 using encryption set Encryption Type to disabled If using WEP security enter the passphrase for your wireless router 6 and generate the WEP keys accordingly then select one of the WEP keys to use If using WPA PSK or WPA2 PSK enter the PSK for the wir...

Страница 11: ...f the user interface Click Save Changes 3 Source Setup Enter a source name and source type for each source If the 1 source does not support RNET the source type should be set to Standard IR When a source input is not being used leave the source name blank 2 and select None in the corresponding source type combo box Click Save Changes 3 Configuration Controller Type Choose appropriate Zone Names En...

Страница 12: ... from the main menu of the 4 Administrative Console Click the Browse button and locate the Firmware Image file 5 previously downloaded Click the Upgrade button The update can take up to 3 minutes 6 When the update is complete the TCH1 displays a message 7 indicating that the upgrade was successful and will then reboot The new version number shows in the Administrative Console on the top right corn...

Страница 13: ...elects next lower channel frequency Selects next higher channel frequency Selects previous preset current bank Selects next preset current bank AM FM Toggles between AM and FM bands SMS3 Smart Media Server Selects previous theme Selects next theme Restarts current song selects previous song in queue Selects next song in queue Pause Unpause iBridge Selects previous playlist Selects next playlist Pl...

Страница 14: ...Playing page Zone Settings Touch for the menu to view change zone audio settings and mode status Master Party DND and Shared Zone Page Touch zone name to select that zone for control Zone Settings On the Zones page touch the small blue arrow button to access the Zone Settings menu Audio Options Touch to change settings DND Change zone or source to Do Not Disturb Party Turn on exit or participate i...

Страница 15: ...er selecting a source it will return to the Now Playing screen Audio Mode Option Touch to control Done Saves setting and returns to Zone Edit page source selection Previous Next Goes to previous or next zone setting Zone Settings cont d When an individual option is selected the adjustment window appears for choosing specific setting options levels Now Playing Touch to return to Now Playing page ...

Страница 16: ...g Antenna 1 x 2dBi Built in Frequency Band Bandwidth 2 4 GHz IEEE 802 11b g ISM Channels 1 to 11 IEEE 802 11b g North America Wireless Transmission Speed 54Mbps Transmission Speed Details 54Mbps Auto fallback IEEE 802 11g6Mbps Interfaces Ports 4 x RJ45 10 100Base TX LAN1 x RJ45 10 100Base TX Connectivity Media 10 100Base TX Category 5 Twisted Pair Wired Data Transfer Rate 100Mbps Fast Ethernet Ser...

Страница 17: ...nly through authorized Dealers and Distributors to ensure that customers obtain proper support and service Any Russound product purchased from an unauthorized dealer or other source including retailers mail order sellers and online sellers will not be honored or serviced under existing Russound warranty policy Any sale of products by an unauthorized source or other manner not authorized by Russoun...

Страница 18: ...18 Russound TCH1 Installation Manual NOTES ...

Страница 19: ...19 Russound TCH1 Installation Manual Notes ...

Страница 20: ...1344 05 01 09 2009 Russound All rights reserved All trademarks are the property of their respective owners iPhone and iPod touch are registered trademarks of Apple Inc Specifications are subject to change without notice Russound is not responsible for typographical errors or omissions TCH1 RNET Touchpoint Installation Manual ...

Отзывы: