background image


Installation 


1


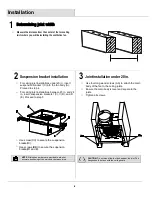
Determining joist width 


Measure the distance from the center of the two ceiling 
joists where you will be installing the ventilation fan.  


2


Suspension bracket installation 

3


Joint installation under 20 in. 

□  For ceiling joist installations under 20 in., insert 

suspension bracket I (C) into the fan body (A). 
Proceed to step 4. 

□  For ceiling joist installations between 20 in. and 24 

in., insert suspension brackets I (C), II (D), and III 
(E). Proceed to step 5. 


NOTE

: Sliding hanger bars are provided to allow for 

accurate positioning of the main body between joists.


□  Use four long wood screws (AA) to attach the main 

body of the fan to the ceiling joists. 

□  Ensure the main body is level and square to the 

joists. 

□  Tighten all screws. 


CAUTION:

 Do not mount the fan flush against the joist. The 

flange should be flush with the ceiling board.


□ 

Use screw(CC) to secure the suspension

□ 

Use screws (BB) to secure the supension

bracket(C).

bracket(D and E).

Содержание BPT18-44A

Страница 1: ... BPT18 44A It is very important that you read this manual installation for your safety and efficiency of the unit Please be advised that all units should be installed by a licensed electrician READ AND SAVE THESE INSTRUCTIONS ...

Страница 2: ...must be carried out by qualified person s in accordance to all local and safety codes including the rulers for fire rated construction 12 Sufficient air supply is required for proper combustion and the exhausting of gases through the chimney flue of fuel burning equipment to prevent back drafting See the standards of NFPA National Fire Protection Association and ASHRAE American Society for Heating...

Страница 3: ...the dimensions on page 12 to determine the required hole size for the ceiling The grill edges should overlap the finished ceiling NOTE If installing in existing construction you must have access to space above and below the installation location This unit will operate most quietly and efficiently when located where the shortest possible duct run and minimum number of elbows will be needed Do not i...

Страница 4: ...ons possible for this ventilation fan Not all configurations are shown If your installation requires a variation other than those shown consult with a licensed contractor to determine the best installation for your project If you are replacing an existing fan ensure that the new grill will adequately cover the existing opening TOOLS REQUIRED Hammer Safety goggles Phillips screwdriver Level Electri...

Страница 5: ...e not shown to actual size Part Description Quantity AA Long wood screw M4x30 8 BB Short screw M4x12 2 CC Short screw M4x8 1 PACKAGE CONTENTS Part Description A Fan body B Grill C Suspension bracket I D Suspension bracket II E Suspension bracket III AA BB CC B ...

Страница 6: ...ions between 20 in and 24 in insert suspension brackets I C II D and III E Proceed to step 5 NOTE Sliding hanger bars are provided to allow for accurate positioning of the main body between joists Use four long wood screws AA to attach the main body of the fan to the ceiling joists Ensure the main body is level and square to the joists Tighten all screws CAUTION Do not mount the fan flush against ...

Страница 7: ...oist Secure the suspension brackets C D and E to the joist using long wood screws AA Ensure the main body is level and square to the joists Tighten all screws CAUTION Do not mount the fan flush against the joist The flange should be flush with the ceiling board Install a circular duct 1 to the outlet and secure Install the duct with a gradient of 1 2 to the outside 1 it with duct tape or clamps to...

Страница 8: ...ese colors determine what each house wire represents before connecting You may need to consult a licensed electrician to determine this safely Connect house wires to ventilation fan wires Match colors as shown black to black white to white and green to green using wire nuts not provided Replace the junction box cover Do not pinch the lead wires Use the spring clips to pinch mount and insert the gr...

Страница 9: ...5 Sone Power consumption Watts 42 W Speed 660 rpm Air deliver at 0 1 WG 150 cfm Weight 10 78 lbs 4 9 kg DIMENSIONS Ceiling opening length 10 8 in 27 4 cm Ceiling opening width 10 5 in 26 7 cm Ceiling opening depth 8 5 in 21 6 cm Housing dimension length 10 2 in 25 9 cm Housing dimension width 10 2 in 25 9 cm Housing dimension depth 8 0 in 20 30 cm ...

Страница 10: ...ove dust and dirt from the fan housing with a vacuum cleaner Dampen a cloth with dish detergent wipe the fan housing and dry with a cloth Replace the grill To reduce the risk of fire always vent fans to the exterior and in compliance with local codes Do not vent exhaust air into spaces within walls ceilings attics crawl spaces or garages Unplug or disconnect the appliance from the power supply bef...

Отзывы: