background image

  ELX4 -60 

ADVANCED CONFIGURATION 


58 

2003.05.21 (v 1.0) 

Rugged CCTV


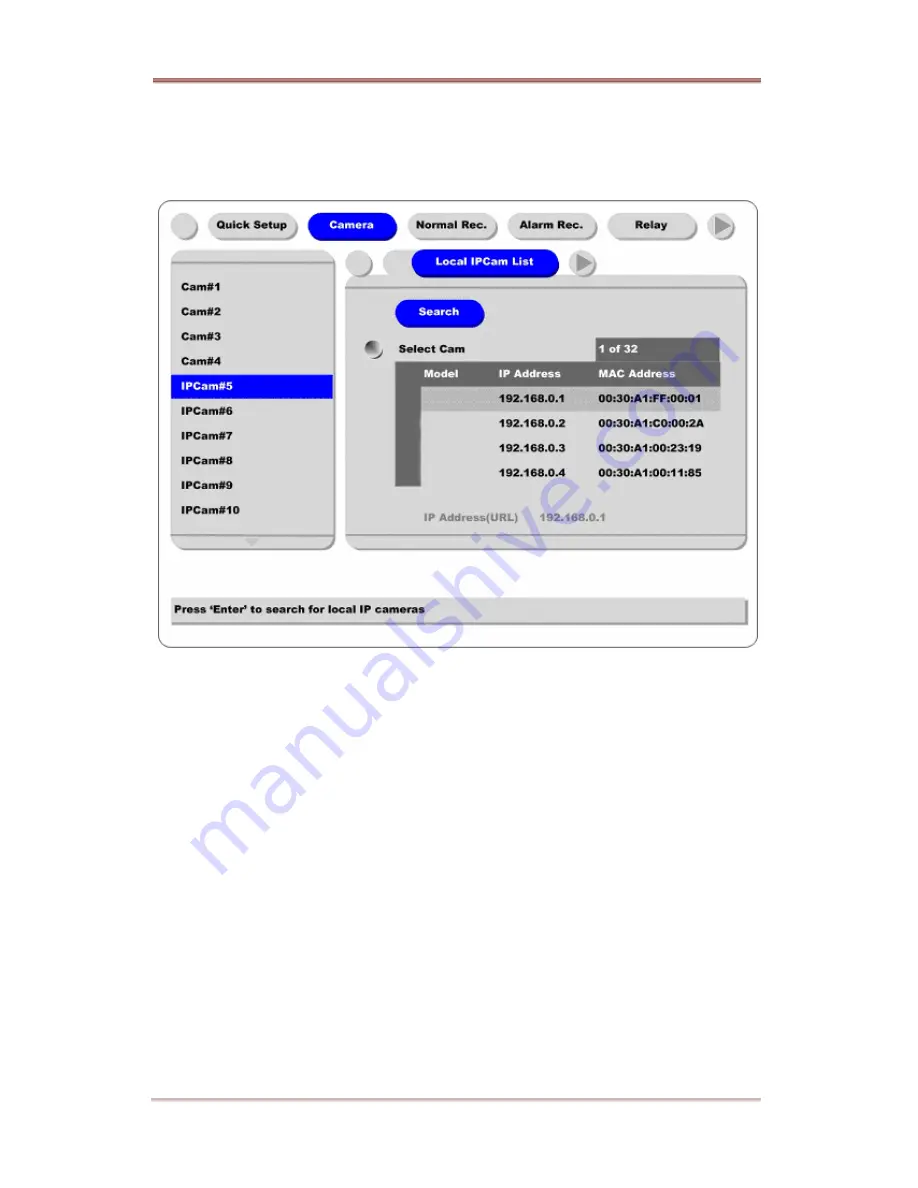
6.2.2.   Local IP Cam List 

This menu is for easy registering of local IP cameras. If  ELX4 -60 is connected to network and IP 

cam era s are connected to the same local network, they are listed in this menu. 


Search   

Select this button and press the [ENTER] button to refresh the list of local IP cameras.    


Select Cam 

Select  “Select Cam” by pressing the [ENTER] button and select the desired IP camera fr om the list. 

When using this method, the IP Address, Type, and Port are automatically configured on the previous 

screen. 


Содержание ELX4-60

Страница 1: ...ELX4 60 User s Guide CCTV Monitor User v 1 0...

Страница 2: ...to radio communications However there is no guarantee that interference will not occur in a particular installation If this equipment does cause harmful interference to radio or television reception w...

Страница 3: ...nnecting ELX4 60 directly to an AC current will cause electric damages to ELX4 60 4 Be careful not to drop the ELX4 60 Physical shocks may harm the product In addition be sure the ELX4 60 is secured a...

Страница 4: ...nels with sequence mode 13 3 5 Viewing an alarm triggered channel 14 3 6 Viewing images with Digital Zoom 14 3 7 Viewing with connected PTZ 14 3 8 Using Relay 16 3 9 Using Screen Lock 16 4 Playback 16...

Страница 5: ...7 4 Special Time 40 5 7 5 Security 41 5 7 6 Disk Setup 42 5 7 7 Network 43 5 7 8 Serial Setup 49 5 7 9 Miscellaneous 50 5 8 Utility 52 5 8 1 Disk Manager 53 Advanced Configuration 55 6 Using IP Cam 55...

Страница 6: ...l Rec menu 63 7 2 Using Keyboard 64 7 2 1 Setting at Serial Setup s RS232 menu 64 7 2 2 Setting at Serial Setup s PTZ menu 64 APPENDIX 65 Appendix 1 Technical Specification 66 Appendix 2 Utilizing IP...

Страница 7: ...efficiency ELX4 60 records over 30 days on a 200GB hard disk drive when recording 4 channels at the speed of 10ips per channel ELX4 60 also allows users to record and playback audio for one channel S...

Страница 8: ...nditions Intelligent file system for managing event triggered video data ATM POS transaction information text recording and search with corresponding video Text search function is supported through DV...

Страница 9: ...recording at a lower rate PLAY Displays playback status The rate of blinking indicates the speed of playback i e When blinking rapidly ELX4 60 is playing back at a high rate when blinking slower the E...

Страница 10: ...elected menu or lock current screen Arrow key Replay function or to move inside the Configuration menu 2 2 Rear Panel 1 Serial Port DIO Serial RS232 9Pin D Sub Connector RS232 422 485 terminal block S...

Страница 11: ...ugged CCTV 2003 05 21 v 1 0 11 2 3 Installation Summary Connect Camera Connect Monitor Connect Ethernet This is optional to view image on remote location or to add IP channel to ELX4 60 Connect Audio...

Страница 12: ...r switch On LED is on and ELX4 60 starts booting After start up the basic screen quad split is displayed If user password is set a dialogue box for entering the password will appear 3 2 Viewing single...

Страница 13: ...Seq Switching sec and press the ENTER button Set any value between 1 and 60 seconds Then press the SEQ button from any viewer mode except 16 13 split screen Note Sequence mode can run only when connec...

Страница 14: ...enable the digital zoom press the ZOOM button Digital Zoom will expand the image to twice its normal size Default location of the digital zoom is in the center of screen The zoom box can be moved each...

Страница 15: ...om Focus from the PTZ Menu Control zoom and focus functions using the up down left and right arrows of front panel Load Preset To load preset for dome camera during live monitoring mode Press the SELE...

Страница 16: ...3 seconds lock mode will run with showing Screen Locked message If lock mode runs any function button will not be operated In order to cancel lock mode user password should be entered 4 Playback To re...

Страница 17: ...he Arrow button To cancel the zoom box press the ZOOM button once more 4 1 4 Various playback modes PLAY To begin playback mode and replay at 1x speed After pressing PAUSE PLAY will advance recorded i...

Страница 18: ...uring playback mode Search for data by entering Date Time or by selecting an event from the Event Log browser Press the ENTER button after entering the desired Date Time or selecting Event from log Th...

Страница 19: ...er To copy backup delete the recorded data This menu is activated during playback mode Press the SELECT button and MENU button in Playback mode 4 3 1 Copy Image To copy a specific data with USB memory...

Страница 20: ...Time To designatebackup range Select Disk To select which storage will be used as backup device To change the disk status use the Disk Manager menu under the System tab Note Backup Manager does not s...

Страница 21: ...he recording schedule based on alarm conditions Motion Detection Sensors etc Also Quick Setup has time setting menu 5 1 1 Date Time When ELX4 60 is manufactured in factory time zone will be set as GMT...

Страница 22: ...sed in Arizona This menu is linked with Time Zone menu Namely if selecting daylight saving area in time zone this menu will be activated Oppositely if selected time zone is not enforced it will not be...

Страница 23: ...ote Most setting values are applied automatically when exiting from the related menu page But Date Time settings are not applied automatically because they may critically affect the file system of the...

Страница 24: ...ally the status is marked as Macro Setup Otherwise it is marked as Custom Setup Channel Status When On all four analog channels will record based on the Quick Setup settings Recording Speed Quality Th...

Страница 25: ...era status is automatically set as On Settings such as Brightness and Contrast can be set for each channel The values assigned will apply for both monitoring and playback modes Button control Press ME...

Страница 26: ...n ELX4 60 front panel 0 to 9 When using the ARROW buttons use the PLAY button to select each choice The intersection between the horizontal and the vertical bar is the select ed choice Press t he butt...

Страница 27: ...a To toggle the setting use dip switch on the rear panel of ELX4 60 For each of the following settings use the ENTER button to access the setting then the ARROW buttons to change the values Color Set...

Страница 28: ...cording settings based on channel and timetable If this menu is configured Q uick Setup the previous Quick Setup values will be replaced by the Normal Recording settings Time Schedule Each camera can...

Страница 29: ...ttons The Night range is set automatically based on Day range Recording Speed Quality There are four conditions Low Standard High Custom All conditions except Custom synchronize Speed ips and Quality...

Страница 30: ...an be designated as Special Time Event Recording Press the ENTER button to access the Event Recording feature Set On Off using the or buttons Event recording condition is set under the Alarm Recording...

Страница 31: ...tivate this schedule set Event Recording under the Normal Recording tab to On MD Choose from among four sensitivity conditions Off Low Standard High MD Area Customize the MD area Default value is Sele...

Страница 32: ...nd press the ENTER button Press the EXIT button when finished Text In order to display or record text with image it should be set as On For more detail setting methods please refer to Using Text Data...

Страница 33: ...BASIC CONFIGURATION ELX4 60 Rugged CCTV 2003 05 21 v 1 0 33 Post Alarm sec Set a value up to 60 seconds to maintain recording conditions Post Alarm...

Страница 34: ...ime schedule Relay commands are only used with events triggered with the four analog channels Setup Alarm triggered events MD or Sensors can be set to trigger Relays 1 through 4 When set the event wil...

Страница 35: ...witching sec To set sequence time between 1 and 60 seconds Alarm Pop up Pop up Hold sec To set alarm pop up screen Pop up duration time can be set between 5 and 10 seconds If setting as Keep pop up sc...

Страница 36: ...channel or with all of them Recording Set to On using the ENTER button and the ARROW buttons to record audio Audio Gain Increases or decreases the sensitivity to the audio signal Can be set between 7...

Страница 37: ...t text data both of menus should be set as On Sync Text With To set channel to synchronize with text Device Currently the protocol of Star Finger 007 Access control model is built in ELX4 60 as text d...

Страница 38: ...a is transmitted to ELX4 60 ELX4 60 can recognize it as starting point Two headers can be set maximally Delimiter Because delimiter value may be different refer to the manual of related device Timeout...

Страница 39: ...d Day Night Weekday Start End Press ENTER to access the Time Setting Set the range for Weekday between Monday and Sunday using the or buttons Weekend is set automatically based on Weekday range Day St...

Страница 40: ...ELX4 60 BASIC CONFIGURATION 40 2003 05 21 v 1 0 Rugged CCTV 5 7 4 Special Time Up to four zones can be designated as Special Time...

Страница 41: ...efault password is 0000 Admin Password Designate an Administrator s Password to control access to Configuration Menu and full system control authority Default password is 9999 Remote Setup When set to...

Страница 42: ...re written over based on a first in first out basis Images recorded based on Alarm conditions are not written over Auto Del Alarm If enabled all images Normal and Alarm will be written over based on a...

Страница 43: ...If ELX4 60 is connected on xDSL line that needs PPPoE process to connect to the Internet administrator should select xDSL However if the xDSL line does not need PPPoE process administrator should sel...

Страница 44: ...led Users on the LAN can connect to the ELX4 60 using the private IP address and outside users can connect to the ELX4 60 over the Internet IP Address NetMask and Gateway Address Administrator may con...

Страница 45: ...rator should configure the user ID and password for PPPoE ID The password may be acquired from the ISP that installed the line Once configured the ELX4 60 will receive an IP address when it is connect...

Страница 46: ...hen they want to access the ELX4 60 To register dynamic IP address to HRS configure the descriptions below If using xDSL modem or Cable modem configuration should be the same HRS Interval HRS Interval...

Страница 47: ...the HRS from the ELX4 60 belonging to group The group ID should be unique to avoid unauthorized access to the ELX4 60 Unauthorized users will not be able to access the ELX4 60 unless they have a logi...

Страница 48: ...er to an open port some firewalls and or ISPs block certain ports press the ENTER button and use the dialogue box TP Server Port The port used for Transparent Protocol server Firewall Port If there is...

Страница 49: ...vices connected via the DB 9 pin and the other for PTZ setting and one RS 422 485 menu Device Designate the connected external device Interface Used to designate the protocol on the RS422 RS485 Menu B...

Страница 50: ...h a single IR Remote Control Designate each unit with a unique number under the Remote Control ID menu How to register remote controller Aim remote controller at the ELX4 60 Press the ID button of rem...

Страница 51: ...ted automatically For example 1 st ELX4 60 has five cameras and 2 nd ELX4 60 has six camer as keyboard PTA address of 1 st ELX4 60 should be set as 1 and one of 2 nd ELX4 60 be set as 6 Be cautious th...

Страница 52: ...2003 05 21 v 1 0 Rugged CCTV 5 8 Utility The following description is how to add format internal or external HDD ELX4 60 supports various external storages Button control Press MENU button and move t...

Страница 53: ...d To add disk Remove To remove current HDD formatted for use Format To set format In this case Alarm Partition menu is activated Confirm Removed Removed HDDs are still listed in the system and can be...

Страница 54: ...ng Add used command it will be changed to R There is no need to format again F Connected but not available file system After using Add need to format to make HDD available for recording R Connected an...

Страница 55: ...s and 4 analog cameras simultaneously And current system can be expandable easily with connecting text or keyboard device 6 Using IP Cam 6 1 Activating IP Cam menus To setup the IP cam menu first enab...

Страница 56: ...P cam setting menu 6 2 1 Configuration Button control Press MENU button and move to each IPCam 5 to 16 below Camera menu Then select Configuration menu by pressing the ENTER button and using the or bu...

Страница 57: ...ly enter the IP using the dialog box similar to the box for Name or select an IP from the Local IP Cam List To use the Local IP Cam List please refer to the next page Port Press the ENTER button to op...

Страница 58: ...P cameras are connected to the same local network they are listed in this menu Search Select this button and press the ENTER button to refresh the list of local IP cameras Select Cam Select Select Cam...

Страница 59: ...Ch 16 This menu is for configuring the normal recording settings based on channel and timetable IP Cams cannot be setup with Quick Setup menu All conditions for recording IP camera channel s are set o...

Страница 60: ...u cannot be set like analogue camera because only the i Rec series can transmit event signals to ELX4 60 IP Cam Event Currently only the i Rec series is compatible with the ELX4 60 for IP cam events S...

Страница 61: ...to use text device the following four menus should be set Text menu Serial Setup s RS232 menu Alarm Rec menu Normal Rec menu 7 1 1 Setting at Text menu Set both Recording and Monitoring as On Set Syn...

Страница 62: ...D CONFIGURATION 62 2003 05 21 v 1 0 Rugged CCTV 7 1 2 Setting at Serial Setup s RS232 menu Set RS232 s device menu as Text And set baud rate parity stop and data 7 1 3 Setting at Alarm Rec menu Set te...

Страница 63: ...yed image is different The default value of Monitoring mode is to show just channel number Then next step is to show channel name and text event status and HDD status The default value of Playback mod...

Страница 64: ...Serial Setup s RS232 menu Serial Setup s PTZ menu 7 2 1 Setting at Serial Setup s RS232 menu Set RS232 s device menu as Keyboard And set baud rate parity stop and data 7 2 2 Setting at Serial Setup s...

Страница 65: ...APPENDIX ELX4 60 Rugged CCTV 2003 05 21 v 1 0 65 APPENDIX APPENDIX...

Страница 66: ...pression Rate 20 1 500 1 Average file size 3 5KB Standard Quality Video Channel NTSC or PAL video format are supported 4Ch analog video inputs via BNC connector Recording Performance on 360X243 Analog...

Страница 67: ...USB storage Compact Flash Smart Media Memory Stick SD Card Displaying Performance Frame Rate on CCTV Monitor Max 120fps Frame Rate on PC Max 60ips Display Channel Quad Auto Sequential Misc Play speed...

Страница 68: ...PPoE Line 10 100Mbps Ethernet RJ 45 Simultaneous User Support over Network Monitoring Max 5 users Playback Max 5 users Management and Firmware Upgrades Firmware upgrades via Network Security Password...

Страница 69: ...struction xxx 0 255 e g 192 168 1 1 2 Network class A class A network that contains IP addresses from 0 to 127 at room X1 Network ID X1 Host ID X2 X3 X4 Total number of A class networks is 128 in the...

Страница 70: ...emote users can access local network over Internet through the gateway router Generally the second number is assigned as Gateway address Broadcast address It is to broadcast to all devices that are co...

Страница 71: ...resses xxx xxx xxx 130 xxx xxx xxx 254 3 To use as three sub networks 1 4 1 4 1 2 Sub Network ID xxx xxx xxx 0 Gateway Address xxx xxx xxx 1 Subnet Mask 255 255 255 192 Broadcast Address xxx xxx xxx 6...

Страница 72: ...64 Gateway Address xxx xxx xxx 65 Subnet Mask 255 255 255 192 Broadcast Address xxx xxx xxx 127 IP Addresses xxx xxx xxx 66 xxx xxx xxx 126 Sub Network ID xxx xxx xxx 128 Gateway Address xxx xxx xxx...

Страница 73: ...ELX4 60 Rugged CCTV 2003 05 21 v 1 0 73 Rugged CCTV 5327 Cedar Creek Dr Kemp Texas 75143 Tel 866 301 2288 Fax 903 498 8989 Technical Support 1 866 301 CCTV URL www rugged cctv com E mail sales rugged...

Отзывы: