background image

5 — English


SECURE WORK

 firmly against the miter guide or fence. 


NEVER

 stand or have any part of your body in line with 

the path of the wheel.


NEVER

 attempt to free a stalled wheel without first turning 

the saw 

OFF 

and disconnecting the saw from the power 

source.


IF THE POWER SUPPLY CORD IS DAMAGED, 

it must 

be replaced only by the manufacturer or by an authorized 
service center to avoid risk.


AVOID AWKWARD OPERATIONS AND HAND  
POSITIONS

 where a sudden slip could cause your hand 

to move into the cutting tool.


MAKE SURE THE WORK AREA HAS AMPLE LIGHTING


to see the work and that no obstructions will interfere with 

safe operation 

BEFORE 

performing any work using the 

saw.


ALWAYS TURN OFF SAW 

before disconnecting it, to 

avoid accidental starting when reconnecting to power 

supply.


THIS TOOL 

should have the following markings:

  a) 

Wear eye, hearing, and breathing protection.

  b) 

Use splash hood for every operation for which it can 

be used.

  c)  Disconnect saw before servicing, when changing 

cutting wheels, and cleaning.

  d)  Use tool only with smooth edge cutting wheels free 

of openings, grooves, and teeth.

  e) 

Replace damaged cutting wheel before operating.

  f) 

Do not fill water bath above water fill line.


SAVE THESE INSTRUCTIONS.

 Refer to them  

frequently and use to instruct other users. If you loan 
someone this tool, loan them these instructions too.

SPECIFIC SAFETY RULES

CALIFORNIA PROPOSITION 65

WARNING:


This product and some dust created by power sanding, sawing, grinding, drilling, and other construction activities 
may contain chemicals, including lead, known to the State of California to cause cancer, birth defects, or other 
reproductive harm. 

Wash hands after handling. 


Some examples of these chemicals are:


• lead from lead-based paints,


• crystalline silica from bricks and cement and other masonry products, and


• arsenic and chromium from chemically-treated lumber.


Your risk from exposure to these chemicals varies, depending on how often you do this type of work. To reduce 
your exposure, work in a well-ventilated area and with approved safety equipment, such as dust masks that are 
specially designed to filter out microscopic particles. 

Содержание DT180EVO

Страница 1: ...eiller à bien comprendre le manuel d utilisation avant d employer ce produit Su sierra de losas ha sido diseñada y fabricada de conformidad con nuestras estrictas normas para brindar fiabilidad facilidad de uso y seguridad para el operador Con el debido cuidado le brindará muchos años de sólido funcionamiento y sin problemas ADVERTENCIA Para reducir el riesgo de lesiones el usuario debe leer y com...

Страница 2: ...y malfunction failure or defects resulting from misuse abuse neglect alteration modification or repairs by other than Authorized Service Centers RUBI makes no warranties representations or promises as to the quality or performance of its power tools other than those specifically stated in this warranty HOW TO GET AUTHORIZED SERVICE AND OR REPAIR Please contact a service representative at RUBI TOOL...

Страница 3: ... nonskid footwear rubber soled boots are recommended when working outdoors Also wear protective hair covering to contain long hair ALWAYS WEAR SAFETY GLASSES WITH SIDE SHIELDS Everyday eyeglasses have only impact resistant lenses they are NOT safety glasses SECURE WORK Use clamps or a vise to hold work when practical it is safer than using your hand and frees both hands to operate the tool DON T O...

Страница 4: ...on cords that have 3 prong grounding plugs and 3 pole receptacles that accept the tool s plug DO NOT MODIFY the plug provided If it will not fit the outlet have the proper outlet installed by a qualified electrician KEEP TOOL DRY CLEAN AND FREE FROM OIL AND GREASE Always use a clean cloth when cleaning Never use brake fluids gasoline petroleum based products or any solvents to clean tool STAY ALER...

Страница 5: ...hen changing cutting wheels and cleaning d Use tool only with smooth edge cutting wheels free of openings grooves and teeth e Replace damaged cutting wheel before operating f Do not fill water bath above water fill line SAVE THESE INSTRUCTIONS Refer to them frequently and use to instruct other users If you loan someone this tool loan them these instructions too SPECIFIC SAFETY RULES CALIFORNIA PRO...

Страница 6: ...ury Wet Conditions Alert min Per Minute no No Load Speed Alternating Current min Minutes Hz Hertz A Amperes V Volts Electrocution Failure to properly ground can result in electrocution SYMBOLS Always wear eye protection with side shields marked to comply with ANSI Z87 1 along with hearing and breathing protection The following signal words and meanings are intended to explain the levels of risk as...

Страница 7: ...ng the same configuration as the plug Do not use an adapter with this product Ground Fault Circuit Interrupter GFCI protection should be provided on the circuit s or outlet s to be used for the tile saw Outlets are available having built in GFCI protection and may be used for this measure of safety EXTENSION CORDS Use only 3 wire extension cords that have 3 prong ground ing plugs and 3 pole recept...

Страница 8: ... water from dripping onto the outlet or plug The operator should arrange a drip loop in the cord connecting the saw to the outlet The drip loop is that part of the cord below the level of the outlet or the connector if an extension cord is used to prevent water traveling along the cord and coming in contact with the outlet If the plug or outlet does get wet DO NOT unplug the cord Disconnect the fu...

Страница 9: ...e 24 in Diagonal Capacity tile size 18 in Maximum Depth of Cut 2 1 4 in Rating 120 V 9 Amps 60 Hz No Load Speed 6 500 r min RPM TILE CUTTING WHEEL ON OFF SWITCH MITER GUIDE MAX WATER FILL LINE DRAIN PLUG WATER TRAY UPPER WHEEL GUARD SLIDING TABLE SCALE SLIDING TABLE WHEEL GUARD LOCK WATER TRAY FRAME LOCK KNOB ...

Страница 10: ...ls rated less than the speed of this tool Failure to heed this warning could result in personal injury MITER GUIDE The easy to read indicator on the miter guide shows the exact angle for the desired cut MOTOR This machine has a strong motor with sufficient power to handle tough cutting jobs ON OFF SWITCH This saw has an easy access on off switch SLIDING TABLE The sliding table allows the user to s...

Страница 11: ...wrench 1 E Wheel wrench 1 F Arbor nut 1 G Outer washer 1 H Cutting wheel 1 I Inner washer 1 J 90 fitting 2 K Water pump 1 L Water tray 1 M Miter guide 1 N Hex nut 5 O Spacer 5 P Socket Head Screw 5 The following items are included with your tile saw MAX MI N Fig 5 G F J H I B D L C A K M N O P E ...

Страница 12: ...n is misuse and could result in a hazardous condition leading to possible serious personal injury WARNING Do not connect to power supply until assembly is complete Failure to comply could result in acci dental starting and possible serious personal injury Fig 6 TILE CUTTING WHEEL For maximum performance and safety it is recommended that you use the 7 in cutting wheel provided with your saw Additio...

Страница 13: ...le lock lever reaches the stop on the front rail on the right hand side of the frame pull the lever out and hold it out until the lock has passed the stop Release the lever Slide the table along the rails until the final rollers engage the rails To lock the sliding table Turn the table lock lever until the lever points up Release the lever NOTE When the table is installed on the water tray frame a...

Страница 14: ...bor Holding the arbor wrench firmly to prevent movement pull the wheel wrench left side forward to the front of the machine to loosen Remove the arbor nut and outer washer leaving the inner washer on the arbor WARNING Always install the inner wheel washer before plac ing wheel on arbor Failure to do so could cause an accident since the wheel will not tighten properly Never use wheels that have ope...

Страница 15: ... the cutting wheel Thepumpisequippedwithsuctionfeettosecureinplace Press down firmly on the pump to attach the feet to the bottom of the water tray Placethewaterpump selectricalcordundertheframerails and over the left side of the frame as shown in figure 14 Push the end of the 90 fitting into the hole on top of the water pump Connect the clear hose to the barbed end of the 90 fitting Position the ...

Страница 16: ...e thoroughly Discard the waste water in accordance with local regula tions Replace the drain plug and refill tray with clean water TO CONTROL THE FLOW OF WATER See Figure 17 Fill the water tray with clean water as described below Locate the Max Min water flow selector on the pump For best performance set the flow to Max to control the flow of water over the wheel The pump turns on when the motor i...

Страница 17: ...ntended to prevent unauthor ized and possible hazardous use by children and others To turn the saw on Lift the switch to turn ON To turn the saw off Press the switch down to turn OFF To lock the saw With the saw turned OFF remove the switch key WARNING In the event of a power failure or when the tool is not in use turn the switch OFF This action will prevent the tool from accidentally starting whe...

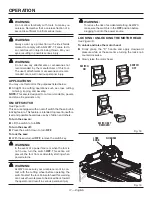
Страница 18: ...he material is clear of the cutting wheel before turning on the saw Turn the on off switch to the ON position Let the cutting wheel build up to full speed and wait for the wheel to get wet before moving the material into the wheel Hold the material firmly against the sliding table fence and feed the material into the cutting wheel When the cut is made turn the saw OFF Wait for the cut ting wheel t...

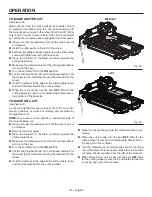
Страница 19: ...f the material TO MAKE AN L CUT See Figure 23 L cuts are cuts that remove a piece of tile to fit in a corner around a cabinet or a piece of molding and are made by two separate cuts NOTE Only overcut on the bottom or underneath side of the material being cut Using a marker or grease pencil mark the area to be cut on material Remove the miter guide Place the material on the table and firmly against...

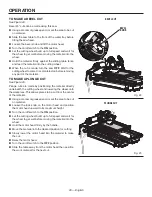
Страница 20: ...E CUT See Figure 25 Plunge cuts are made by positioning the material directly underneath the cutting wheel and lowering the wheel onto the workpiece This allows pieces to be cut from the center of the material Using a marker or grease pencil mark the area to be cut on material Loosen the lock knob on the motor head and position the motor head upward to its maximum height Turn the on off switch to ...

Страница 21: ... checked with a square and made test cuts to be sure adjust ments are necessary Once the screws are loosened these items must be reset Unplug the saw Using a hex key loosen cap bolts on the left rail Place a framing square against the fence and the flat part of the wheel Move the rail until the fence is square with the cutting wheel Tighten the cap bolts securely TO ADJUST THE LOWER TABLE ROLLERS ...

Страница 22: ...nation square beside the wheel Using a wrench turn the 0 hex bolt until the wheel is square to the table and the hex bolt is resting on the saw housing Tighten the bevel lock knob If the wheel is not an exact 45 Set the saw arm to a 45 angle Place a combination square beside the wheel and set the saw arm at 45 Using a wrench turn the 45 hex bolt until the hex bolt is resting on the saw housing ADJ...

Страница 23: ...se the rails will become dirty preventing the table rollers from sliding smoothly It is important to clean the rails often MAINTENANCE CLEANING THE SAW Unplug the saw Using a small brush and or water clean each piece thor oughly removing any trapped debris Remove the drain and empty waste water into a bucket Donotallowthewatertosplashontothegroundoraround the machine Rinse the machine thoroughly D...

Страница 24: ...s when either has less than 1 4 in length of carbon remaining Do not replace one side without replacing the other Reassemble using new brush assemblies Make sure curvature of brush matches curvature of motor and that brush moves freely in brush tube Make sure brush cap is oriented correctly straight and replace Tighten brush cap securely Do not overtighten CLEANING THE WATER NOZZLE Ifthewaternozzl...

Страница 25: ... défauts résultant d un usage incorrect ou abusif de la négligence de la modification de l altération ou de réparations effectuées par quiconque autre qu un centre de réparations agréé RUBI ne fait aucune autre garantie représentation ou promesse concernant la qualité et les performances de cet outil électrique autres que celles expressément indiquées dans le présent document COMMENT OBTENIR DE SE...

Страница 26: ...ce ne doit être engagée que contre le sens de rotation de la disque de l accessoire ou de la toupie de ponçage NEJAMAISLAISSERL OUTILENFONCTIONNEMENT SANS SURVEILLANCE COUPER L ALIMENTATION ÉLECTRIQUE Ne pas s éloigner de l outil avant qu il soit parvenu à un arrêt complet AVERTISSEMENT Lire et veiller à bien comprendre toutes les instructions Le non respect de toutes les instructions ci dessous p...

Страница 27: ...es cordons prolongateurs à 3 fils doté d une fiche à prise de terre branchés sur une prise triphasée compatible avec la fiche de l outil NE PAS MODIFIER la fiche fournie Si elle ne peut pas être insérée dans la prise secteur faire installer une prise adéquate par un électricien qualifié GARDERL OUTILSEC PROPREETEXEMPTD HUILE OU DE GRAISSE Toujours utiliser un chiffon propre pour le nettoyage Ne ja...

Страница 28: ...lacer endommagé muele de coupe avant de opération f Ne pas remplir le réservoir d eau au delà de la ligne de remplissage maximal CONSERVER CES INSTRUCTIONS Les consulter fréquemment et les utiliser pour instruire les autres utilisateurs Si cet outil est prêté il doit être accompagné de ces instructions RÈGLES DE SÉCURITÉ PARTICULIÈRES PROPOSITION 65 DE L ÉTAT DE CALIFORNIE AVERTISSEMENT Ce produit...

Страница 29: ... et à apprendre leur signification Une interprétation correcte de ces symboles permettra d utiliser l outil plus efficacement et de réduire les risques Lire le manuel d utilisation Symbole d alerte de sécurité Mains à l écart SYMBOLE NOM DÉSIGNATION EXPLICATION Tension Intensité Fréquence cycles par seconde Temps Type de courant Vitesse de rotation à vide Tours coups vitesse périphérique orbites e...

Страница 30: ...e de l outil sur une borne sous tension Le fil à gaine verte avec ou sans traceur jaune est le fil de terre CORDONS PROLONGATEURS Utiliser exclusivement des cordons prolongateurs à 3 fils doté d une fiche à prise de terre branchés sur une prise triphasée compatible avec la fiche de l outil Lors de l utilisation d un outil électrique à grande distance d une prise secteur veiller à utiliser un cordo...

Страница 31: ...ie peut être changée ou la protection auxiliaire peut être obtenue Ces appareils auxiliaires de protection sont disponibles à votre détaillant local PLACER DE LA SCIE À CARREAUX Voir la figure 2 Afin d éviter de mouiller la fiche de l appareil ou la prise de courant placer la scie à carreaux du côté d une prise de courant murale afin d empêcher l eau de s égoutter dans la prise ou la fiche L utili...

Страница 32: ...ale carreaux la taille 457 mm 18 po Profondeur de coupe maximum 57 mm 2 1 4 po Alimentation nominale 120 V 9 A 60 Hz Vitesse à vide 6 500 r min RPM MEULE À CARREAUX INTERRUPTEUR MARCHE ARRÊT GUIDE D ONGLET L EAU MAXIMUM REMPLIT LA LIGNE BOUCHON DE VIDANGE PLATEAU D EAU PROTÈGE MEULE ÉSCALA DE TABLE COULISSANTE TABLE COULISSANTE PROTÈGE MEULE DE BLOCAGE BÂTI D EAU BOUTON DE VERROUILLAGE ...

Страница 33: ...rieure à celle de l outil Ne pas prendre cette précaution pourrait entraîner des blessures graves GUIDE D ONGLET Le rapporteur facile à lire indique l angle exact pour les coupes MOTEUR Cette scie est équipée d un moteur assez puissant pour effectuer les coupes les plus difficiles INTERRUPTEUR MARCHE ARRÊT La scie est dotée d un interrupteur marche arrêt facile d accès TABLE COULISSANTE La table c...

Страница 34: ...able coulissante 1 C Bâti d eau 1 D Clé d arbre 1 E Clé de meule 1 F Écrou d arbre 1 G Rondelle extérieure 1 H Meule à carreaux 1 I Rondelle intérieure 1 J Raccord de 90 2 K Pompe d eau 1 L Plateau d eau 1 M Guide d onglet 1 N Écrou hexagonal 5 O Entretoise 5 P Vis à tête creuse 5 MAX MI N Fig 5 G F J H I B D L C A K M N O P E ...

Страница 35: ...abusif et peuvent créer des conditions dangereuses risquant d entraîner des blessures graves AVERTISSEMENT Ne pas brancher sur le secteur avant d avoir terminé l assemblage Le non respect de cet avertissement peut causer un démarrage accidentel entraînant des blessures graves MEULE À CARREAUX Para rendement maximum et sécurité Il est conseillé de n utiliser que le muele de coupe 7 po est fournie a...

Страница 36: ... l arrêt sur la riel de devant sur le côté droite du bâti tirer le levier et le tient hors hors jusqu à ce que la asegurar a passé buteé Relâcher la levier Glisserlatablelelongdesrielsjusqu àcequelescylindres finals engagent les riels Pour verrouillage de table coulissante Tourner le levier de verrouillage de table jusqu à ce que le levier en haut Relâcher la levier NOTA Lorsque la table est insta...

Страница 37: ...a clé d arbre sur l arbre Tenir fermement la clé d arbre pour empêcher le mouvement tirer la clé de meule côté gauche vers l avant de la machine pour le desserrer Retirer la écrou d arbre et rondelle extérieure en laissant la rondelle intérieure sur l arbre AVERTISSEMENT Toujours installer le rondelle de muele intérieur avant placer le muele sur arbre L absence de cette pièce pourrait un provoquer...

Страница 38: ...ui la retient solidement en place Appuyer fermement sur la pompe afin de fixer le pied au compartiment du dispositif du dessous du plateau à eau Placer la pompe d eau corde électrique sous les barres de cadre et sur le côté gauche du bâti selon la figure 14 Pousser la fin de la Raccord de 90 dans le trou sur la pompe d eau Brancher le tuyau flexible transparent dans l extrémité à entailles du racc...

Страница 39: ...mplacerlebouchondevidangeetleplateauderecharge avec l eau propre POUR CONTRÔLER LE FLUX D EAU Voir la figure 17 Remplir le plateau à eau avec de l eau propre comme décrit au dessous Repérer le sélecteur de débit d eau Max Min de la pompe Pour obtenir un rendement optimal régler le sélecteur de débit d eau à Max pour contrôler le débit d eau sur la meule La pompe s allume lorsque le moteur est mis ...

Страница 40: ...errouillage intégré Ce dispositif est conçu pour empêcher l utilisation non autorisée et potentiellement dangereuse par des enfants ou personnes non compétentes Pour mettre la scie en marche Le relever pour mettre la scie en MARCHE Pour arrêter la scie Abaisser le commutateur en position d ARRÊT Pour verrouiller la scie Avec la scie éteindre retirer la clé du commutateur AVERTISSEMENT Lorsque l ou...

Страница 41: ...NE COUPE TRANSVERSALE Voir la figure 20 Les coupes transversale sont directement 90 les coupures Le matériel est nourri dans la coupure à un 90 l angle à la roue et la muele est verticale L utilisation d un crayon de borne ou graisse marquer le secteur être coupé sur le matériel Placer le matériau sur la table et fermement contre le guide de table coulissante Avant d allumer la scie s assurer que ...

Страница 42: ...acoupeeffectuée ARRÊT OFF lascie Attendre que la meule à carreaux s arrête complètement avant de retirer le matériaux POUR EFFECTUER UNE COUPE EN L Voir la figure 23 Une coupe en L est une section de la matériaux q on retire et qu on utilize lorsqu on coupe un morceau de matériaux afin de l ajuster dans le coin d une armoire ou une boiserie et sont fait par deux coupures séparées NOTE Seulement ov...

Страница 43: ...ure 25 Il est possible d effectuer des coupes en plongée en plaçant le matériau directement en dessous de la meule et en abaissant celle ci sur la pièce à travailler Cela permet de couper les pièces à partir du centre L utilisation d un crayon de borne ou graisse marquer le secteur être coupé sur le matériel Desserrer le bouton de verrouillage situé sur la tête du moteur et tirer celle ci vers le ...

Страница 44: ...pour être certain que les ajustements sont nécessaires Une fois les vis desserrées ces items doivent être ajustés de nouveau Débrancher la scie Utilisation clé hex desserrer le boulon de capuchon le rail gauche Placer une équerre de charpentier contre la guide et le plat de la muele Déplacer la barre jusqu à ce que la table est carrée avec la meule de coupe Serrer fermement boulon hex AJUSTER LES ...

Страница 45: ...tion clé hexagonale tourner la vis de serrage de 0 jusqu à ce que la meule soit perpendiculaire à la table et que la vis de serrage repose sur le logement de la scie Serrer fermement le bouton de verrouillage de biseau Si la muele n est pas parfaitement à 45 Régler le bras de scie à un 45 l angle Placer une équerre combinée à côté de la muele et régler le bras de scie à un 45 Utilisation clé tourn...

Страница 46: ... table glisse pas facilement NETTOYER DE RAILS Pendant l usage la rails deviendra empêcher sale les rouleaus de table du glissement facilement C est important de nettoyer la rails souvent NETTOYER DE LA SCIE Débrancher la scie Utiliser une petite brosse et ou de l eau nettoyer à fond chaque pièce enlever tout débris piégés Retirer le tuyau de trop plein et le vider dans un seau Éviterleséclaboussu...

Страница 47: ...aislorsque la longueur du carbone est de 6 mm 1 4 po ou moins Ne pas remplacer un balai sans remplacer l autre Installer les nouveaux balais S assurer que la courbure des balais correspond à celle du moteur et que les balais tournent librement dans leurs tubes S assurer que le couvercle est correctement aligné droit et l assujettir Serrer le couvercle solidement Ne pas trop serrer NETTOYER LE BUSE...

Страница 48: ...o falla o defecto producido por el uso indebido maltrato negligencia alteración modificación o reparación efectuada por terceros diferentes de los centros de servicio autorizados RUBI no ofrece ninguna garantía declaración o promesa en relación con la calidad o el desempeño de sus herramientas eléctricas más que las señaladas específicamente en esta garantía CÓMO OBTENER SERVICIO TÉCNICO AUTORIZAD...

Страница 49: ... A W G por lo menos para un cordón de extensión de 7 6 metros 25 pies de largo o menos Si tiene dudas utilice un cordón del calibre más grueso siguiente Cuanto menor es el número de calibre mayor es el grueso del cordón VÍSTASE ADECUADAMENTE Evite ponerse ropas holgadas corbatas ni joyas que puedan engancharse y tirar de usted hacia las piezas en movimiento Se recomiendan guantes y calzado antider...

Страница 50: ...RAMIENTA ELÉCTRICA Si la herramienta está provista de una clavija de tres puntas debe conectarse en un enchufe eléctrico de tres polos CONECTE LA HERRAMIENTA SOLAMENTE A UNA TOMA DE CORRIENTE PROTEGIDA POR GFCI INTERRUPTOR DE CIRCUITO CON PÉRDIDA A TIERRA CONSULTE A UN ELECTRICISTA CALIFICADO o técnico de servicio si no ha comprendido completamente las instrucciones de conexión a tierra o si no es...

Страница 51: ...rotección ocular oídos y respirar b Utilice protector para salpicaduras para cada operación para que puede ser utilizado c Siempredesconecteelsuministrodecorrienteantes de realizar su mantenimiento al cambiar las muelas o al limpiar la unidad d Utilicielaherramientaconorillalisamuelaparacortar orificios y muescas e Reemplace dañado muela para cortar antes de opération f No llene el recipiente de a...

Страница 52: ...r mejor y de manera más segura la herramienta SÍMBOLO NOMBRE DENOMINACIÓN EXPLICACIÓN No exponga la unidad a la lluvia ni la use en lugares húmedos Alerta de condiciones húmedas No acercar las manos Si no mantiene las manos alejadas de la rueda de corte se cau sará serias lesiones corporales Alerta de seguridad Indica un peligro posible de lesiones personales Lea el manual del operador Para reduci...

Страница 53: ...S ADVERTENCIA Inspeccione los cables de extensión cada vez antes de usarlos Si están dañados reemplácelos de inmediato Nunca utilice la herramienta con un cable dañado ya que si toca la parte dañada puede sufrir una descarga eléctrica con las consecuentes lesiones graves CONEXIÓN ELÉCTRICA Esta herramienta está impulsada por un motor eléctrico fabricado con precisión Debe conectarse únicamente a u...

Страница 54: ...el sierra hasta que una salida pueda ser cambiada o la protección auxiliara puede ser obtenida Estos dispositivos auxiliares de la protección están disponibles en su detallista local POSICIONAR DEL SIERRA DE LOSAS Vea la figura 2 Para evitar que el tomacorriente o enchufe del accesorio se humedezcan coloque la sierra de losas hacia un lado del tomacorriente que se encuentra en la pared para que el...

Страница 55: ...pulg Profundidad del corte máxima 57 mm 2 1 4 pulg Potencia nominal 120 V 9 A 60 Hz Velocidad en vacio 6 500 r min RPM CARACTERÍSTICAS Fig 3 MUELA PARA CORTAR LOSAS INTERRUPTOR DE ENCENDIDO APAGADO GUÍA DE INGLETES AGUA MÁXIMA LLENA LA LÍNEA TAPÓN DE DRENAJE BANDEJAS DE AGUA PROTECCIÓN DE LA MUELA ESCALA DE MESA DESLIZABLE MESA DESLIZABLE PROTECCIÓN PARA LA MUELA DE FIJACIÓN AGUA EN LA ARMAZÓN PER...

Страница 56: ...de esta herramienta La inobservancia de esta advertencia puede causar lesiones serias GUÍA DE INGLETES Este indicador de fácil lectura muestra el ángulo exacto para cortes MOTOR Esta sierra dispone de un potente motor con suficiente potencia para realizar hasta los trabajos de corte más pesados INTERRUPTOR DE ENCENDIDO APAGADO Esta sierra dispone de un interruptor de encendido apagado de fácil acc...

Страница 57: ... 1 C Water tray frame 1 D Llave del árbor 1 E Llave de la muela 1 F Tuerca del árbol 1 G Arandela exterior 1 H Muela para cortar 1 I Arandela interior 1 J Conexión de 90 2 K Bomba de agua 1 L Bandejas de agua 1 M Guía de ingletes 1 N Tuerca hexagonal 5 O Separador 5 P Tornillo de cabeza hueca 5 MAX MI N Fig 5 G F J H I B D L C A K M N O P E ...

Страница 58: ...que culmine en lesiones corporales graves ADVERTENCIA No conecte la unidad a la toma de corriente antes de terminar de armarla De lo contrario la unidad puede ponerse en marcha accidentalmente con el consiguiente riesgo de lesiones graves MUELA PARA CORTAR LOSAS Para un mayor rendimiento y seguridad se recomienda que use solamente 7 pulg muela para cortar es suministrada con la sierra Se dispone d...

Страница 59: ...eroentonces colocan los rodillos en el lado derecho del armazón Sostener la paralela de mesa con el armazón empuja la mesa hacia parte trasera del sierra Cuandolapalancadefijacióndelamesaalcancelaparada en la riel delantera en el lado derecho del armazón saque la palanca y tenga fuera hasta que la verrouillage haya pasado la tope Suelte la palanca Deslice la mesa por las riels hasta que los rodill...

Страница 60: ...memente la llave del árbol para prevenir firmemente movimiento tire de la llave de la muela lado izquierdo hacia la parte delantera de la máquina para aflojarla Retire la tuerca del árbol y la arandela exterior dejando la arandela interior en el árbol ADVERTENCIA Siempre installer de la arandela interior de la muela antes de colocar la muela sobre la arbre Si no lo hace podría producirse un accide...

Страница 61: ...de succión que la mantiene en su lugar Presione con fuerza la bomba para conectar el pie al compartimiento de la bandeja de agua del sistema inferior Coloque la cuerda eléctrica de bomba de agua bajo las barandas de marco y sobre el lado izquierdo del armazón como mostrado en la figura 14 Empuje el fin del conexión de 90 en el hoyo encima de la bomba de agua Conecte la bomba a la toma de corriente...

Страница 62: ...aciones locales Reemplace el tapón de ddrenaje y bandeja de repuesto con agua potable PARA CONTROLAR EL FLUJO DE AGUA Vea la figura 17 Llene la bandeja con agua limpia como explica abajo Ubique el selector de flujo máximo mínimo de agua en la bomba Para lograr un desempeño óptimo ajuste el flujo a Max máximo para controlar el flujo de agua sobre la rueda La bomba se enciende cuando se enciende el ...

Страница 63: ...sta característica tiene la finalidad de evitar el uso no autorizado y posiblemente peligroso por niños y otras personas Para encender la sierra Levante de mismo a la posición de ENCENDIDO Para apagar la sierra Para apagarla baje de interruptor a la posición de APAGADO Para asegurar la sierra Con la sierra apagó retire la llave del interruptor ADVERTENCIA Cuando no esté en uso la herramienta siemp...

Страница 64: ...a función de la herramienta PARA EFECTUAR CORTES TRANSVERSALES Vea la figura 20 Los cortes transversal son directamente 90 los cortes La materia es alimentada en el corte en un 90 el ángulo a la rueda y la mueda son verticales Utilizar un lápiz de marcador o grasa marca el área para ser cortada en la material Coloque la materia sobre la mesa y firmemente contra la guía de mesa deslizable Asegúrese...

Страница 65: ...aváncela hacia la muela para cortar Cuandotermineelcorte apaguelasierra paraello ponga el botón en la posición OFF Espere a que la muela se detenga por completo antes de retirar cualquier parte de la material PARA EFECTUAR CORTES EN L Vea la figura 23 Une corte en L es una sección que se saca de la material y se una al cortar la material que entrará en un rincón de un mueble o pieza de moldura y s...

Страница 66: ...TRACIÓN Vea la figura 25 Los cortes de penetración se realizan ubicando el material directamente debajo de la rueda de corte y bajando la rueda hasta la pieza de trabajo Esto permite que las piezas se corten desde el centro del material Utilizar un lápiz de marcador o grasa marca el área para ser cortada en la material Afloje la perilla de ajuste ubicada en el motor y tire el cabezal del motor hac...

Страница 67: ...para asegurarse de que son necesarios los ajustes Desconecte la sierra Utilizar llave hexagonal afloja el perilla de la tapa en el riel izquierdo Coloque una escuadra de carpintero contra la guía de ingletes y parte plana de la muela Mueva la mesa hasta que la riel sea cuadrada con la muela corte Apriete firemente los pernos hexagonal AJUSTE LOS RODILLOS DE MESA INFERIOR Vea la figura 27 Si la mes...

Страница 68: ...lizar llave hexagonal gire el tornillo fijador de 0 hasta que el disco esté a escuadra con la mesa y el tornillo fijador descanse sobre el alojamiento de la sierra Ajustar la perilla de fijación del bisel Si la muela no está perfectamente a 45 Ponga el sierra brazo a un 45 ángulo Coloque una escuadra de carpintero junto a la muela y Ponga el sierra brazo a un 45 Utilizar llave gire el perno hexago...

Страница 69: ...lisamente LIMPIEZA DE LOS RIELES Al usarse el riel llegará a ser prevenir sucia los rodillos de mesa de deslizar lisamente Es importante limpiar el riel a menudo LIMPIEZA EL SIERRA Desconecte la sierra Utilizandounpequeñoescobillay oagua limpiarafondo cada pieza eliminando cualquier suciedad atrapada Retire el drenaje para derrames y vacíelo en un balde no deje que el agua salpique sobre el suelo ...

Страница 70: ...ulg de carbón restante No reemplace un solo lado sin reemplazar el otro Vuelva a armar la unidad empleando conjuntos de escobillas nuevos Asegúrese de que la curvatura de la escobillas corresponda a la del motor y de que las escobillas se muevan libremente en los tubos de las mismas Asegúrese de que la tapa de la escobilla esté orientada correctamente en línea recta y colóquela Apriete firmemente ...

Страница 71: ...25 NOTES NOTAS ...

Страница 72: ...technique ou le Service à la clientèle téléphoner au 1 866 872 RUBI 7824 Inscrire les numéros de modèle et de série inscrits sur la plaque d identification du produit No de modèle No de série Información sobre servicio al consumidor Paraobtenerservicio comprarpiezasderepuesto localizaruncentrodeservicioautorizado y obtener Servicio o Asistencia Técnica al Consumidor le suplicamos llamar al 1 866 8...

Отзывы: