background image

80

en | Menu Structure

DBP Digital Beltpack

2021-06 | 01 | F.01U.380.825

Technical Manual

Bosch Security Systems, LLC
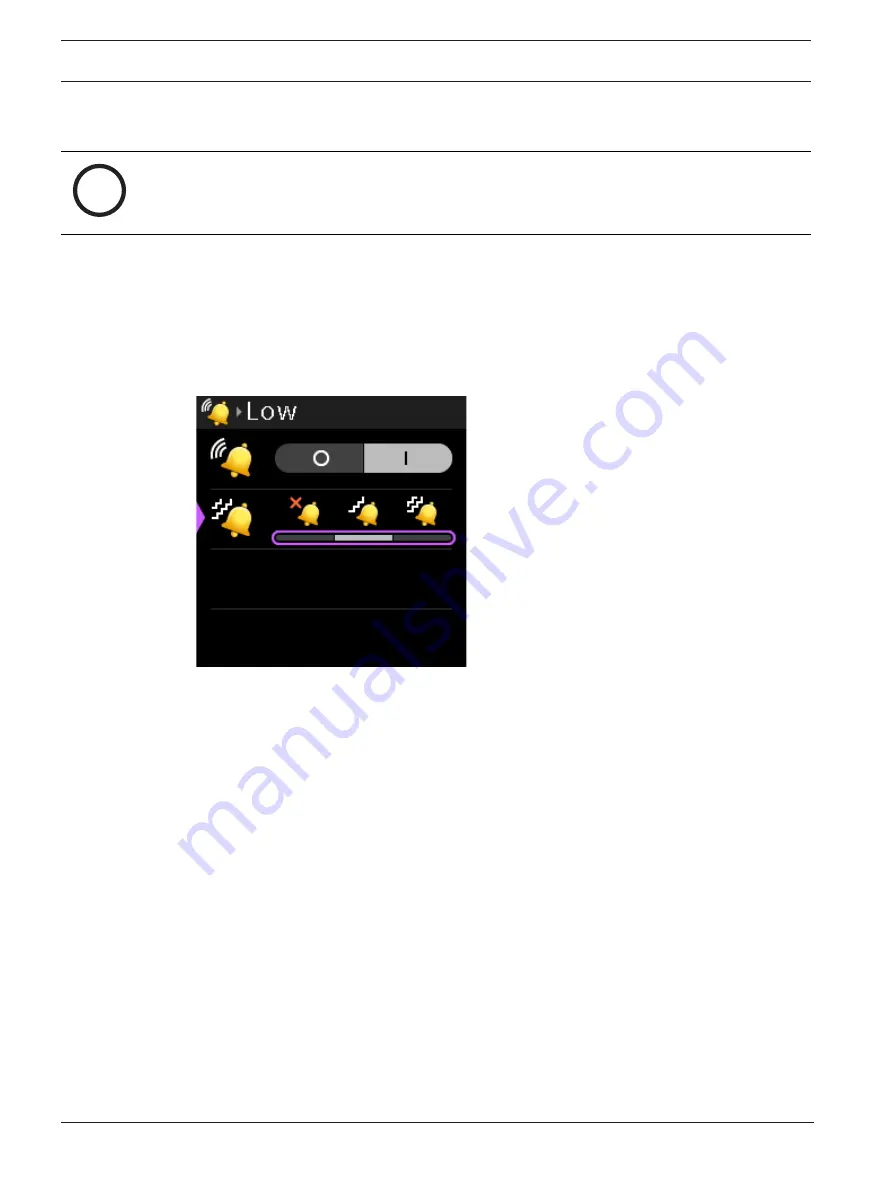
9.13.2

Call Vibration

Use the 

Call Vibration

 menu item to set the vibration intensity when receiving a call signal.

i

Notice!

You can use call beep and call vibration at the same time, if desired.

There are three settings Off, Low, and High.
The default setting is low vibration.

To 

set the vibration intensity

, do the following:

1.

Navigate to the 

Call Vibration menu item

 (Call Alerts | Call Vibration).

2.

Press the 

SEL/MENU button

.

The field becomes active.

3.

Rotate either 

shaft encoder

 to scroll through the selections.

Cycling through the haptic settings for low and high, the DBP vibrates to give an
indication of the vibration strength and frequency.

4.

Press the 

SEL/MENU button

 to confirm the change, or press the 

CLR/BACK button

 to

abort changes.

9.14

Information

Use the 

Information

 menu item to display the firmware versions of the various components of

the DBP as well as the serial number and the main board ID.

Содержание DBP 4F

Страница 1: ...DBP Digital Beltpack DBP 4M DBP 4F DBP 5F en Technical Manual...

Страница 2: ......

Страница 3: ...Create connections using IPedit 18 6 4 1 Add DBP to IPedit 18 6 4 2 Configure an OMNEO channel for DBP using IPedit 19 6 4 3 Configure the DBP to accept an OMNEO offer using IPedit 21 6 5 Create conn...

Страница 4: ...2 Set PIN 62 9 6 Setup Key Modes 63 9 7 Audio Headset 63 9 7 1 Sidetone 63 9 7 2 Echo Canceller 64 9 8 Audio Microphone 65 9 8 1 Mic Select 65 9 8 2 Mic Gain 65 9 8 3 Hot Mic 66 9 8 4 Noise Gate 67 9...

Страница 5: ...13 Call Alerts 79 9 13 1 Call Beep 79 9 13 2 Call Vibration 80 9 14 Information 80 9 15 Bluetooth 81 9 15 1 Ready to Pair 81 9 15 2 Paired Headsets 83 9 15 3 Paired Aux Devs 84 9 16 Display 86 9 16 1...

Страница 6: ...Bosch Security Systems LLC All other trademarks are property of their respective owners The content and illustrations are subject to change without prior notice 1 2 Notices CE Compliant and UL Certifi...

Страница 7: ...iers that produce heat 8 Only use attachments accessories specified by the manufacturer 9 Use only with the cart stand tripod bracket or table specified by the manufacturer or with the apparatus When...

Страница 8: ...802 3af or 802 3at compliant Ethernet interface The PoE power over Ethernet In port connects to a PoE compliant power sourcing equipment The PoE Out port is available for daisy chain connections to ot...

Страница 9: ...2 13 14 1 Master Volume Control knob Key A and C Volume knob 2 CLR BACK button 3 CALL button 4 SEL MENU button 5 Master Volume Control knob Key B and D Volume knob 6 Lanyard loop 7 Belt Clip 8 USB Blu...

Страница 10: ...l and replacement 1 2 To remove the belt clip do the following 1 Lift the tension clip 1 up 2 With the tension clip up slide the belt clip out of the belt clip track 2 To replace the belt clip do the...

Страница 11: ...o the following 1 Using a CAT 5e cable attach one end to the PoE IN connector on the DBP 2 Connect the other end of the cable to an approved PoE switch 3 Using a second CAT 5e cable connect one end to...

Страница 12: ...her end of the cable to an approved PoE switch 3 Using a second CAT 5e cable connect one end to the approved PoE switch 4 Connect the other end to an Ethernet connector on the OMI card SERIAL J5 J2 J1...

Страница 13: ...nection offer page 17 4 4 PoE The Digital Belt Pack includes a PoE In and PoE Out connector that allows multiple DBPs to be daisy chained from the same switch port RTS recommends use of an 802 3at com...

Страница 14: ...To daisy chain belt backs together do the following 1 Connect one end of a CAT 5e cable from the PoE Out connector on one DBP belt pack 2 Connect the other end of the CAT 5e cable to the PoE In conne...

Страница 15: ...move the dongle while the DBP has power it does not reboot i Notice Optimal Bluetooth audio quality is achieved when the DBP is paired with a headset that incorporates a boom microphone construction v...

Страница 16: ...hows devices that support Easy Connect KP Series DBP OKI etc Discoverable devices need to be powered on connected to the network and be on the same subnet 3 Navigate to the Connect All button OR Navig...

Страница 17: ...the following 1 Navigate to the OMNEO icon 2 Click the right encoder knob The OMNEO Channels screen displays i Notice If the intercom system contains only one ODIN frame the Frame field is not display...

Страница 18: ...an be pressed to cancel this prompt and go back to editing the underlying screen 17 Click the right encoder knob to confirm the selection 6 3 Accept a connection offer on DBP To accept a DBP Offer do...

Страница 19: ...button The device catalog displays the selected devices 5 Click the Done button The screen closes 6 4 2 Configure an OMNEO channel for DBP using IPedit To configure an OMNEO channel for DBP using IPed...

Страница 20: ...C 1 In the Destination Device Name field click the button The Discovered Devices screen displays 2 Expand the tree to view the destination devices available 3 Select the desired device for the destina...

Страница 21: ...on offers from ODIN For information on using the DBP user interface to accept connection offers refer to Accept a connection offer on DBP page 18 To configure the DBP to accept an OMNEO offer using IP...

Страница 22: ...hould be configured to ODIN channel 5 6 Optional Enter the channel description Using the Device Configuration Pane 1 Optional Enter a description for the device 2 Send the changes to the device 6 5 Cr...

Страница 23: ...eld 4 Select the Device Type to which you want to connect 5 Select the OMNEO channel on which to communicate 6 Select the Latency of the connection i Notice DBP supports a minimum latency of 2ms 6 5 2...

Страница 24: ...o select from a list of devices 6 Enter the IP address of the device to which you want to make a connection offer This field auto populates when you select the device name 7 From the Partner Device Ty...

Страница 25: ...to an OMS system In PL mode the display screen shows Party Line assignments Relay or UPL Resource assignments You can make PL assignments via DBP while you use AZedit to make Relay or UPL Resource ass...

Страница 26: ...connection DBP has offers Aux connected to the intercom Aux connected to the intercom but muted Aux expecting a connection Aux has offers XLR headset connected XLR headset error 3 5mm headset connect...

Страница 27: ...les the control to Key A or Key C listen volume Scrolls through the menu items when in a menu or sub menu In most situations pressing the A C shaft encoder button behaves the same as pressing the CLR...

Страница 28: ...ly Specifically when editing device domain names or IP addresses the A C shaft encoder moves the cursor between letters or octets and the B D shaft encoder change the value of the currently highlighte...

Страница 29: ...ment popup window Use the shaft encoders to select an option and then press the SEL MENU button to activate that option There are two options Hang Up and To Intercom To Intercom is a mixer toggle on o...

Страница 30: ...h the highlighted menu item Press and release the MENU SEL key with a widget highlighted Deactivates the widget moves highlight back to menu item and saves the current widget state as current operatin...

Страница 31: ...whether the DBP is in PL mode or KP mode 8 4 UI controls UI Control Type Description Input field The A C shaft encoder and the B D shaft encoder do different actions For example while editing an IP ad...

Страница 32: ...rs on the display screen The volume bar increases or decreases depending on the adjustment made The belt pack exits volume adjustment mode after a few seconds of inactivity If the Master Volume is mut...

Страница 33: ...t encoder Mute a PL assignment key In PL mode listen is always on You can mute PL assignments so only one PL assignment is heard To mute an individual PL key do the following 1 Click either shaft enco...

Страница 34: ...gnal The red talk key indicators turn blue and the call signal icon shows in the center of the display The call signal generates for as long as you hold the CALL button and the talk keys are still on...

Страница 35: ...he CWW Call Waiting Window to manage multiple incoming calls to the belt pack The DBP CWW displays three calls at a time with a scroll bar appearing if there are more calls up to nine in the list A po...

Страница 36: ...the call disappears from the list Show the CWW To show the CWW do the following 4 On the home screen press the CLR BACK button The CWW window appears Scroll and select a call in the CWW To scroll and...

Страница 37: ...l the Bluetooth dongle page 15 The Bluetooth menu item appears grey when the dongle is not present in the device Figure 8 1 Bluetooth dongle not installed When the dongle is present the icon turns blu...

Страница 38: ...ystems LLC 1 Press the SEL MENU button to answer the call or press the CLR BACK button to ignore the call A Call Connected popup notification appears 2 Press the SEL MENU button again to display the c...

Страница 39: ...re 8 3 Call Management Screen 8 9 3 Patch a phone call to the Intercom To patch a phone call to the intercom do the following When a phone call comes into the belt pack via a Bluetooth device a popup...

Страница 40: ...essing the SEL MENU button while on this item i Notice When you select To Intercom the mic audio and the phone audio go to the intercom and anything heard from the intercom is heard on the phone When...

Страница 41: ...are using the Firmware Upload Tool do the following 1 Open the Firmware Upload Tool 2 From the File menu select Options The Firmware Upload Tool Options window opens 3 Click the Change button A networ...

Страница 42: ...42 en Basic Operation DBP Digital Beltpack 2021 06 01 F 01U 380 825 Technical Manual Bosch Security Systems LLC 8 Click the Upload button The Select firmware for upload window opens...

Страница 43: ...echnical Manual 2021 06 01 F 01U 380 825 9 Select the firmware to upload 10 Click the Start button The Select firmware for upload window closes The progression bar next to the device shows the downloa...

Страница 44: ...load The download begins 10 Verify the download progress on the device Once the download is complete the device reboots automatically 8 11 Download screen saver images or splash screen images When cre...

Страница 45: ...r or Download splash screen A Windows explorer screen appears 6 Navigate to the desired file 7 Click Open The Download Screen Saver File screen opens 8 Select the DBP radio button from the Panel Size...

Страница 46: ...zing until the DBP acquires an IP address Similarly the Key Assignments menu is disabled and the context text shows Not Connected until the DBP connects to an intercom Audio Use to configure the heads...

Страница 47: ...provals occur at the same time 9 1 1 Device Name Use the Device Name menu item to configure the name of the device To configure the name of the device do the following 1 Navigate to the Device Name me...

Страница 48: ...encoder quickly then it behaves like the SEL MENU button and saves your edits 5 Press the SEL MENU button to confirm the change or press the CLR BACK button to abort changes 9 1 2 DHCP Use the DHCP m...

Страница 49: ...hanges i Notice Changes to this menu result in a device reboot 9 1 4 Netmask Use the Netmask menu item to configure or change the Netmask address Netmask addressing subdivides a network and in turn al...

Страница 50: ...the current octet reaches 255 the focus moves to the next octet 4 Press the SEL MENU button to confirm the change or press the CLR BACK button to abort changes i Notice Changes to this menu result in...

Страница 51: ...firm the change or press the CLR BACK button to abort changes i Notice Changes to this menu result in a device reboot 9 1 6 DNS Server Use the DNS Server menu item to configure the DNS server address...

Страница 52: ...his menu result in a device reboot 9 1 7 Domain Use the Domain menu item to configure the domain to which the belt pack belongs Validation on address fields occur when you try to save them If an addre...

Страница 53: ...e the shaft encoder quickly then it behaves like the SEL MENU button and saves your edits 5 Press the SEL MENU button to confirm the change or press the CLR BACK button to abort changes 9 1 8 MAC Addr...

Страница 54: ...ield becomes active 3 Rotate either shaft encoder to scroll through the available offers 4 Press the SEL MENU button to confirm the change or press the CLR BACK button to abort changes The DBP disconn...

Страница 55: ...the SEL MENU button to confirm the selection To configure talk key assignments in keypanel mode do the following 1 Navigate to the Key Assignments menu item Setup Key Assignments 2 Press the SEL MENU...

Страница 56: ...assignments appears on the talk key button previously selected If you have not accessed the scroll list for this assignment type before the DBP asks the intercom for it and a wait prompt displays unt...

Страница 57: ...tton to confirm the change or press the CLR BACK button to abort changes 9 4 2 Test Mode Use the Test Mode menu item to check the operation of all keys and displays on the belt pack To enter test mode...

Страница 58: ...hysical buttons light as well 5 Press the shaft encoders and turn the shaft encoders The shaft encoder buttons light in magenta when pushed and blue directional arrows appear to indicate the rotationa...

Страница 59: ...ration resets The DBP does not reboot after a User Reset 9 4 4 Factory Reset Use the Factory Reset menu item to set the device back to its original factory settings The factory reset differs from a us...

Страница 60: ...Navigate to the Factory Reset menu item Setup Service Factory Reset 2 Press the SEL MENU button The field becomes active 3 Press the SEL MENU button The Factory Reset confirmation message appears 4 Pr...

Страница 61: ...the PIN if Authentication is enabled occurs upon exiting the menu or the PIN is changed 9 5 1 Require PIN By default the DBP does not have PIN entry security enabled To enable PIN entry do the followi...

Страница 62: ...ired to access the DBP menu structure PIN length can be 1 to 8 characters To set the PIN do the following 1 Navigate to the Authentication Menu item Setup Authentication 2 Press the SEL MENU button 3...

Страница 63: ...available options 5 Press the SEL MENU button to confirm the change or press the CLR BACK button to abort changes 9 7 Audio Headset Use the Headset menu item to configure sidetone and enable echo canc...

Страница 64: ...press the CLR BACK button to abort changes 9 7 2 Echo Canceller Use the Echo Canceller menu item to enable echo cancellation for the headset Echo cancellation prevents feedback from occurring between...

Страница 65: ...u shows XLR gain If the mic type selected is 3 5mm the mic gain shows 3 5mm gain The DBP has the ability to detect insertion and removal of headsets and automatically configure the active microphone s...

Страница 66: ...io Microphones Mic Gain 2 Press the SEL MENU button The field becomes active 3 Rotate either shaft encoder to adjust the level 4 Press the SEL MENU button to confirm the change or press the CLR BACK b...

Страница 67: ...tive mic The noise gate defaults to a different value depending upon the microphone selected XLR 72 dBu 3 5mm 66 dBu Bluetooth 62 dBu Available options Disabled 87 dBu 84 dBu 81 dBu 78 dBu 75 dBu 72 d...

Страница 68: ...2 Press the SEL MENU button The field becomes active 3 Rotate either shaft encoder to scroll through the selections 4 Press the SEL MENU button to confirm the change or press the CLR BACK button to ab...

Страница 69: ...utton to confirm the change or press the CLR BACK button to abort changes 9 8 7 Send Mic Kill Use the Send Mic Kill menu item to send an inaudible signal that forces all devices on the affected party...

Страница 70: ...d adjust the Aux input and output gain levels If either Aux Input or Aux Output is enabled and if the 3 5mm microphone had been configured as active this forces the Mic Select setting to XLR The AUX f...

Страница 71: ...To adjust the input gain do the following 1 Navigate to the Input Gain menu item Audio Aux Levels Input Gain 2 Press the SEL MENU button The field becomes active 3 Rotate either shaft encoder to adju...

Страница 72: ...ooth Aux input gain level To adjust the input gain do the following 1 Navigate to the Input Gain menu item Audio BT Aux Levels Input Gain 2 Press the SEL MENU button The field becomes active 3 Rotate...

Страница 73: ...nput and output gain levels for OMNEO channel 2 OMNEO Aux input and output can be mixed to a headset or to the intercom 9 11 1 Input Gain Use the Input Gain menu item to adjust the level of input audi...

Страница 74: ...ress the CLR BACK button to abort changes 9 12 Audio Mixer Use the Mixer menu item to route select input audio signals to different destinations The following destinations are available Headset L R He...

Страница 75: ...ut sources are routed to the left channel of the headset independently to those routed to the right channel By default From Intercom is selected If Bluetooth is installed then From Intercom and BT are...

Страница 76: ...ted to the right channel of the headset do the following 1 Navigate to the Headset Right menu item Audio Mixers Headset Right 2 Press the SEL MENU button The field becomes active 3 Rotate the A C shaf...

Страница 77: ...ercom Active Mic OMNEO Ch2 In and Bluetooth In if available To select input sources routed to the 3 5mm Aux Out do the following 1 Navigate to the 3 5mm Aux Out menu item Audio Mixer 3 5mm Aux Out 2 P...

Страница 78: ...item 5 Press the SEL MENU button to confirm the change or press the CLR BACK button to abort changes 9 12 7 Bluetooth Out Use the Bluetooth Out menu item to select the input source routed to the Bluet...

Страница 79: ...se the Call Alerts menu to configure how the belt pack notifies the user of an incoming call signal 9 13 1 Call Beep Use the Call Beep menu item to enable an audible alert to play when receiving a cal...

Страница 80: ...tensity do the following 1 Navigate to the Call Vibration menu item Call Alerts Call Vibration 2 Press the SEL MENU button The field becomes active 3 Rotate either shaft encoder to scroll through the...

Страница 81: ...his menu item cannot be accessed and is disabled at the top level menu if a Bluetooth dongle is not detected Entering the Bluetooth menu enables discoverability on the DBP This means that other Blueto...

Страница 82: ...rity Systems LLC 3 Rotate either shaft encoder to scroll available devices 4 Press the SEL MENU button to select a device for pairing A Pair prompt appears 5 Press the SEL MENU button to start pairing...

Страница 83: ...off or moved out of range from each other the headset attempts to connect when both devices are in range of each other In which case a popup connection request appears To connect disconnect or unpair...

Страница 84: ...ir a Bluetooth headset do the following 1 Navigate to the Paired Headsets menu item Bluetooth Paired Headsets 2 Press the SEL MENU button The field is active if Bluetooth devices are available otherwi...

Страница 85: ...luetooth devices are available otherwise the menu item does not activate 3 Rotate either shaft encoder to scroll through available devices 4 Press the SEL MENU button to select the device A popup wind...

Страница 86: ...y Mode Use the Display Mode menu item to select a predefined display brightness There are three modes from which to choose The default brightness settings for each mode are Normal 76 brightness Dim 26...

Страница 87: ...selected mode in the Brightness menu item 4 Press the SEL MENU button to confirm the selection 9 16 2 Brightness Use the Brightness menu item to adjust the brightness for the currently selected displa...

Страница 88: ...rs 8 Hours 10 Hours and 12 Hours To configure the screen saver do the following 1 Navigate to the Screen Saver menu item Display Screen Saver 2 Press the SEL MENU button The field becomes active 3 Rot...

Страница 89: ...Bosch Security Systems LLC Technical Manual 2021 06 01 F 01U 380 825 3 Rotate either shaft encoder to enable screen flip The screen display flips 4 Press the SEL MENU button to confirm the change or p...

Страница 90: ...e DNS Server Domain Configure the Domain MAC Address Display the MAC address Offers Enter the Offers menu DBP Offers Select a DBP Offer Aux Offers Select an Aux Offer Key Assignments Enter Key Assignm...

Страница 91: ...on made in the Mic Select menu Hot Mic Enable or Disable Hot Mic Noise Gate Adjust the Noise Gate level The type of noise gate adjustment XLR Bluetooth or 3 5mm is dependent upon the active mic select...

Страница 92: ...ation Select Call Vibration intensity Info Enter the Information menu DBP Version Display the DBP version Bootcode Version Display the Bootcode version DSP Version Display the DSP version OMNEO Versio...

Страница 93: ...mplifier XLR Input Electret Mic Input 42 5 dBu Nominal Dynamic Mic Input 50 dBu Nominal Frequency Response LEC Disabled 120 Hz to 20 kHz Frequency Response LEC Enabled 120 Hz to 7 4 kHz 3 5 mm Input E...

Страница 94: ...nologies LM506 Range 15 ft 5 m Audio Codec SBC TFT Display Active Area 27 72 mm wide x 27 72 mm high Dot Resolution 240 x 240 pixels Color Resolution 16 bit 64 K RGB color View Angle 80 typical all di...

Страница 95: ...ic Ground Pin 2 Mic Mic Mic Mic Pin 3 Speaker Speaker Speaker Speaker Pin 4 Left Speaker Left Speaker Speaker Speaker Pin 5 Right Speaker Right Speaker N A N A Aux 3 5mm Connector Headset Mode Aux Inp...

Страница 96: ...96 Technical data DBP Digital Beltpack 2021 06 01 F 01U 380 825 Technical Manual Bosch Security Systems LLC...

Страница 97: ......

Страница 98: ...RTS 12000 Portland Avenue South Burnsville MN 55337 USA www rtsintercoms com Bosch Security Systems LLC 2021 202106141758...

Отзывы: