background image

              Document Number 900-20571 Rev. A

8

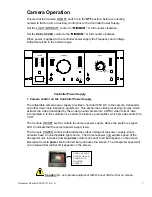
AUX. INPUT jack controls the external camera and transporter by means of 

auxiliary

control box

.

The VIDEO LEVEL LEDS indicate the present of a camera video signal. Depending on
the light in the pipe, the yellow or the green LED is lit. If the RED LED or NO LED is lit,
this indicates a video problem.

The LOAD VOLTS / LINE AMPS is an operation indicator that can be toggled to show
the relative output 

voltage

 or 

current

 from camera power supply.

The momentary FOCUS and IRIS are used to change the remote camera focus or iris.

The flashing red RESET LED indicates that the power supply was overloaded and the
power supply is disconnected from the output connector. To reset, place the camera
ON/OFF switch to the 

OFF

 position. Turn the camera LIGHT control to 

minimum

 and

wait about 45 seconds to allow the power supplies to discharge. Then place the Camera
ON/OFF to the 

ON

 position. If the RESET LED is flashing, place the camera ON/OFF to

the 

OFF

 position and correct the fault.

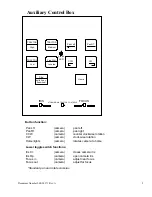
 2.  Dual Function


Auxiliary Control Box

With the power 

OFF

,

 plug the Dual Function Control Box into the front panel jack marked

AUX. INPUT

 (controller power supply).


To


operate the Omni II Zoom or Omni III Zoom

camera, push the rocker mode switch (on the top of the box), for desired mode 

STD.

 or

Zoom

. To use standard functions, push toggle switch towards 

STD

 (red). Use the 16

standard functions. These common functions are used for the tractor, the pan and rotate
camera as well as tele and wide. Every function change will cause a corresponding flash
of the green transmit LED, in the middle of the control box. To switch between Standard
function controls and Zoom, push down rocker switch on top of the box towards the

Zoom

 (blue). Use the 16 functions. Commonly, the standard (STD) mode function

buttons are primarily used and the Zoom mode is only used when manually controlling
the Iris, Shutter, Gain, focus etc. The 

Home button

 gives the operator the ability to

return the camera to the start (home) location.

Содержание Omni II 10-1620

Страница 1: ...tems A Full Service Company www rstechserv com O Om mn ni i I II I P Pa an n a an nd d T Ti il lt t C Co ol lo or r C Ca am me er ra a M M Mo o od d de e el l l 1 1 10 0 0 1 1 16 6 62 2 20 0 0 O OP PE...

Страница 2: ...safety 2 Test operates the sewer camera and associated electrical equipment in a dry location away from any potential exposure to hazardous conditions to determine whether the equipment functions nor...

Страница 3: ...v A 3 Table of Contents PAGE 4 Product Overview PAGE 5 Operator and Equipment Safety PAGE 6 Equipment Compatibility PAGE 7 Camera Operation PAGE 10 Maintenance PAGE 12 Warranty Policy PAGE 13 MRA Merc...

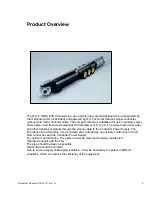
Страница 4: ...24 The camera transmits video and other transducer signals through the sincon cable to the Controller Power Supply The Functions of the Omni Eye II color camera are controlled by an auxiliary control...

Страница 5: ...om the controller power supply Refer to the appropriate generator operator s manual for starting To prevent personal injury or damage to equipment turn off Camera power When making electrical connecti...

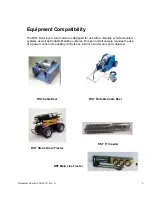
Страница 6: ...use with a mainline vehicle mounted systems as well as Portable Mainline systems This pan and tilt camera requires the use of a power control unit auxiliary controls box skid or a tractor unit and cab...

Страница 7: ...rovides a nominal 120V DC to the camera transporter and other down hole inspection equipment This section has video processing circuitry which extracts the video transmitted by the under ground camera...

Страница 8: ...ON position If the RESET LED is flashing place the camera ON OFF to the OFF position and correct the fault 2 Dual Function Auxiliary Control Box With the power OFF plug the Dual Function Control Box...

Страница 9: ...tates camera to home Lower toggle switch functions Iris Cl camera closes camera iris Iris Op camera open camera iris Focus in camera adjust near focus Focus out camera adjust far focus Standard pan an...

Страница 10: ...ntire assembly Inspect camera cradle and hardware Inspect camera lens for scratches and cracks Turn camera on and check light bulbs Inspect the camera clamps fins skids and mounting hardware Inspect t...

Страница 11: ...Document Number 900 20571 Rev A 11...

Страница 12: ...94954 Mt Sterling KY 40353 RST shall at our option repair or replace any defective part or component in our service facility or ship the customer a replacement component or part The customer shall ret...

Страница 13: ...omer has requested an estimate before the equipment is repaired an estimate will be prepared as soon as possible A Customer Service representative will then contact the customer to provide the estimat...

Страница 14: ...ervice Company SALES SERVICE PARTS THE FOLLOWING FORM IS PROVIDED FOR YOUR CONVENIENCE MAKE COPIES OF THE FORM FOR YOUR USE FILL OUT THE FORM COMPLETELY AND OBTAIN AN MRA NUMBER MAKE A COPY OF THE COM...

Страница 15: ...o P O required OR Expedite use P O ___________________________ OR Estimate required Serial number s ________________________________________________________________________ SECTION III What merchandis...

Отзывы: