background image

RNS-3200 GPS Receiver

10

 Chapter 3 Using the RNS-3200

RoyalTek

Contents

Index

Chapter 3  Using the RNS-3200 

3.1

RNS-3200 Operating Basics

After fully charging the RNS-3200  it is ready to be used. You can now turn it 
on to calibrate the screen. After screen calibration, proceed to system settings 
configuration.

3.2

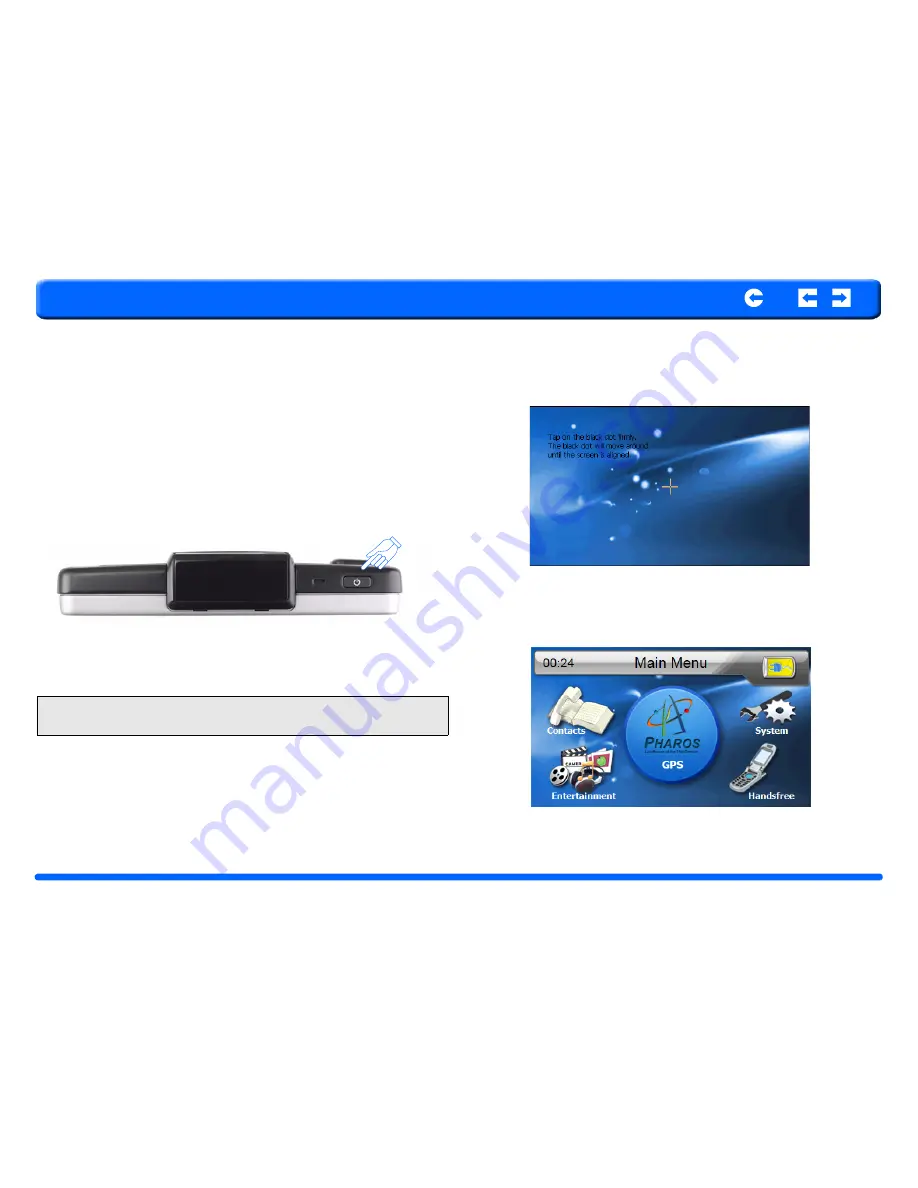
To turn on and calibrate the device:

1. Turn on your device by pressing the power button  on the top right panel of 

the device.

2. Tap the center of the black dot as it moves around the screen.

After calibrating the screen, the Main Menu panel displays. This is also referred 
to as the Home panel. 

NOTE:  

When you first turn on your device, you will be asked to calibrate the 

screen. This process ensures the accuracy of the touchscreen when used.

Содержание RNS-3200

Страница 1: ...RoyalTek Contents Index RNS 3200 Portable Navigation Device Reference Manual User instructions for operating the RoyalTek RNS 3200 ...

Страница 2: ...n any form or by any means electronic mechanical photocopy recording or otherwise without the prior written permission of RoyalTek Inc DISCLAIMER AND LIMITATION OF LIABILITY RoyalTek and its subsidiaries makes no representations or warranties either expressed or implied with respect to the contents hereof and specifically disclaims the implied warranties of merchantability or fitness for a particu...

Страница 3: ...glass GPS location information is not typically available inside buildings tun nels or underground parking lots A minimum of 4 GPS satellite signals is needed to calculate your GPS position Signal reception can be affected by weather events or overhead obstacles e g dense foliage and tall buildings Other wireless devices in the vehicle may interfere with the reception of satel lite signals and cau...

Страница 4: ... 16 4 1 1 Using the SD MMC slot 16 4 1 2 To insert a storage card 16 4 1 3 To remove a storage card 16 4 1 4 Establishing device PC connection 16 4 2 Installing Microsoft ActiveSync 17 4 2 1 Minimum installation requirements 17 4 2 2 To install Microsoft ActiveSync on your computer 17 4 3 Installing Contacts Manager 18 4 3 1 To install Contacts Manager 18 4 3 2 Creating a partnership 19 Chapter 5 ...

Страница 5: ...interface Pre loaded languages International English French German Italian and Spanish Additional language options for navigation mode Danish Dutch Nor wegian Portuguese and Swedish Advanced power saving options 1 6 Multimedia programs MP3 for your musical entertainment Photo for your favourite digital pictures 1 7 Contacts management programs Contacts for managing contact information on your devi...

Страница 6: ...rs 1 11 GPS Typeinternal ChipsetSiRF GSC3 Antenna typePatch antenna Very first start time cold start typ 42 sec Warm start after fix and power off 4hrs typ 35 sec Hot start after fix and power off 4hrs typ 1 sec Car Adapter Input rating12 24V Output rating5 0V 2A Power indicatorred LED non blinking Fuse2A Certificatese Mark AC Adapter AC Rating110 240V 50 60Hz DC Rating5 0V 2A Protection classII L...

Страница 7: ...r documentation RNS 3200 Portable Navigation Device Companion CD RNS 3200 Portable Navigation Device Quick Start Guide RNS 3200 Portable Navigation Device Warranty Booklet 2 1 2 Front Panels Figure 1 Front Panel View NOTE Although the RNS 3200 rechargeable Li ion battery comes approxi mately 30 charged before using it is best to connect the AC adapter and plug to power socket and fully charge the ...

Страница 8: ...ex Figure 2 Top and Bottom view Figure 3 Left and Right side view Table 2 Top and Bottom controls No Function 1 Power button 2 USB input 3 On Off 4 Reset 1 2 3 4 Table 3 Left and Right panel controls No Function 1 Main Menu 2 Power input 3 FM antenna 4 SD MMS slot 1 2 4 3 ...

Страница 9: ...ing angle in a left right direction 3 Vertical angle adjustment knobs Slightly loosen the knobs to adjust the viewing angle in an up down direction 4 Extendable rod Extend the rod to adjust the device position in a front to rear direction 5 Suction cup locking lever Secures the vacuum seal of the car mount 6 Suction cup Fixes the car mount on the selected mounting area 7 Suction cup release tab Pu...

Страница 10: ...ed to system settings configuration 3 2 To turn on and calibrate the device 1 Turn on your device by pressing the power button on the top right panel of the device 2 Tap the center of the black dot as it moves around the screen After calibrating the screen the Main Menu panel displays This is also referred to as the Home panel NOTE When you first turn on your device you will be asked to calibrate ...

Страница 11: ...and date time settings first The rest of the user prefer ences can be set up later 1 Tap System in the Main menu 2 Tap Language on the System Menu panel 3 To set the system language settings tap the forward or backward arrow until the language you want appears 4 Tap the Up Arrow in the top left to set the language and return to the Sys tem Menu 5 To set the system date and time tap Date Time in Sy...

Страница 12: ...nd return to the Date Time Menu 8 Tap the Time in the Date Time Menu 9 Tap the Up Arrow in the top left to set the Date and return to the Date Time Menu 10 Next tap Time Zone in the Date Time Menu 11 Tap the Up Arrow in the top left to set the Date and return to the Date Time Menu 12 Tap the Up Arrow in the top left of the Date Time Menu to return to the System Munu ...

Страница 13: ...djust how long you want to wait before Backlight goes into power sav ings mode while using battery or connected to a power source 4 Tap the Up arrow to return to the System Menu 3 6 Volume 1 Tap the Volume icon in the System Menu 2 Tap or to set default system sound volume 3 Tap the Up arrow to save and return to the System Menu 3 7 Power 1 Tap the Power icon in the System Menu 2 You can view the ...

Страница 14: ...em Menu 2 You can view the OS version GPS firmware version and other system information 3 Tap the Sys Info icon in the System Menu 4 You can view the OS version GPS firmware version and other system information NOTE Check Hot Keys backlight LED turn on when pressed To conserve battery power these settings should be set to lowest values ...

Страница 15: ...RNS 3200 GPS Receiver 15 Chapter 3 Using the RNS 3200 RoyalTek Contents Index ...

Страница 16: ...slot The card is secure when it is not protruding from the slot 4 1 3 To remove a storage card 1 Hold the device securely then push against the top of the card as if you were pushing it further into the slot letting the card spring out An audible system sound will signal that the card has been released 2 Gently remove the card from the slot 4 1 4 Establishing device PC connection The USB cable tha...

Страница 17: ...E Microsoft Outlook 2000 or later required for Contacts synchronization Microsoft Internet Explorer 5 0 or later Hard disk drive with 12 to 65 MB of available hard disk space Available USB port CD ROM drive VGA graphics card or compatible video graphics adapter at 256 color or higher 4 2 2 To install Microsoft ActiveSync on your computer 1 Close any open programs including those that run at startu...

Страница 18: ...mation on how to use ActiveSync on your computer start ActiveSync on your computer click Help then Microsoft ActiveSync Help 4 3 Installing Contacts Manager Use Contacts Manager to manage the contact information located on your device and on your computer This PC program shares the same contact data base as the Contacts component of Microsoft Outlook It only has an import export function you still...

Страница 19: ... on the left panel of the device Plug the USB client connector into an available USB port on your com puter The New Partnership setup wizard will automatically start on your computer screen 3 Follow the onscreen instructions 4 When prompted to select the items to be synchronized select only Con tactSync 5 Click Finish on the Setup Complete dialog box The initial synchronization process will automa...

Страница 20: ...RNS 3200 GPS Receiver 20 Chapter 4 Synchronizing with PC RoyalTek Contents Index ...

Страница 21: ...nd colleagues contact information These include their email address street address multiple phone numbers and other related information such as birthday or anniversary dates You can enter multiple address entries for each contact This program is inte grated with GPS navigation enabling users to treat all address entries as possi ble destination points in navigation mode 5 1 1 Using Contacts 5 1 2 ...

Страница 22: ...e related information for the new contact 3 Enter other address 4 Multiple phone numbers 5 Tap SAVE to save the new contact 5 1 4 Editing contact information 1 In the Contacts control pad tap the contact you wish to edit 2 Tap Edit 3 Enter the new information for the contact 4 Tap SAVE to save the new contact ...

Страница 23: ... Navigate The calculated route is shown on the map as a blue line from your current GPS position 5 1 6 Exporting contacts from your RNS 3200 1 Insert an SD or MMC storage card into the device Exported contact file s will be saved to this storage card for later access from your computer 2 Tap in the Contacts control pad 3 Select whether to export all contacts or just the currently selected one Sele...

Страница 24: ...0 should be recog nized as a USB mass storage device with the SD MMC card shown as a sub folder Using a compatible card reader directly copy videos digital music and image files to the SD MMC card It is recommended to organize files into subfolders These folders will makes files easier to find and play 6 2 Using the different media players 6 3 MP3 Enjoy your favorite music on the road The program ...

Страница 25: ...layer window below controls playback 4 File collection menu from 3 above NOTE You can also enter the MP3 music player by pressing the music hot key on the front panel See section XXXXXX 1 2 3 4 5 Table 5 MP3 player functions No Function Description 1 Repeat 2 Random play 3 File collection playlist 4 Skip backwards forwards 5 Pause Stop ...

Страница 26: ...control Playlist support based on sub directory contents Each sub directory containing compatible music files is treated as an individual playlist For a more organized file search it is advisable to named sub directo ries based on genre or listening preferences 6 4 1 Using the Video Player 6 4 2 To enter into the different media players 1 Tap the Entertainment icon in the Main Menu 2 Tap Video Pla...

Страница 27: ...ry contents Each subdirectory can hold multiple images and be used as an individual album For a more organized file search it is advisable to sort image files into sub directories based on meaningful name or date An example could be sum mer vacation pictures or New baby or 2005 Best Viewing files in Slide Show mode You have the option to view images in a slide show much like viewing a Power Point ...

Страница 28: ...nt icon in the Main Menu 2 Tap Video Player in the Entertainment menu 3 To set the system language settings tap the forward or backward arrow until the 4 To enable the Slide Show mode In Thumbnail or Full Screen mode tap Slide Show 1 above Table 7 Photo Album Menu No Function Description 1 Slideshow viewer 2 Go up to Folder level 3 Move selection up 4 Move selection down 1 2 3 4 ...

Страница 29: ...ntertainment Features RoyalTek Contents Index 5 Rotate an image below 6 Photo full screen view Table 8 Photo Album Viewer No Function 1 Slideshow viewer 2 Rotate photo 3 Zoom in 4 Zoom out 5 Move to the next photo or back one 1 2 3 4 5 2 ...

Страница 30: ...RNS 3200 GPS Receiver 30 Index RoyalTek Contents Index Index C Calibration 10 Car mount 9 F Front Panel View 7 8 ...

Страница 31: ...rence by one or more of the following measures Reorient or relocate the receiving antenna Increase the separation between the equipment and receiver Connect the equipment into an outlet on a circuit different from that to which the receiver is connected Consult the dealer or an experienced radio TV technician for help CAUTION Any changes or modifications not expressly approved by the party respons...

Отзывы: