background image

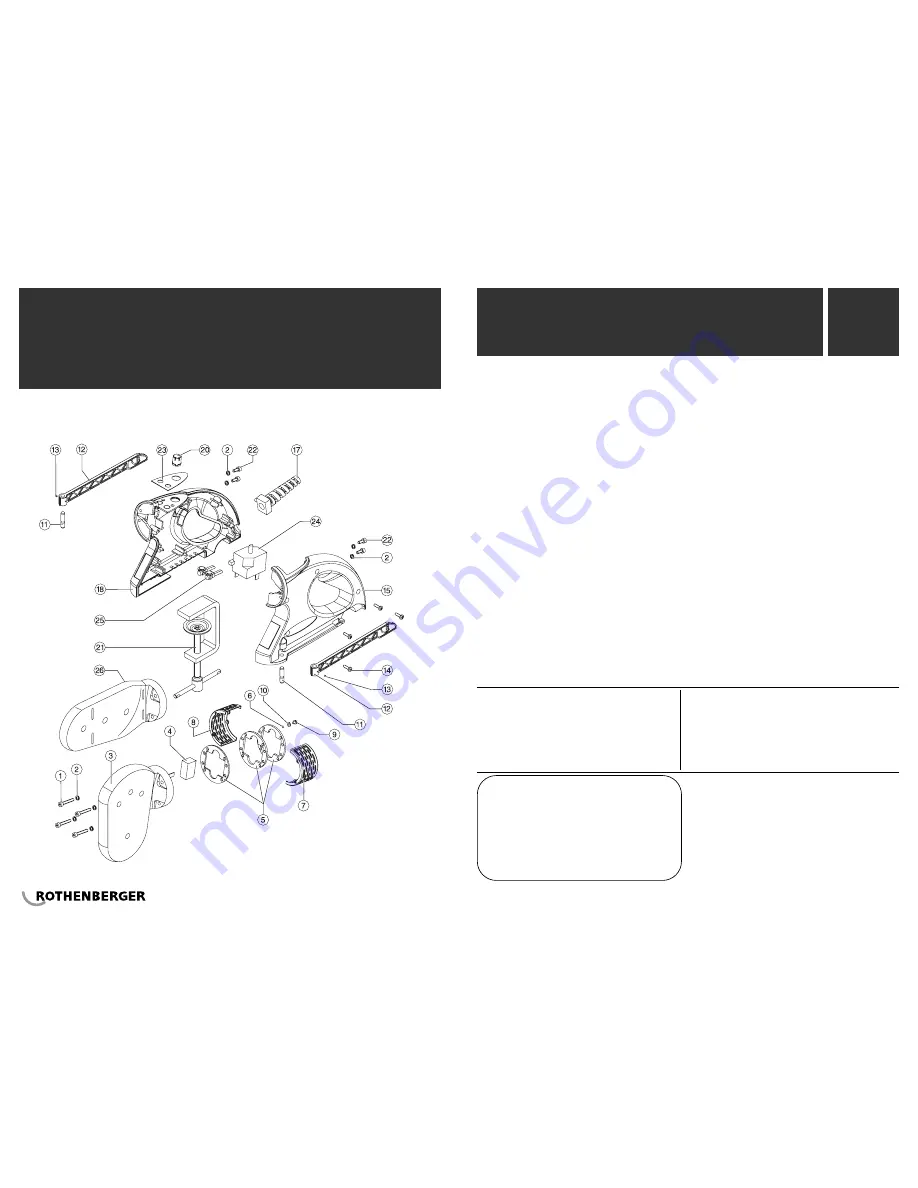
Explosionsdarstellungen

Exploded Views

Liste de Pièces

Despieces

Peças desmontadas

Esploso

76

Modell - Model - Modèle - Modelo -  Modelo - Modello:

__________________________________________________________________________

Fabrik - Serial - Matricule - Matrícula -  Matrícula - Matricola:

__________________________________________________________________________

Name des käufers - Buyer’s name - Nom de l’acheteur-
Nombre de comprador - Nome do comprador - Nome dell’acquirente:

__________________________________________________________________________

Adresse - Address - Adresse - Dirección - Direcçao - Indirizzo:

__________________________________________________________________________
__________________________________________________________________________

Name des verkäufers  - Dealer’s name - Nom du vendeur
Nombre de vendedor - Nome do vendedor - Nome del venditore:

__________________________________________________________________________

Adresse - Address - Adresse - Dirección - Direcçao - Indirizzo:

__________________________________________________________________________
__________________________________________________________________________

Einkaufsdatum - Date os purchase - Date de l’achat
Fecha de adquisición - Data de compra - Dara di acquisto: ____________________

Unterschrift des verkäufers:

Unterschrift des vendeur:

Dealer’s signature:

Buyer’s signature:

Signature du vendeur:

Signature du l’acheteur:

Firma del vendedor:

Firma del comprador:

Assinatura do vendedor

Assinatura do comprador:

Firma del venditore:

FIrma dell’acquirente:

ROTHENBERGER, S.A.

Ctra. Durango-Elorrio km 2 • 48220 Abadiano - SPAIN

Tel.: +34 94 621 01 01 • Fax: +34 94 621 01 02 

e-mail:[email protected]

www.rothenberger.es

Garantieschein • Warranty

Certificat de garantie • Certificado de garantía

Certidão de garantia • Certificato di garanzia 

2

Jahr / Year

Jour / Año

Ano / Anno

Modell SOCKET WELDER P63-S4 / P63-S5 Thermostatic / SOCKET WELDER P63-S4 / P63-S5 Thermostatic

Modèle SOCKET WELDER P63-S4 / P63-S5 Thermostatic / Modelo SOCKET WELDER P63-S4 / P63-S5 Thermostatic

Modelo SOCKET WELDER P63-S4 / P63-S5 Thermostatic / Modello SOCKET WELDER P63-S4 / P63-S5 Thermostatic

Содержание P63-S4

Страница 1: ...Electronic Thermostatic Polifusor SOCKET WELDER P63 S4 P63 S5 Electronic Thermostatic Máquina de Soldar SOCKET WELDER P63 S4 P63 S5 Electronic Thermostatic Polifusore SOCKET WELDER P63 S4 P63 S5 Electronic Thermostatic 9992090 07 04 Gebrauchsanweisung Instruction Manual Manuel d instructions Manual de instrucciones Manual de instruções Manuale delle istruzioni IT ...

Страница 2: ...e com as regulações CE descritas ROTHENBERGER dichiariamo assumendo la piena responsabilità di tale dichiarazione che questo prodotto è conforme alla direttiva descrita Produktbeschreibung Description of the article Description du produit Descripción de Artículo Descrição do artigo Descrizione di prodotto CE richtlinien CE Directives Directive CE Directiva CE Directiva CE Direttiva CE EN 50144 1 8...

Страница 3: ...UNG 4 Bestimmungsgemässe Verwendung 4 Benennung der Bauteile 4 TECHNISCHE DATEN 5 INBETRIEBNAHME 5 BEDIENUNGSANLEITUNG 5 A Vorbereiten des Rohres 5 B Vorbereiten des Muffenschweißgerätes 5 C Schweißvorgang 9 FEHLERBEHEBUNG 12 AUFBEWAHRUNG 12 WARTUNG UND PFLEGE 12 ELEKTROSCHALTPLÄNE 73 EXPLOSIONSDARSTELLUNGEN 75 ...

Страница 4: ...fiziertem Personal vorgenommen werden können die Funktionstüchtigkeit des Gerätes beeinträchtigen und Unfälle oder Verletzungen verursachen WICHTIGE HINWEISE Diese Gebrauchsanweisung vermittelt alle für den sicheren Betrieb des Gerätes erforderlichen Kenntnisse Stellen Sie sicher dass diese Gebrauchsanweisung dem Benutzer übergeben wird Bewahren Sie die Gebrauchsanweisung an einem leicht zugänglic...

Страница 5: ...efestigung mit Tischklemmstück Zusammen mit dem Schweißgerät wird ein Tischklemmstück zur sicheren Befestigung und Stabilisierung des Gerätes am Arbeitstisch geliefert Führen Sie den oberen Teil des Klemmstücks in die Aussparung auf der Geräteunterseite ein GERÄTEBESCHREIBUNG BESTIMMUNGSGEMÄSSE VERWENDUNG Das MUFFENSCHWEISSGERÄT SOCKET WELDER P63 S4 P63 S5 dient zum überlappenden Verschweißen von ...

Страница 6: ...sitionen siehe Abb 8 0 Aus 6 Betriebsposition Abb 8 Drehknopf Modell Thermostatic Abb 2 Tischklemmstück einsetzen Schieben Sie die gesamte Einheit auf die Kante der Werkbank und drehen Sie den beweglichen Teil des Klemmstücks fest bis die Einheit sicher befestigt ist Abb 3 Befestigung mit Tischklemmstück Befestigung ohne Tischklemmstück Klappen Sie die Bodenständer aus und stellen Sie das Schweißg...

Страница 7: ... Betriebsposition Abb 9 Drehknopf Modell Electronic 5 Vergewissern Sie sich dass das Schweißgerät die Arbeitstemperatur erreicht Modell SOCKET WELDER P63 S4 P63 S5 Thermostatic Sobald das Schweißgerät die optimale Arbeitstemperatur erreicht hat leuchtet die Temperatur Kontrollleuchte grün Ab diesem Zeitpunkt können Sie mit dem Schweißvorgang beginnen Die Temperatur Kontrollleuchte schaltet sich ab...

Страница 8: ...in der Tabelle 2 Seite 11 unter SCHMELZZEIT angegeben Abb 15 Schmelzzeit HINWEIS Vergewissern Sie sich dass der Schweißbereich während dieser Zeit keiner Belastung ausgesetzt wird 4 Abkühlen Lassen Sie das Rohr für die in Tabelle 2 angegebene Zeit ABKÜHLZEIT abkühlen Abb 16 Abkühlzeit Nach Ablauf dieser Zeit können Rohr und Formstück bereits entsprechend den Angaben des Rohrherstellers verwendet w...

Страница 9: ...nem trockenen Ort außerhalb der Reichweite von Kindern und unter Verschluss auf Abb 17 Aufbewahrung des Muffen schweißgerätes WARTUNG UND PFLEGE Überprüfen Sie die Heizbuchsen und dorne vor der Verwendung Wenn an diesen noch Materialreste von früheren Schweißvorgängen haften müssen diese vorsichtig entfernt werden HINWEIS Überprüfen Sie regelmäßig den Zustand der Muffen um ein korrektes Schweißen ...

Страница 10: ...NT 16 Applications 16 Identification of parts 16 TECHNICAL CHARACTERISTICS 17 PREPARATION FOR USE 17 OPERATING INSTRUCTIONS 17 A Preparing the tube 17 B Preparing the socket welding device 17 C The welding process 21 TROUBLE SHOOTING 24 STORAGE 24 CARE AND MAINTENANCE 24 ELECTRICAL SCHEMATICS 73 EXPLODED VIEWS 75 ...

Страница 11: ...ns information required for safe use of this equipment Ensure that the user receives a copy of this manual Keep this manual in a location where the operator can easily consult it whenever necessary Before using the socket welding device read this manual carefully and follow the instructions and advice it contains Take care to comply with the Safety Measures described in this manual to avoid accide...

Страница 12: ...ons B PREPARING THE SOCKET WELDING DEVICE 1 Mount the socket welding device Mounting using the G clamp The socket welding device is supplied with a G clamp that can be used to attach it firmly to a workbench Introduce the top section of the G clamp into the slot in the bottom of the unit DESCRIPTION OF THE EQUIPMENT APPLICATIONS The SOCKET WELDER P63 S4 P63 S5 has been designed to weld tubes and a...

Страница 13: ...s 6 position for the regulator knob See Fig 8 0 Off 6 Working position Fig 8 Thermostatic model regulator knob Fig 2 Insert the adapter s Mount the unit on the edge of the workbench and tighten the screw of the G clamp until the unit is firmly held in place Fig 3 Mounting using the G clamp Mounting without the G clamp Spread out the legs and rest the socket welding device on a flat surface ensurin...

Страница 14: ... has a temperature scale marked from 200 C to 300 C 260 C 280 C Working position Fig 9 Electronic model regulator knob 5 Wait until the socket welding device reaches its working temperature SOCKET WELDER P63 S4 P63 S5 Thermostatic Model When the socket welding device has reached its optimum working temperature the green temperature control LED will light Welding can now start The temperature contr...

Страница 15: ...NG TIME in Table 2 page 23 Fig 15 Setting time NOTE Ensure that the region of the weld is not subjected to any force during this time 4 Cooling Allow the tube to cool for the time recommended in Table 2 COOLING TIME Fig 16 Cooling time After the cooling time has finished the welded tubes and accessories can be used as recommended by the tube manufacturer TUBE Heating time sec Max assembly time sec...

Страница 16: ...it to cool in order to store it Store it carefully in a locked dry place out of reach of children Fig 17 Storing the socket welding device CARE AND MAINTENANCE Inspect the adapters before using them Carefully remove any material remaining from previous welding operations NOTE Check the condition of the adapters from time to time to ensure correct welding PRECAUTION PRECAUTION Do not use metallic i...

Страница 17: ...PO 40 Aplicaciones 40 Nomenclatura de piezas 40 CARACTERÍSTICAS TÉCNICAS 41 PUESTA EN SERVICIO 41 INSTRUCCIONES DE FUNCIONAMIENTO 41 A Preparación del tubo 41 B Preparación del polifusor 41 C Proceso de soldadura 45 SOLUCIÓN DE PROBLEMAS 48 ALMACENAMIENTO 48 CUIDADO Y MANTENIMIENTO 48 ESQUEMAS ELÉCTRICOS 73 DESPIECES 75 ...

Страница 18: ...NTE En este manual están incluidos los conocimientos necesarios para un funcionamiento seguro del aparato Asegúrese de entregar al usuario este manual de instrucciones Asegúrese de guardar este manual de instrucciones en un lugar accesible para que el operario pueda consultarlo siempre que lo desee Antes de utilizar el polifusor lea detenidamente este manual y siga las instrucciones e indicaciones...

Страница 19: ... climáticas B PREPARACIÓN DEL POLIFUSOR 1 Fije el polifusor Sujeción con mordaza Junto con el polifusor se suministra una mordaza para asegurar la sujeción del aparato a la mesa de trabajo así como su estabilidad Introduzca la parte superior de la mordaza en la cavidad existente en la parte inferior del aparato DESCRIPCIÓN DEL EQUIPO APLICACIONES El POLIFUSOR SOCKET WELDER P63 S4 P63 S5 ha sido di...

Страница 20: ...tatic El modelo termostático cuenta con 6 posiciones posibles Ver Fig 8 0 Apagado 6 Posición de trabajo Fig 8 Pomo regulador modelo Thermostatic Fig 2 Introducir mordaza Coloque el conjunto en el canto de la mesa de trabajo y gire la parte móvil hasta dejarlo perfectamente fijado Fig 3 Sujeción con mordaza Sujeción sin mordaza Despliegue las patas y apoye el polifusor sobre una superficie plana as...

Страница 21: ...osición de trabajo Fig 9 Pomo regulador modelo Electronic 5 Asegúrese de que el polifusor alcanza la temperatura de trabajo Modelo SOCKET WELDER P63 S4 P63 S5 Thermostatic Cuando el polifusor haya alcanzado la temperatura óptima de trabajo el LED de temperatura verde se iluminará A partir de este momento podrá comenzar con el proceso de soldadura El LED de temperatura se apagará y encenderá periód...

Страница 22: ... pág 47 Fig 15 Tiempo de fusión NOTA Asegúrese de que la zona de soldadura no está sometida a ningún esfuerzo durante este tiempo 4 Enfriamiento Deje enfriar el tubo el tiempo recomendado en la Tabla 2 T ENFRIAMIENTO Fig 16 Tiempo de enfriamiento Transcurrido estos tiempos ya se pueden utilizar los tubos y accesorios soldados siguiendo las recomendaciones del fabricante del tubo TUBO T Calentamien...

Страница 23: ...uárdelo con cuidado y almacénelo en un sitio seco fuera del alcance de los niños y cerrado con llave Fig 17 Almacenamiento del polifusor CUIDADO Y MANTENIMIENTO Revise las matrices antes de usarlas Si sobre su superficie hubiera adheridos restos de material de soldaduras anteriores retírelos con cuidado NOTA Revise periódicamente el estado de las matrices para garantizar una soldadura correcta PRE...

Страница 24: ...léctricos Schemi Elettrici Modell SOCKET WELDER P63 S4 P63 S5 Electronic SOCKET WELDER P63 S4 P63 S5 Electronic Modèle SOCKET WELDER P63 S4 P63 S5 Electronic Modelo SOCKET WELDER P63 S4 P63 S5 Electronic Modelo SOCKET WELDER P63 S4 P63 S5 Electronic Modello SOCKET WELDER P63 S4 P63 S5 Electronic ...

Страница 25: ...4 P63 S5 Thermostatic Modèle SOCKET WELDER P63 S4 P63 S5 Thermostatic Modelo SOCKET WELDER P63 S4 P63 S5 Thermostatic Modelo SOCKET WELDER P63 S4 P63 S5 Thermostatic Modello SOCKET WELDER P63 S4 P63 S5 Thermostatic Modell SOCKET WELDER P63 S4 P63 S5 Electronic SOCKET WELDER P63 S4 P63 S5 Electronic Modèle SOCKET WELDER P63 S4 P63 S5 Electronic Modelo SOCKET WELDER P63 S4 P63 S5 Electronic Modelo S...

Страница 26: ...n Direcçao Indirizzo __________________________________________________________________________ __________________________________________________________________________ Einkaufsdatum Date os purchase Date de l achat Fecha de adquisición Data de compra Dara di acquisto ____________________ Unterschrift des verkäufers Unterschrift des vendeur Dealer s signature Buyer s signature Signature du vende...

Страница 27: ... ROTHENBERGER Hungary KFT Vácí út 30 H 1044 Budapest Tel 36 1 3 90 05 19 Fax 36 1 3 90 05 21 E Mail rothenberger mail datanet hu ROTHENBERGER weltweit ROTHENBERGER Ireland Ltd Bay N 119 Shannon Industrial Estate IRL Shannon Co Clare Tel 35 3 61 47 21 88 Fax 35 3 61 47 24 36 ROTHENBERGER Italiana s r l Via G Reiss Romoli 17 I 20019 Settimo Milanese Tel 39 02 33 50 12 12 Fax 39 02 33 50 01 51 E Mail...

Отзывы: