background image

12

• 

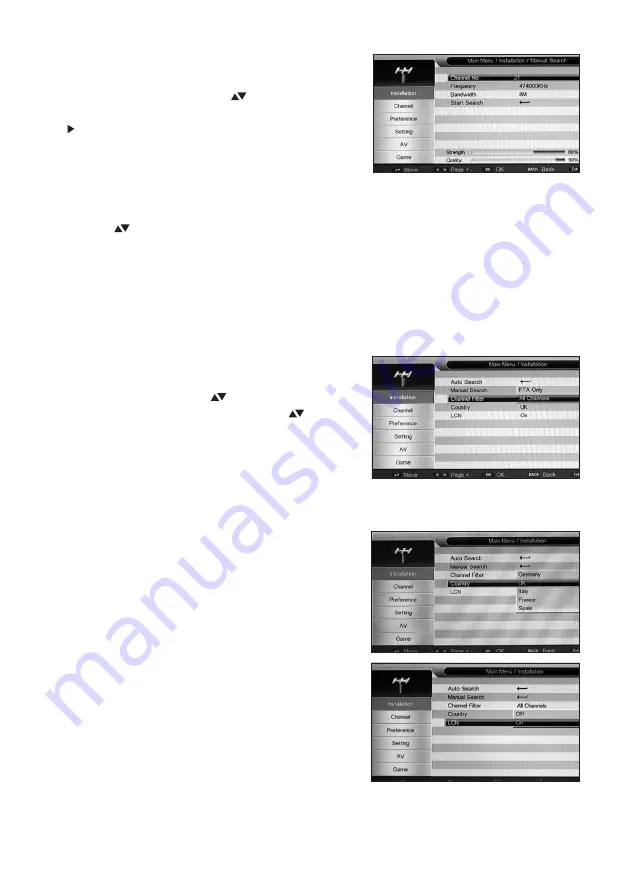
Manual Search:

 This can be useful if you know 

  a new programme has been added to a 
  particular CHANNEL. Using ( ) keys select the 
  MANUAL SEARCH function and press the 
  ( ) Cursor Key or the “OK” button. You will then 
  be prompted to enter the number of the CHANNEL 
  you wish to search for Digital Programmes or 
  (if you know it)  the FREQUENCY in kHz. It is 
  recommended that you use the CHANNEL option 
  as this is easier. Press the “OK” button and  then 
  use the ( ) keys to select your desired CHANNEL. 
  Press “OK” to confirm. It is not necessary to 
  change the BANDWIDTH setting. Scroll down to 
  START SEARCH and press “OK”. Your chosen 
  CHANNEL will now be searched for available 
  Programmes and the results stored. PRESS
   “EXIT” to leave.

• 

Channel Filter

: This feature enables you to remove 

  encrypted (Pay TV) CHANNELS from your Programme 
  List if you wish. Using the ( ) keys select CHANNEL 
  FILTER and press “OK”. Then using the ( ) select 
  FTA ONLY and press to confirm. You will need to
  retune your receiver to remove the “PAY TV” 
  Programmes from your list. If you want to restore the
  “PAY TV” channels then repeat this procedure but
  select ALL CHANNELS instead of FTA ONLY. Press “EXIT” to leave.

• 

Country: 

This feature is used to set your Country

  of location. You will not normally need to change it 
  from the default setting of UK.

• 

LCN

: The LCN (Logical Channel Numbering) 

  ensures that your Programmes are stored in the
  preferred order, such as BBC1 as Location 1, 
  BBC2 as Location 2 etc…. It is not recommended 
  that you change this setting.

Содержание HDT2-5101

Страница 1: ...DVB T2 HD Terrestrial Receiver User Manual MODEL NUMBER HDT2 5101 Please read this Manual thoroughly before using your Receiver and then retain for future reference ...

Страница 2: ... your Programme p10 4 8 OTR Recording p10 4 9 Channel List and Favourite List p10 5 The Main Menu p11 5 1 Installation Menu p11 5 2 Channel Menu p13 5 3 Preference Menu p14 5 4 Setting Menu p16 5 5 AV Audio Video p22 5 6 AV Games p24 6 Recording Playback and Media Functions p25 6 1 Compatible Recording Media p25 6 2 Disk Space Requirements for Recording p25 6 3 Recording p26 6 4 Playback p26 6 5 P...

Страница 3: ...containers such as vases filled with water or other liquids on this unit DO NOT stand on soft furnishings DO NOT operate close to heaters or other heat sources DO NOT allow anything to trap pinch or otherwise damage the Power Cord If the Power Cord should become damaged IMMEDIATELY switch if off at the wall socket and then unplug it Contact your Service centre to carry out a repair DO NOT unplug t...

Страница 4: ...g Digital area but cannot receive some or all of the available Programmes then ask your local Aerial Installers to check your Antenna as this may require upgrading This symbol indicates that at the end of its useful life this product must not be disposed of with normal domestic waste To prevent possible harm to the environment or human health from uncontrolled waste disposal please recycle it resp...

Страница 5: ...r Volume Up Button Standby LED Indicator Standby Button 7 Segment Display Menu Channel Down Button 3 2 Rear Panel TV Antenna In Loop Out HDMI S PDIF Optical TV Scart Ethernet Component Video Audio Right USB Audio Left E F G I H J A B C D A E F G I J A B C D E I F J G H E F H I J G A B D C C B H D ...

Страница 6: ...24 25 26 29 28 30 31 33 34 35 36 37 38 39 42 Power Standby 22 1 MUTE Numeric Keys 0 9 Text Audio Vol Vol RED Button GREEN Button Cursor Up Cursor Left MENU V FORMAT Play Pause Stop Fast Reverse Fast Forward GOTO AUDIO DESCRIPTOR A B 2 4 5 6 8 9 10 11 12 13 14 16 18 17 19 20 21 TV Radio 3 A Ratio 7 INFO 27 BACK 15 CH PAGE PREVIOUS 40 PAUSE 41 OK 32 ...

Страница 7: ...n MENU EPG CHANNEL LIST or FAVOURITE modes MENU Accesses the MENU options V FORMAT Select the resolution you require from 480p through to 1080p at a variety of frame rates BACK Returns you to the previously viewed Programme or goes back one step when in MENU mode PLAY PAUSE Used in MHEG5 only for video content etc STOP Stops Playback FAST REVERSE Choose from X2 X4 X8 and X16 when playing back reco...

Страница 8: ...G SOURCE Takes you to the MULTIMEDIAfunctions AMEMORY DEVICE must be installed for the functions in this MENU to be active REC LIST Accesses a list of all the current Programme recordings on your external USB Device DEV Provides access to the attached USB Memory device RECORD Press to RECORD the programme being currently viewed Press record a second time to set the duration of the recording in the...

Страница 9: ...ion describes in more detail the use of your new Digital receiver Connecting the TV Aerial Your TV aerial needs to be connected to the TV Antenna In at the rear of your Receiver Digital TV requires a good quality signal for optimum reception use a loft or roof mounted High Gain Aerial If in doubt contact your local Aerial Installer Connecting to your Television There are four methods to connect yo...

Страница 10: ...Receiver to the SCART socket on your TV CVBS This is the least effective method of connection as with Component it also needs separate audio feeds to the TV Using a 3 way Cinch RCA cable connect the VIDEO and AUDIO LEFT AUDIO RIGHT of your receiver to the TV SPDIF Audio Connection Optical This receiver is equipped with an Optical Audio Out This is very useful if you have an external Audio Amplifie...

Страница 11: ...ny HD Channels being Broadcast Your receiver is now ready to use Use the NUMERIC or CH keys to change Programme and the VOL to control the volume There are many more features and functions that you can explore and use these will be covered in the remainder of this manual but you will now be able to watch and enjoy your Digital Television programmes 4 5 EPG The EPG is an extremely useful tool that ...

Страница 12: ...16 To cancel the LIVE PAUSE and return to the current point in your Programme press the Stop Key NOTE To remove the INFO box that is displayed press the INFO button 4 8 OTR Recording External USB Memory Required If you decide you want to record a Programme you are currently watching then you can press the RECORD key The Receiver will initialise the recorder and start recording In order to stop the...

Страница 13: ...tings of your Receiver and to get the most from its variety of useful features To enter a particular MENU press MENU on your Remote Control and then use the Cursor keys to select your required sub menu from the sections listed below Installation Channel Preference Setting AV Game 5 1 Installation Menu To enter the INSTALLATION Menu you will always need to enter your Password the default password i...

Страница 14: ... available Programmes and the results stored PRESS EXIT to leave Channel Filter This feature enables you to remove encrypted Pay TV CHANNELS from your Programme List if you wish Using the keys select CHANNEL FILTER and press OK Then using the select FTA ONLY and press to confirm You will need to retune your receiver to remove the PAY TV Programmes from your list If you want to restore the PAY TV c...

Страница 15: ...nel you wish to rename and press the BLUE button A Character Matrix will then be displayed where you can delete the original name and insert your own Follow the on screen prompts to edit and confirm Your change will be saved when you press EXIT Re number Using the keys select the Channel you wish to renumber and press the OK button Then enter the new number for the Channel using the numeric keys P...

Страница 16: ...m Time on OSD Select whether you wish ON SCREEN TIME to be displayed Using the keys select TIME ON OSD and then press OK Use the keys again to select your preference and press OK to confirm OSD Transparency Select your preferred OSD Transparency Using the keys select OSD TRANSPARENCY and then press OK Use the keys again to select your preference and press OK to confirm NOTE 0 is Opaque 1st Preferr...

Страница 17: ...eference and press OK to confirm PVR Config In this screen you can set up your preferences for the PVR facility that this Receiver provides when a compatible USB STORAGE device is connected to the rear USB Port PVR File Size You can select between 1Gb 2Gb 3Gb 4Gb or Auto If the file size of a recording exceeds your selected option then the Receiver will divide the file into additional sections as ...

Страница 18: ...e there are 10 Timers available therefore you cannot set Reminders future Records or other timed items for more than 10 events To set a future record beyond your 7 DAY EPG or to set up another type of event follow the Instructions below Timers Menu In the SETTING Menu press use the keys to select TIMERS and then press OK or the Cursor key to enter the TIMERS menu Timer Select Check for a free TIME...

Страница 19: ... the Cursor key then using the Cursor and Numeric Keys set the required time Press OK to confirm End Time Scroll down to the END TIME function press the Cursor key then using the Cursor and Numeric Keys set the required time Press OK to confirm AD Record Here you can set the Receiver to Record the AUDIO DESCRIPTOR if the Programme you are recording is broadcasting this information Press the Cursor...

Страница 20: ...n press OK to confirm Delete All You can also delete all TIMER entries by using the RED button Take care when using this function as it will also delete all REMINDERS of future RECORD events that you may have set from within the EPG Child Lock This feature enables Parental Control to prevent Children accessing inappropriate content or tampering with the Installation Using the keys select CHILD LOC...

Страница 21: ...ecommended you do not change this setting Ethernet Config This feature allows the user to set up the LAN Local Area Network Ethernet port to enable connection to the Internet for future services such as BBC Iplayer Auto Mode In Auto the Ethernet settings will be set automatically for you as shown in the example below Manual Mode If Manual is selected then all the values need to be entered manually...

Страница 22: ...able it is recommended you update your Receiver to take advantage of the benefits that the new version may offer Proceed as follows Download Download the firmware update from the Ross Website to your PC Extract and Copy The file will be compressed so you will need to extract it prior to copying it to your Memory Stick Make sure that you use an empty Memory Stick for this purpose and copy the file ...

Страница 23: ... select OTA UPGRADE press OK to confirm You will now be taken to the OTA UPGRADE SCREEN Use the key to confirm you wish to search for an upgrade then press OK to confirm You will need to retune your receiver if an OTA Upgrade takes place Refer to SECTION 4 4 for assistance if required Version This screen provides information on the Hardware Software Firmware Version levels together with the Build ...

Страница 24: ...onfirm Adjust to your preferred setting using the keys and then press OK to confirm Brightness Use the keys to select BRIGHTNESS and the OK button to confirm Adjust to your preferred setting using the keys and then press OK to confirm Saturation Colour Use the keys to select SATURATION and the OK button to confirm Adjust to your preferred setting using the keys and then press OK to confirm ...

Страница 25: ...o confirm Use the keys to adjust the delay between 0 250mS depending on your equipment Press OK to confirm Aspect Ratio This feature allows the User to adjust the screen format to match their TV Please note however that in the higher resolutions i e from 720p upwards the Aspect ratio is fixed at 16 9 If the Aspect Ratio is set to 576i then the user has a choice of 4 3 PS 4 3 LB or 16 9 Using the k...

Страница 26: ...elect VIDEO RESOLUTION and press OK to confirm Again using the keys select your preferred option and press OK to confirm The default setting is 720p 50Hz 5 6 AV Games This Receiver comes pre loaded with five exciting games to challenge both your mind and your aptitude Enjoy Box Man Follow the on screen prompts to play this game using the Cursor keys and the OK button Tetris Follow the on screen pr...

Страница 27: ...Memory Stick can give you a reasonable amount of capacity for recording if you want to take full advantage of the capabilities of this Receive then it is recommended you purchase a USB HDD These come in many capacities your Receiver will work with a drive of up to 1Tb capacity but for most purposes 500Gb should be adequate Please be aware that whilst as much testing as possible has been undertaken...

Страница 28: ...s is the most convenient way of recording Simply press the EPG key then using the Cursor keys scroll to the Programme you wish to record your choice will be highlighted Then press the GREEN button Reminder and then press again to change the REMINDER to a RECORD A GREEN symbol will appear to the left of your Programme Name Remember though to leave your Receiver in Standby and your USB HDD switched ...

Страница 29: ...d event you wish to cancel Then press the GREEN Off button and the event will be cancelled Timer Record This Receiver has a 10 Event Timer this means that if you want to Record a Programme beyond the coverage of the 8 Day EPG you can programme a TIMER to do this for you Please refer to SECTION 5 4 for detailed instructions on how to do this 6 4 Playback All media playback is accessed via the sourc...

Страница 30: ...cording will be highlighted press OK again to view Normal playback controls on your remote can be used to control playback 6 6 Playback of Music files Using the Cursor keys select MUSIC Now press the key This will highlight your attached USB Memory device Press OK a list of MUSIC files will be displayed Using the keys select the title you wish to play and press OK Playback will then commence Norma...

Страница 31: ... you are using USB Device Functions Your Chosen device or partition needs to be highlighted to use the options described below Set Partition This feature is useful when you are using a USB Device with more than one partition Using the keys select the partition you wish to use for your recordings and press the RED button Your choice will be confirmed by a red dot being added to your chosen partitio...

Страница 32: ... controls are active in this mode Delete Select the Programme you wish to delete and then press the RED button You will be asked to confirm that you wish to delete the file Select YES and press OK to delete the file Rename You can easily rename a programme by selecting the recording and then pressing the GREEN button An onscreen character matrix will then be displayed allowing you to change the na...

Страница 33: ...splayed Press OK again and then using the keys select the file to Move Copy Press the GREEN select key Then on the right side of the screen select the Partition where you want to store the programme you selected Now press either the YELLOW Copy button or the BLUE Move button to relocate your Programme You can then confirm by checking the source and destination partitions to see if your file has be...

Страница 34: ...o Picture or sound No video or audio connection Check your chosen source HDMI SCART is properly connected to to your TV Your cable is faulty Change channels Picture is breaking up or freezing Signal level too low Check aerial No Signal found Aerial not connected Aerial misaligned damaged No signal You may be tuned to a data text only channel Channel cannot be received May be an encrypted channel T...

Страница 35: ... 16QAM 64QAM 256QUAM FFT Mode T 2K 8K FFT Mode T2 1K 2K 4K 8K 16K 32K FEC Code Rate T 1 2 2 3 3 4 5 6 7 8 FEC Code Rate T2 1 2 3 5 2 3 3 4 5 6 7 8 Guard Band Interval T 1 4 1 8 1 16 1 32 Guard Band Interval T2 1 4 1 8 1 16 1 32 1 32 1 64 1 128 Symbol Rate 0 2 7 2 Msps Connectors S PDIF Optical TOSLINK SCART TV Full HDMI 720p 50Hz 1080i 25Hz 1080p 50Hz Component Y Pb Pr RCA Connectors Video Composi...

Страница 36: ...UK Office Stafford Park 1 Telford Shropshire England TF3 3BD Tel 44 0 1952 238 100 Fax 44 0 1952 238 180 Helpline 0845 194 7584 UK For further product information please go to www ross co uk ...

Отзывы: