background image

9. CMS

46

Real Time Recording  & Full HD Display

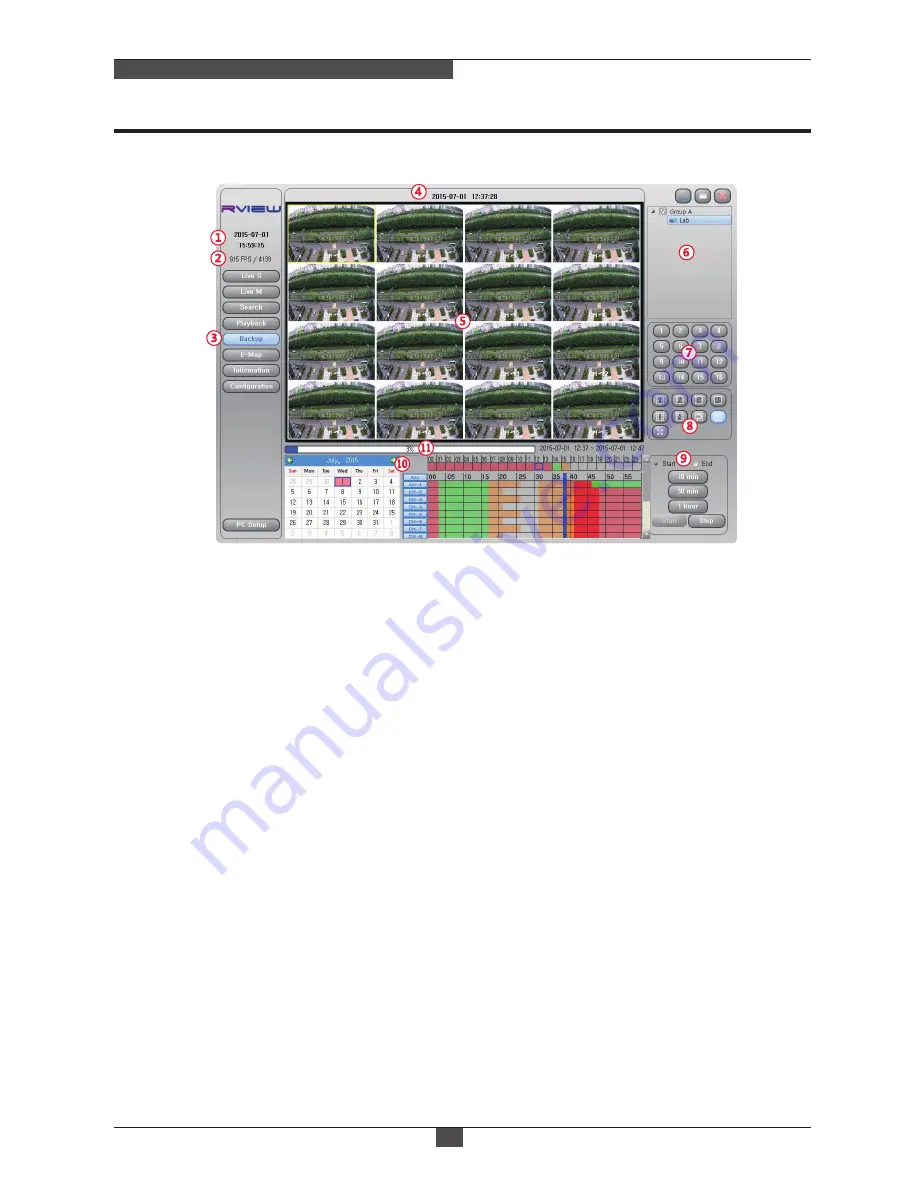
9-4-6. Backup

1)  Computer's time : Computer time is displayed.

2)  No. of frames : Display the number of total frames per second transmitted over the network.

3)  Function selection : Backup Icon is displayed in blue when it is selected.

4)  DVR name, accout, time, speed of playback: Display the currently connected DVR's name, account, time

     and playback speed.

5)  Video monitoring window : Display the currently connected DVR's playback pictures.

6)  List management window : Add, modify, delete DVR list. When you click the right mouse button, pop up 

     a window displaying Disconnect, Add group, Modify group, Delete group, Add DVR, Modify DVR, Delete DVR.

7)  Channel selection button : If you select a channel, the selected channel is displayed on full screen.

8)  Screen configuration : Displaying mode that is 4-split(1-4, 5-8, 9-12, 13-16), 9-split(1 ~ 9, 8 ~ 16), Sequence,

    16-split , FULL Screen(video only) can be selected.

9)  Backup related button : When you click the mouse left or right button on the calendar, a blue bar will be 

     displayed. In the state, select start or end radio button and select a time button(10 minutes, 30minutes, 1 hour).

     Then amount of time selected data is displayed in dark red. If start radio button is checked, the blue bar is 

     a starting point. If end radio button is checked, the blue bar is a ending point. Press the start button to backup. 

     If you press the stop button, backup operation will be stoped.

10) Calendar : Recorded data is displayed on the calendar. Use the scroll bar up to 16 channels of recording

     data can be found at once. Recorded data is displayed in a different color. Red(Manual or Continuous record), 

    Green(Motion record). All channels or specific channels can be selected using ALL

    button, CH-1 ~ CH-16 button. The selected channel will be backed up.

11) Backup progress bar : Display backup progress status.

Содержание RMD-AH04

Страница 1: ...Real time Recording Full HD AHD2 0 DVR Operating Instruction Before installing and using this product please read the instruction fully and keep it handy for later use Preliminary 1080P...

Страница 2: ......

Страница 3: ...radio communications Operation of this equipment in a residential area is likely to cause harmful interference in which case the user will be required to correct the interference at his own expense Ca...

Страница 4: ...Product Installation 7 2 System Operating 7 3 Setup 7 4 Search 7 5 Playback 7 6 Backup 7 7 Network Monitoring 7 Operation 10 8 1 System 8 2 Network 8 3 Record 8 4 Hard disk HDD 8 5 Event 8 6 Account 8...

Страница 5: ...such like PTZ dome Optional AHD2 0 Differential converter a dongle enables Non UTP camera to deliver FHD video through UTP cable BNC Input Video Over Coaxial cable only Common Features BNC UTP Input V...

Страница 6: ...LED LED Power Recording Event Enter the main menu setting USB port Built in Staus LEDs IR Receiver for remote control option Move the cursor Up Down Left Right Select Set mode in the menu Name Functi...

Страница 7: ...t Ethernet Connector USB port RS485 communication connector Sensor Input Relay Output Option Camera Video Input UTP Connector DC Power input connector Adaptor Power On Off switch HD Output port Audio...

Страница 8: ...rnet Connector USB port RS485 communication connector Sensor Input Relay Output Option DC Power input connector Adaptor Camera Video Input HD Output port Audio Input Output VGA Output port Name Functi...

Страница 9: ...920x1080 1024x768 1280x720 1280x1024 1440x900 1 2 3 4 5 6 7 10 15 30 NTSC 10 Steps 1 2 3 4 5 6 7 9 12 25 PAL 10 Steps 4 Levels Low Medium High Super 120fps 720p 960H D1 100fps 720p 960H D1 60fps 1080p...

Страница 10: ...camera Connect the cameras 7 1 3 Power supply Connect the power supply to operate the product 7 1 4 Product configuration Using the default setting is sufficient also the user can change the recording...

Страница 11: ...ze Running zoom only single xcreen mode Record Menu Search Backup Remote DVR Log off Power off Turning on and off the recording Enter the main setup menu Enter the search menu Enter the backup menu Vi...

Страница 12: ...y ago Playback the video just 1 day ago from the current time 7 4 2 Calendar SEARCH Calendar search function is supported Identifying the presence of recorded video per channel is easy The time zone w...

Страница 13: ...time and channels that you want to search in the event search menu then event lists that occurred during that time period are displayed 7 5 PLAYBACK Split screen seletion playback related buttons are...

Страница 14: ...al media player Time Setting Select the time to back up Start and end time of backup can be set by time or bookmarks Channel Selection All channel or individual channel can be selected After selecting...

Страница 15: ...ideo Loss Record Fail Record Warning Camera Name Motion Icon Sensor Icon Record Icon Status Bar Application Kernel Name ID Time Date Language S W Upgrade Configuration Buzzer Display SETUP Menu Table...

Страница 16: ...6 hours ago 1 day ago Low Medium High Super Manual Continuous Motion Continuous Event Schedule 0 30 1 4 Audio Record Time Overlay Overwrite Once On Off Cont 5sec 10sec 30sec Sender Receiver Sensitivi...

Страница 17: ...16 Pelco D 0 255 Pan Tilt Zoom Focus CH1 CH16 On Off Setup CH1 CH16 Contents Post Alarm Record None 10 60sec CH1 CH16 PTZ Playback Backup Network Network Timeout Address Port ID Password SSL MIME E ma...

Страница 18: ...hours 12 hours method is possible 3 Time Zone Select a time zone where the DVR is installed Daylight saving time is set by the time zone 4 NTP Select whether to use NTP When it is ON states it takes...

Страница 19: ...kernel two options are available 2 File Press refresh button after inserting a USB memory to the USB port of the DVR Upgrade will be in progress when upgrade button is pressed after selecting the upg...

Страница 20: ...the screen 2 Motion Icon Select whether to display motion detection icon on the screen 3 Sensor Icon Select whether to display sensor detection icon on the screen 4 Record Icon Select whether to displ...

Страница 21: ...sted 8 VGA Only Adjust the display parameters of VGA port only Luminance Contrast Hue Saturation Color Gain can be adjusted Static IP Address Click the keyboard icon and enter the IP address to use Su...

Страница 22: ...bandwidth of network transmission data Type IP Address 192 168 0 100 Static Record HDD Event Camera Info Stream Client Info Remote DVR Status Account System DDNS TCP IP Apply Subnet Mask 255 255 0 0...

Страница 23: ...eck button to check availability from the DDNS server Check Default Hostname eznetdns com 0010c0 eznetdns com Record HDD Event Camera Info Stream Client Info Remote DVR Status Account System DDNS TCP...

Страница 24: ...e current status of the network Channel Resolution Quality Framerate 480x270 All Record HDD Event Camera Info Client Info Remote DVR Status Account System DDNS Stream TCP IP Apply HIGH 15 Network IP A...

Страница 25: ...Test Check the operation state of UPnP function DNS Test Check the state of the DNS server s operation DDNS Test Verify the information that is successfully registered on the DDNS admin 192 168 0 209...

Страница 26: ...arched using same user interface and playbacked C On the mouse menu click Exit Remote DVR in order to disconnect the remote DVR Address Port User Password 554433 eznetdns com 1111 admin Record HDD Eve...

Страница 27: ...modes LOW MEDIUM HIGH SUPER can be selected 4 Framerate Each channel can be set independently up to 30fps NTSC 25fps PAL 5 Mode MANUAL CONTINUOUS MOTION CONTINUOUS EVENT SCHEDULE1 SCHEDULE4 mode can...

Страница 28: ...CONTINUOUS EVENT When you use a remote controller or the button of front panel press the OK button to change the recording mode sequentially Schedule 1 00 01 01 02 02 03 03 04 04 05 05 06 06 07 07 08...

Страница 29: ...in progress In the ONCE mode When the hard disk is full DVR stops the recording 2 Forced Deletion It is a function that erases forcely the recorded data Based on the current time previous data will be...

Страница 30: ...that there is possibility to occure serious problems within 24 hours so back up important data and need to replace the hard disk 2 Check Interval Select the S M A R T test period 6hours 12hours 24hou...

Страница 31: ...area Hold down the right mouse button to release the area Clicking the right mouse button or pressing the MENU button on the remote control or front keys Motion Setting menu appears All On All Off Sav...

Страница 32: ...that you want to use Address Enter the address of the SMTP server to use Default value is the Google s SMTP server Port Enter the SMTP port number Default value is the Google s SMTP port number Authen...

Страница 33: ...tion information is included in the email content Video Loss Video loss information is included in the email content Record Status Recording status is included in the email content System Access Syste...

Страница 34: ...NONE 10s 20s 30s 40s 50s 60s can be selected Motion Video Loss On On Apply Camera Info Email Post Record Account System Motion Network Record HDD Event Address SMTP Condition Contents Record Status O...

Страница 35: ...Set a password for a user account 3 Permission Set account specific feature The channel PTZ control playback backup network monitoring network connections network access time limit functions can be s...

Страница 36: ...sharpness can be adjusted 8 7 3 Adjustment 1 Auto Set whether to use an automatic log off 2 Wait Time Set the wait time of an automatic log off 30s 1min 3min 5min 10min can be selected Apply Auto On...

Страница 37: ...everse control function 4 Baudrate Set the baud rate 1200 2400 4800 9600 19200 38400 57600 115200 is possible 8 7 5 PTZ 8 7 4 UTC 16ch only Channel Model PELCO_D Ch 1 ID Reverse Control 1 Baudrate 960...

Страница 38: ...zone which selected channel 3 Zone Setting privacy mask area 8 7 7 Privacy Automatic screen switch setting 8 7 6 Sequence Channel Enable Zone Ch 1 Off Ch 1 Ch 5 Ch 9 Ch 13 Ch 2 Ch 6 Ch 10 Ch 14 Ch 3 C...

Страница 39: ...h 8 Ch 12 Ch 16 All OK Information System System Log Event Log Network Record HDD Event Account Camera Info Start 2015 04 17 04 18PM 2015 04 17 05 18PM End Information System System Log Event Log Netw...

Страница 40: ...Real time video monitoring retrieval and backup of recorded data configuration functions are provided Up to 256 channels of video can be monitored simultaneously Double click the CMS_VerX X X_Setup ex...

Страница 41: ...ing the Add DVR enter the information of DVR which you want to Add The default ID PW are admin 1234 Press OK button the DVR will be added on the list 4 Select the Connection by clicking the mouse righ...

Страница 42: ...t window Manage the group and DVR using add modify and delete function 4 Screen selection window Select a channel to show on the monitoring window or screen 5 Contol window or calendar window In LiveS...

Страница 43: ...e and close buttons In particular the Maximize button maximize not only the video but also including all function buttons so user can control all functions at the maximized window 9 Function Zoom Capt...

Страница 44: ...network 3 Function selection Search Icon is displayed in blue when it is selected 4 DVR name accout time speed of playback Display the currently connected DVR s name account time and playback speed 5...

Страница 45: ...on If you select a channel the selected channel is displayed on full screen 8 Screen configuration Displaying mode that is 4 split 1 4 5 8 9 12 13 16 9 split 1 9 8 16 Sequence 16 split FULL Screen vid...

Страница 46: ...4 split 1 4 5 8 9 12 13 16 9 split 1 9 8 16 Sequence 16 split FULL Screen video only can be selected 9 Backup related button When you click the mouse left or right button on the calendar a blue bar w...

Страница 47: ...a in the Modify Mode In the Setup mode User can select whether to pop up the duration time of Popdown image size 3 E Map display window Display map and images 4 Camera icon Display the location of cam...

Страница 48: ...rding hard disk events accounts cameras can be selectable 4 Configuration display window Display the configuration values of selected group 1 Save path Set the saving location of Captured Still images...

Страница 49: ...9 CMS 49 Real Time Recording Full HD Display Display the program version information and the computer s storage device information...

Страница 50: ...he application RVIEW below screen will be displayed 10 3 1 Execution If you press the menu button DVR s list management menu will pop up at the bottom of the screen There are buttons for Add Edit Dele...

Страница 51: ...n of the selected DVR After selecting the DVR from the list press the Connection button then DVR will be connected 10 3 3 Connection 3 Delete Exit Press the Delete Exit button to delete or exit the Ap...

Страница 52: ...VR name Display the name of the connected DVR 3 Capture Image capture button 4 DVR time Display the currently connected DVR s time 5 Video monitoring window Display Currently connected DVR s video 6 S...

Страница 53: ...Focus Focus control button 10 IRIS Iris control button 10 3 6 PTZ control 1 Live Live mode toggle button 2 Search Search mode toggle button 3 Display speed of playback Display playback speed 4 Video...

Страница 54: ...le 10 3 10 Setup Preferences menu for application Network stream types Main Sub Auto Aspect Ratio Full 4 3 Playback option Skip Non skip Audio ON OFF OSD visibility can be selected 10 3 11 Landscape v...

Страница 55: ...16ch Application me31XXapp_restore bin XX 04 4ch 08 8ch 16 16ch Copy the files to a USB memory Copy the bootloader file to recover bootloader copy the kernel file to recover kernel or copy the applica...

Страница 56: ...MADE IN KOREA RME0900 V1 Real time Recording Full HD AHD2 0 DVR...

Отзывы: