background image

54

This is how it works:

This is how it looks:

This is what it‘s for:

Rollei Fototechnic GmbH, Salzdahlumer Strasse 196, D-38126 Braunschweig, Tel 0531-6800-0, Fax 0531-6800-243, eMail [email protected]

55

This is how it works: 

This is how it looks:

This is what it‘s for:

Rollei Fototechnic GmbH, Salzdahlumer Strasse 196, D-38126 Braunschweig, Tel 0531-6800-0, Fax 0531-6800-243, eMail [email protected]

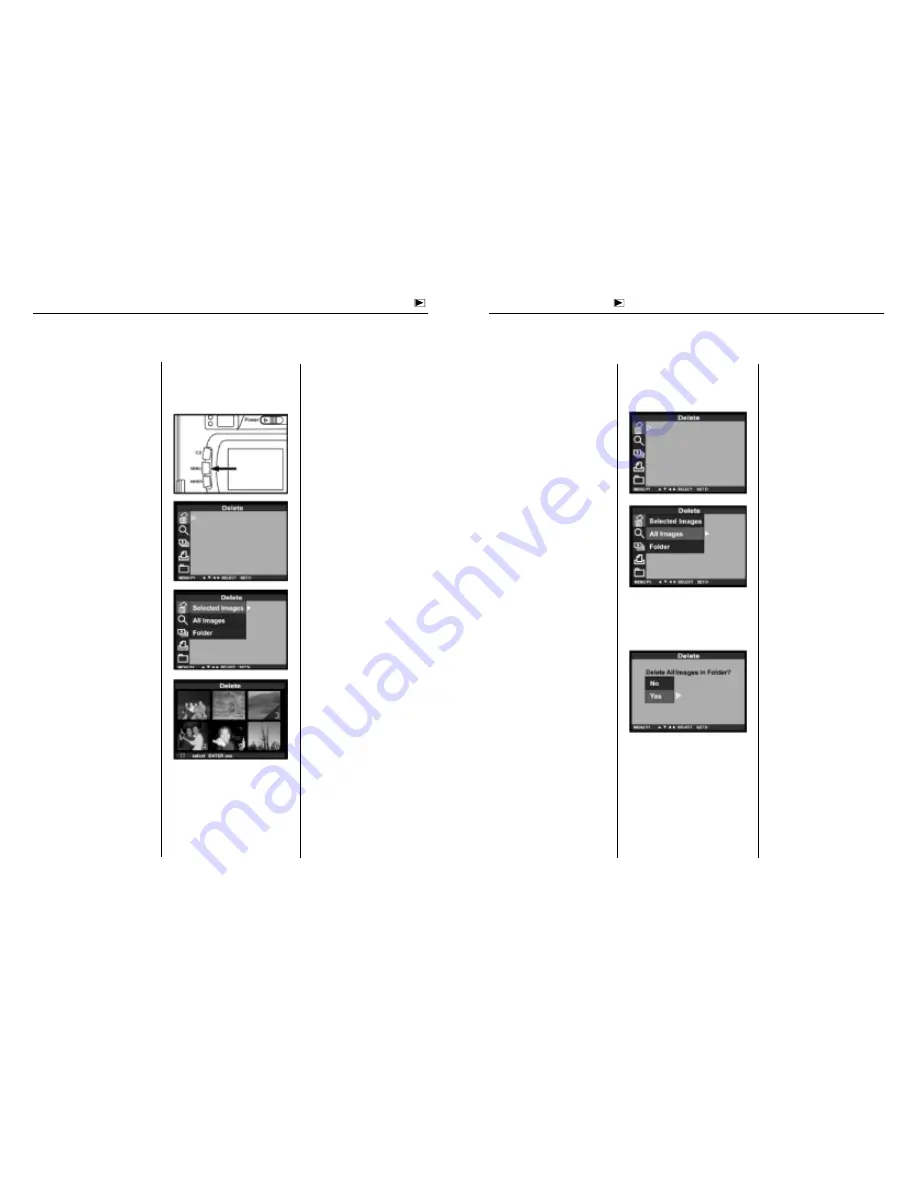
Deleting images 

Mode dial set to Playback icon


Deleting images one by 
one

The images stored on your 
memory card can be 
selected via the camera 
screen and deleted either 
separately or all at once.

In Playback mode, press the 
MENU button and use the 
four-way control to select 
Delete. Press the Right 
arrow 

 of the control to 

access a submenu where 
depression of the same 
arrow under Select Image 
lets you delete one of six 
pictures displayed. The 
image selected is highlighted 
in color and has to be 
confirmed by pressing the 
screen display button. Then 
select Yes in the dialog that 
follows and confirm by 
pressing the Right arrow 


of the control.

Please note that deleted 
pictures are irreversibly lost.

The different steps required 
for deleting images are 
summarized on page XX.
If you use your camera only 
occasionally, it is advisable 
to copy this page and keep 
it in your camera case.

Deleting all the images 
on your memory card

All the images stored on 
your memory card can be 
deleted at once with a single 
menu command.

In Playback mode (with the 
mode dial set to Playback 
icon), press the MENU 
button, then select Delete 
using the four-way control.

Press the Right arrow 

 of 

the four-way control to 
access a submenu where 
another depression of 


under All Images will delete 
all the pictures on your card.

In the submenu that follows, 
confirm Yes by pressing 


again.

Please note that deleted 
images are irreversibly lost.

Frequently used memory 
cards should occasionally be 
reformatted (Format mode 
accessible with the mode 
dial set to Set).

This applies above all to 
cards that have already been 
used in digital cameras of 
other make.

Mode dial set to Playback icon


Deleting images

Содержание d33

Страница 1: ... five modes Automatic exposure control single frames continuous shooting and multishot images Various autofocus and exposure modes Shutter speeds 2 1 500 s apertures f 3 4 3 6 to f 15 1 8 inch TFT screen 220 x 280 pixels Type I CompactFlash cards as storage medium Professional image management with camera folders Video Out for TV beamer Power supplied by four size AA alkaline or rechargeable NiCd ...

Страница 2: ...d If you have dropped the camera or if it has received a severe blow that might have damaged its interior components immediately remove the batteries and do not use the camera any more Do not use the camera if it emits smoke smell or heat Do not walk or run while looking at the TFT screen NEVER try to dismantle your camera Contact with its electrical circuits may result in electric shock Please co...

Страница 3: ...n in Camera mode 22 Screen settings 23 Taking pictures Focusing 24 Focus lock 24 Special focusing situations 25 Digital zoom 26 Shooting digital images 28 Autofocus photography 29 Switching to spot autofocus 30 Switching from autofocus to manual focusing 31 Switching to macro autofocus 32 Using the built in flash unit 33 More details about flash photography 34 Using the different shooting modes 36...

Страница 4: ...ing folders from the memory card 59 DCF standard for digital image storage 60 Basic settings Basic camera settings and functions 62 Default settings for Playback Set and Transfer modes 64 PC linkup Connecting the camera to PC 66 Connecting the camera to Macintosh 67 Tips and tricks How to handle batteries 69 Notes on the use of CompactFlash cards 70 Care of TFT screen 70 Taking care of your digita...

Страница 5: ...oming helps you navigate through the display of stored images and select camera functions As a rule the selection made in the different setting menus is confirmed by depression of the Right arrow The enter button at the back of the camera is enabled only when the four way control is needed for example for selection in index displays Shutter release Mode dial LCD monitor Self timer indicator Flash ...

Страница 6: ...schweig Tel 0531 6800 0 Fax 0531 6800 243 eMail info rollei de Names of parts and controls Names of parts and controls Camera terminals bottom plate LCD monitor Video Out Power supply terminal USB terminal Tripod socket Self timer Image size Battery status Frame counter No card Flash mode The max number of images is approximate The actual number is a function of JPEG compression Battery cover ...

Страница 7: ...r framing at short range Parallax marks Focus indicator green Flash indicator orange Focus indicator green Lights Subject in focus Blinks rapidly Focusing impossible approx 8x per second Insufficient contrast subject too dark or too close In macro mode subject too far away Blinks slowly Image being written to CompactFlash card approx 2x per second or loaded from card Focus area Flash indicator ora...

Страница 8: ...Brief instructions Load batteries Insert memory card Shoot Turn mode dial to camera icon Press power switch on off Frame your subject in the viewfinder or on the TFT screen If necessary zoom in or out pressing the four way control Right wide angle Left telephoto Press shutter release halfway until the green lamp beside the viewfinder eyepiece lights green Press shutter release fully to take your p...

Страница 9: ...played using the four way control you can navigate between all the pictures stored on your memory card Deleting images Turn mode dial to Playback icon Press 1 menue button on camera back 2 Right hand arrow of four way control on Delete item of menu 3 Right hand arrow of four way control once more on Select Image item of submenu An overview of six images will be displayed the image to be deleted be...

Страница 10: ...t date and time Left without power supply for a prolonged period the camera will forget individual settings and reset to default values However the pictures stored on your memory card will not be lost Do not put the camera down with the battery compartment open to prevent damage to its cover Be careful when changing batteries that may get hot in use Checking battery power With batteries loaded the...

Страница 11: ...teries in the camera To charge these use a commercial charger Even with the power supply unit the camera will automatically cut off for safety reasons after 30 minutes of non use To reactivate the camera simply press the power switch Using the CompactFlash memory card Always switch off your camera before inserting or changing a Com pactFlash card Other wise the data on the card may be lost or the ...

Страница 12: ...de Basic functions Basic functions Screen settings The TFT screen in Camera mode Each depression of the Display button will change the screen display as follows Live image Camera settings displayed TFT screen turned off Live image Camera settings not shown Focusing mode see page 42 White balance see page 43 Flash mode see page 33 Image quality see page 40 Frame counter Exposure compensation see pa...

Страница 13: ... distance away or over 40 cm in Macro mode The autofocus system is center weighted and uses image contrast the difference between dark and bright details to detect focus This is why there are some subjects that make autofocusing impossible In this case either use focus lock focusing on a subject at the same distance or switch to manual focusing Special focusing situations Your subject is too dark ...

Страница 14: ...yond the longest focal length of the camera s zoom lens The digital zoom is operative only with the TFT screen switched on To turn on the digital zoom press the Right arrow of the four way control beyond the maximum value for two seconds Note Use this feature only in exceptional cases and for pictures that require only lesser resolution because the camera will automatically change over to 480x640 ...

Страница 15: ...ography The shutter release operates in two stages Half depressed the camera will start automatic focusing This always takes a second or so approx 1 5 second for a subject 3 m away Once the camera has focused on your subject a green lamp will light beside the viewfinder eyepiece focus indicator and a short beep will be heard Only now should you press the shutter release fully for exposure Always w...

Страница 16: ... focus precisely on a specific part of your subject Switching from autofocus to manual focusing As an alternative to autofocusing you may also focus manually Use the TFT screen of the camera for manual focusing This cannot be turned off in the manual focusing mode Press the MENU button on the camera back and use the four way control to select Focusing Then select Focus and from there Manual Confir...

Страница 17: ...ssible over a range of 0 08 to 0 4 m Manual focusing is helpful in close range photography because the macro mode lets you focus all the way down to 8 cm object field approx 4x6 cm Using the built in flash unit The built in flash unit has five different modes that can be selected with the four way control To select the desired mode press the Right arrow of the control When the light is low the fla...

Страница 18: ...a sturdy support tripod or similar Stativ etc If subject contrast is high for example with sunlight incident at an angle use the flash to fill in shadows Flash On mode Flash is disabled in the Continuous and Macro modes More details about flash photography Flash output is controlled automatically but flash exposure compensation is possible Press the MENU button on the camera back and use the four ...

Страница 19: ...may reduce the image size number of pixels and or image quality compression Focusing is another point in continuous photography that deserves your attention The camera will focus the first image of a series Should your subject leave the area of sharp focus you might have to interrupt the series to resume focusing In the Multishot 16 mode 16 pictures will be taken at intervals of approx two seconds...

Страница 20: ... the entire field However for certain subjects such as portraits against a bright background you may also switch to center weighted metering Spot metering in turn is ideal for precise metering of important subject details For pinpoint metering use AE lock with the shutter release depressed halfway Exposure compensation Automatic exposure can be compensated over a range of 2 0 to 2 0 Press the MENU...

Страница 21: ...will get you a few additional pictures on your card at reduced quality Try to buy addi tional high capacity memory cards or use other storage media mobile hard disk laptop and make full use of maximum resolution 1536x2048 and minimum compression Fine Selecting the com pression level The data provided by the camera s CCD sensor can be saved at three different compression levels Fine 1 6 Standard 1 ...

Страница 22: ... in portraits it is usually more convenient to sharpen or soften very carefully only later using suitable PC image processing software Selecting white balance With its automatic white balance the camera automatically adjusts to the color temperature of available light sources To optimize your results and make allowance for special lighting conditions you may set the camera to special light sources...

Страница 23: ...modes default to the following settings Flash Autoflash with red eye reduction Focus Mode Autofocus Focus Area Center weighted Drive Mode Single frames Image size Full format 1536x2048 pixels Quality Medium compression White Balance Automatic Exposure EV Zero exposure compensation Exposure Area Center weighted metering Sharpness No sharpening Camera TFT screen LCD Screen brightness set to a medium...

Страница 24: ...e camera back and use the four way control to select LCD and Brightness where values from 0 to 9 can be set on a scale Confirm by pressing the Right arrow of the control Your setting will remain effective even when the camera is switched off Screen brightness can also be set in the Playback menu Taking pictures Mode dial set to Camera icon Screen dark Camera defective Not necessarily Before turnin...

Страница 25: ... all your pictures right after the shot is one of the main advantages of digital photography Immediately after pressing the shutter release you can see your picture check framing exposure and focus and repeat the shot if necessary By the way Your picture is displayed on the screen during saving though very briefly Displaying several images Index Mode If you press the screen display button twice wi...

Страница 26: ...picture have their eyes open so that you may repeat the shot if necessary Other subjects may be checked for optimum focus If necessary you can then switch to manual focusing and repeat the shot Slide show The camera can display all the pictures on your memory card in the form of an automatic slide show In Playback mode with the mode dial set to the Playback icon press the MENU button and use the f...

Страница 27: ...sabled in this mode You may use any of the playback modes of the camera single frames zoom magnifier and above all slide show Dark TV screen Check whether the right video input of your TV set is activated Many TV sets have several video inputs Connecting your digital camera to a TV set is a neat way of viewing your pictures quickly and hassle free on a large screen or showing them to your friends ...

Страница 28: ...tton Then select Yes in the dialog that follows and confirm by pressing the Right arrow of the control Please note that deleted pictures are irreversibly lost The different steps required for deleting images are summarized on page XX If you use your camera only occasionally it is advisable to copy this page and keep it in your camera case Deleting all the images on your memory card All the images ...

Страница 29: ...s a submenu with the items STD Index and Cancel If you select STD a set of thumbnails is displayed for selection with the four way control Preset the number of prints desired for the image selected by pressing the Up arrow of the control A compatible printer will then print the desired number of copies from the card The DPOF function lets you select right in the camera and thus without connection ...

Страница 30: ...a personal computer As new folders are created the camera will save your pictures to the folder last generated which is thus active If you have other possibly even empty folders on your card and have changed between these via Folder Select you will first have to go back to display of the images in the correct folder or search all the folders Deleting folders from the memory card With the exception...

Страница 31: ... different printers The memory cards can be used interchangeably in different cameras and camera systems of different makers The digital images taken with the camera can be processed in a PC Mac Mode dial set to Playback icon Image management Setting camera screen brightness The brightness of the TFT screen on the camera back can be varied Press the MENU button on the camera back and use the four ...

Страница 32: ...ower supply unit the interval is fixed at 30 min default Formatting will irreversibly delete all your images on the card If you have more than one card check whether you really have inserted the card you wish to format The shorter the interval the more power you will save Also use the camera screen only when you really need it It consumes more power than anything else Basic camera settings and fun...

Страница 33: ...Playback Set and Transfer modes In the Set menu the following defaults are reset in the Playback Set and Transfer modes In Playback menu Delete Selected image single frame Slide Show Time Screen time 5 seconds Slide Show Direction Forward playback Print STD standard Folders Numbering of folders 100SK330 LCD camera screen 5 medium brightness In Camera Set menu Power Save Automatic cutoff after 3 mi...

Страница 34: ...o next screen No Exit When the Start Copying Files box is displayed select Next Start installation Back Back to preceding dialog box Cancel Exit When the Setup Complete box appears click Finish to finish installation The following steps apply to both OS 8 6 and OS 9 Select the driver for your system Start installation with a double click When the Welcome box appears click Continue Start installati...

Страница 35: ...computer A very safe and comfortable means of transferring data is the use of CompactFlash card readers that are connected to the USB terminal or a PC or Macin tosh How to handle batteries Battery power drops at low temperatures When shooting in a cold environment keep fresh batteries ready preferably in a warm pocket inside your clothing The power of rechar geable NiMH batteries drops more slowly...

Страница 36: ...n However it will go back to normal as soon as normal temperature is restored Should the screen surface be dirty first blow away dust and sand then use a soft dry and clean cloth Should the screen flicker permanently or fail to work it will have to be replaced Your camera is sensitive to shock and should therefore be handled with care Switch the camera off for carrying and remove the batteries You...

Страница 37: ...camera switched off Turn control dial 32 release to and switch camera on Is camera set to Record Does green focus lamp Your image is being saved 33 blink slowly on CF card Wait until approx twice per second saving is completed and and does Recording neither the focus blink on LCD screen lamp nor Recording blink Problem Cause Remedy Page Delete images you donicht not wish to keep or load pictures d...

Страница 38: ...al zoom Zoom playback does not work Did you use exposure compensation Reset exposure compensa tion to zero 26 39 18 Lens moves out but data monitor remains blank and camera does not work Does the battery icon blink Display goes dead after five seconds If the battery icon blinks the display will go dead after five seconds while the lens moves out Replace the batteries Image file damaged Did you rem...

Страница 39: ...modes Autoflash fill flash flash off autoflash with red eye reduction default setting slow sync flash disabled in macro mode Interfaces Video Out Composite signal PAL H resolution 220 lines PC interface USB terminal Universal Serial Bus for PC and Macintosh Power sources Batteries Four size AA alkaline batteries or rechargeable NiCd or NiMH batteries External power source AC power supply unit DC t...

Отзывы: