background image


 Cable/DSL Router User Guide 


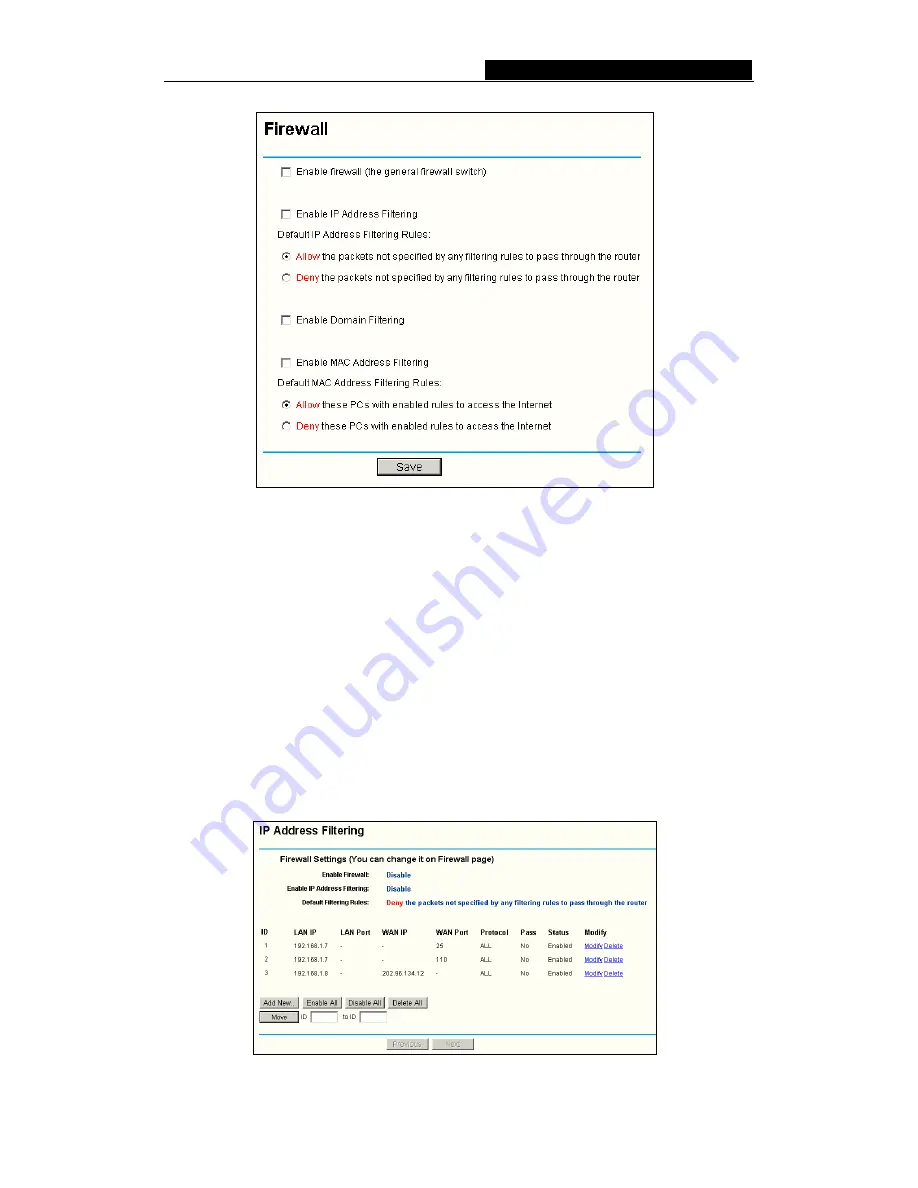
Figure 5-19  Firewall Settings 

¾


Enable Firewall


-

 The general firewall switch is on or off. 

¾


Enable IP Address Filtering


-

 Set IP Address Filtering is enabled or disabled. 

There are two default filtering rules of IP Address Filtering, either Allow or Reny 
passing through the router. 

¾


Enable Domain Filtering


-

 Set Domain Filtering as enabled or disabled. 

¾


Enable MAC Filtering


-

 Set MAC Address Filtering is enabled or disabled. You can 

select the default filtering rules of MAC Address Filtering, either Allow or Reny 
accessing the router. 

5.7.2  IP Address Filtering 

The IP Address Filtering feature allows you to control Internet Access by specific users 
on your LAN based on their IP addresses. The IP Address Filtering are set on this page, 
figure 5-20: 


Figure 5-20  IP Address Filtering 


- 27 - 

Содержание Cable/DSL Router

Страница 1: ...User Guide Cable DSL Router Shares high speed Internet access Built in 4 port switch and firewall For Home and Small Office...

Страница 2: ...ing measures Reorient or relocate the receiving antenna Increase the separation between the equipment and receiver Connect the equipment into an outlet on a circuit different from that to which the re...

Страница 3: ...stallation Guide 7 4 1 TCP IP configuration 7 4 2 Quick Installation Guide 8 Chapter 5 Configuring the Router 12 5 1 login 12 5 2 Status 12 5 3 Quick Setup 13 5 4 Network 13 5 4 1 LAN 13 5 4 2 WAN 14...

Страница 4: ...5 9 1 Firmware 34 5 9 2 Factory Defaults 35 5 9 3 Reboot 35 5 9 4 Password 36 5 9 5 Log 36 Appendix A FAQ 38 Appendix B Configuring the PCs 42 Appendix C Specifications 47 Appendix D Glossary 48...

Страница 5: ...L Router One AC power Adapter for Cable DSL Router Quick Installation Guide One Resource CD for Cable DSL Router including This Guide Other Helpful Information Note If any of the listed contents are d...

Страница 6: ...be familiar with the router this guide will make configuring the router easy Before installing the router please look through this guide to get to know all the router s functions 1 1 Purposes This Gu...

Страница 7: ...Quick Setup is supported and friendly help messages are provided for every step So you can configure it quickly and share Internet access files and fun comfortably 2 2 Features Complies with IEEE802 3...

Страница 8: ...cription 2 3 2 The Rear Panel The rear panel contains the following features Viewed from left to right Factory Default Reset button There are two ways to reset the router s factory defaults 1 Use the...

Страница 9: ...ated especially if it is in a closet Operating temperature 0 40 32 104 Operating Humidity 10 90 RH Non condensing 3 3 Connecting the Router Before you install the router you should connect your PC to...

Страница 10: ...Cable DSL Router User Guide Figure 3 1 Hardware Installation of the Cable DSL Router 6...

Страница 11: ...tructions as to how to do this please refer to Appendix B Configuring the PCs 2 Configure the network parameters The IP address is 192 168 1 xxx xxx is from 2 to 254 Subnet Mask is 255 255 255 0 and G...

Страница 12: ...router s IP address is 192 168 1 1 your PC s IP address must be within the range of 192 168 1 2 192 168 1 254 the gateway must be 192 168 1 1 4 2 Quick Installation Guide With a Web based Internet Ex...

Страница 13: ...f the User Name and Password are correct you can configure the router using the web browser Please click the Quick Setup link on the left of the main menu and the Quick Setup screen will appear Figure...

Страница 14: ...c IP the Static IP settings page will appear shown in figure 4 8 Figure 4 8 Quick Setup Static IP Note The IP parameters should have been provided by your ISP IP Address This is the WAN IP address as...

Страница 15: ...Cable DSL Router User Guide Figure 4 9 Quick Setup Finish After finishing all configurations of basic network parameters please click Finish button to exit this Quick Setup 11...

Страница 16: ...unctions below 5 2 Status The Status page displays the router s current status and configuration All information is read only 1 LAN This field displays the current settings or information for the LAN...

Страница 17: ...5 2 the Network menu There are three submenus under the Network menu shown in figure 5 2 LAN WAN and MAC Clone Click any of them and you will be able to configure the corresponding function The detai...

Страница 18: ...u set is not in the same subnet the Virtual Server and DMZ Host may change accordingly at the same time you d better re configure it as well 5 4 2 WAN You can configure the WAN port parameters on this...

Страница 19: ...ly from ISP Note If you get Address not found errors when you go to a Web site it is likely that your DNS servers are set up improperly You should contact your ISP to get DNS server addresses Get IP w...

Страница 20: ...nection as soon as you attempt to access the Internet again If you wish to activate Connect on Demand click the radio button If you want your Internet connection to remain active at all times enter 0...

Страница 21: ...e Name AC Name The service name and AC Access Concentrator name this should not be done unless you are sure it is necessary for your ISP ISP Specified IP Address If you know that your ISP does not aut...

Страница 22: ...ays the MAC address of the PC that is managing the router If the MAC address is required you can click the Clone MAC Address button and this MAC address will fill in the WAN MAC Address field Click Re...

Страница 23: ...owed connection to the router with their current dynamic IP address Enter the amount of time in minutes which the user will be leased this dynamic IP address The range of the time is 1 2880 minutes Th...

Страница 24: ...the values on this page To update this page and to show the current attached devices click on the Refresh button 5 5 3 Address Reservation When you specify a reserved IP address for a PC on the LAN t...

Страница 25: ...won t take effect until the router reboots 5 6 Forwarding Figure 5 13 the Forwarding menu There are four submenus under the Forwarding menu shown in figure 5 13 Virtual Servers Port Triggering DMZ and...

Страница 26: ...select the ID you want to use and click the Copy to button If the Common Service Port list does not have the service that you want to use type the number of the service port or service port range in...

Страница 27: ...these applications that can work with an NAT router You can set up Port Triggering on this page shown in figure 5 15 Figure 5 15 Port Triggering Once configured operation is as follows 1 A local host...

Страница 28: ...e system when it responds to the PC s request 4 Select the protocol used for Incoming Ports Range from the pull down list either TCP UDP or All 5 Select the Enable checkbox to enable 6 Click the Save...

Страница 29: ...Address field 3 Click the Save button Note After you set the DMZ host the firewall related to the host will not work 5 6 4 UPnP The Universal Plug and Play UPnP feature allows the devices such as Inte...

Страница 30: ...menu There are six submenus under the Security menu shown in figure 5 18 Firewall IP Address Filtering Domain Filtering MAC Filtering Remote Management and Ping Click any of them and you will be able...

Страница 31: ...r Enable Domain Filtering Set Domain Filtering as enabled or disabled Enable MAC Filtering Set MAC Address Filtering is enabled or disabled You can select the default filtering rules of MAC Address Fi...

Страница 32: ...f WAN IP addresses in the field in dotted decimal notation format For example 61 145 238 6 61 145 238 47 Keep the field open which means all WAN IP addresses have been put into the field 4 WAN Port Ty...

Страница 33: ...enable the Firewall and IP Address Filtering on the Firewall page then you should specify the Default IP Address Filtering Rule Deny these PCs with effective rules to access the Internet on the Firew...

Страница 34: ...Click Modify or Delete as desired on the Edit column Click the Enable All button to enable all entries Click the Disable All button to disable all entries Click the Delete All button to delete all en...

Страница 35: ...XX XX XX XX XX X is any hexadecimal digit For example 00 0E AE B0 00 0B 2 Type the description of the PC in the Description field Fox example John s PC 3 Status Select Enabled or Disabled for this en...

Страница 36: ...eater security you can change the remote management web interface to a custom port by entering that number in the box provided Choose a number between 1024 and 65534 but do not use the number of any c...

Страница 37: ...k To add or delete a route work in the area under the Static Routing page shown in figure 5 28 Figure 5 28 Static Routing To add static routing entries 1 Enter the following data Destination IP Addres...

Страница 38: ...wn in figure 5 29 Firmware Factory Defaults Reboot Password and Log Click any of them and you will be able to configure the corresponding function The detailed explanations for each submenu are provid...

Страница 39: ...st accord with the current hardware version Note 1 Do not turn off the router or press the Reset button while the firmware is being upgraded 2 The router will reboot after the upgrading has been finis...

Страница 40: ...matically 5 9 4 Password This page shown in figure 5 33 allows you to change the factory default user name and password of the router Figure 5 33 Password It is strongly recommended that you change th...

Страница 41: ...uide Figure 5 34 System Log The router can keep logs of all traffic You can query the logs to find what happened to the router Click the Refresh button to refresh the logs Click the Clear Log button t...

Страница 42: ...mode Type an appropriate number for Max Idle Time to avoid wasting paid time Otherwise you can select Auto connecting for Internet connection mode Figure A 2 PPPoE Connection Mode Note i Sometimes the...

Страница 43: ...as a sponsor you don t need to do anything with the router 2 If you start as a responsor you need configure Virtual Server or DMZ Host 3 How to configure Virtual Server Login to the router click the...

Страница 44: ...f your browser and click Remote Management submenu On the Remote Management page type a port number except 80 such as 88 into the Web Management Port field Click Save and reboot the router Figure A 6...

Страница 45: ...Cable DSL Router User Guide Figure A 7 Virtual Server 41...

Страница 46: ...guration tab in the appearing Network window 3 Click on the Add button Select Protocol and then click Add Figure B 1 Add Network Protocol 4 Under Manufacturers on Select Network Protocol page highligh...

Страница 47: ...display and the IP Address tab is open on this window by default 4 Now you have two ways to configure the TCP IP protocol below Assigned by DHCP Sever a Select Obtain an IP address automatically as s...

Страница 48: ...hown in the following figure Figure B 6 DNS Configuration tab Setting IP address manually a Select Specify an IP address on IP Address tab as shown in the following figure If the router s LAN IP addre...

Страница 49: ...y tab and click on the Add button as shown in the figure Figure B 8 Gateway tab c On the DNS Configuration tab click Enable DNS radio and type your computer name in to the Host field and a Domain such...

Страница 50: ...Cable DSL Router User Guide click Add button Shown below Figure B 9 DNS Configuration tab Now all the configurations are finished it will take effect after reboot 46...

Страница 51: ...pporting Auto MDI MDIX Cabling Type 10BASE T UTP category 3 4 5 cable maximum 100m EIA TIA 568 100 STP maximum 100m 100BASE TX UTP category 5 5e cable maximum 100m EIA TIA 568 100 STP maximum 100m Pow...

Страница 52: ...main Name A descriptive name for an address or group of addresses on the Internet DoS Denial of Service A hacker attack designed to prevent your computer or network from operating or communicating DSL...

Отзывы: