Roland KR-3 Скачать руководство пользователя страница 20

KR-3


Owner’s Manual

Tones and related functions

20

Selecting Drum Set Types

Press <

Type> or <Type

®

>. 

Each time you press one of these buttons, the drum set 
type will change, and the names of the drum sounds 
appearing on the display will change.

Note: There is one SFX set.

Adding effects to Tones
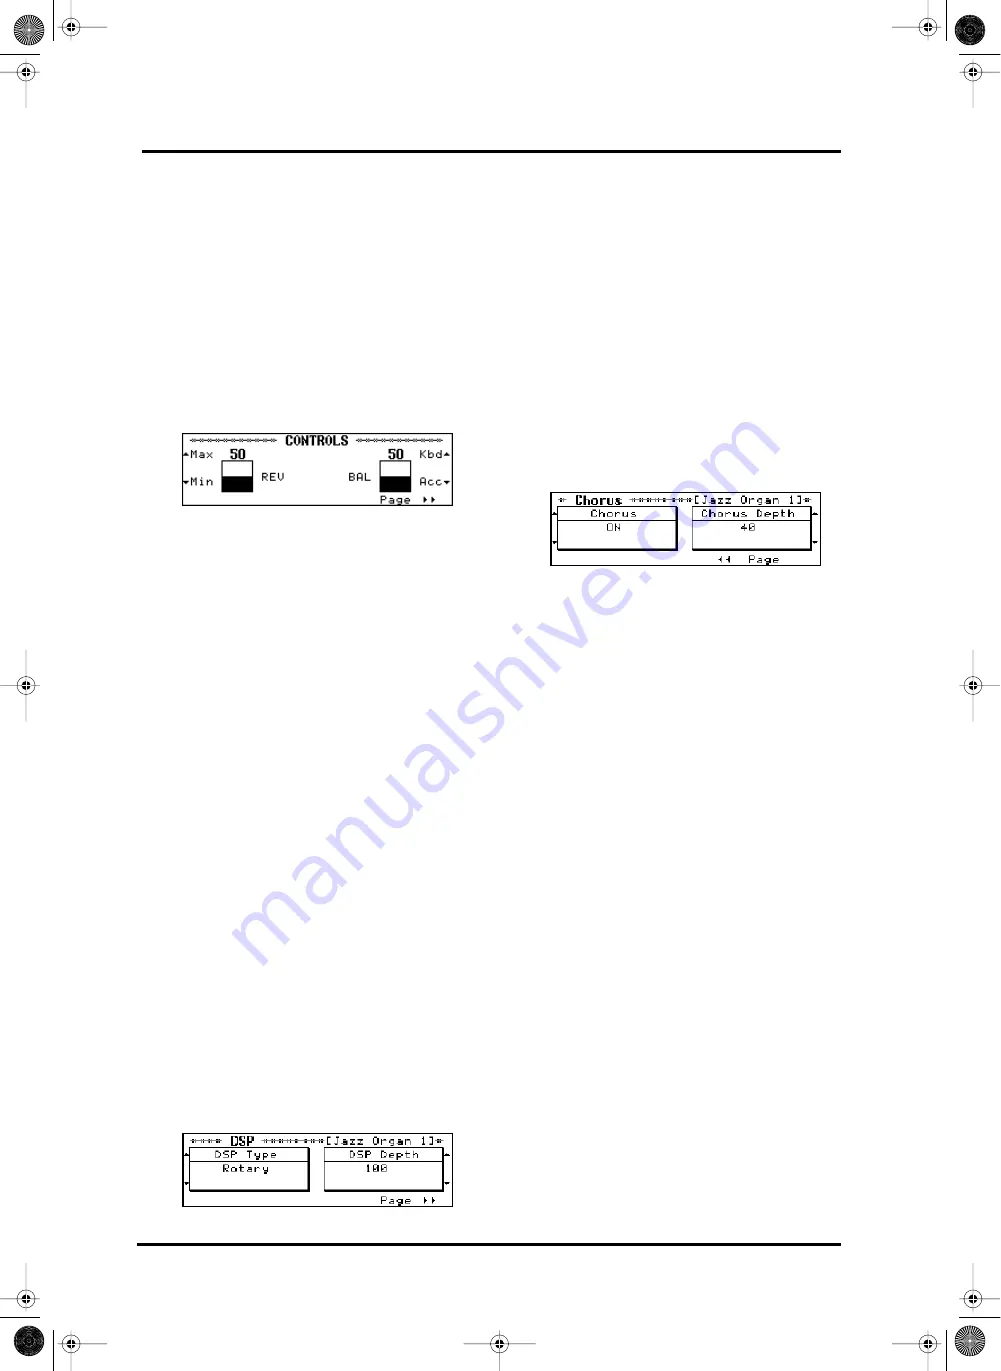
Reverberation (REV)

Reverb is a digital effect that gives the impression that 
you are playing in a concert hall.

1. 

Press the [UTILITY] button.

2. 

Use the <

> and <

> buttons to the left of the 

display to modify the Reverb balance.

Setting the value to “100” gives you maximum Reverb, 
while selecting “0” removes all Reverb from the sound. 
The REV parameter actually increases or decreases the 
Reverb Depth for the sound currently assigned to the 
keyboard. It works much the same way as a cathedral: 
the louder you sing, the more Reverb you hear. In the 
case of the cathedral, singing louder means that you 
increase the effect send level, i.e. the level of the signal 
(your voice) that will be processed by the acoustic 
environment. The overall volume of the effect (cathe-
dral) itself, however, does not change.

The other parts (the Arranger and Composer parts) 
are also processed by the same Reverb effect. If REV 
were assigned to the volume of the effect itself, select-
ing the Min value would also strip the accompaniment 
of Reverb.

Note: The KR-3 contains several Reverb programs (called 
Types), so that you can always use the Reverb type that best 
suits your needs. See “Reverb Types” on page 48.

Note: You cannot adjust the Reverb Depth of the Arranger 
parts or the sounds played back by the Composer function.

Adding other effects — DSP effect

DSP is short for 

Digital Signal Processor

. The DSP 

effect contains a variety of effects programs, one of 
which you can select for the song you are about to 
play. See “DSP effects” on page 52 for a list of all DSP 
effects the KR-3 contains.

1. 

Select <DSP…> on the Tone Select screen.

The display now jumps to a screen similar to the fol-
lowing:

2. 

Use the buttons to the left of the display to select 

the Type (kind of effect), and set its Depth with the 
buttons to the right of the display.

Select “OFF” from the Type screen if you don’t need a 
DSP effect.

Note: Only one DSP effect can be used at a time.

Note: When you select Upper, Lower, or Whole and choose 
the Rotary Effect, you can switch the rotation speed with the 
button at the upper left of the display.

Chorus effect

Your KR-3 also contains a Chorus effect. Chorus is an 
effect that creates a more spacious, “fatter” sound.

1. 

After pressing <DSP…> on the Tone Select screen, 

press <PAGE

®®

>.

The display now jumps to a page similar to the 
following:

2. 

Turn the Chorus on and off with the buttons to the 

left of the display, and select the Chorus Depth with 
the buttons to the right of the display.

After several seconds, the display returns to the 
previous screen.

Note: The KR-3 contains several Chorus programs (called 
Types), so that you can always use the Chorus type that best 
suits your needs. See “Chorus Types” on page 48.

Octave Shift: changing the pitch 
by octaves

Octave Shift is a function that changes the pitch of a 
sound in octave steps. Octave Shift can be set indepen-
dently for the Lower and Upper parts.

To give you an idea of the flexibility of this system, 
here is an example: suppose you assign the same Tone 
(E.Piano 1) to both the Upper and Lower keyboard 
section. Though you are using the same sound, it is 
assigned to two parts you can shift individually. Thus, 
by setting Octave Shift to “+1” for the Lower part, 
while leaving it at “0” for the Upper part, you create an 
overlap of the octaves immediately to the left (Lower) 
and right (Upper) of the split point. You could use this 
feature for playing intricate parts.

1. 

Start by selecting the Tone you need on the Tone 

Select screen (see page 19).

2. 

Select the octave (shift amount) by pressing 

<Octave>.

You can raise or lower the pitch by a maximum of two 
octaves. After a few seconds, the display will revert to 
the Basic screen.

Note: When you switch off the KR-3, the Octave Shift set-
tings return to their preset values. If you’d like the KR-3 to 
memorize your settings, see “Memory Backup” on page 50.

KR-3_Book  Page 20  Wednesday, July 10, 2002  10:27 AM

Содержание KR-3

Страница 1: ...ral MIDI System m The General MIDI System is a set of recommenda tions which seeks to standardize the MIDI support features of sound generating devices Sound generat ing devices and musical data disks...

Страница 2: ...Playing back a Composer song 32 8 3 Track Mute Muting specific tracks 32 8 4 Playing back songs without tempo changes 32 8 5 Erasing the Composer song 32 8 6 Saving a song to disk 33 9 Composer Menu...

Страница 3: ...el or at a level that is uncomfortable If you experience any hearing loss or ringing in the ears you should immediately stop using the unit and con sult an audiologist 011 Do not allow any objects e g...

Страница 4: ...or its plugs with wet hands when plugging into or unplugging from an outlet or this unit If you need to move the instrument take note of the precautions listed below At least two persons are required...

Страница 5: ...m age the exterior finish Maintenance To clean the unit use a dry soft cloth or one that is slightly dampened Try to wipe the entire surface using an equal amount of strength moving the cloth along wi...

Страница 6: ...have a WRITE PROTECT tab which can protect the disk from accidental erasure It is recom mended that the tab be kept in the PROTECT position and moved to the WRITE position only when you wish to write...

Страница 7: ...b Allows you to make the overall sound brighter or darker I PERFORMANCE PAD buttons Various functions can be assigned to these buttons see Performance Pad buttons additional or fre quently used functi...

Страница 8: ...button to add a harmony to the melody you are playing a POWER switch left side Press this button to switch the KR 3 on and off b Disk drive right side Used for playing back material recorded on floppy...

Страница 9: ...s been fully extended When opening and closing the lid be careful not to let your fingers get caught If small children will be using the KR 3 adult supervision should be provided If you need to move t...

Страница 10: ...cuit A brief interval a few seconds after power up is required before the unit will operate normally To turn the power off turn the Volume knob all the way to the left and press the Power switch The P...

Страница 11: ...acks of the external keyboard amplifier mixer or tape deck Note If you are connecting the KR 3 to a device with a monaural input be sure to use the L MONO jack Note For cassette decks or HiFi amplifie...

Страница 12: ...knob to change the display contrast Navigating through the display pages Changing screen pages PAGE and PAGE Some screens may comprise multiple display pages By pressing PAGE you will go to the next p...

Страница 13: ...rmance stops automatically when all songs have been played 5 Press Exit or To Menu to stop playback Note All rights reserved Unauthorized use of the demo songs for purposes other than private enjoymen...

Страница 14: ...g a mellower tone Using the metronome The KR 3 features a metronome function Use the metronome whenever you want to practice at a given tempo By pressing the button to the right of the met ronome icon...

Страница 15: ...pany your melodies and solos 136 accompaniments called Music Styles cov ering all popular musical genres are built in Other Styles can be loaded from the supplied floppy disk while you can also create...

Страница 16: ...on If you think the accompaniment is too slow press TEMPO instead Pressing the and buttons simultaneously will return the Arranger to the default tempo of the Jazz Band Style 5 At the end of the song...

Страница 17: ...in on the downbeat of the first measure PU Pickup will be displayed when the song begins After that measure numbers will be displayed 5 Playback stops automatically at the end of the song You can stop...

Страница 18: ...y pressing the pedal set Pitch Bend Range to 2 two semitones or one whole tone and select Bend Up as Pedal Assign function To bend to the G below the C you are playing set the Range value to 5 and Ped...

Страница 19: ...modes Caution Expansion Tones are only temporarily selected and cannot be written to a Music Assistant memory see page 44 Whenever you select another mode for example if you change from Whole mode to...

Страница 20: ...ft of the display to select the Type kind of effect and set its Depth with the buttons to the right of the display Select OFF from the Type screen if you don t need a DSP effect Note Only one DSP effe...

Страница 21: ...t is the highest note of the Lower part Organ playing usually involves two different sounds so the keyboard is automatically split whenever you press the One Touch Program ORGAN button and select Jazz...

Страница 22: ...select the desired piano Tone 2 Press Layer on the Basic screen 3 Press the TONE STRINGS button The indicator of the TONE button you press lights up Play a few notes on the keyboard to confirm that t...

Страница 23: ...rely on the chord or note information you play in the chord recognition area i e the keyboard zone you have assigned to the Arranger originally the left half of the keyboard Also note that you can use...

Страница 24: ...y a note or chord to the left of the split point The Arranger starts playing the introduction of the Music Style you selected Press the START STOP button Note Whenever the Arranger is not playing the...

Страница 25: ...3 Play a note or chord in the chord recognition area Starting manually If you prefer to be in complete control of the Arranger and therefore do not want it to start as soon as you play one or several...

Страница 26: ...and to the right of the display to adjust the volume balance Adjusting the volume of each part Part Volume The BAL function adjusts the balance of the overall accompaniment volume and that of the melo...

Страница 27: ...ttern type You can do this before starting a Style or during playback of the Style Note There are other Arranger functions you can use by assigning them to a PAD button See Performance Pad buttons add...

Страница 28: ...is intelligent in that it allows you to play major chords by pressing just one key the root note while minor chords can be played with two keys and com plex chords with only three keys Unlike other br...

Страница 29: ...like the one shown below will be displayed 2 Use the buttons next to the display to select a Melody Intelligence type There are five pages you can select with PAGE and PAGE Select the type you need fo...

Страница 30: ...ng Select screen Select U User Song and press the REC button 2 Begin recording When you are ready to record the melody of a song with Arranger backup start Style playback see Start ing a Music Style a...

Страница 31: ...SET button to stop recording The indicator of the track button you pressed now lights up to signal that the track contains data Note See also Saving a song to disk on page 33 Be aware however that due...

Страница 32: ...ng is called Minus One Play You can also record your Minus One performance Please refer to Recording Minus One performances on page 31 Press the button of the track you wish to mute indi cator goes of...

Страница 33: ...ow 5 Press Save Press EXIT instead if you do not want to save the song after all Functions of the Composer Menu 1 Press the Composer MENU button The display now jumps to the Composer Menu Choose one o...

Страница 34: ...you to concentrate on the melody because the Chord Sequencer will take care of feeding the Arranger with the correct chord information and selecting the desired Style division 1 Press Chord Sequencer...

Страница 35: ...existing recording without overwriting the previous version This mode is ideal for programming the drums because it allows you to start with the bass drum and snare drum and add the HiHat and cymbals...

Страница 36: ...remaining parts You can use VOL and VOL to the left of the display to set the volume level for each track 5 Press the EXEC button or the Composer REC button to confirm your settings The User Style is...

Страница 37: ...ecorded with the 16 track Sequencer see page 33 1 Use the 16 track Sequencer to record a perfor mance of Major Minor or Seventh types Because only certain tracks can be converted to Style data you sho...

Страница 38: ...songs you have recorded Note After carrying out one of the following functions it may be impossible to restore the previous settings Also songs recorded with Arranger backup may sometimes yield surpri...

Страница 39: ...Use and below the display to select a parameter and set the value with and Track From For see step 2 under Quantize timing corrections Event refers to the types of data that will be erased All all dat...

Страница 40: ...ows you to change the key of what has already been recorded It can be invaluable for tricky phrases that you want to play only once 1 Press Transpose 2 Use and below the display to select a parameter...

Страница 41: ...to pianos Compared with equal tuning low notes are tuned slightly lower while high notes are tuned slightly higher At power on this parameter is set to On 2 Set the Stretch Tuning ON OFF with the but...

Страница 42: ...g When you put a marker in a song playback will start from the beginning of the measure where the A marker is put By way of example let s place a Marker at the begin ning of measure 5 2 Go to the targ...

Страница 43: ...ns Note See above for how to set the split point Note See page 42 for information on using markers Auto changing the Arranger defaults Selecting a Music Style means that the KR 3 automati cally loads...

Страница 44: ...r that you can also carry out a lot of in depth programming Those set tings can also be saved to a Music Assistant memory 1 Make the settings that you want to register 2 Press the Music Assistant butt...

Страница 45: ...to save them to disk first see above Note To stop the operation press the EXIT button 11 2 Performance Pad buttons additional or frequently used functions You can assign a wide variety of performance...

Страница 46: ...playback See page 35 for details 11 3 Pedal functions You can also assign other functions to left pedal Soft 1 On the Basic screen press Pad Pdl 2 Press Page 3 Use and to the side of the display to se...

Страница 47: ...Menu screen press PAGE or PAGE to select the following display page Key Touch velocity sensitivity Except for the fact that there are five options here this function does the same as Key Touch velocit...

Страница 48: ...with slow undulations Chorus 2 A light chorus with rapid undulations Chorus 3 A strong chorus with slow undulations Chorus 4 A deep chorus with rapid undulations Feedback Cho A soft sound with an effe...

Страница 49: ...TX MIDI Channel TX MIDI Ch refers to the MIDI channel used for transmitting messages from the KR 3 to external instruments TX is short for transmit If the external instrument is set to receive on RX M...

Страница 50: ...he instrument off until the display shows Backup complete This returns all settings stored in the KR 3 to their ini tial values when shipped from the factory Note The Music Assistant memories also ret...

Страница 51: ...nect the KR 3 to an external sound module sequencer etc When working with an exter nal sequencer be sure to establish both connections and to set Local Control see page 49 to Off Note You don t always...

Страница 52: ...rance of this instrument are subject to change without prior notice 14 Appendix 1 Overdrive Distorts the sound a little 2 Distortion Distorts the sound a lot 3 Phaser Gives a swelling sound 4 Enhancer...

Страница 53: ...ca Guitar Bass Nylon Guitar Gut Guitar Steel Guitar Jazz Guitar 12 str Guitar Mandolin Hawaiian Guitar JC E Guitar Acoustic Bs Acoustic Bs Cymbal Fingered Bs Picked Bs Banjo Muted Guitar Overdrive Gui...

Страница 54: ...17 Mersey Beat 18 Beach Sound 19 Bluegrass 20 Cntry Waltzl 21 Rock n Cntry 22 Summer Days 23 Train Beat 24 Tejano 25 Twistin 26 Twist 27 Country Pick n 28 Country 29 Sl Rock2 Big Band Swing 1 Jazz Z B...

Страница 55: ...en Surdo EXC6 27 28 29 31 33 35 30 32 34 39 40 41 43 45 47 42 44 46 36 38 37 87 88 84 86 85 51 52 53 55 57 59 54 56 58 48 50 49 63 64 65 67 69 71 66 68 70 60 62 61 75 76 77 79 81 83 78 80 82 72 74 73...

Страница 56: ...85 72 74 73 C3 C4 C5 C6 57 0 SFX High Q Slap Scratch Push EXC7 Scratch Pull EXC7 Sticks Square Click Metronome Click Metronome Bell Guitar sliding Finger Guitar cutting noise down Guitar cutting nois...

Страница 57: ...FM7 C7 C 7 D7 E 7 E7 F7 Cm C m Dm E m Em Fm Cm7 C m7 Dm7 E m7 Em7 Fm7 Cdim C dim Ddim E dim Edim Fdim Dm7 5 Em7 5 Caug C aug Daug E aug Eaug Faug Csus4 C sus4 Dsus4 E sus4 Esus4 Fsus4 C7sus4 C 7sus4 D...

Страница 58: ...Gm A m Am B m Bm F m7 Gm7 A m7 Am7 B m7 Bm7 F dim Gdim A dim Adim B dim Bdim Gm7 5 Am7 5 Bm7 5 F aug Gaug A aug Aaug B aug Baug F sus4 Gsus4 A sus4 Asus4 B sus4 Bsus4 F 7sus4 G7sus4 A 7sus4 A7sus4 B 7...

Страница 59: ...1 16 0 127 X X Mode 3 OMNI OFF POLY O X 8n v 64 Song Pos Song Sel Tune X X X Clock Commands X X X X X X O X 0 32 1 5 6 38 7 10 11 64 65 66 67 84 91 93 98 99 100 101 O X X X O X X O X O O O O O X X O O...

Страница 60: ...KR 3 Owner s Manual Tones Drum Sets Music Styles 164 Notes KR 3_Book Page 164 Wednesday July 10 2002 10 27 AM...

Страница 61: ...165 KR 3 Tones Drum Sets Music Styles ENGLISH ENGLISH ENGLISH REFERENCE Notes KR 3_Book Page 165 Wednesday July 10 2002 10 27 AM...

Страница 62: ...KR 3 Owner s Manual Tones Drum Sets Music Styles 166 KR 3_Book Page 166 Wednesday July 10 2002 10 27 AM...

Страница 63: ...eet ARD E1 Golf Heliopolis Cairo 11341 EGYPT TEL 20 2 417 1828 REUNION Maison FO YAM Marcel 25 Rue Jules Hermann Chaudron BP79 97 491 Ste Clotilde Cedex REUNION ISLAND TEL 0262 218 429 SOUTH AFRICA Th...

Страница 64: ...KR 3 Owner s Manual Tones Drum Sets Music Styles 168 KR 3_Book Page 168 Wednesday July 10 2002 10 27 AM...

Отзывы: