


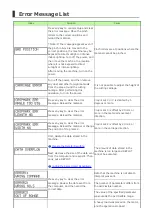


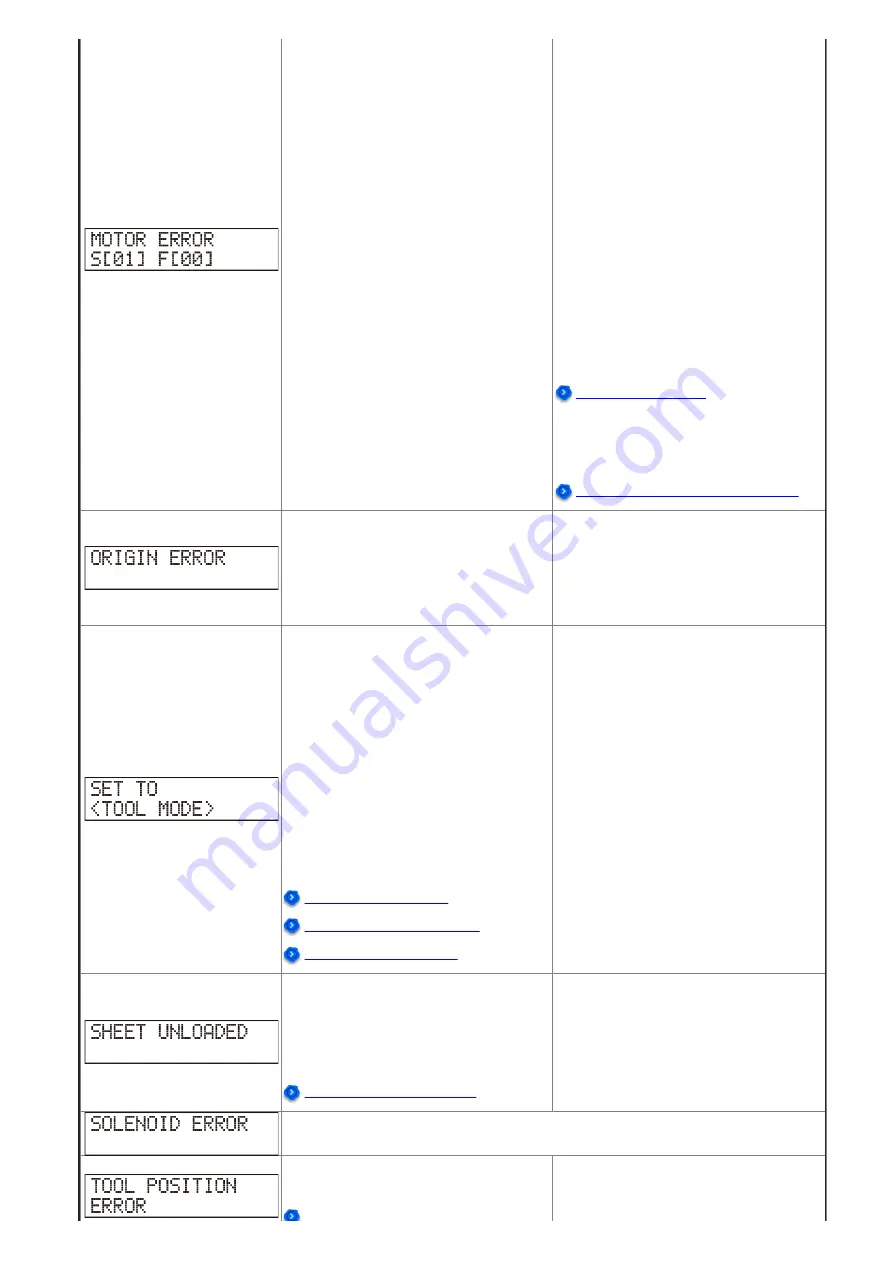
Turn off the power, turn on the power,
and then load the material again.
If jammed material is caught and
impedes the initial operation when you
turn the power on, perform the
following operations.
1. Turn the power off.
2. Move the cutting carriage to the right
edge of the machine by hand.
3. Turn the power on (the pinch rollers
automatically rise).
4. Remove the jammed material.
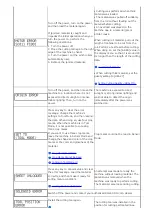
• Cutting was performed when thick
material was loaded.
• The material was pulled off suddenly
from the roll without feeding out the
material before cutting.
• An overload was placed on the
machine due to a material jam or
similar cause.
When cutting roll material, pull out the
length of material to be cut from the
roll. Perform a test feed before cutting.
When doing so, set the [AREA] value in
the display menu so that it is around 20
cm longer than the length of the cutting
data.
• When cutting thick material, set the
quality setting to [HEAVY].
Setting Cutting Quality <QUALITY>
Turn off the power, and then move the
machine to a location where it is not
exposed to direct sunlight or intense
indoor lighting. Then, turn on the
power.
The machine is exposed to direct
sunlight or strong indoor lighting and
was not able to detect the origin
immediately after the power was
switched on.
Press any key to clear the error
message. Change the machine's
settings to Tool Mode, and then resend
the data. When doing so, use four crop
marks. When the machine is in Tool
Mode, it is not possible to cut using
three crop marks.
If you want to use three crop marks,
leave the machine in Sensor Mode and
change the shape and color of the crop
marks or the color and glossiness of the
material.
Crop marks could not be read in Sensor
Mode.
Press any key to cancel setup and clear
the error message. Load the material
correctly, and then make it ready for
cutting (setup condition).
An attempt was made to ready the
machine without loading material. The
material was removed when the
machine was ready to perform cutting.
The material came loose during cutting.
Switch off the power and contact your authorized Roland DG Corp. dealer.
Install the cutting tool again.
The cutting tool was installed in the
position for cutting perforated lines.
Содержание GR-420
Страница 31: ...If the Traces Left by the Blade Are Indistinct Too Deep Changing the Blade Force Setting the Origin...
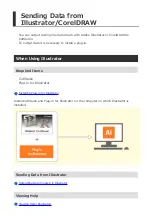
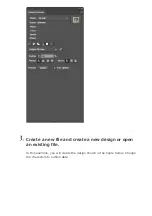
Страница 35: ...2 Set the Model Procedure From the File menu click Cutting Setup The Cut Setting window appears...
Страница 36: ...Use Name under Printer to select the model name of the cutting machine to use Creating Cutting Data 2...
Страница 47: ...loaded the cutting area must be set again from the Cut Setting menu Performing Cutting...
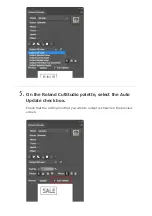
Страница 54: ...Select the Auto Update check box in the palette With SALE selected click An outline is created...
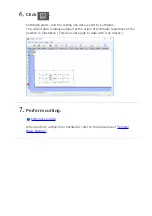
Страница 55: ...Use Illustrator s rectangle tool to draw a frame around SALE Save the data Performing Cutting...
Страница 61: ...Removing the Material...
Страница 64: ...After the material is cut the cutting carriage returns to the new origin...
Страница 68: ...This value is intended only as a rough guide The accuracy of this value is not guaranteed Improving the Finish...
Страница 70: ...Press ENTER to select the setting Press MENU to return to the original screen Improving the Finish...
Страница 72: ...Improving the Finish...
Страница 80: ...Improving the Finish...
Страница 82: ...1 Grit pattern 2 Pinch roller Improving the Finish...
Страница 89: ...CAUTION Never touch the tip of the blade Doing so may result in injury Remove the old blade...
Страница 92: ......
Страница 100: ...Click OK...
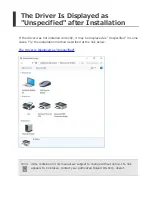
Страница 103: ...Click the View tab Select the Hidden items check box...
Страница 105: ...Click the View tab and then select the Show hidden files folders and drives option...
Страница 106: ...Click OK...
Страница 119: ...http startup rolanddg com...
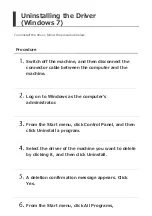
Страница 127: ...Installation Procedure...
Страница 133: ...Installation Procedure...
Страница 139: ......
Страница 146: ...Installing the Cutting Tool...
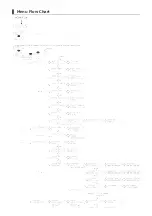
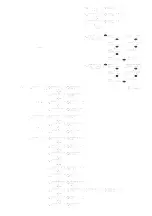
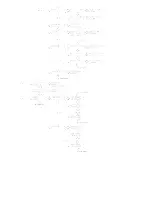
Страница 147: ...Menu Flow Chart...
Страница 148: ......
Страница 149: ......
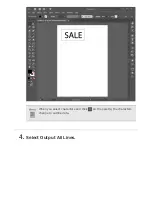
Страница 157: ...When you select characters and click on the palette the characters change to outline data Select Output All Lines...
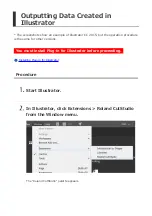
Страница 160: ...Viewing Help Illustrator Procedure On the Roland CutStudio palette click and then click Help...
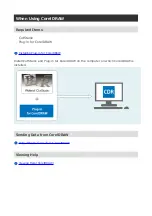
Страница 166: ...Viewing Help CorelDRAW Procedure On the Roland CutStudio palette click and then click Help...
Страница 174: ...Use Name under Printer to select the model name of the machine on hand Click OK From the File menu click Print Cut...
Страница 176: ...Click Printer Setup...
Страница 181: ...For more details refer to Changing the Darkness of an Aligned Image Step 3 Draw the Cutting Lines...
Страница 184: ...The image is printed as shown in the figure below Cutting lines are not printed Step 5 Load the Printed Material...
Страница 191: ...Step 7 Perform Cutting Sensor Mode...
Страница 198: ...On the palette click Crop marks are inserted in the artboard...
Страница 199: ...Click and then click Crop marks Select the model name from the Type list and then select 4 from the Point list...
Страница 204: ...From the File menu click Print The image is printed as shown in the figure below Step 5 Load the Printed Material...
Страница 211: ...Step 7 Perform Cutting Sensor Mode...
Страница 213: ...Click CutStudio starts and the cutting data is sent to CutStudio...
Страница 220: ...On the palette click Crop marks are inserted in the document...
Страница 221: ...Click and then click Crop marks In the Type list select GR 640 540 420 In the Point list select 4...
Страница 226: ...From the File menu click Print The image is printed as shown in the figure below Step 5 Load the Printed Material...
Страница 233: ...Step 7 Perform Cutting Sensor Mode...
Страница 235: ...Click CutStudio starts and the cutting data is sent to CutStudio...
Страница 256: ...From the Layout Points list select 3...
Страница 257: ...Click OK After setting the values check that the crop marks are within the printing area...
Страница 259: ...CorelDRAW Procedure Click and then click Crop marks From the Point list select 3 Click OK...
Страница 260: ...Setting the Margins and the Distance between Crop Marks...
Страница 267: ...Cutting in Tool Mode 2...
Страница 276: ...Step 3 Set Perforated Cutting Conditions...
Страница 279: ...Perforation length Half cut length Perforation length Half cut length Click OK Step 4 Cut Perforated Lines...
Страница 284: ...Click Select Output Perforated Cut Lines...
Страница 286: ...Perform cutting Performing Cutting...
Страница 288: ...The Roland CutStudio palette appears Select the object that you want to apply perforated lines to...
Страница 289: ...Click Select Output Perforated Cut Lines...
Страница 291: ...Perform cutting Performing Cutting...
Страница 295: ...Check the size of the material to be used Step 2 Load the Material...
Страница 299: ...The segment size is updated...
Страница 300: ...Select the Tiled Output check box and then enter the number of tiles...
Страница 305: ...Step 6 Perform Cutting...
Страница 313: ...Press ENTER to select the setting Use MENU to return to the screen in the figure Other Things That You Can Do...
Страница 315: ...Press ENTER to execute the operation You are returned to the screen in the figure Other Things That You Can Do...
Страница 317: ...Press ENTER Operation is normal if the figure shown below is cut Other Things That You Can Do...
Страница 319: ...Press Use and to select the screen brightness Setting range 1 to 5 Press ENTER Other Things That You Can Do...
Страница 322: ...Press ENTER Other Things That You Can Do...
Страница 325: ...Press ENTER Press MENU to return to the top screen Other Things That You Can Do...
Страница 329: ...Press ENTER Press MENU to return to the top screen Other Things That You Can Do...
Страница 331: ...Use and to select ON or OFF Press ENTER Press MENU to return to the top screen Other Things That You Can Do...
Страница 335: ...Press ENTER Press MENU to return to the top screen Other Things That You Can Do...
Страница 340: ...Other Things That You Can Do...
Страница 351: ...Press ENTER Press MENU to return to the top screen Other Things That You Can Do...
Страница 358: ...Select the Fine adjustment check box and then click Adjust...
Страница 359: ...The Crop Mark Adjustment dialog box appears...
Страница 363: ...Back to Adjusting the Cutting Position...
Страница 370: ...Use and to select CLEAR Press ENTER The data is cleared Send data from the computer To next procedure...
Страница 372: ...Press ENTER You are returned to the screen in the figure and cutting is performed To previous procedure...
Страница 376: ...Click OK...
Страница 379: ...Click the View tab Select the Hidden items check box...
Страница 381: ...Click the View tab and then select the Show hidden files folders and drives option...
Страница 382: ...Click OK...
Страница 395: ...When you select characters and click on the palette the characters change to outline data Select Output All Lines...
Страница 397: ...Select the model name of the machine on hand and then click Cut The cutting data is output...
Страница 398: ...Viewing Help Illustrator Procedure On the Roland CutStudio palette click and then click Help...
Страница 405: ...The Roland CutStudio palette appears On the palette click Crop marks are inserted in the artboard...
Страница 406: ...Click and then click Crop marks Select the model name from the Type list and then select 4 from the Point list...
Страница 411: ...From the File menu click Print The image is printed as shown in the figure below Step 5 Load the Printed Material...
Страница 418: ...Step 7 Perform Cutting Sensor Mode...
Страница 422: ...Removing the Material...
Страница 428: ...From the Window menu click Extensions and then click Roland CutStudio The Roland CutStudio palette appears...
Страница 429: ...Select the object that you want to apply perforated lines to Click...
Страница 430: ...Select Output Perforated Cut Lines On the Roland CutStudio palette click Update...
Страница 441: ...Press ENTER to select the setting Use MENU to return to the screen in the figure Other Things That You Can Do...
Страница 443: ...Press ENTER to execute the operation You are returned to the screen in the figure Other Things That You Can Do...
Страница 445: ...Press ENTER Operation is normal if the figure shown below is cut Other Things That You Can Do...
Страница 447: ...Press Use and to select the screen brightness Setting range 1 to 5 Press ENTER Other Things That You Can Do...
Страница 450: ...Press ENTER Other Things That You Can Do...
Страница 453: ...Press ENTER Press MENU to return to the top screen Other Things That You Can Do...
Страница 457: ...Press ENTER Press MENU to return to the top screen Other Things That You Can Do...
Страница 459: ...Use and to select ON or OFF Press ENTER Press MENU to return to the top screen Other Things That You Can Do...
Страница 463: ...Press ENTER Press MENU to return to the top screen Other Things That You Can Do...
Страница 468: ...Other Things That You Can Do...
Страница 479: ...Press ENTER Press MENU to return to the top screen Other Things That You Can Do...
Страница 491: ...Use and to select CLEAR Press ENTER The data is cleared Send data from the computer To next procedure...
Страница 493: ...Press ENTER You are returned to the screen in the figure and cutting is performed To previous procedure...